Tag: Programming

  • A Complete Guidebook on Starting Your Own Homelab for Data Analysis

    A Complete Guidebook on Starting Your Own Homelab for Data Analysis

    There has never been a better time to start your data science homelab for analyzing data useful to you, storing important information, or developing your own tech skills.

    Will Keefe Published in Towards Data Science

    There’s an expression I’ve read on Reddit a few times now in varying tech-focused subreddits that is along the lines of “Paying for cloud services is just renting someone else’s computer.” While I do think cloud computing and storage can be extremely useful, this article will focus on some of the reasons why I’ve moved my analyses, data stores, and tools away from the online providers, and into my home office. A link to the tools and hardware I used to do this is available as well.

    Introduction

    The best way to start explaining the method to my madness is by sharing a business problem I ran into. While I’m a fairly traditional investor with a low-risk tolerance, there is a small hope inside of me that maybe, just maybe, I can be one of the <1% to beat the S&P 500. Note I used the word “hope”, and us such, do not put too much on the line in this hope. A few times a year I’ll give my Robinhood account $100 and treat it with as much regard as I treat a lottery ticket — hoping to break it big. I will put the adults in the room at ease though by sharing that this account is separate from my larger accounts that are mostly based on index funds with regular modest returns with a few value stocks I sell covered calls on a rolling basis with. My Robinhood account however is borderline degenerate gambling, and anything goes. I have a few rules for myself though:

    1. I never take out any margin.
    2. I never sell uncovered, only buy to open.
    3. I don’t throw money at chasing losing trades.

    You may wonder where I’m going with this, and I’ll pull back from my tangent by sharing that my “lottery tickets” that have, alas, not earned me a Jeff-Bezos-worthy yacht yet, but have taught me a good bit about risk and loss. These lessons have also inspired the data enthusiast inside of me to try to improve the way I quantify risk and attempt to anticipate market trends and events. Even models directionally correct in the short term can provide tremendous value to investors — retail and hedge alike.

    The first step I saw toward improving my decision-making was to have data available to make data-driven decisions. Removing emotion from investing is a well-known success tip. While historical data is widely available for stocks and ETFs and is open-sourced through resources such as yfinance (an example of mine is below), derivative historical datasets are much more expensive and difficult to come by. Some initial glances at the APIs available provided hints that regular, routine access to data to backtest strategies for my portfolio could cost me hundreds of dollars annually, and possibly even monthly depending on the granularity I was seeking.

    I decided I’d rather invest in myself in this process, and spend $100’s of dollars on my own terms instead. *audience groans*

    Building on the Cloud

    My first thoughts on data scraping and warehousing led me to the same tools I use daily in my work. I created a personal AWS account, and wrote Python scripts to deploy on Lambda to scrape free, live option datasets at predetermined intervals and write the data on my behalf. This was a fully automated system, and near-infinitely scalable because a different scraper would be dynamically spun up for every ticker in my portfolio. Writing the data was more challenging, and I was nestled between two routes. I could either write the data to S3, crawl it with Glue, and analyze it with serverless querying in Athena, or I could use a relational database service and directly write my data from Lambda to the RDS.

    A quick breakdown of AWS tools mentioned:

    Lambda is serverless computing allowing users to execute scripts without much overhead and with a very generous free tier.

    S3, aka simple storage service, is an object storage system with a sizable free tier and extremely cost-effective storage at $0.02 per GB per month.

    Glue is an AWS data prep, integration, and ETL tool with web crawlers available for reading and interpreting tabular data.

    Athena is a serverless query architecture.

    I ended up leaning toward RDS just to have the data easily queryable and monitorable, if for no other reason. They also had a free tier available of 750 hours free as well as 20 GB of storage, giving me a nice sandbox to get my hands dirty in.

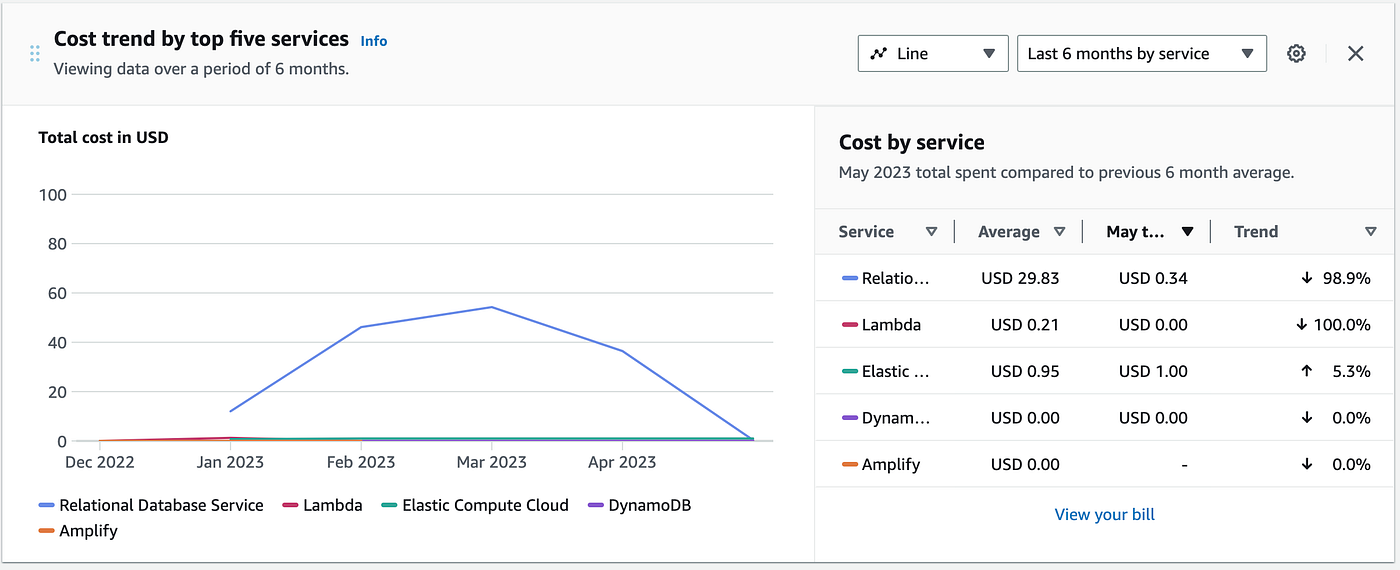
    Little did I realize, however, how large stock options data is. I began to write about 100 MB of data per ticker per month at 15-minute intervals, which may not sound like much, but considering I have a portfolio of 20 tickers, before the end of the year I would have used all of the entirety of the free tier. On top of that, the small compute capacity within the free tier was quickly eaten up, and my server ate through all 750 hours before I knew it (considering I wanted to track options trades for roughly 8 hours a day, 5 days a week). I also frequently would read and analyze data after work at my day job, which led to greater usage as well. After about two months I finished the free tier allotment and received my first AWS bill: about $60 a month. Keep in mind, once the free tier ends, you’re paying for every server hour of processing, an amount per GB out of the AWS ecosystem to my local dev machine, and a storage cost in GB/month. I anticipated within a month or two my costs of ownership could increase by at least 50% if not more, and continue so on.

    Yikes.

    Leaving the Cloud

    At this point, I realized how I’d rather be taking that $60 a month I am spending renting equipment from Amazon, and spend it on electric bills and throwing what is left over into my Robinhood account, back where we started. As much as I love using AWS tools, when my employer isn’t footing the bill (and to my coworkers reading this, I promise I’m frugal at work too), I really don’t have much interest in investing in them. AWS just is not priced at the point for hobbyists. They give plenty of great free resources to learn to noobies, and great bang for your buck professionally, but not at this current in-between level.

    I had an old Lenovo Y50–70 laptop from prior to college with a broken screen that I thought I’d repurpose as a home web scraping bot and SQL server. While they still can fetch a decent price new or certified refurbished (likely due to the i7 processor and dedicated graphics card), my broken screen pretty much totaled the value of the computer, and so hooking it up as a server breathed fresh life into it, and about three years of dust out of it. I set it up in the corner of my living room on top of a speaker (next to a gnome) and across from my PlayStation and set it to “always on” to fulfill its new purpose. My girlfriend even said the obnoxious red backlight of the computer keys even “pulled the room together” for what it’s worth.

    Gnome pictured, but at the time photo was taken, the server was not yet configured.

    Conveniently my 65″ Call-of-Duty-playable-certified TV was within HDMI cable distance to the laptop to actually see the code I was writing too.

    I migrated my server from the cloud to my janky laptop and was off to the races! I could now perform all of the analysis I wanted at just the cost of electricity, or around $0.14/kWh, or around $0.20–0.30 a day. For another month or two, I tinkered and tooled around locally. Typically this would look like a few hours a week after work of opening up my MacBook, playing around with ML models with data from my gnome-speaker-server, visualizing data on local Plotly dashboards, and then directing my Robinhood investments.

    I experienced some limited success. I’ll save the details for another Medium post once I have more data and performance metrics to share, but I decided I wanted to expand from a broken laptop to my own micro cloud. This time, not rented, but owned.

    Building the Home Lab

    “Home Lab” is a name that sounds really complicated and cool *pushes up glasses*, but is actually relatively straightforward when deconstructed. Basically, there were a few challenges I was looking to address with my broken laptop setup that provided motivation, as well as new goals and nice-to-haves that provided inspiration.

    Broken laptop problems:

    The hard drive was old, at least 5 or 6 years old, which posed a risk to potential future data loss. It also slowed down significantly under duress with larger queries, a noted problem with the model.

    Having to use my TV and Bluetooth keyboard to use my laptop with Windows 10 Home installed was very inconvenient, and not ergonomically friendly.

    The laptop was not upgradeable in the event I wanted to add more RAM beyond what I had already installed.

    The technology was limited in parallelizing tasks.

    The laptop alone was not strong enough to host my SQL server as well as dashboards and crunching numbers for my ML models. Nor would I feel comfortable sharing the resources on the same computer, shooting the other services in the feet.

    A system I would put into place had to solve each of these problems, but there were also new features I’d like to achieve too.

    Planned New Features:

    A new home office setup to make working from home from time to time more comfortable.

    Ethernet wiring throughout my entire apartment (if I’m paying for the whole gigabit, I’m going to use the whole gigabit AT&T).

    Distributed computing* with microservers where appropriate.

    Servers would be capable of being upgraded and swapped out.

    Varying programs and software deployable to achieve different subgoals independently and without impeding current or parallel programs.

    *Distributed computing with the computers I chose is a debated topic that will be explained later in the article.

    I spent a good amount of time conducting research on appropriate hardware configurations. One of my favorite resources I read was “Project TinyMiniMicro”, which compared the Lenovo ThinkCentre Tiny platform, the HP ProDesk/EliteDesk Mini Platform, and the Dell OptiPlex Micro platform. I too have used single-board computers before like the authors of Project TMM, and have two Raspberry Pis and an Odroid XU4.

    What I liked about my Pis:

    They were small, ate little power, and the new models have 8GB of RAM.

    What I liked about my Odroid XU4:

    It is small, has 8 cores, and is a great emulation platform.

    While I’m sure my SBCs will still find a home in my homelab, remember, I need equipment that handles the services I want to host. I also ended up purchasing probably the most expensive Amazon order of my entire life and completely redid my entire office. My shopping cart included:

    • Multiple Cat6 Ethernet Cables
    • RJ45 Crimp Tool
    • Zip ties
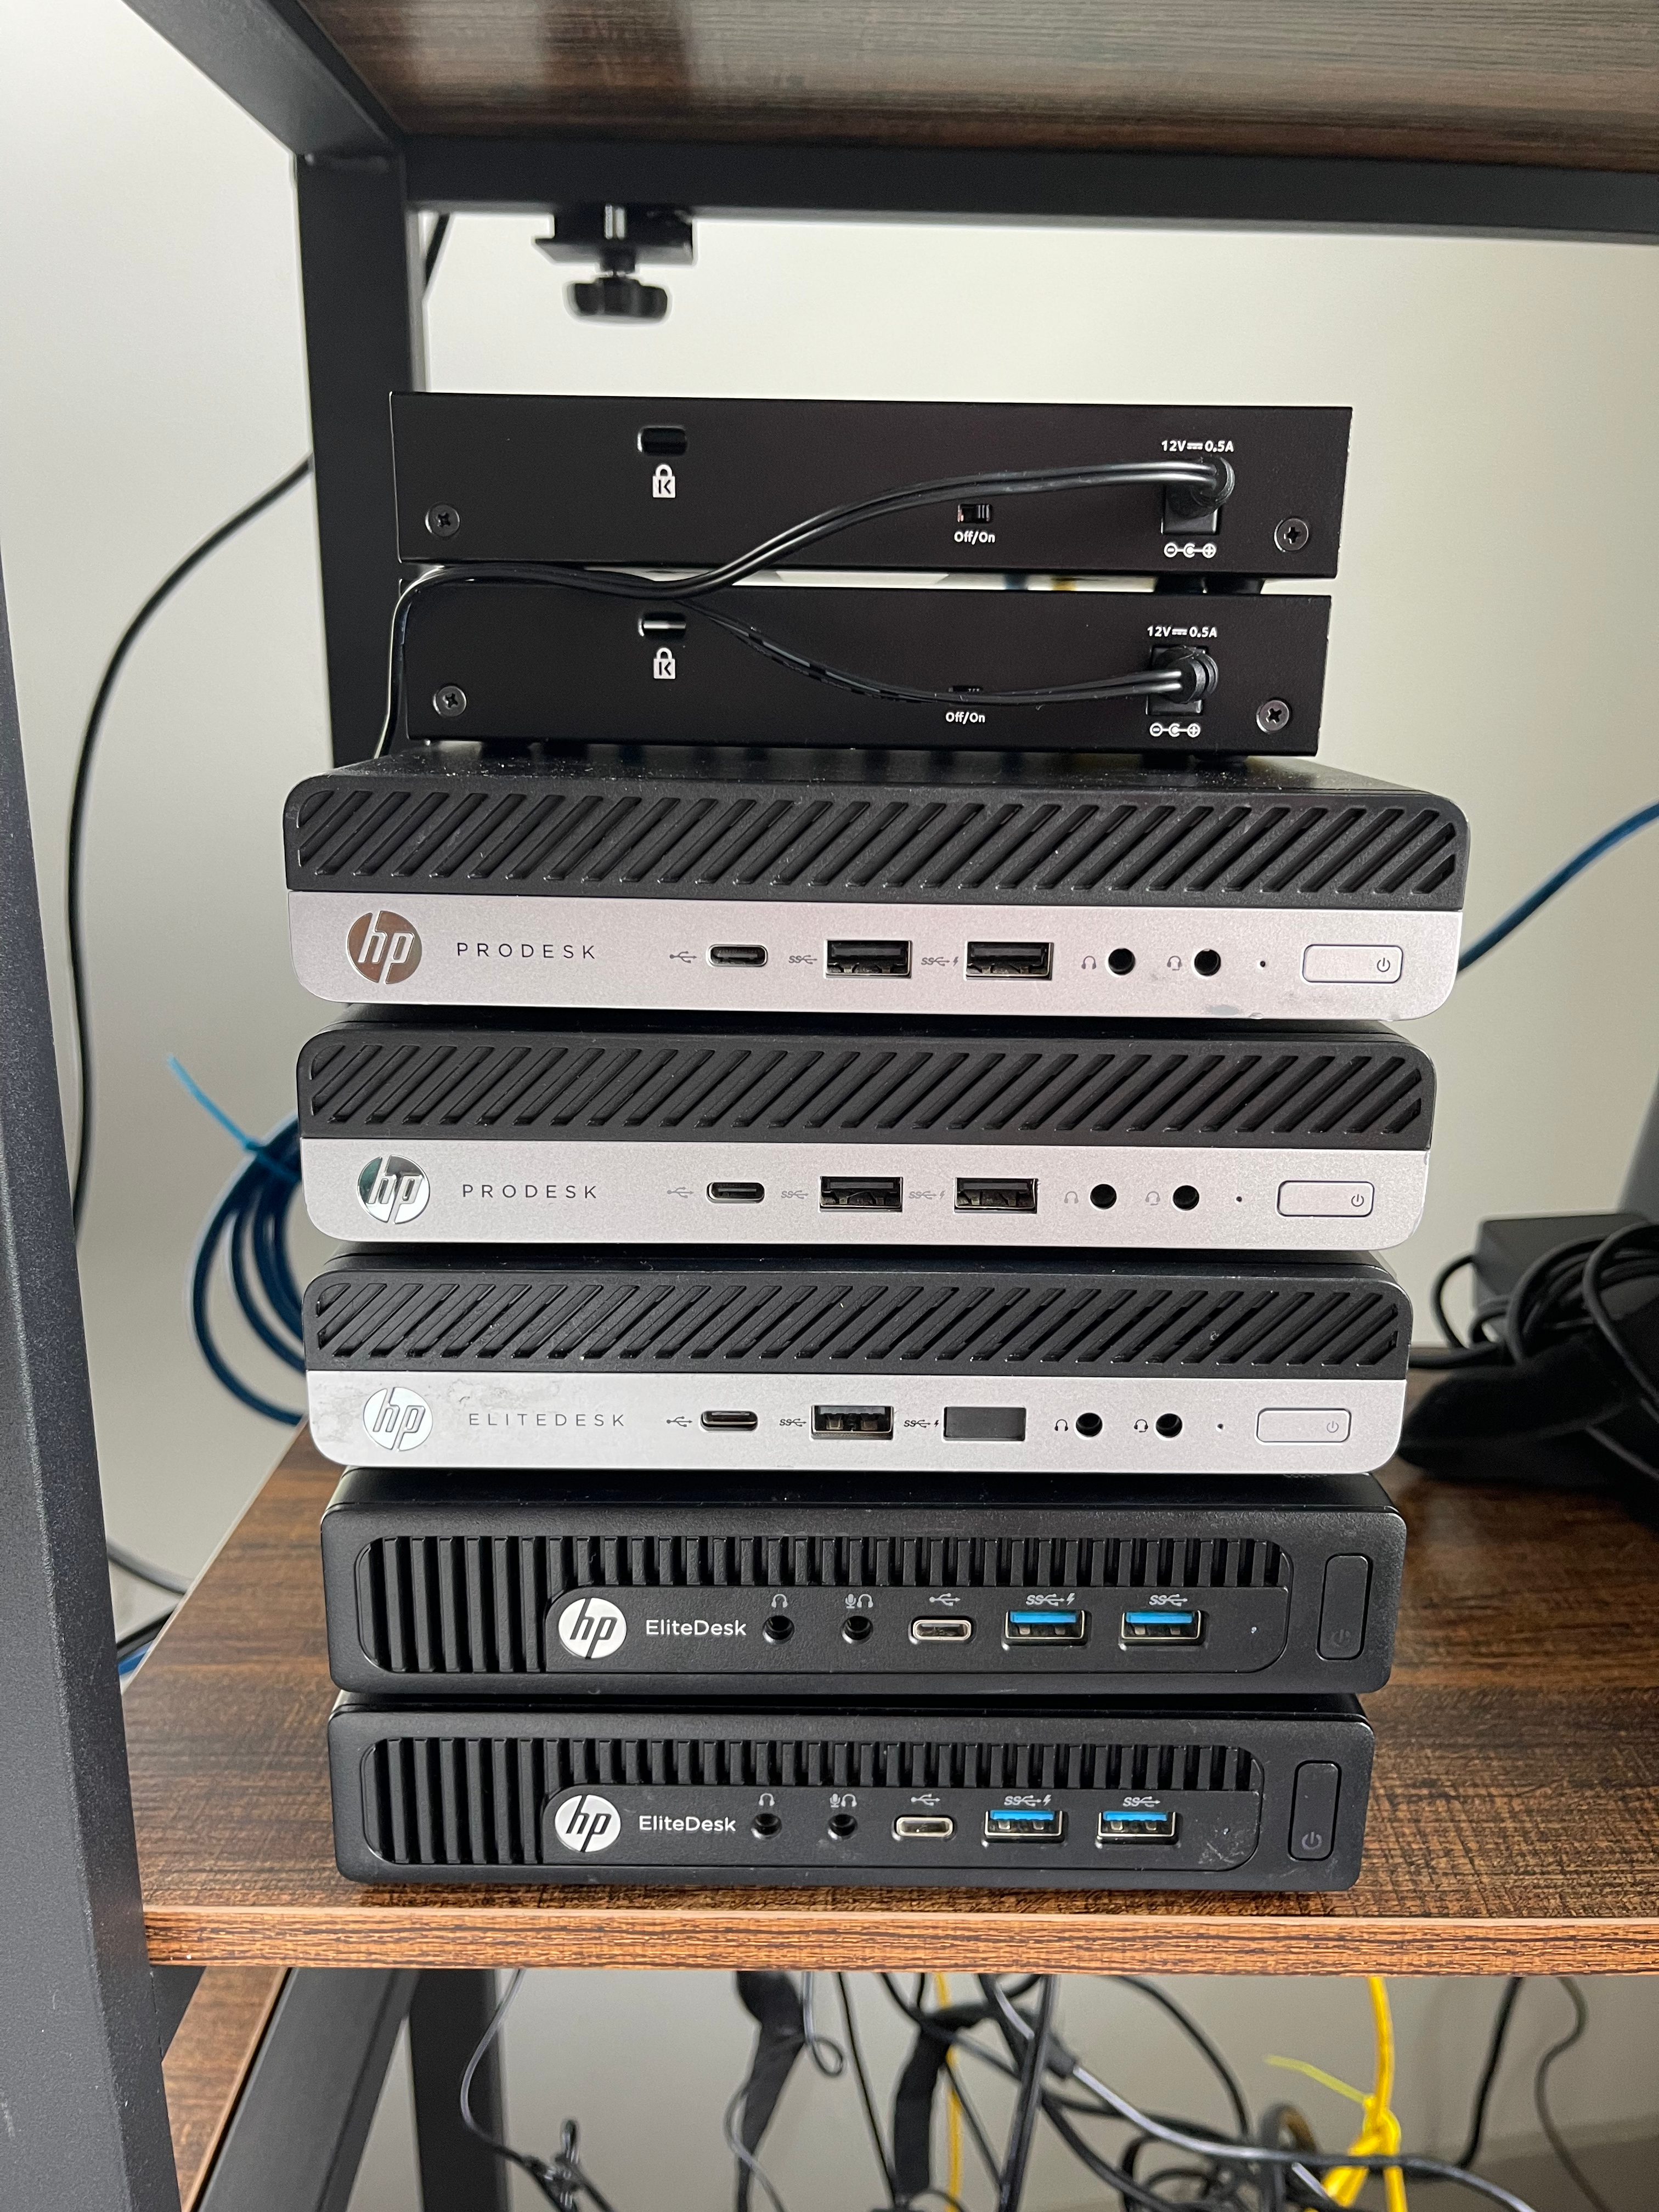
    • 2 EliteDesk 800 G1 i5 Minis (but was sent G2 #Win)
    • 1 EliteDesk 800 G4 i7 Mini (and sent an even better i7 processor #Win)
    • 2 ProDesk 600 G3 i5 Minis (and send sent a slightly worse i5 #Karma)
    • Extra RAM
    • Multiple SSDs
    • A new office desk to replace my credenza/runner
    • New office lighting
    • Hard drive cloning equipment
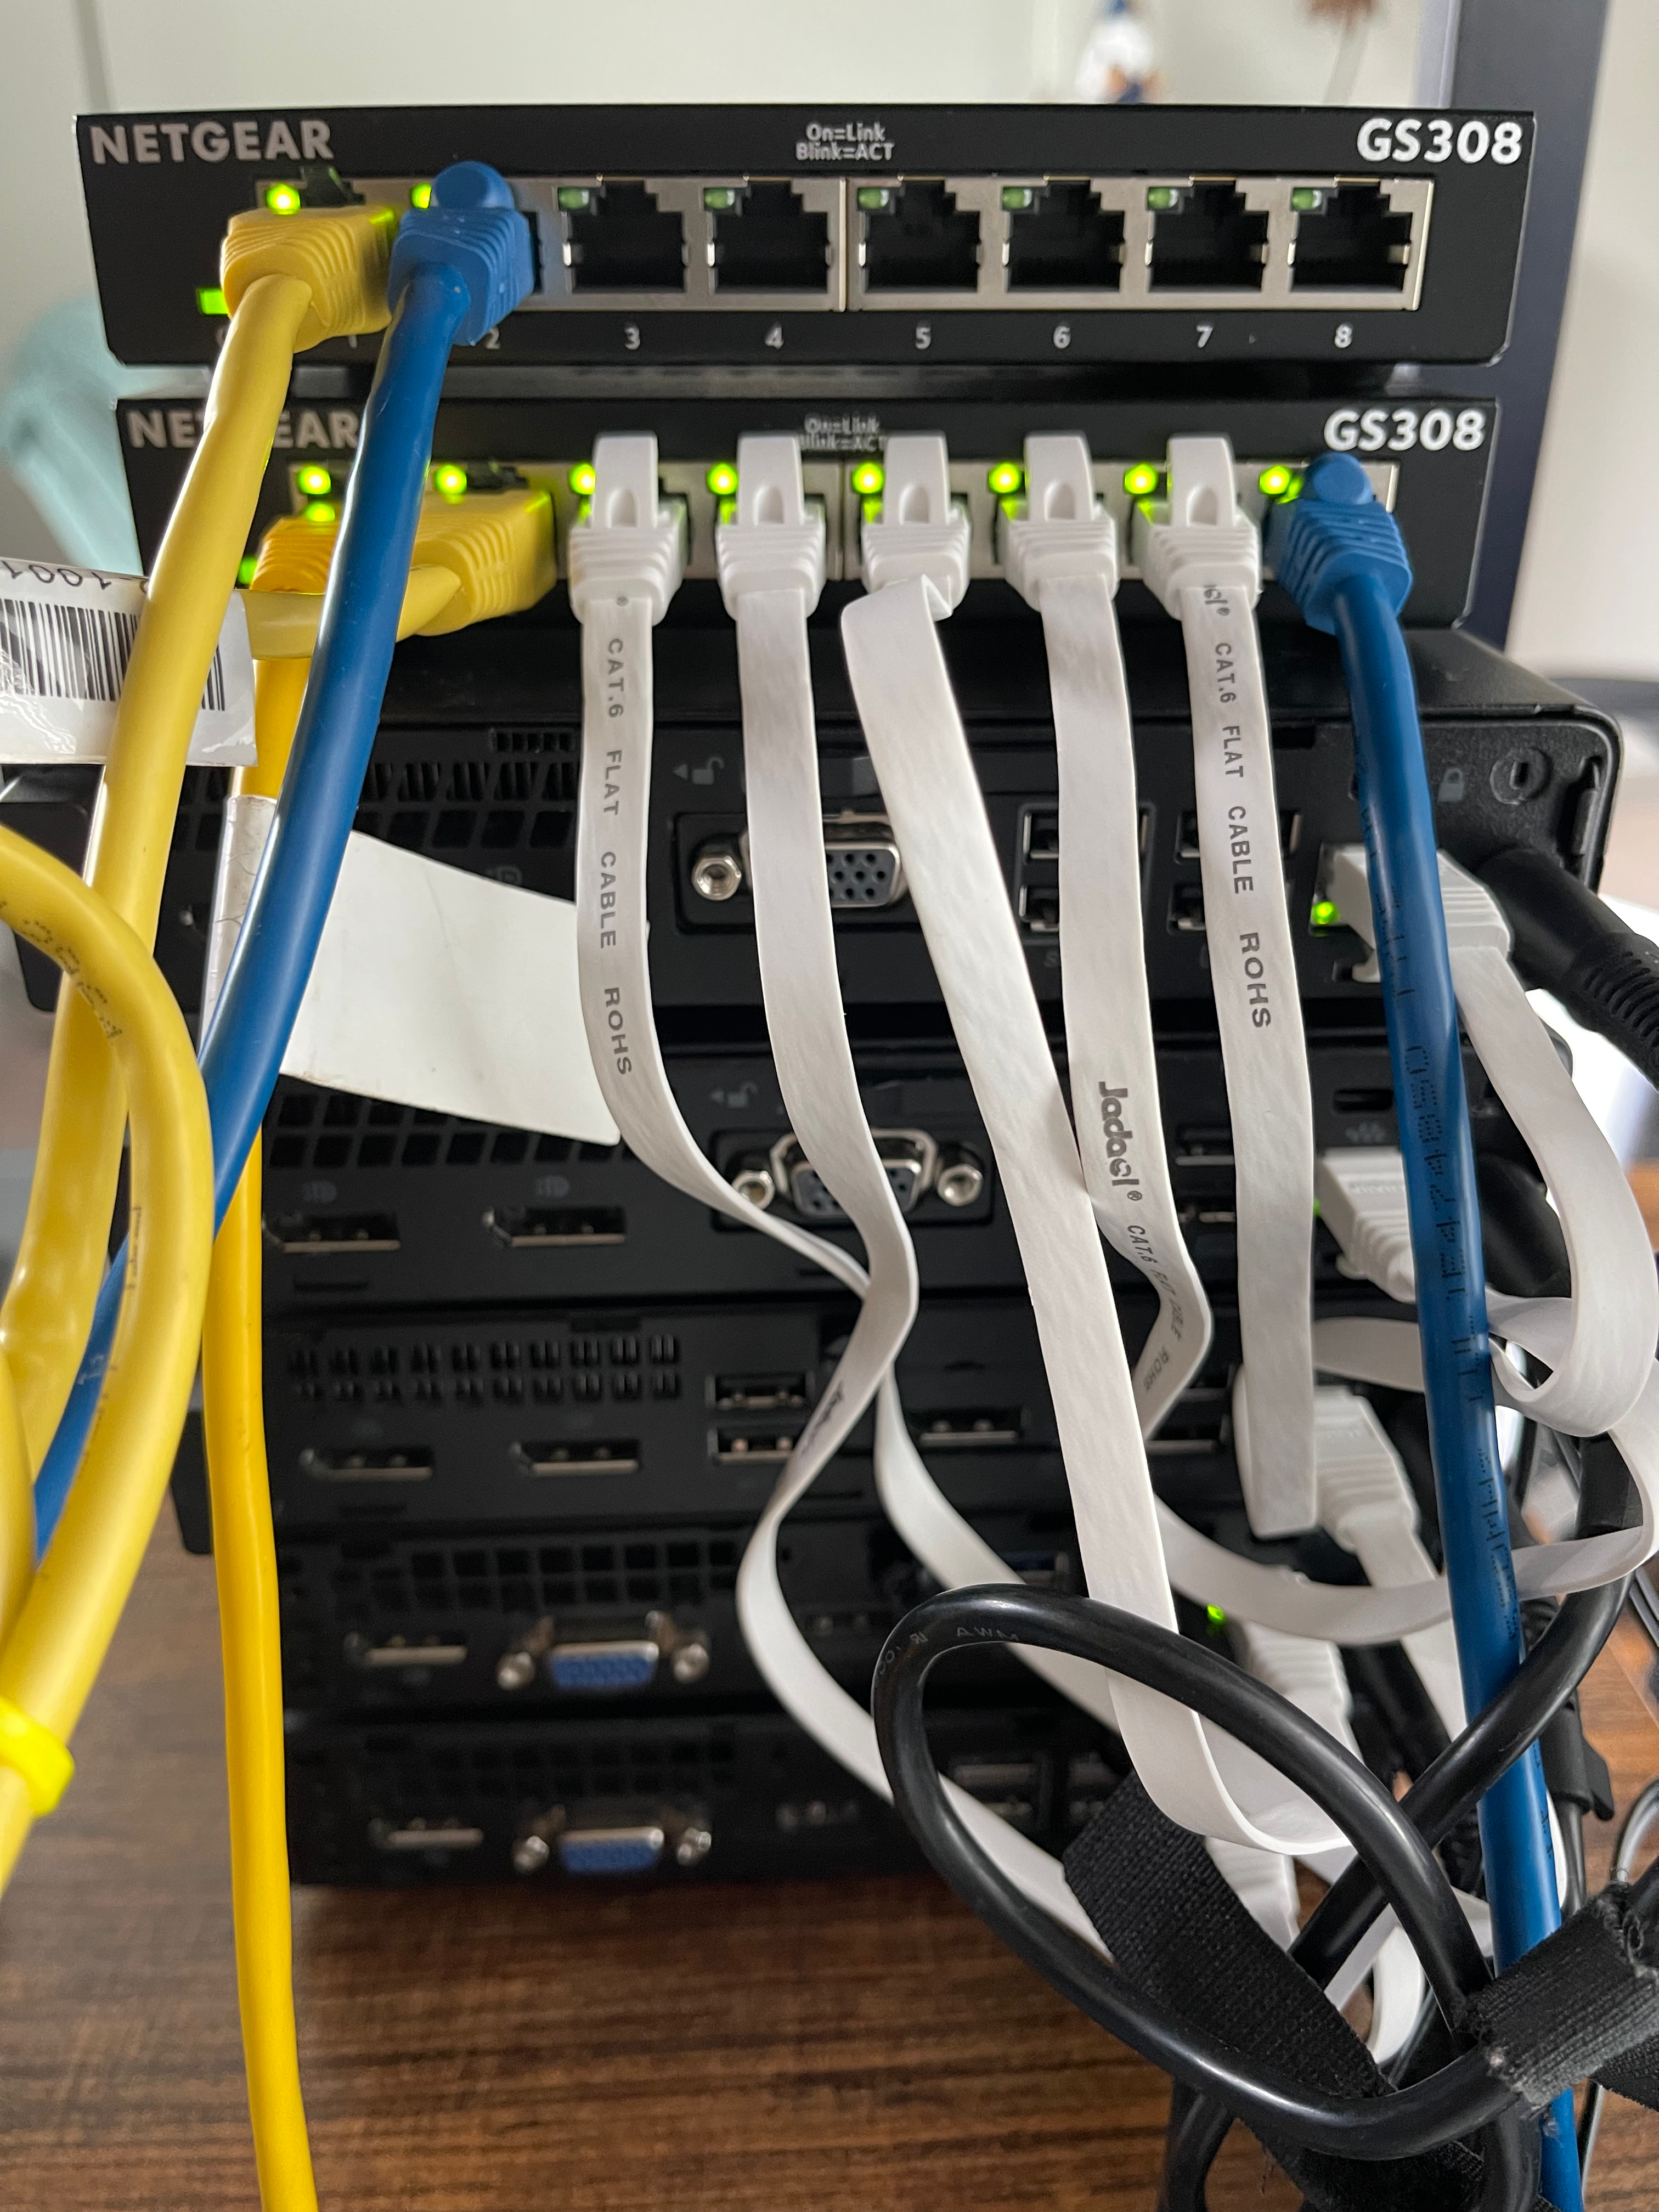
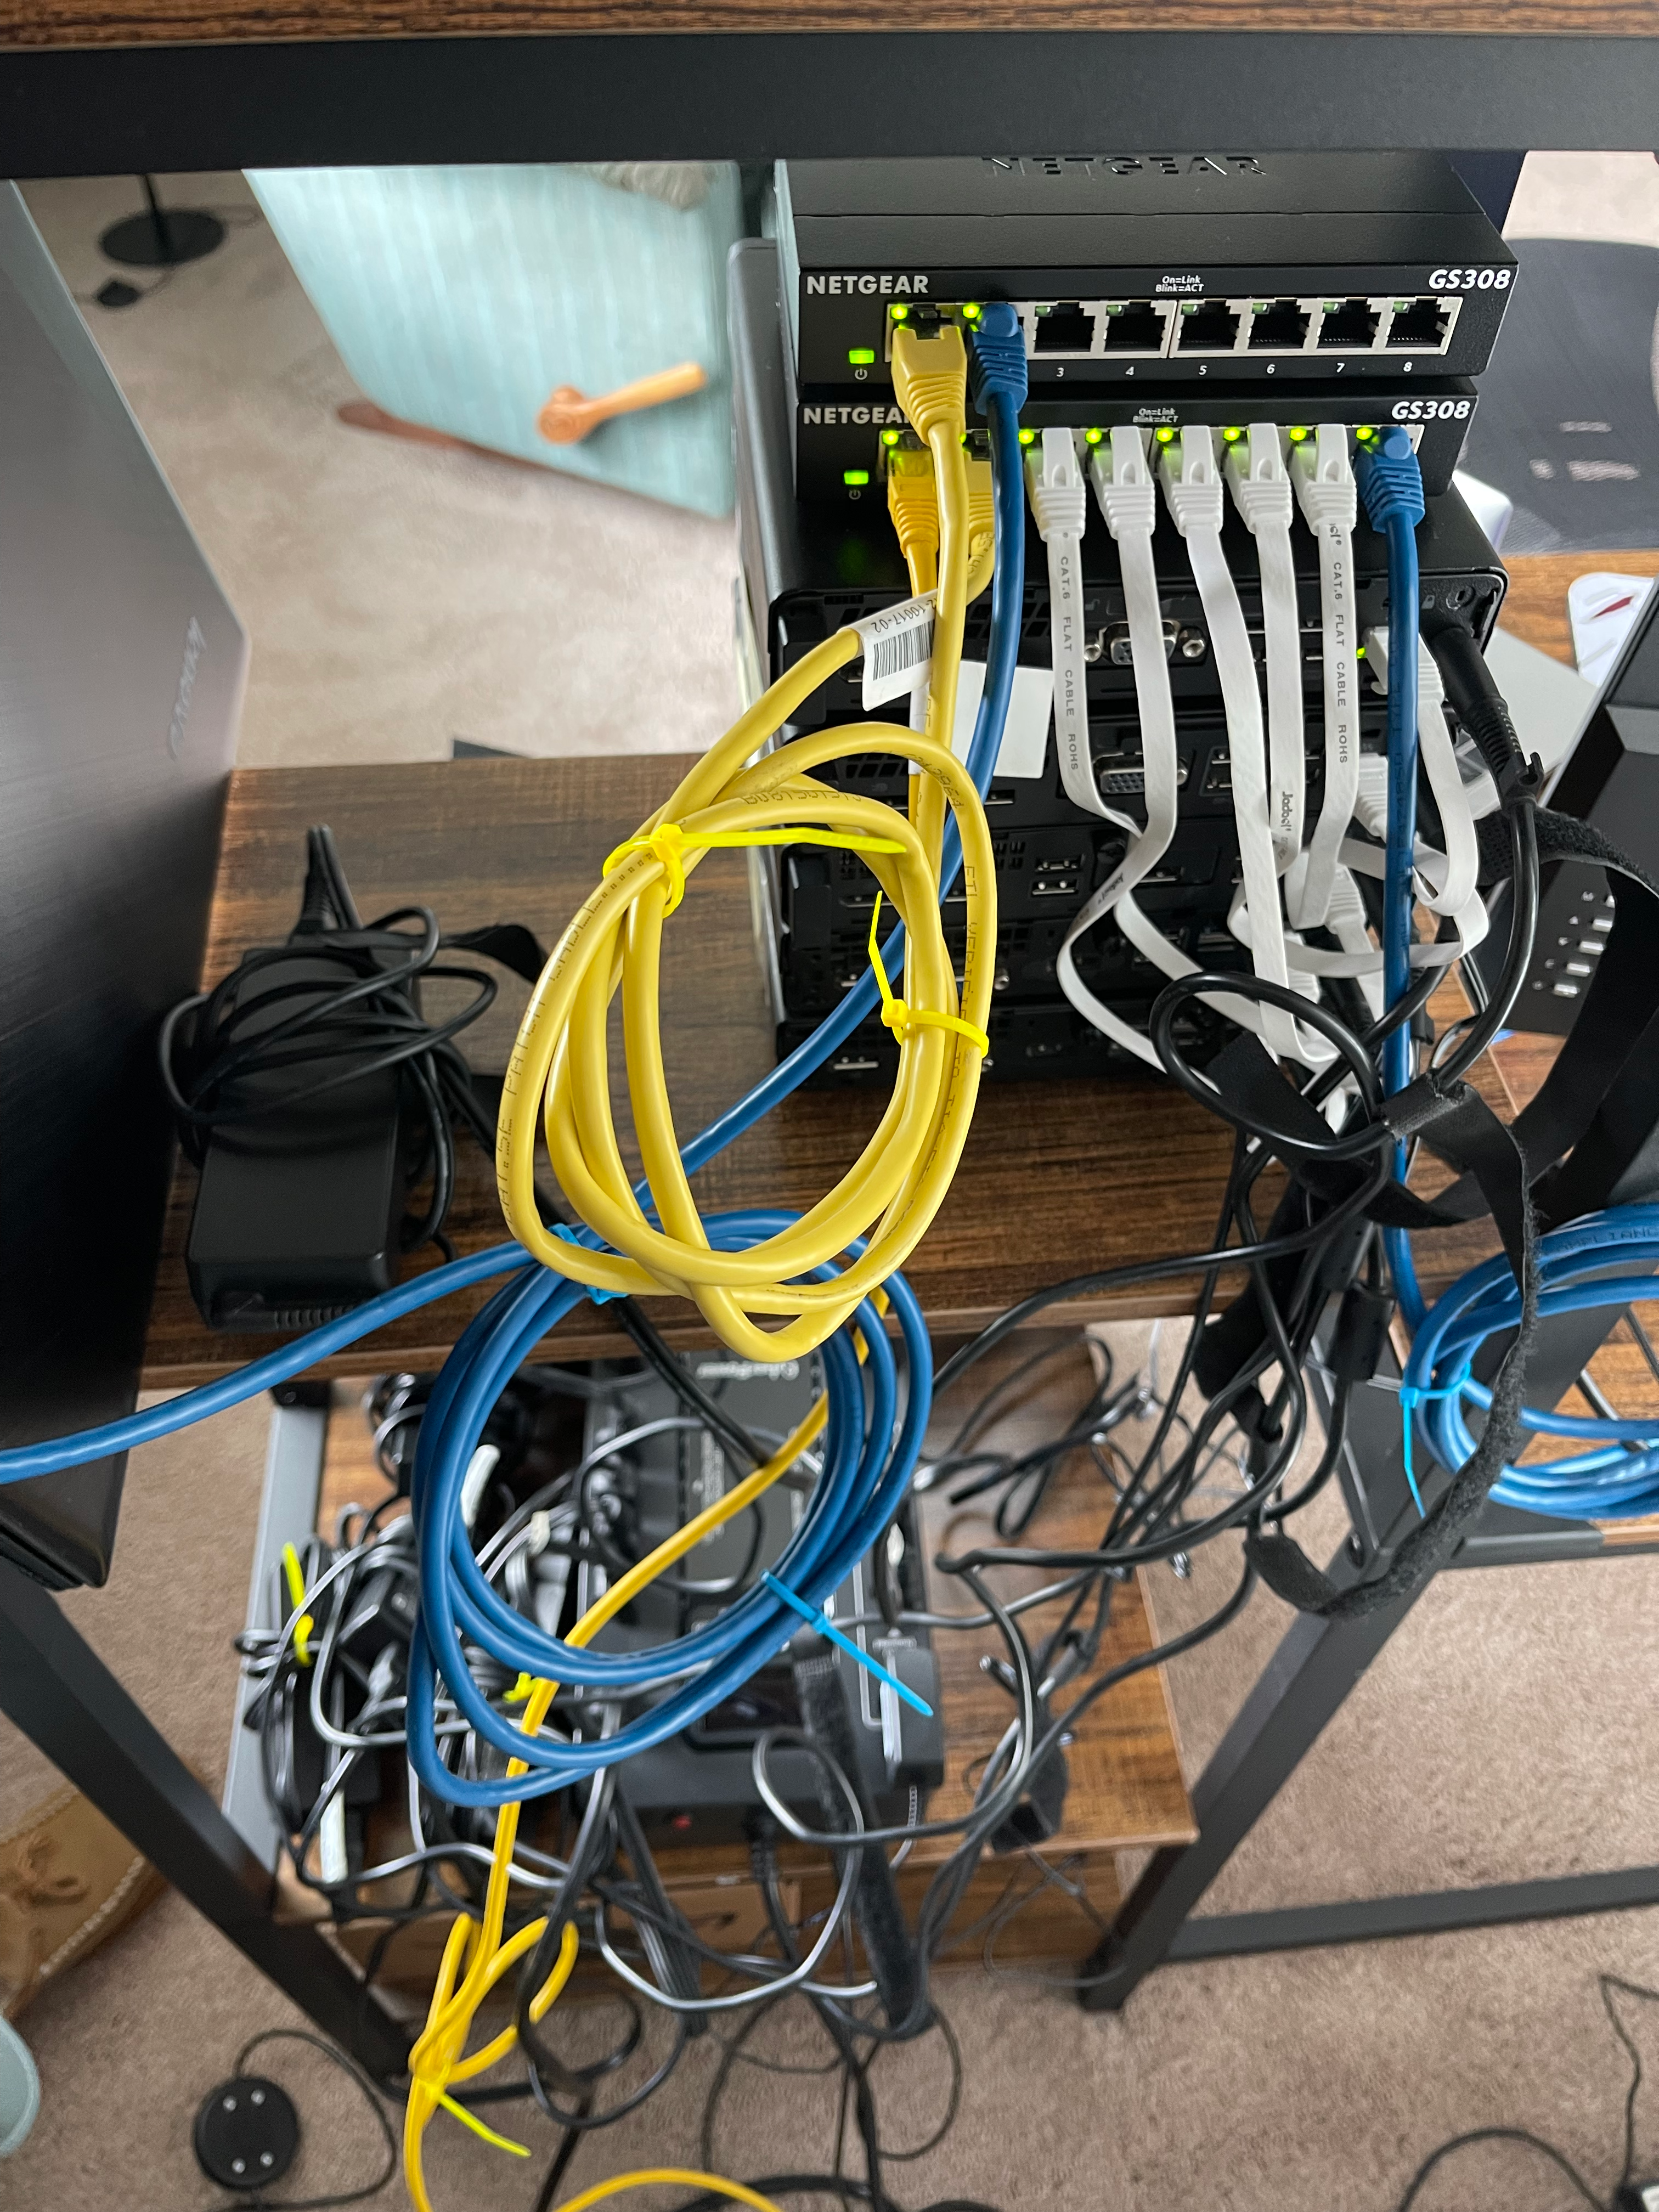
    • Two 8-Port Network Switches
    • An Uninterruptible Power Supply
    • A Printer
    • A Mechanical Keyboard (Related, I also have five keyboard and mice combos from the computers if anyone wants one)
    • Two new monitors

    If you’d like to see my entire parts list with links to each item to check it out or two make a purchase for yourself, feel free to head over to my website for a complete list.

    Once my Christmas-in-the-Summer arrived with a whole slew of boxes on my doorstep, the real fun could begin. The first step was finishing wiring my ethernet throughout my home. The installers had not connected any ethernet cables to the cable box by default, so I had to cut the ends and install the jacks myself. Fortunately, the AWESOME toolkit I purchased (link on my site) included the crimp tool, the RJ45 ends, and testing equipment to ensure I wired the ends right and to identify which port around my apartment correlated to which wire. Of course, with my luck, the very last of 8 wires ended up being the one I needed for my office, but the future tenants of my place will benefit from my good deed for the day I guess. The entire process took around 2–3 hours of wiring the gigabit connections but fortunately, my girlfriend enjoyed helping and a glass of wine made it go by faster.

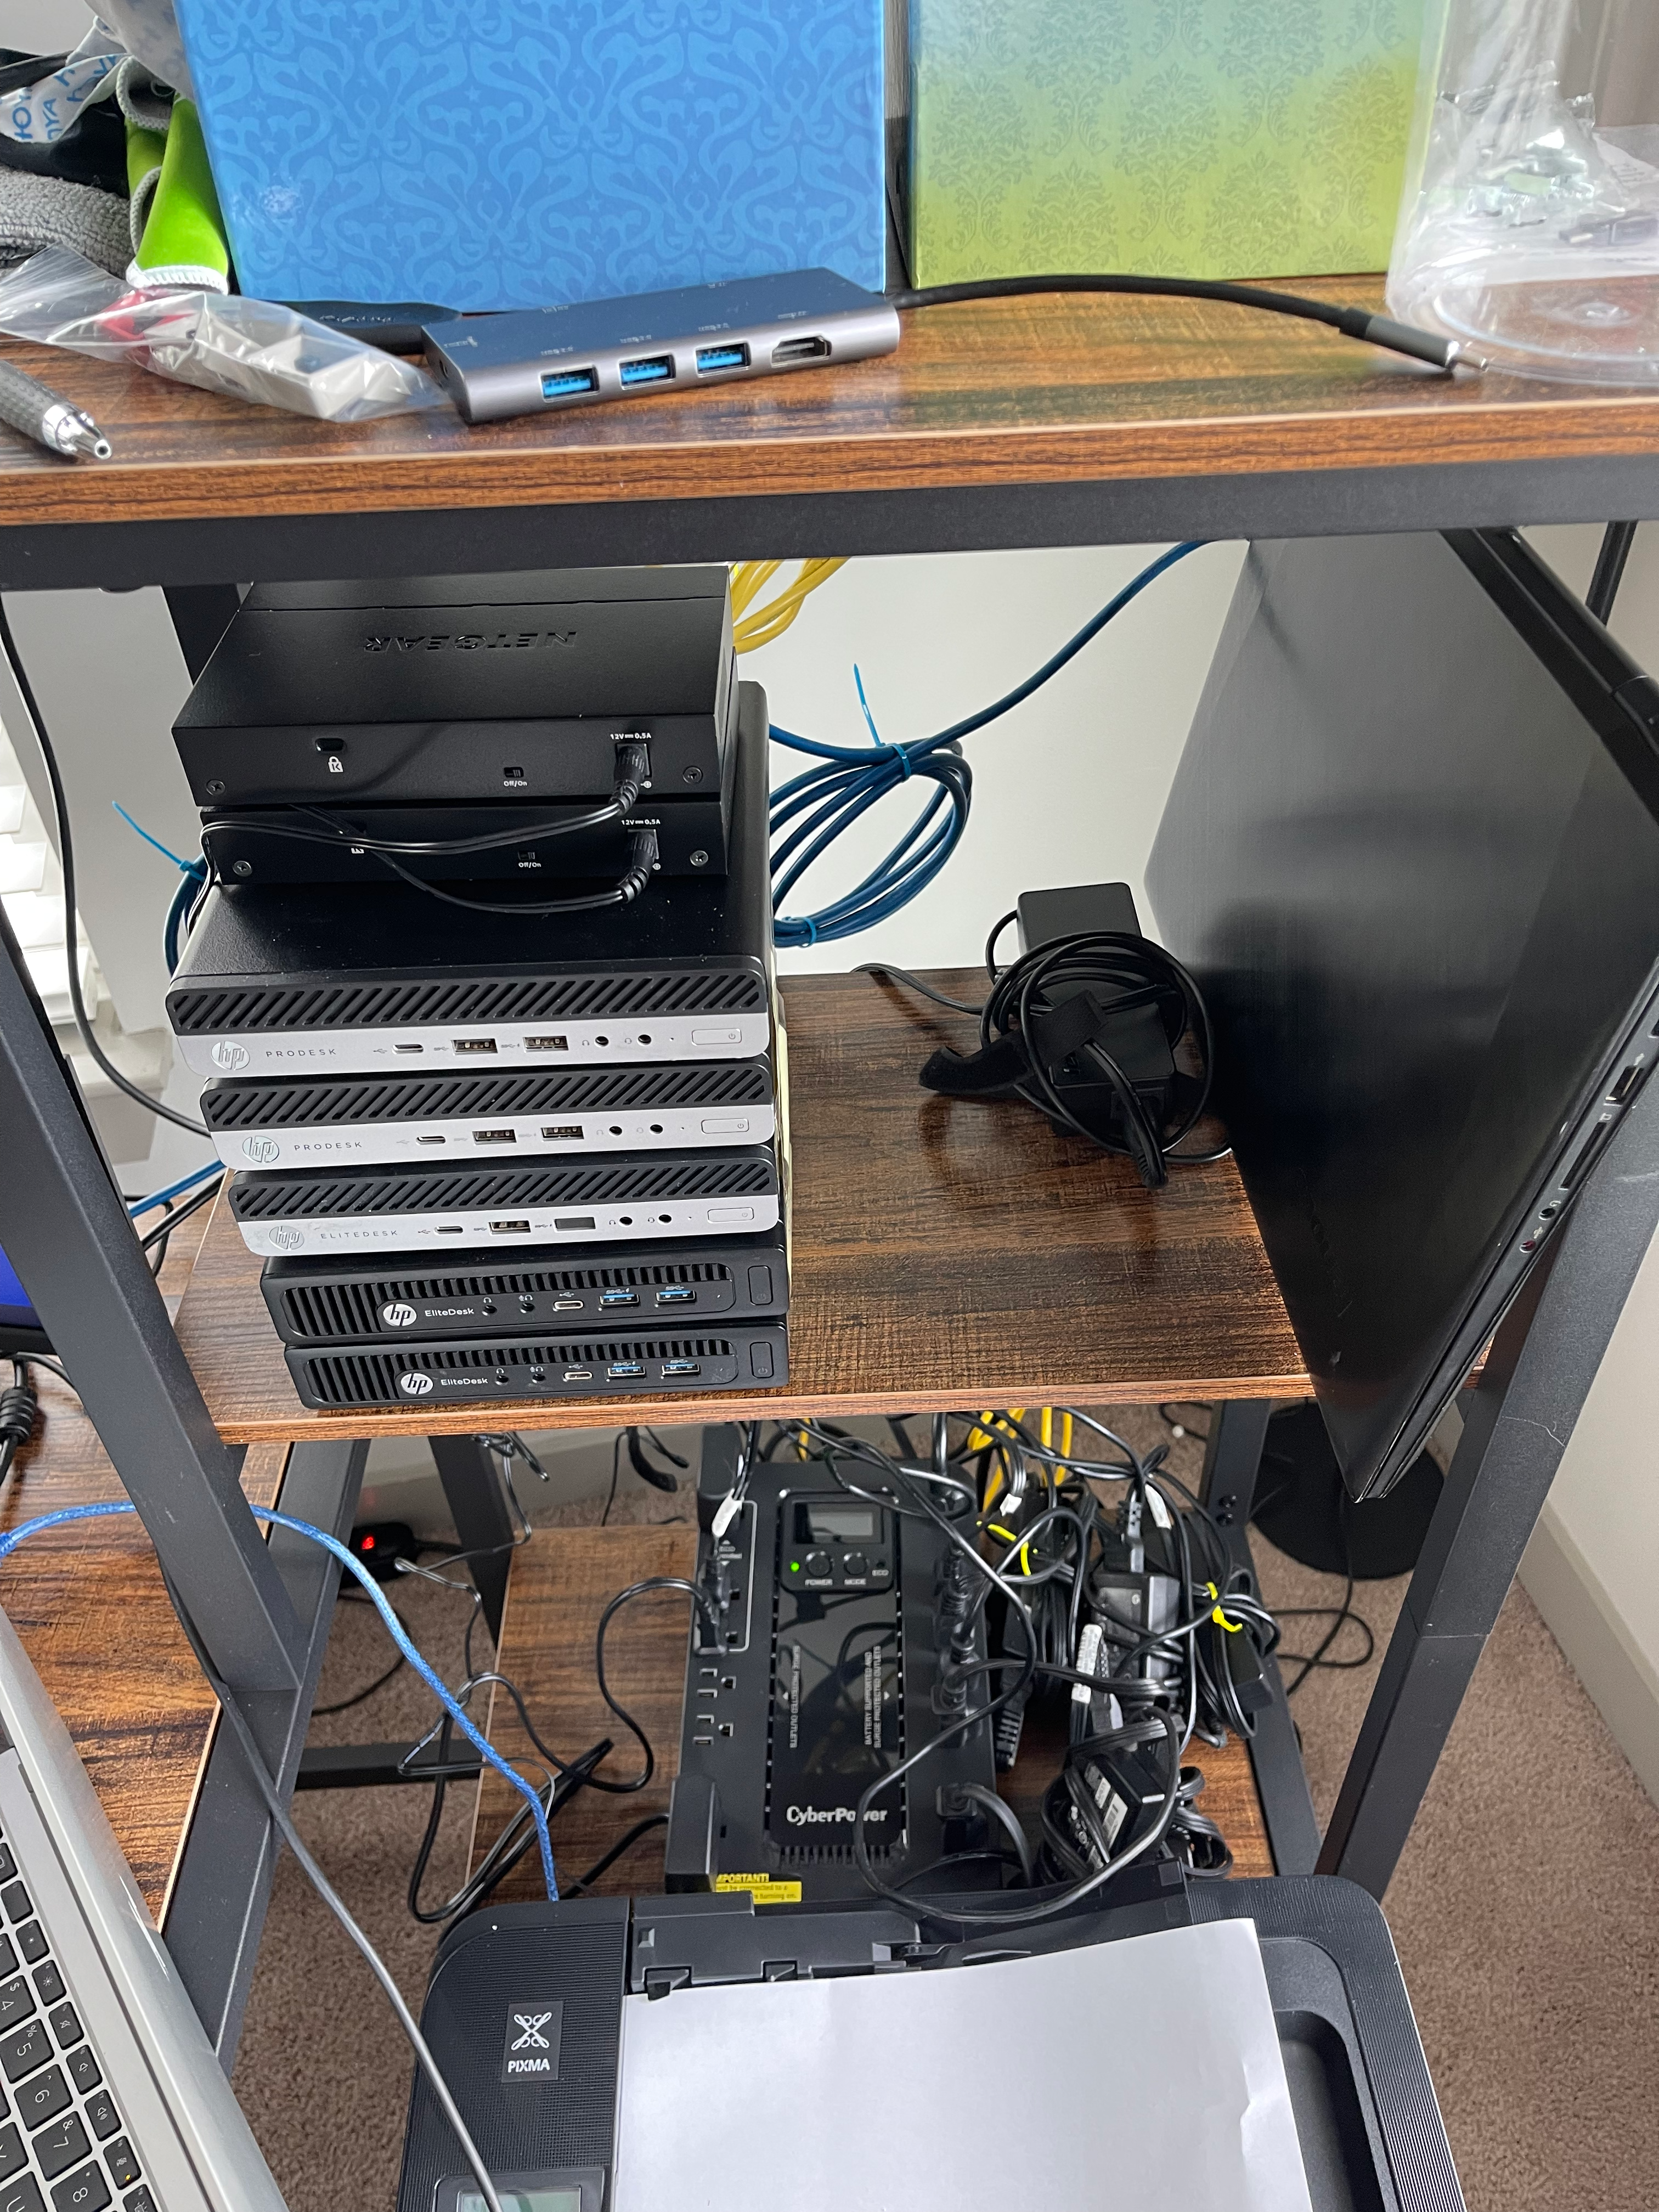
    Following wired networking, I began to set up my office by building the furniture, installing the lighting, and unpacking the hardware. My desk setup turned out pretty clean, and I’m happy with how my office now looks.

    Before and After

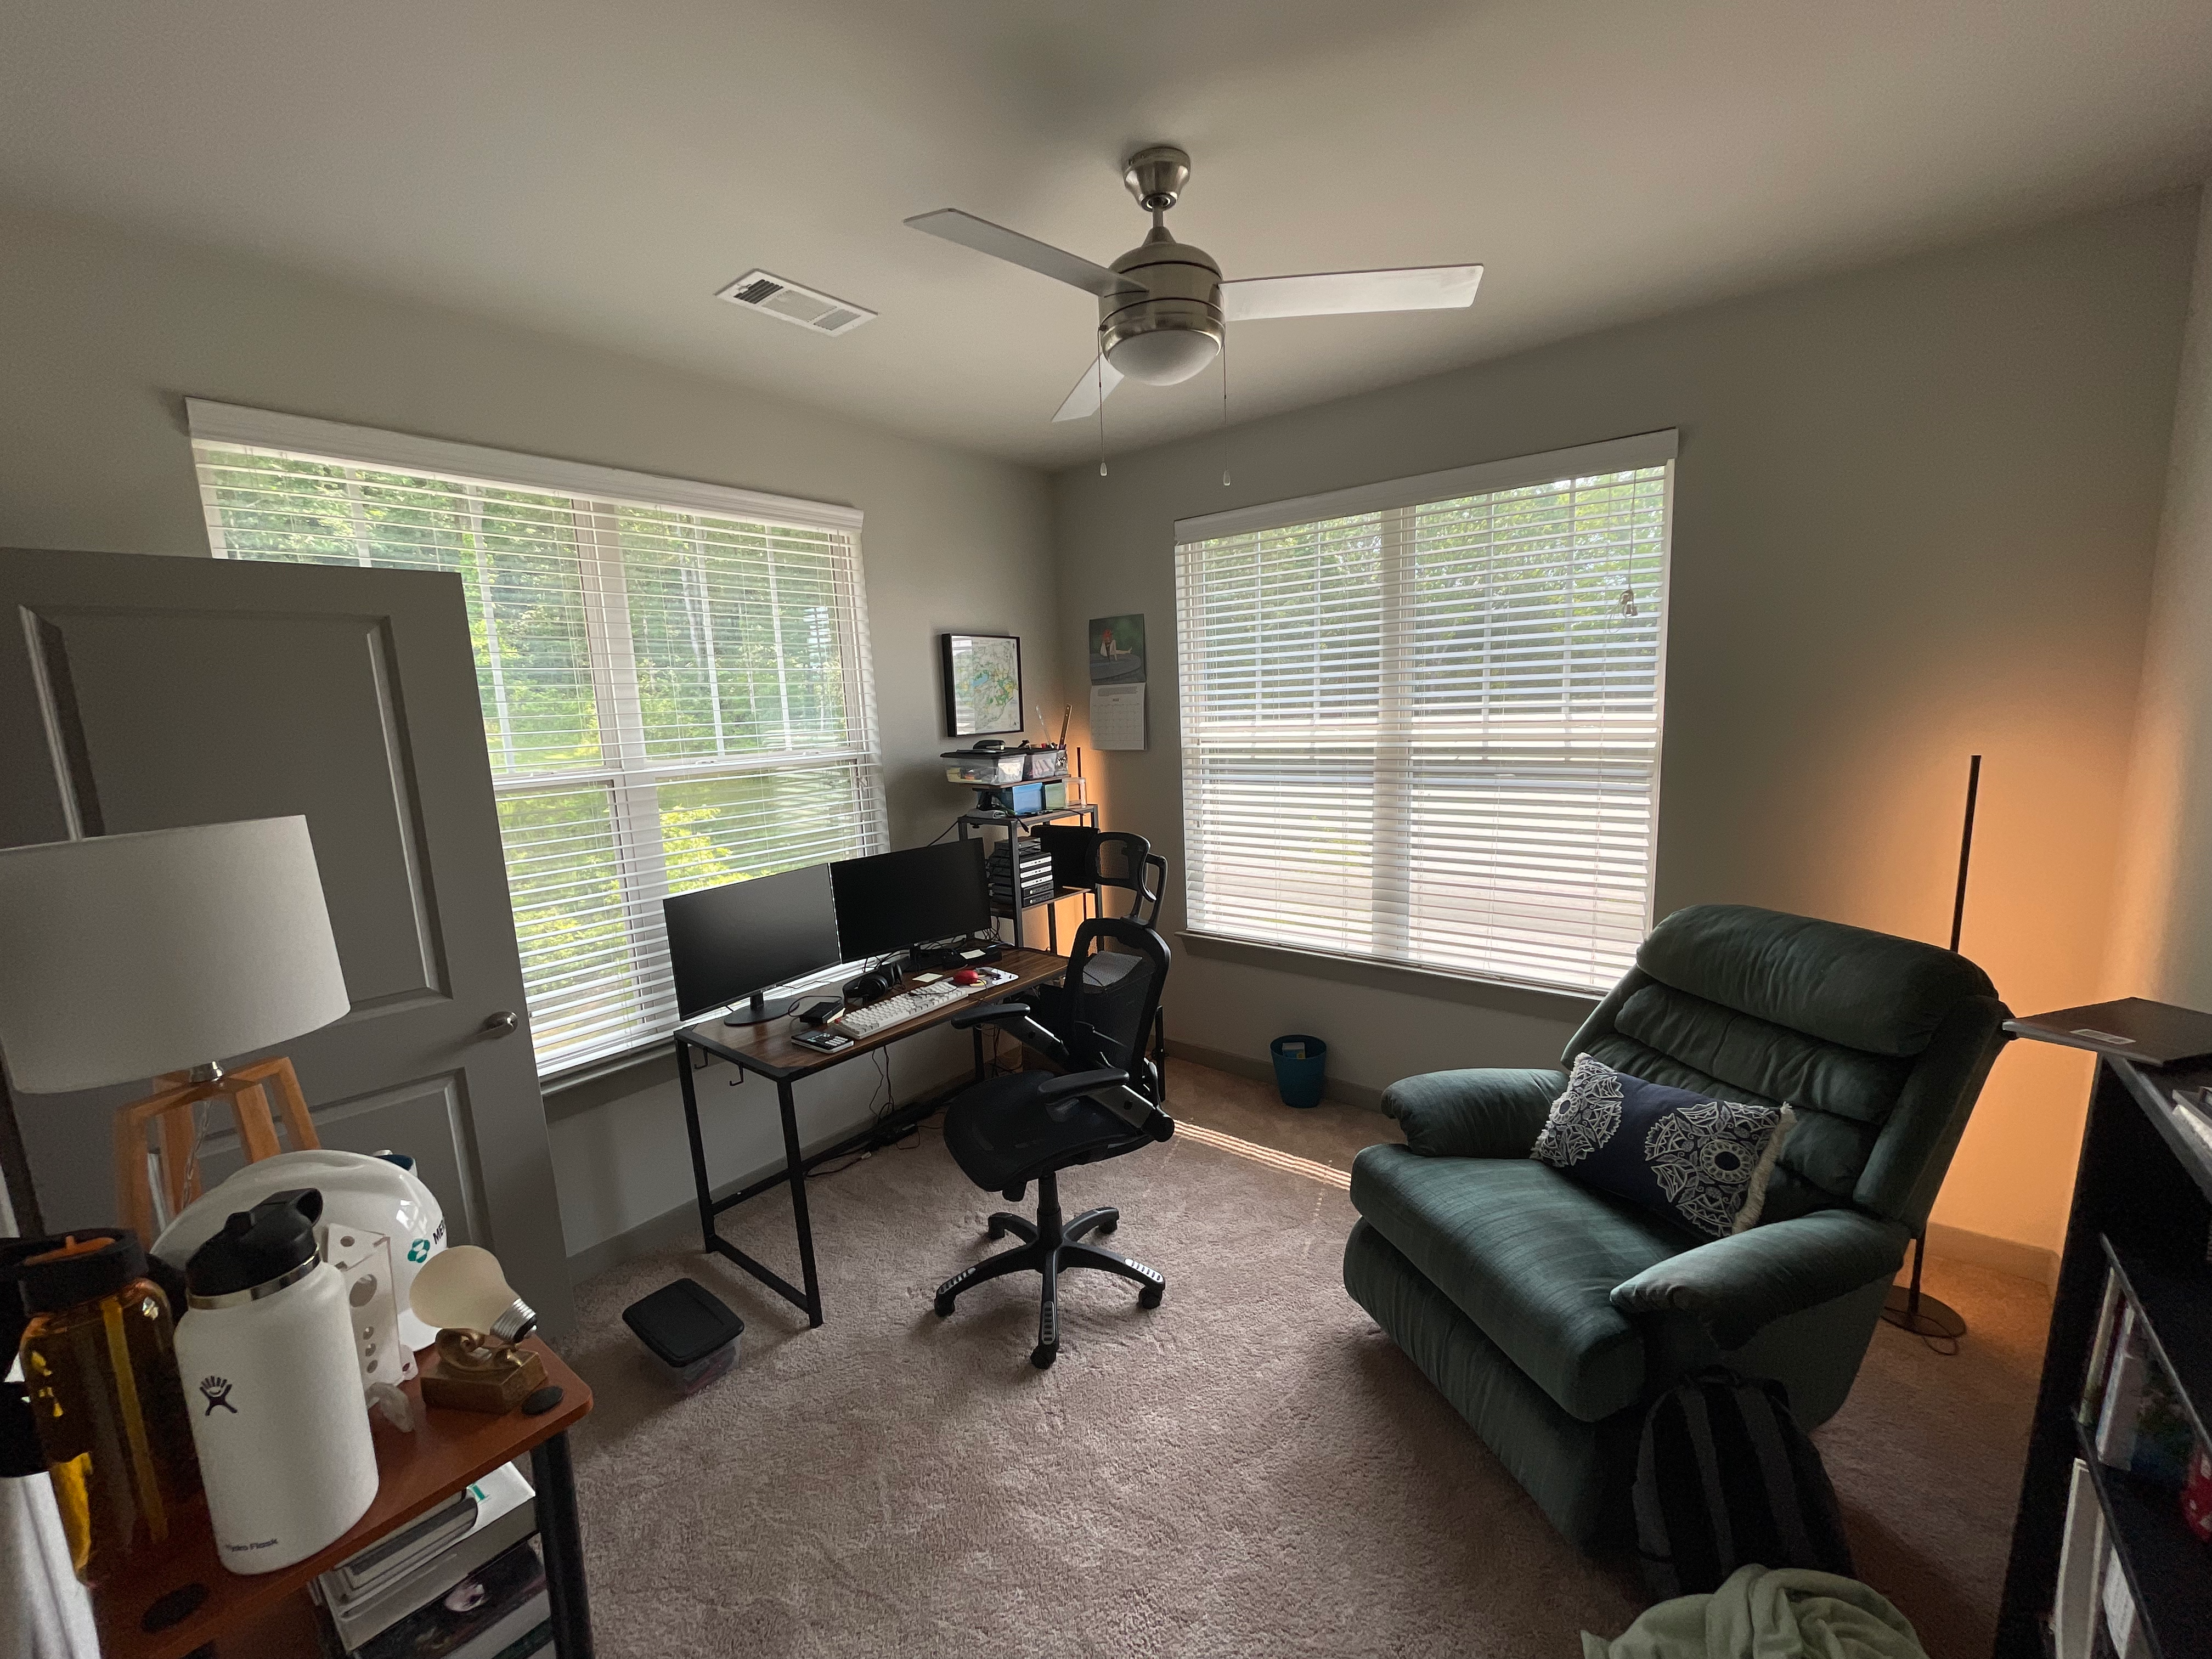
    As for my hardware setup, each of the computers I purchased had 16GB of RAM I upgraded to 32 as well as Solid State Drives (a few I upgraded). Since every device is running Windows 10 Pro, I am able to remote login in my network as well and I set up some of my service already. Networking the devices was quite fun as well, although I think my cable management leaves a little room for improvement.

    Front of Home Lab Nodes
    Back of Home Lab Nodes

    Now per the asterisk I had in the beginning, why did I spend around a year’s worth of AWS costs on five computers with like 22 cores total rather than just buy/build a tricked-out modern PC? Well, there are a few reasons, and I’m sure this may be divisive with some of the other tech geeks in the room.

    1. Scalability — I can easily add another node to my cluster here or remove one for maintenance/upgrades.
    2. Cost — It is easy and cheap to upgrade and provide maintenance. Additionally, at around 35W max for most units, the cost of running my servers is very affordable.
    3. Redundancy — If one node goes down (ie, a CPU dies), I have correcting scripts to balance my distributed workloads.
    4. Education — I am learning a significant amount that furthers my professional skills and experience, and education is ✨invaluable✨.
    5. It looks cool. Point number 5 here should be enough justification alone.

    Speaking of education though, here are some of the things I learned and implemented in my cluster:

    • When cloning drives from smaller to larger, you will need to extend the new drive’s volumes which frequently requires 3rd party software to do easily (such as Paragon).
    • You need to manually assign static IPs to get reliable results when remoting between desktops.
    • When migrating SQL servers, restoring from a backup is easier than querying between two different servers.

    I’m sure there will be many more lessons I will learn along the way…

    Below is an approximate diagram of my home network now. Not pictured are my wifi devices such as my MacBook and phone, but they jump between the two routers pictured. Eventually, I will also be adding my single-board computers and possibly one more PC to the cluster. Oh yeah, and my old broken-screen-laptop? Nobody wanted to buy it on Facebook Marketplace for even $50 so I installed Windows 10 Pro on it for remote access and added it to the cluster too for good measure, and that actually could be a good thing because I can use its GPU to assist in building Tensorflow models (and play a few turn-based games as well).

    Home Lab Network Diagram

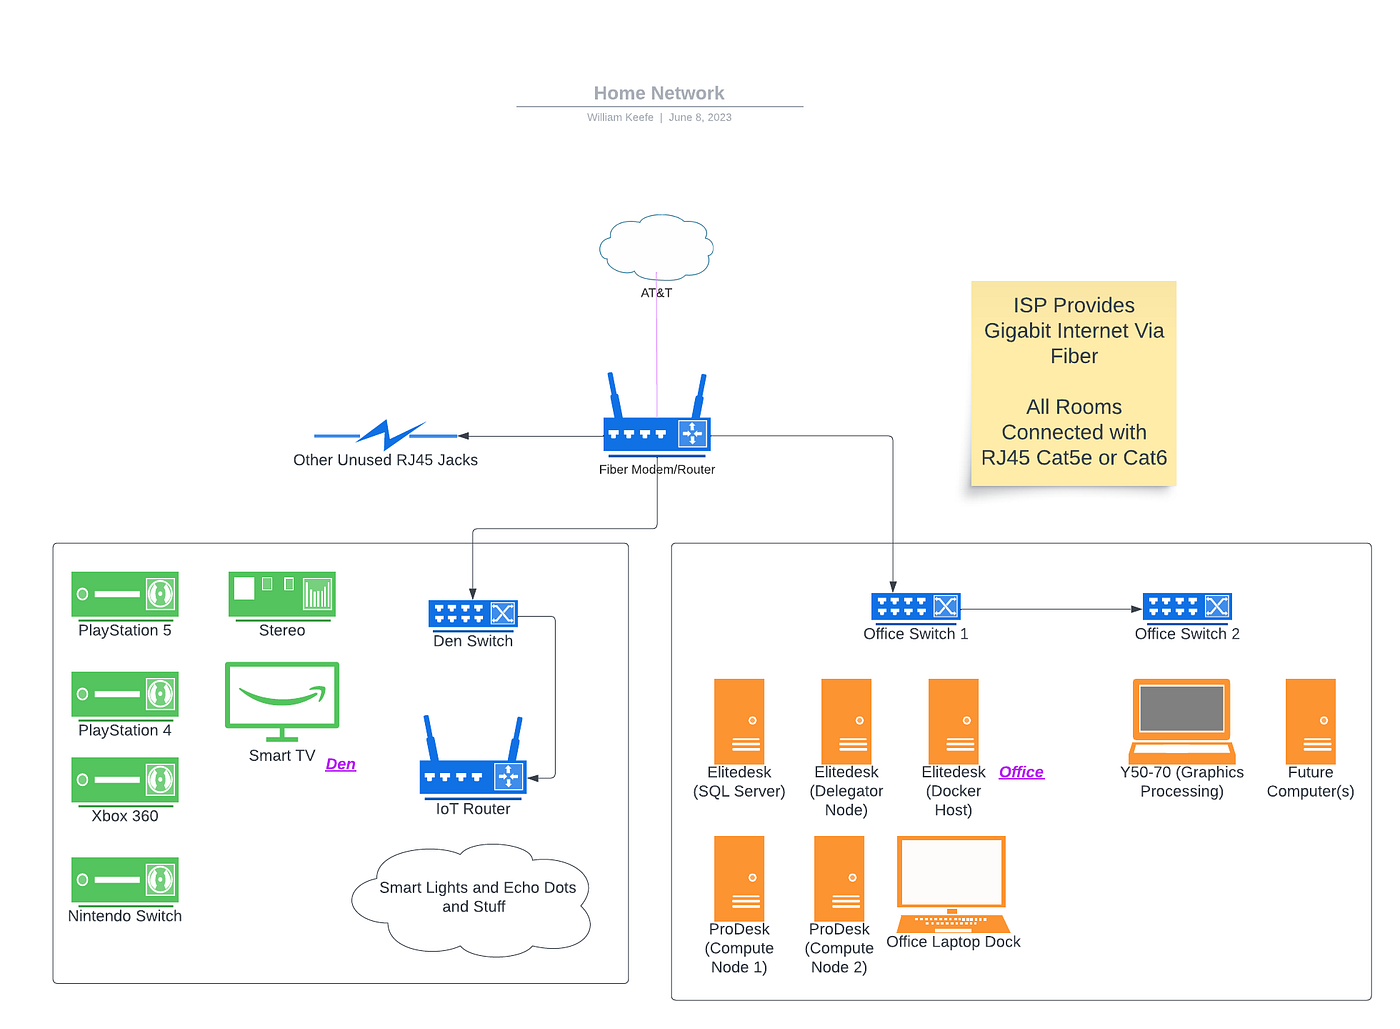
    Speaking of Tensorflow, here are some of the services and functions I will be implementing in my new home lab:

    • The SQL server (currently hosting my financial datasets, as well as new datasets I am web scraping and will later write about including my alma mater’s finances and the city I am living in’s public safety datasets)
    • Docker (for hosting apps/containers I will be building as well as a Minecraft server, because, why not)
    • Jenkins CI/CD system to build, train, and deploy Machine Learning models on my datasets
    • Git Repo for my personal codebase
    • Network Attached Storage supporting my many photos from my photography hobby, documents, and any other data-hoarding activities
    • And other TBD projects/services

    Closing Thoughts:

    Was it worth it? Well, there is an element of “only time will tell”. Once my credit card cools off from my Amazon fulfillment purchases I’m sure it will enjoy the reprieve from AWS pricing as well. I am also looking forward to being able to build and deploy more of my hobbies, as well as collect more data to write more Medium articles about. Some of my next few planned articles include an analysis of the debt West Virginia University is currently facing financially as well as an exploratory data analysis of Nashville’s public safety reporting (and possibly an ML model for anticipating emergency events and allocating resource needs). These data science projects are large enough that they would not be possible without some sort of architecture for storing and querying the massive amount of related data.

    What do you think? Does leaving the cloud and building a home lab sound like a project you would want to do? What would your hardware choice be?

    If you’re curious about the hardware I used, check out my reviews at www.willkeefe.com

    Some of my related recent Medium content:

    Production Planning and Resource Management of Manufacturing Systems in Python

    Efficient supply chains, production planning, and resource allocation management are more important than ever. Python…

    towardsdatascience.com

    Crime Location Analysis and Prediction Using Python and Machine Learning

    Using Python, Folium, and ScyPy, models can be built to illustrate crime incidents, calculate the best locations for…

    towardsdatascience.com

    Data Science

    Data

    Programming

    Serverless

    Homelab

    Will Keefe

    Written by Will Keefe

    ·Writer for

    Towards Data Science

    Engineer, python enthusiast, and fintech hobbyist.

    Crime Location Analysis and Prediction Using Python and Machine Learning

    Using Python, Folium, and ScyPy, models can be built to illustrate crime incidents, calculate the best locations for safety event resource…

    How I Turned My Company’s Docs into a Searchable Database with OpenAI

    And how you can do the same with your docs

    Tabulating Subtotals Dynamically in Python Pandas Pivot Tables

    One of the current disadvantages of the Pandas library’s built-in pivot functions is the lack of gathering subtotals dynamically for…

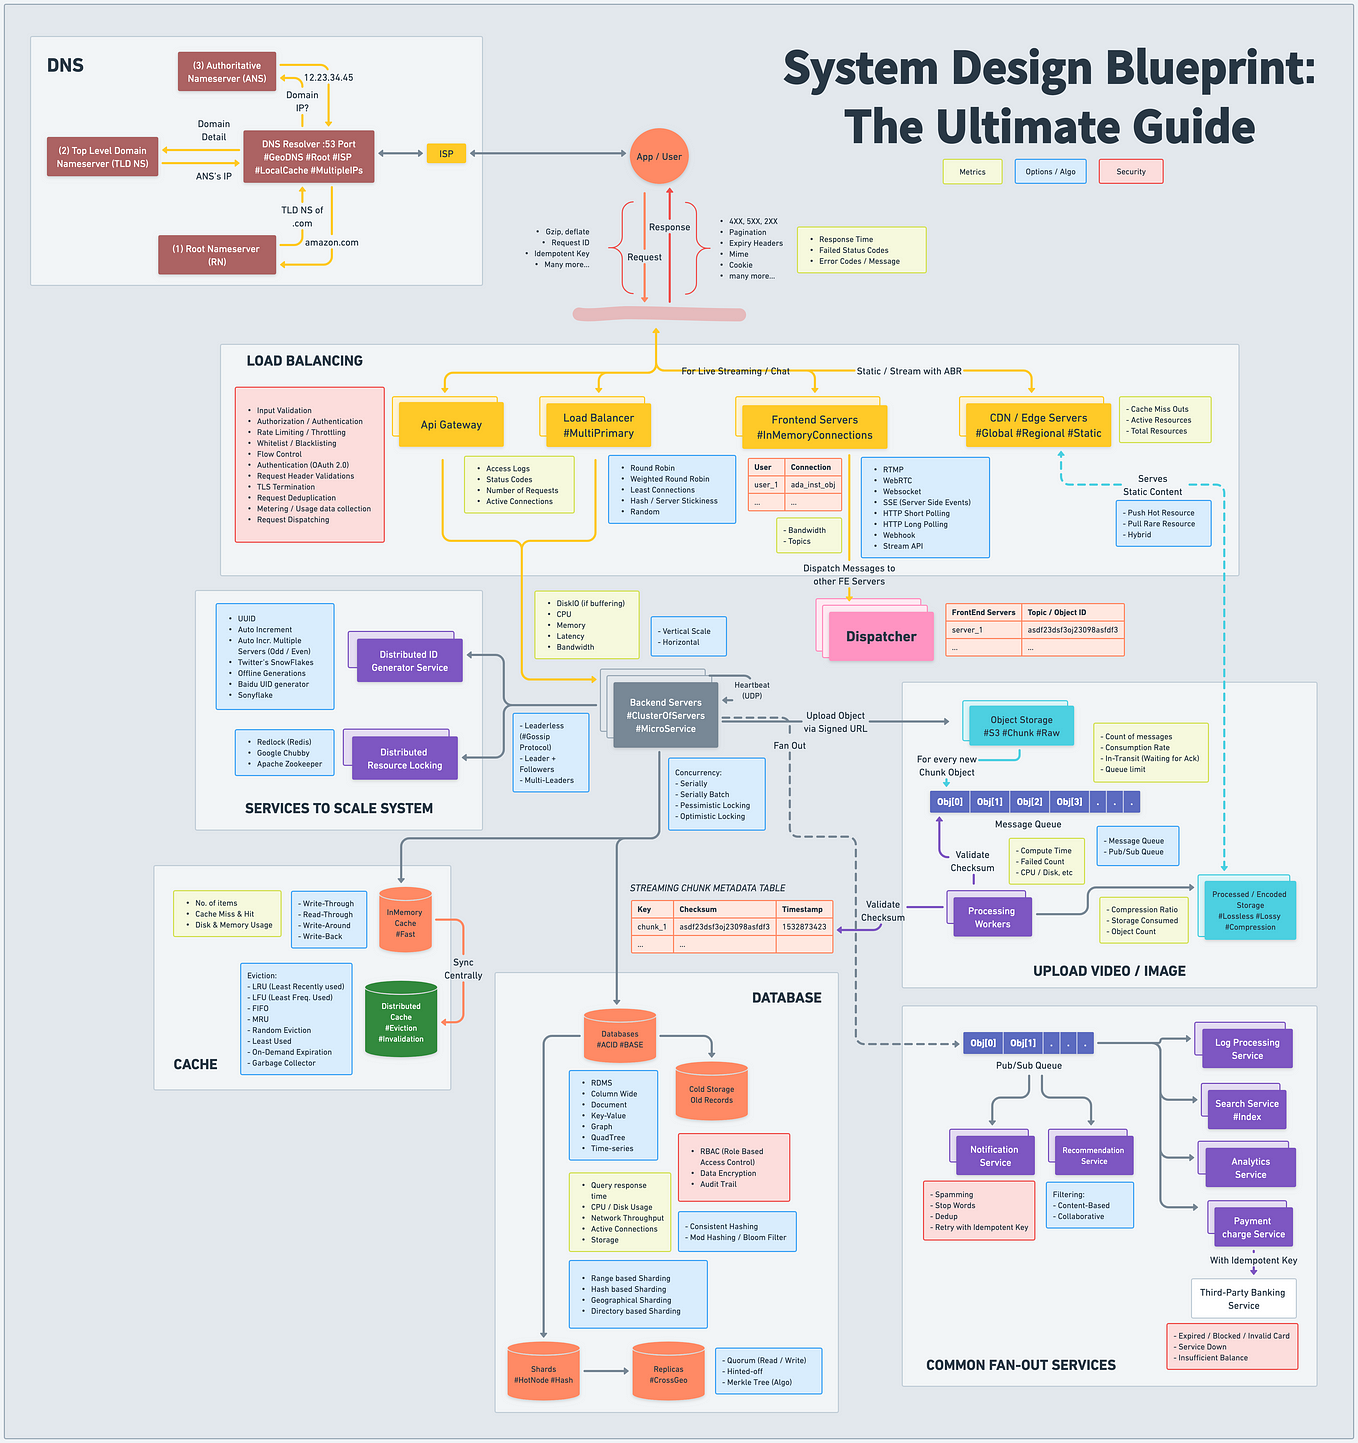
    System Design Blueprint: The Ultimate Guide

    Developing a robust, scalable, and efficient system can be daunting. However, understanding the key concepts and components can make the…

    🐼Introducing PandasAI: The Generative AI Python Library 🐼

    Pandas AI is an additional Python library that enhances Pandas, the widely-used data analysis and manipulation tool, by incorporating…

    The Right Way to Run Shell Commands From Python

    These are all the options you have in Python for running other processes — the bad, the good, and most importantly, the right way to do it

  • Laravel: Automate Code Formatting!

    Pint is one the newest members of Laravel first-party packages and will help us to have more readable and consistent codes.

    Installing and Configuring Laravel Pint is so easy and It is built on top of PHP-CS-Fixer so it has tones of rules to fix code style issues. (You don’t need Laravel 9 to use Pint and it’s a zero dependency package)

    But running Pint is quite painful because every time we want to push our changes to the remote repository we have to run below command manually:

    ./vendor/bin/pint --dirty

    The --dirty flag will run PHP-CS-Fixer for changed files only. If we want to check styles for all files just remove --dirty flag.

    In this article we want to simply automate running code styles check with Pint before committing any changed file so even team developers will have a well defined code structure and don’t need to run Laravel Pint every time before we push our codes to remote repo!

    Before we start, be careful this is a very simple setup and you can add as many options as you want to Laravel Pint.

    In order to run ./vendor/bin/pint --dirty just before every commit, we should use the pre-commit hook inside .git folder.

    First of all we will create a scripts folder inside our root Laravel directory. In this folder we will have a setup.sh file and pre-commit file without any extension.

    scripts/
    setup.sh
    pre-commit

    Inside our setup.sh we have:

    #! /usr/bin/env bash
    
    cp scripts/pre-commit .git/hooks/pre-commit
    chmod +x .git/hooks/pre-commit

    And write the following lines on pre-commit file:

    #! /usr/bin/env bash
    
    echo "Check php code styles..."
    echo "Running PHP cs-fixer"
     ./vendor/bin/pint --dirty
     git add .
    echo "Done!"

    Second of all, we should go to composer.json file and on the scripts object add this line: (If post-install-cmd key does not exist, you should create post-install-cmd part and then add below)

    "post-install-cmd": [
                "bash scripts/setup.sh"
            ]

    Third of all, we will require Pint package by this:

    composer require laravel/pint --dev

    And To be sure Don’t Forget to run:

    composer install

    The composer install command will add the pre-commit hook to our .git folder and after that we are ready to go!

    From now on, we can simply write our code and just before we commit our changes the Pint command will run automatically and will fix our code styles!

    Pint use Laravel code styles as defaultbut if you want to use psr-12 like me, you can create a pint.json file inside the root directory of your Laravel project and copy below json to have a more opinionated PHP code styles:

    {
        "preset": "psr12",
        "rules": {
            "simplified_null_return": true,
            "blank_line_before_statement": {
                "statements": ["return", "try"]
            },
            "binary_operator_spaces": {
                "operators": {
                    "=>": "align_single_space_minimal"
                }
            },
            "trim_array_spaces": false,
            "new_with_braces": {
                "anonymous_class": false
            }
        }
    }

    This is a simple config for our Pint command and will simplify null returns and define an equal indentation for arrays. You can check all PHP-CS-Fixer options here!

    READ MORE:

  • 6 Crazy Front-End Portfolios You Should Check Out

    6 Crazy Front-End Portfolios You Should Check Out

    Image for post
    Photo by Matthieu Comoy on Unsplash

    One of the toughest websites a web developer can make is a portfolio site showcasing all of the projects, experience, and skills.

    Not that building a portfolio site is programmatically challenging but because it is a place that potential employers will use to evaluate your work.

    Questions like “What projects to show first?” and “Should I add a photo of myself?” are just some of the many questions that come to mind when building a personal portfolio.

    Most web developers have built projects that aren’t unique like movie ratings or a calculator app.

    Therefore, one of the most differentiating factors for you can be building a highly unique portfolio site to showcase all these projects as well as any other past work.

    However, if you are looking to create a new project just for your portfolio, you can check my recent article on some of the most unique APIs.7 Free APIs That Nobody Is Talking AboutCreate unique and interesting apps using these APIsmedium.com

    Below are 6 highly unique portfolio websites you should definitely check out:

    1. Bruno Simon

    Bruno Simon is a creative developer and his portfolio is not a typical website that you’d come to expect.

    This is by far the most unique and interactive portfolio on this list.

    Bruno has created a uniquely immersive site, in which you can navigate using a car.

    The site is incredibly detailed and objects are moveable as well.

    As he states, he has used Three.js for the WebGL rendering.

    In fact, Bruno is on Medium and you can check his descriptive blog on the portfolio site.

    2. Ilya Kulbachny

    Ilya Kulbachnny’s site is one of the cleanest yet unique websites.

    Even though he has primarily used a black and white color scheme, he has worked on making the text large while adding a smooth scroll animation.

    Moreover, you can see that at the top of the page, the text “creative director” is also animated and he has used a personal photo of his as a background.

    Using a personal picture of yourself is important if you want to connect with your audience or you are a freelancer.

    Nonetheless, adding a personal picture won’t hurt and Ilya’s site demonstrates how he has used his personal picture which also has animate on scroll property.

    3. Abhishek Jha

    Abhishek’s portfolio follows the same color palette as the one above but his use of text, as well as the same animation on a scroll, gives it a unique touch.

    Another immediate takeaway is that he has replaced the default scrollbar with his own and also the cursor icon changes when you scroll over images.

    By placing the same text with different styles below one another and making the image overlap these texts is an interesting approach that, when used correctly, can be used to lay emphasis on particular texts.

    Not many people know but you can actually customize the scrollbar directly from your CSS file.

    /* width */
    ::-webkit-scrollbar {
    width: 10px;
    }

    /* Track */
    ::-webkit-scrollbar-track {
    background: #f1f1f1;
    }

    /* Handle */
    ::-webkit-scrollbar-thumb {
    background: #000;
    }

    /* Handle on hover */
    ::-webkit-scrollbar-thumb:hover {
    background: #355;
    }

    You can find more on this here.

    4. Robby Leonardi

    Much like Bruno Simon’s portfolio, this is also an interactive game. However, Bruno’s site included 3D graphics and a car to navigate, while this is a 2D game.

    Robby’s portfolio reminded me of the beloved Mario game.

    Robby Leonardi also has a portfolio site for illustrations and the same graphic and theme have made their way to it as well.

    He has done an outstanding job in making these sites and it’s rather out-of-box thinking.

    The background of his illustration portfolio as well as all the images used blend in perfectly, as well as showcases his finest works at the same time.

    5. Jacek Jeznach

    Another outstanding portfolio you should check out is by Jacek Jeznach.

    By using a very TikTok-like color palette and simple animations, he put together an enthralling website.

    The theme even extends to the map on the contacts page.

    He has even added background sound that you can easily toggle on and off.

    If you look closely you can even see that key HTML tags are present at the start and end of the webpage which is a neat addition to this site.

    This website is a great example of combining vibrant colors with a dark background and how to bring about an aspect of uniformity.

    6. Damian Watracz

    Damian’s site is a great example that giving attention to detail can drastically transform the site.

    This website utilizes a simple black and white color palette primarily.

    By combining simple animations, custom loading circles as well as the apt personal photo, Damian has managed to put together a very polished and professional website.

    One of the things I really liked about his site is that when you hover over the items in the menu, the background changes to reflect the link address page which is a thoughtful addition.

    Moreover, the pagination on this page is not common and really blends with the website.

    Another useful takeaway from this site is that the small yet notable contact button on the bottom left side of the page. It is a helpful shortcut that does not get in the way.

    Final thoughts

    Building a personal portfolio can be quite challenging.

    The main reason I have put together this list is to show that each portfolio site is unique and great in its own manner.

    There is no definite way you can go about while building sites like these.

    The only thing to keep in mind is to give your best and add your own personal touch to the site.

    If you enjoyed or felt inspired after reading this article, do check out my article on design inspirations.

  • 8 VSCode Extensions Every Developer Must Have

    Vedant Bhushan7 days ago

    These are awesome extensions! Maybe you could add tabnine as well.

    2

    2 replies

    Reply

    Jacob Bankston

    Jacob Bankston3 days ago

    Definitely picked up Turbo Console Log, and had a few of the others already! Great list overall.I would recommend adding indent-rainbow, it colorizes the indentations of lines to make your code more readable.

    1

    1 reply

    Reply

    Sylvain Pont

    Sylvain Pont7 days ago (edited)

    TCL is Amazing, thank you for that.Some remarks:Project manager seems to be a LOT more used than Projects. Whould you explain why you chose the later?VSCode now ships with Sync Settings. I used to use Settings sync extension but the VSCode one is…...

    Read More1 reply

    5 min read

    VS Code is one of the most popular and widely used code editor. It comes packed with lots of features that are free in comparison to other editors. You can download extensions on VS code, which add another dimension of incredible features.

    I have listed some of my favorite VS code extensions, without which I cannot live.

    Please note that there is no ranking involved. Each extension is impressive in itself. The last one and the first are equal.

    I am sure you will leave with a new extension that will make your work easier.

    1. Turbo Console Log

    Turbo console log is a killer extension when coming to the debugging part. This extension makes debugging easier by automating the process of writing meaningful log messages.

    You insert meaningful log message automatically with two steps:

    • Selecting the variable which is the subject of the debugging
    • Pressing ctrl + alt + L

    2. Import cost

    Speed is essential for your website. If your page or app can’t load quickly, it is the same as no page.

    This extension displays your import’s size. This way, you get to know how much you will be downloading and figure out why your application is sluggish.

    With this extension, you can decide if you should write a function or import the whole bundle.

    3. Prettier

    This extension is for everyone, be it If you code in python, JavaScript, or any other language.

    It makes your code, as the name suggests, prettier.

    I am terrible at giving equal lines and spacing and tab. As a result, my code looks just like some noodle pasta.

    With prettier, as soon as you press command+S, you will experience the magic. All your code will get correctly and equally spaced, and proper line spaces. Your code will look beautiful.

    No-One will ever identify how messy you are 😐.

    4. Bracket pair colorizer

    How many times it happens that when editing JavaScript code, you have trouble finding the closing brackets. It is painful to use the finger to trace the opening and closing brackets. Stop wasting your time and use this extension.

    Your opening and closing brackets are colored the same; it is easier this way.

    This extension is a must-have for those who have spent time with python because python doesn’t require brackets; this will help the transition.

    Image for post

    5. Live share

    Live share is a fantastic extension. With it, I can code with my friends, colleagues.

    Whenever I am stuck with a problem, I can pull over my friend to help me.

    What this extension does is that it gives remote control of your VS code editor, the opened files. With that, another person can change my code and save it—no need to struggle over the phone anymore or wait to meet your friend to get help.

    One of the features you get with this is that — You get to code in real-time. You get to know who is typing and what it is that they are entering. It makes coding just like messaging, which we all love. Thanks to VS code and live share. Besides, it also gives access to localhost, your terminal.

    Live share is one of the best features of VS code, in my opinion, and the reason I recommend it to everyone. I haven’t seen anything as good as it and free to use. Mind-blowing!

    Bonus: You can download the live share audio extension, which adds audio calling capabilities to Live Share. I love this and especially in the pandemic when everything has gone remote.

    6. Projects

    If you are working on several projects at a time, then switching between folders is hard. You have to navigate to the required folder. And if you switch between quite often, then it is hell.

    One use I find with this extension is that it can work as your favorite tab. E.g. Someone may store custom CSS and bootstrap in a folder and use this extension to navigate in between quickly.

    Image for post

    7. Settings Sync

    As the name suggests, setting sync extension stores all your setting backup in GitHub. This way, you can have the same settings for your multiple devices or new devices. Any changes made can be seamlessly synchronized.

    It allows you to sync pretty much everything you customize on VS Code to Github, from settings to keyboard shortcuts to other VS Code extensions.

    8. JavaScript (ES6) Code Snippets

    VS Code comes with built-in JS IntelliSense, but JS Code Snippetsenhances that experience further by adding premade JavaScript snippets, which contain the most commonly used snippets. No more repeating of code endlessly.

    The extension supports JS, TypeScript, JS React, TS React, HTML, and Vue.

    Image for post

    I hope you enjoyed reading and I provided value to you. If you find extensions that I have missed and you find it amazing, mention it in response.

    Thank You 🙌

    Ali Haider

    Over 5 years of obsession with technology || Writer and developer. I love making new friends, why don’t we be friends?

  • 7 Free APIs That Nobody Is Talking About

    7 Free APIs That Nobody Is Talking About

    Ethan O’Sullivan2 months ago

    APIs are vital tools in the success of any app.

    I agree, I would run into issues trying to use an XML feed because of it's formatting. So I developed an API that converts XML to JSON, check it out:https://medium.com/p/b09734329bc9

    5

    Reply

    Bizzabe83Bizzabe832 months ago

    Many times we just want to focus on the frontend

    Good read

    10

    Reply

    Alex Mireles

    Alex Mireles2 months ago

    Isn't 90% of this list on every beginner API?

    1

    Reply

    Chris Hornberger

    Chris Hornberger2 months ago

    Also, your comment about “everyone using the same APIs...” being a bad thing is just silly. What that does is create uniformity and standards. Oy.

    Reply

    { rxluz }

    { rxluz }2 months ago

    Wow, that’s handy APIs! The glyph and recipe I’ll use in some future project for sure, one suggestion to add to your excellent list is Unplash, I use it before to allow users to search high-quality and free for use images, others to check the weather and result of matches are quite useful as well.

    Anurag KanoriaNov 23, 2020 · 6 min read

    Nothing excites me more than finding an out of the ordinary API.

    Many times we just want to focus on the frontend but also need interesting, dynamic data to display.

    This is where public APIs come into play. API is an acronym for Application Programming Interface.

    The core benefit of using it is that it allows one program to interact with other programs.

    Using public APIs allows you to focus on the frontend and things that matter without worrying so much about the database and the backend.

    Below are 7 less-talked about public and free APIs.

    1. Evil Insult Generator

    How many times have you tried to insult your best friend? Now you have got a helping hand!

    As the API name suggests, the goal is to offer some of the evilest insults.

    You can create an app centered around this API or combine this API with other excellent APIs provided below like implementing the generated insults in meme templates.

    The API is extremely simple to use. You just need to visit a URL and you get the desired JSON output without even signing up for a key.

    Sample output of the API is provided below:

    {
    "number":"117",
    "language":"en",
    "insult":"Some cause happiness wherever they go; others, whenever they go.",
    "created":"2020-11-22 23:00:15",
    "shown":"45712",
    "createdby":"",
    "active":"1",
    "comment":"http:\/\/www.mirror.co.uk\/news\/weird-news\/worlds-20-most-bizarre-insults-7171396"
    }

    You get the other properties as well such as the time it was created, the language, any comment as well as the views.

    2. Movies and TV API

    TMDb is a famous API, but do you know there are other API that provides insights from specific shows and movies?

    Below are some of the APIs you can use to develop apps featuring your favorite show:

    1. Breaking Bad API
    2. API of Ice And Fire
    3. Harry Potter API
    4. YouTube API (for embedding YouTube functionalities)
    5. The Lord of the Rings API

    Like the API above, you can get started with some of the APIs without even signing up for a key.

    Not only this, using non-copyright images, you can truly create a great fan app for your beloved shows.

    Below is a sample output from the Breaking Bad API which you can get here.

    It doesn’t require a key however has a rate limit of 10,000 requests per day.

    {
    [
    {
    "quote_id":1,
    "quote":"I am not in danger, Skyler. I am the danger!",
    "author":"Walter White",
    "series":"Breaking Bad"
    },
    {
    "quote_id":2,
    "quote":"Stay out of my territory.",
    "author":"Walter White",
    "series":"Breaking Bad"
    },
    {
    "quote_id":3,
    "quote":"IFT",
    "author":"Skyler White",
    "series":"Breaking Bad"
    }
    .....
    ]
    }

    It returns a JSON containing an array of objects with quotes, the author of the quotes, and an ID.

    You can mix these dedicated APIs with YouTube API to create an ultimate app for the fans of these shows.

    3. Mapbox

    Mapbox provides precise location information and fully-fledged tools to developers.

    You get instant access to dynamic, live-updating maps which you can even further customize!

    If you have a project geared towards location and maps, this is a must-know API.

    However, it is worth mentioning that you have to sign up for free to get a unique access token.

    Using this token you can use the amazing services offered by this API.

    Not only this, you can use Mapbox with libraries such as the Leaflet.js library and create beautiful, mobile-friendly maps.

    I have discussed this and much more in my recent article covering the basics of Mapbox and Leaflet.js.Add Interactive Maps to Your WebsiteWithout using Google Maps!medium.com

    4. NASA API

    NASA provides a fabulous updated database of space-related information.

    Using this API, one can create mesmerizing and educational apps and websites.

    You get access to various different kinds of data from the Astronomy Picture of the Day all the way to the pictures captured by the Mars Rover.

    You can browse the entire list here.

    You can also retrieve NASA’s patents, software, and technology spinoff descriptions which you can use to build a patent portfolio.

    This API is really diverse and offers a wide variety of data. You can even access the NASA Image and Video library using it.

    Below is a sample query of the pictures captured by Curiosity on Mars.

    {
    "photos":[
    {
    "id":102693,
    "sol":1000,
    "camera":{
    "id":20,
    "name":"FHAZ",
    "rover_id":5,
    "full_name":"Front Hazard Avoidance Camera"
    },
    "img_src":"http://mars.jpl.nasa.gov/msl-raw-images/proj/msl/redops/ods/surface/sol/01000/opgs/edr/fcam/FLB_486265257EDR_F0481570FHAZ00323M_.JPG",
    "earth_date":"2015-05-30",
    "rover":{
    "id":5,
    "name":"Curiosity",
    "landing_date":"2012-08-06",
    "launch_date":"2011-11-26",
    "status":"active"
    }
    },
    .....
    ]
    }

    5. GIF Search

    https://cdn.embedly.com/widgets/media.html?src=https%3A%2F%2Fgiphy.com%2Fembed%2F3o7TKr2xg9OWcU8DWo%2Ftwitter%2Fiframe&display_name=Giphy&url=https%3A%2F%2Fmedia.giphy.com%2Fmedia%2F3o7TKr2xg9OWcU8DWo%2Fgiphy.gif&image=https%3A%2F%2Fi.giphy.com%2Fmedia%2F3o7TKr2xg9OWcU8DWo%2Fgiphy.gif&key=a19fcc184b9711e1b4764040d3dc5c07&type=text%2Fhtml&schema=giphySource: GIPHY

    We all love using and creating GIFs but did you know you can incorporate the GIFs in your next app for free using GIPHY?

    GIPHY is the largest GIF and sticker library in the world right now and using their official API you can leverage the vast collection to produce unique apps for free.

    Using the search endpoints, users can get the most relevant GIFs based on their query.

    You also get access to analytics and other tools which will enable you to create a personalized user experience.

    The most used feature, however, for me was the translate endpoint which converts words and phrases to the perfect GIF or Sticker. You can specify the weirdness level on a scale of 0–10.

    Note that you have to provide proper attribution by displaying “Powered By GIPHY” wherever the API is utilized.

    Below is a sample output of this API:

    {data: GIF Object[]pagination: Pagination Objectmeta: Meta Object}

    6. Favourite Quotes API

    As the name suggests, this API provides you with a thoughtful quotes collection.

    You can use these quotes to show on the landing page of your website or on the splash screen of your app to produce a rich user experience.

    You also get the ability to create and manage users and sessions via this API. However, there exists a rate limit of 30 requests in a 20-second interval per session.

    This API also has endpoints to filter, vote, list, update, and delete quotes.

    Below is the output for the Quote of the Day endpoint.

    {
    "qotd_date":"2020-11-23T00:00:00.000+00:00",
    "quote":{
    "id":29463,
    "dialogue":false,
    "private":false,
    "tags":[
    "great"
    ],
    "url":"https://favqs.com/quotes/walt-whitman/29463-the-great-cit-",
    "favorites_count":1,
    "upvotes_count":2,
    "downvotes_count":0,
    "author":"Walt Whitman",
    "author_permalink":"walt-whitman",
    "body":"The great city is that which has the greatest man or woman: if it be a few ragged huts, it is still the greatest city in the whole world."
    }
    }

    7. Edamam Nutrition and Recipe Analysis API

    Edamam generously provides access to a database of over 700,000 food items and 1.7 million+ nutritionally analyzed recipes.

    This API is great if you want to showcase your frontend skills as you can add high-quality pictures of food alongside the recipe of that food provided by this API.

    The free plan can’t be used commercially however it provides a comprehensive set of features such as Natural Language Processing support and 200 recipes per month.

    You can find the full details regarding different plans offered here.

    The users can simply type the ingredients and get the nutritional analysis which can help them eat smarter and better.

    You can check this cool feature here in the demo of this API.

    They have other APIs as well which can be used in conjunction with the rest to create a one-stop food app.

    They have added a new diet filter specifically geared towards the ongoing pandemic which leverages scientific publications about nutrients and foods to enhance immunity.

    Final Thoughts

    APIs are vital tools in the success of any app.

    Using third-party, public API allows developers to focus on things that matter while conveniently adding robust functionality to their app through these APIs.

    However, using the same API as everybody else not only creates unnecessary competition but also doesn’t provide any real value.

    Leveraging unique and flexible APIs can lead to the creation of some incredibly beautiful projects that you can showcase in your professional portfolio.

  • Laravel: Adding those missing helpers you always wanted

    One of the things I like from any PHP project is having global helpers. You know, those functions you can call anywhere and remove or save you many lines or verbosity into one, maybe two, while allocating in one place any logic.

    $expected = from($this)->do('foo');

    The problem with Laravel itself is that sometimes is not enough with the helpers it includes. The ones included are mostly quick access to Services (like cache()) or Factories (like response()), and some that help you having an expected result (like data_get).

    For example, let’s say we want a function be called multiple times but sleep between executions, like we would need to avoid rate limiting for an external API. Without a helper, we will have to resort to create a Class and put the logic inside a public static method, and hopefully remember where it is located.

    class Logics
    {
    public static function logic_sleep($times, $sleep, $callback)
    {
    // Run and sleep between calls.
    }
    }Logics::sleep(4, 10, function() {
    // ...
    });

    Using this technique makes your global not so globally. Since this is one of many thing I need in my projects, I decided to create a package with more global helpers:

    Larahelp

    Those helpers you always wanted

    The main idea of a global helper, at least to me, is to have a piece of code that offers simplicityreadability and flexibility. Think about them as small swiss knives that you may put in your pocket.

    For example, the above can become its own global function, and we can call it literally anywhere.

    public function handle()
    {
    logic_sleep(10, 5, function () {
    $this->uploadRecords();
    });
    }

    The helper is very simple to operate, but we won’t know what the hell it does behind the scenes unless we dig into the source code, which is fair. In any case, having a global function of one or two words makes the whole code more readable. And since it’s our own helper, we can call it anything we want.

    How to add your own helpers

    But that’s is only one of the many helpers I decided to create for things I use a lot.

    To add global helpers to your project, you can simply add a PHP file with the global functions you want anywhere in your project (preferably inside your PSR-4 root folder) and tell Composer to load it.

    You are free to add how many files you want. I decided to separate them into categories like I did for my package to avoid having a wall of text full of functions.

    "autoload": {
    "psr-4": {
    "App\\": "app"
    },
    "files": [
    "app/Helpers/datetime.php",
    "app/Helpers/filesystem.php",
    "app/Helpers/http.php",
    "app/Helpers/objects.php",
    "app/Helpers/services.php"
    ]
    },

    I’m opened to suggestions too, so give it a go if you think it may be useful for you:

    DarkGhostHunter/Larahelp

    Supercharge your Laravel projects with more than 35 useful global helpers.

    github.com

  • Laravel localization and multi-language functionality in web

    Laravel localization and multi-language functionality in web

    MAKE USE OF LARAVEL FEATURES AND BEST PACKAGES FOR LOCALIZATION

    Laravel localization and multi-language functionality in web

    A step by step guide to implement multi-language functionality in your web projects

    Laravel made it so easy to implement a multi-language website. You can implement it with Laravel localization and just some tricks. Also, there is plenty of Laravel translation packages which you can use in your project. In this post, I will explain how to implement multi-language functionality.

    Creating a multi-language website requires two steps. Firstly, you need to detect user local language setting and change it bu user choice. Secondly, you need to translate messages and strings into user local language, in which we use Laravel localization.

    DETECTING AND SETTING USER LOCALE

    In order to detect user language setting, we need to create a language middleware. this middleware checks for locale setting in the user session. If there was no locale setting, the middleware sets a default locale setting. Then, it sets system locale by the user session setting.

    if (is_null(session('locale'))) {
        session(['locale'=> "en"]);
    }
    app()->setLocale(session('locale'));

    Setting locale is enough for Laravel localization to work. After that, we need a simple function To change the system language. This function gets a locale string and sets the user locale session.

    public function change_lang($lang) {
        if (in_array($lang,['en','tr','fa'])) {
            session(['locale'=> $lang]);
        }
        return back();
    }

    In order to make sure the given string is a locale string, we check the language string against an array of locales.

    Any route to that function, like a drop down to select language will work perfectly and will show your website multi-language functionality for users. So they can easily choose their languages.

    Using Laravel localization to translate strings

    Every string that needed to be translated must be in Laravel lang directive or __ function. For example, you can manage all message strings with inside messages.

    @lang('messages.successful_login')

    In addition, you can find more useful information about localization like how to put variables inside translation strings in Laravel documentation.

    Laravel Langman package is one of the useful packages for translation. In order to translate strings, every time you updated views with new strings, you just need to run Langman sync command:
    php artisan langman:sync

    Laravel Langman has a lot more commands that would help you in your Laravel project localization. Reading through its documentation will add a lot.

    Although this method is easy and enough, I realized that for SEO purposes and to share localized links to your website, you better consider concatenating user locale in your projects routes. Then, you can check user locale from the query string and the rest is just as same as I explained in this post.

    Keep in touch and share your ideas about Laravel localization and how you implement multi-language functionality in your web projects. What other methods and Laravel packages do you use in your multi-language projects?

    Also, you can read my other post about Laravel authorization and user’s permission management in Laravel.

    If you find this multi-language functionality method useful in Laravel and you may want to implement this on your Laravel projects, share your ideas with me. Follow me on Twitter, Let’s connect on LinkedIn and give me a visit to amiryousefi.com

  • Laravel authorization and roles permission management

    EASY AND FLEXIBLE USERS PERMISSIONS MANAGEMENT

    Laravel authorization and roles permission management

    a simple guide for a flexible authentication and authorization

    Inmany web projects, we have different user roles interacting with the system. Each role has its own permission. Every feature of the system can be enabled or disabled for these roles. We can define users permissions in our codes and check if they are authorized to do the requested action or not. A better way, mostly in more flexible systems, is to create a role and authorization management system. I’ll explain how to implement a Laravel authorization system and define users permission based on their roles.

    In this post, firstly we manage users in groups we called roles. Every role has different permissions. In order to avoid permissions conflict, we assume each user has only one role. Secondly, Laravel authorization implemented by middleware. This middleware checks for the user’s role permission and authorizes user requests.

    CREATING ROLES AND PERMISSIONS

    In order to implement Laravel authorization, we will create roles and permissions table. To assign a role for users, we create a roles table. The migration for roles table is as simple as this:

    Schema::create(‘roles’, function (Blueprint $table) {
        $table->increments(‘id’);
        $table->string(‘name’);
        $table->string(‘description’)->nullable();
        $table->timestamps();
    });

    We have an ID and name for roles. All users will be managed in these roles. There is also a description field, because you may need a short note on roles to describe each role for yourself.

    After that, we add a foreign key, role_id, in the user table. Adding this field to the default user model helps us for Laravel authorization.

    $table->unsignedInteger(‘role_id’)->index();
    $table->foreign(‘role_id’)->references(‘id’)->on(‘roles’);

    Now let’s talk about the permissions table. Every request leads to a method of a controller. So we store a list of all methods and their controller’s name in the permissions table. Later, we explain how we gather this list and how we check users authorization in Laravel by this permissions table.

    Schema::create(‘permissions’, function (Blueprint $table) {
        $table->increments(‘id’);
        $table->string(‘name’)->nullable();
        $table->string(‘key’)->nullable();
        $table->string(‘controller’);
        $table->string(‘method’);
        $table->timestamps();
    });

    Finally, a relationship created between roles and permission.

    Schema::create(‘permission_role’, function (Blueprint $table) {
        $table->unsignedInteger(‘permission_id’);
        $table->unsignedInteger(‘role_id’);$table->foreign(‘permission_id’)
            ->references(‘id’)
            ->on(‘permissions’)
            ->onDelete(‘cascade’);$table->foreign(‘role_id’)
            ->references(‘id’)
            ->on(‘roles’)
            ->onDelete(‘cascade’);$table->primary([‘permission_id’, ‘role_id’]);
    });

    We created a complete users->roles->permissions architecture. After that, an access list will be stored in these tables. So, we can easily implement Laravel authorization by checking requests against this list.

    Read Laravel migration documentation for further information about creating tables.

    CREATING AN ACCESS LIST FOR USER PERMISSIONS

    The whole purpose of this post is about being dynamic. Especially, in systems with a different type of roles. We need to create a list of permissions in the system. Also, this list must be updated as the system developed. List of controllers and methods is a good representation of all permissions in the system. Every route is leading to a method of a controller. So, it’s a good idea to make a list of permissions using the routes list.

    In order to do that, I used a Laravel database seeder. Firstly, let’s write a role seeder. It creates basic roles we need and stores them in the roles table. Running this artisan command will create RolesSeeder for you:

    php artisan make:seeder RolesTableSeeder

    Inside this RolesTableSeeder, we create our basic roles:

    DB::table(‘roles’)->insert([
        [‘name’ => ‘admin’],
        [‘name’ => ‘operator’],
        [‘name’ => ‘customer’],
    ]);

    You can add as many roles as you need. Also, you can create new roles from your website whenever you need a new one.

    The second step is to create an authorization list for each role. we create another Laravel seeder in which populate permissions table:

    php artisan make:seeder PermissionTableSeeder

    Firstly, we get all routes list. Then, We check up with the database if the permission already stored. After that, if this permission is not in the table already, we insert new permissions in the permissions table. After all, we attach all permissions to the admin role.

    $permission_ids = []; // an empty array of stored permission IDs
    // iterate though all routes
    foreach (Route::getRoutes()->getRoutes() as $key => $route) {
        // get route action
        $action = $route->getActionname(); // separating controller and method
        $_action = explode(‘@’, $action);
    
        $controller = $_action[0];
        $method = end($_action);
    
        // check if this permission is already exists
        $permission_check = Permission::where(
            [‘controller’ => $controller, ’method’ => $method]
        )->first();
        if (!$permission_check) {
            $permission = new Permission;
            $permission->controller = $controller;
            $permission->method = $method;
            $permission->save();
    
            // add stored permission id in array
            $permission_ids[] = $permission->id;
        }
    } // find admin role.
    $admin_role = Role::where(‘name’, ’admin’)->first(); // atache all permissions to admin role
    $admin_role->permissions()->attach($permission_ids);

    LARAVEL AUTHORIZATION USING MIDDLEWARE

    Every request in Laravel goes through middleware. Knowing that creating RolesAuth middleware will do Laravel authorization. You can create the middleware manually or by an artisan command:

    php artisan make:middleware RolesAuth

    Inside this middleware, we get all permissions for logged in user. Then, we check if the requested action is in the permissions list. If requested action can’t be found in permissions list, a 403 error response returns.

    // get user role permissions
    $role = Role::findOrFail(auth()->user()->role_id);
    $permissions = $role->permissions; // get requested action
    $actionName = class_basename($request->route()->getActionname()); // check if requested action is in permissions list
    foreach ($permissions as $permission) {
        $_namespaces_chunks = explode(‘\’, $permission->controller);
        $controller = end($_namespaces_chunks);
        if ($actionName == $controller . ‘@’ . $permission->method) {
            // authorized request
            return $next($request);
        }
    } // none authorized request
    return response(‘Unauthorized Action’, 403);

    Finally, you can register this middleware in Laravel and use it according to your requirements.

    I started publishing my experience about Laravel development, here you can see my post about Laravel localization. Comment your questions about this post or any other Laravel development questions in this area.

    Update 2020:
    Now you can use my Laravel permission package build based this article. It just got better, cleaner, and easier to understand.
    https://github.com/amiryousefi/laravel-permission

  • Handling Time Zone in JavaScript

    Recently, I worked on a task of adding a time zone feature to the TOAST UI Calendar, the JavaScript calendar library managed by my team. I pretty well knew that the time zone support in JavaScript is quite poor, but hoped that abstracting existing data objects would easily resolve many problems.

    However, my hope was false, and I found it really hard to handle time zone in JavaScript as I progressed more. Implementing time zone features beyond simple formatting of time and calculating time data with complex operations (e.g. calendar) was a truly daunting task. For this reason, I had a valuable and thrilling experience of solving a problem leading to cause more problems.

    The purpose of this article is to discuss the issues and solutions related to the implementation of time zone features using JavaScript. As I was writing this rather lengthy article, I suddenly realized that the root of my problem lied in my poor understanding of the time zone domain. In this light, I will first discuss the definition and standards related to time zone in detail, and then talk about JavaScript.

    What is Time zone?

    A time zone is a region that follows a uniform local time which is legally stated by the country. It’s common for many countries to have its unique time zone, and some large countries, such as the USA or Canada, even have multiple time zones. Interestingly, even though China is large enough to have multi time zones, she uses only one time zone. This sometimes results in such an awkward situation where the sun rises around 10:00 AM in the western part of China

    GMT, UTC, and Offset

    GMT

    The Korean local time is normally GMT +09:00. GMT is an abbreviation for Greenwich Mean Time, which is the clock time at the Royal Observatory in Greenwich, U.K. located at longitude 0. The GMT system began spreading in Feb. 5, 1925 and became the world time standard until Jan. 1, 1972.

    UTC

    Many consider GMT and UTC the same thing, and the two are used interchangeably in many cases, but they are actually different. UTC was established in 1972 to compensate for the slowing problem of the Earth’s rotation. This time system is based on International Atomic Time, which uses the cesium atomic frequency to set the time standard. In other words, UTC is the more accurate replacement system of GMT. Although the actual time difference between the two is tiny, UTC is whatsoever the more accurate choice for software developers.

    When the system was still in development, anglophones wanted to name the system CUT (Coordinated Universal Time) and francophones wanted to name it TUC (Temps Universal Coordonn). However, none of the either side won the fight, so they came to an agreement of using UTC instead, as it contained all the essential letters (C, T, and U).

    Offset

    +09:00 in UTC+09:00 means the local time is 9 hours ahead than the UTC standard time. This means that it’s 09:00 PM in Korea when it’s 12:00 PM in a UTC region. The difference of time between UTC standard time and the local time is called “offset”, which is expressed in this way: +09:00-03:00, etc.

    It’s common that countries name their time zone using their own unique names. For example, the time zone of Korea is called KST (Korea Standard Time), and has a certain offset value which is expressed as KST = UTC+09:00. However, the +09:00 offset is also used by not only Korea but also Japan, Indonesia, and many others, which means the relation between offsets and time zone names are not 1:1 but 1:N. The list of countries in the +09:00 offset can be found in UTC+09:00.

    Some offsets are not strictly on hourly basis. For example, North Korea uses +08:30 as their standard time while Australia uses +08:45 or +09:30 depending on the region.

    The entire list of UTC offsets and their names can be found in List of UTC Time offsets.

    Time zone !== offset?

    As I mentioned earlier, we use the names of time zones (KST, JST) interchangeably with offset without distinguishing them. But it’s not right to treat the time and offset of a certain region the same for the following reasons:

    Summer Time (DST)

    Although this term might be unfamiliar to some countries, a lot of countries in the world adopted summer time. “Summer time” is a term mostly used in the U.K. and other European countries. Internationally, it is normally called Daylight Saving Time (DST). It means advancing clocks to one hour ahead of standard time during summer time.

    For example, California in the USA uses PST (Pacific Standard Time) during winter time and use PDT (Pacific Daylight Time, UTC-07:00) during summer time. The regions that uses the two time zones are collectively called Pacific Time (PT), and this name is adopted by many regions of the USA and Canada.

    Then the next question is exactly when the summer begins and ends. In fact, the start and end dates of DST are all different, varying country by country. For example, in the U.S.A and Canada, DST used to be from the first Sunday of April at 02:00 AM to the last Sunday of October at 12:00 AM until 2006, but since 2007, DST has begun on the second Sunday of March at 02:00 AM till the first Sunday of November at 02:00 AM. In Europe, summer time is uniformly applied across the countries, while DST is applied progressively to each time zone in the states.

    Does Time Zone Changes?

    As I briefly mentioned earlier, each country has its own right to determine which time zone to use, which means its time zone can be changed due to any political and/or economic reasons. For example, in the states, the period of DST was changed in 2007 because President George Bush signed the energy policy in 2005. Egypt and Russia used to use DST, but they ceased to use it since 2011.

    In some cases, a country can change not only its DST but also its standard time. For example, Samoa used to use the UTC-10:00 offset, but later changed to the UTC+14:00 offset to reduce the losses in trading caused by the time difference between Samoa and Australia & New Zealand. This decision caused the country to miss the whole day of Dec. 30, 2011 and it made to newspapers all over the world.

    Netherlands used to use +0:19:32.13 offset, which is unnecessarily accurate since 1909, but changed it to +00:20 offset in 1937, and then changed again to +01:00 offset in 1940, sticking to it so far.

    Time Zone 1 : Offset N

    To summarize, a time zone can have one or more offsets. Which offset a country will use as its standard time at a certain moment can vary due to political and/or economic reasons.

    This is not a big issue in everyday life, but it is when trying to systematize it based on rules. Let’s imagine that you want to set a standard time for your smartphone using an offset. If you live in a DST-applied region, your smartphone time should be adjusted whenever DST starts and ends. In this case, you would need a concept that brings standard time and DST together into one time zone (e.g. Pacific Time).

    But this cannot be implemented with just a couple of simple rules. For example, as the states changed the dates DST starts and ends in 2007, May 31, 2006 should use PDT (-07:00) as the standard time while Mar 31, 2007 should use PST (-08:00) as the standard time. This means that to refer to a specific time zone, you must know all historical data of the standard time zones or the point in time when DST rules were changed.

    You can’t simply say, “New York’s time zone is PST (-08:00).” You must be more specific by saying, for instance, “New York’s current time zone is PST.” However, we need a more accurate expression for the sake of the system implementation. Forget the word “time zone”. You need to say, “New York is currently using PST as its standard time”.

    Then what should we use other than offset to designate the time zone of a specific region? The answer is the name of the region. To be more specific, you should group regions where the changes in DST or standard time zone has been uniformly applied into one time zone and refer to it as appropriate. You might be able to use names like PT (Pacific Time), but such term only combines the current standard time and its DST, not necessarily all the historical changes. Furthermore, since PT is currently used only in the USA and Canada, you need more well established standards from trusted organizations in order to use software universally.

    IANA Time Zone Database

    To tell you the truth, time zones are more of a database rather than a collection of rules because they must contain all relevant historical changes. There are several standard database designed to handle the time zone issues, and the most frequently used one is IANA Time Zone Database. Usually called tz database (or tzdata), IANA Timezone Database contains the historical data of local standard time around the globe and DST changes. This database is organized to contain all historical data currently verifiable to ensure the accuracy of time since the Unix time (1970.01/01 00:00:00). Although it also has data before 1970, the accuracy is not guaranteed.

    The naming convention follows the Area/Location rule. Area usually refers to the name of a continent or an ocean (Asia, America, Pacific) while Location the name of major cities such as Seoul and New York rather than the name of countries (This is because the lifespan of a country is far shorter than that of a city). For example, the time zone of Korea is Asia/Seoul and that of Japan is Asia/Tokyo. Although the two countries share the same UTC+09:00, both countries have different histories regarding time zone. That is why the two countries are handled using separate time zones.

    IANA Time Zone Database is managed by numerous communities of developers and historians. Newly found historical facts and governmental policies are updated right away to the database, making it the most reliable source. Furthermore, many UNIX-based OSs, including Linux and macOS, and popular programming languages, including Java and PHP, internally use this database.

    Note that Windows is not in the above support list. It’s because Windows uses its own database called Microsoft Time Zone Database. However, this database does not accurately reflect historical changes and managed only by Microsoft. Therefore, it is less accurate and reliable than IANA.

    JavaScript and IANA Time Zone Database

    As I briefly mentioned earlier, the time zone feature of JavaScript is quite poor. Since it follows the time zone of the region by default (to be more specific, the time zone selected at the time of the OS installation), there is no way to change it to a new time zone. Also, its specifications for database standard are not even clear, which you will notice if you take a close look at the specification for ES2015. Only a couple of vague declarations are stated regarding local time zone and DST availability. For instance, DST is defined as follows: ECMAScript 2015 — Daylight Saving Time Adjustment

    An implementation dependent algorithm using best available information on time zones to determine the local daylight saving time adjustment DaylightSavingTA(t), measured in milliseconds. An implementation of ECMAScript is expected to make its best effort to determine the local daylight saving time adjustment.

    It looks like it is simply saying, “Hey, guys, give it a try and do your best to make it work.” This leaves a compatibility problem across browser vendors as well. You might think “That’s sloppy!”, but then you will notice another line right below:

    NOTE : It is recommended that implementations use the time zone information of the IANA Time Zone Database http://www.iana.org/time-zones/.

    Yes. The ECMA specifications toss the ball to you with this simple recommendation for IANA Time Zone Database, and JavaScript has no specific standard database prepared for you. As a result, different browsers use their own time zone operations for time zone calculation, and they are often not compatible with one another. ECMA specifications later added an option to use IANA time zone in ECMA-402 Intl.DateTimeFormat for international API. However, this option is still far less reliable than that for other programming languages.

    Time Zone in Server-Client Environment

    We will assume a simple scenario in which time zone must be considered. Let’s say we’re going to develop a simple calendar app that will handle time information. When a user enters date and time in the field on the register page in the client environment, the data is transferred to the server and stored in the DB. Then the client receives the registered schedule data from the server to displays it on screen.

    There is something to consider here though. What if some of the clients accessing the server are in different time zones? A schedule registered for Mar 11, 2017 11:30 AM in Seoul must be displayed as Mar 10, 2017 09:30 PM when the schedule is looked up in New York. For the server to support clients from various time zones, the schedule stored in the server must have absolute values that are not affected by time zones. Each server has a different way to store absolute values, and that is out of the scope of this article since it is all different depending on the server or database environment. However for this to work, the date and time transferred from the client to the server must be values based on the same offset (usually UTC) or values that also include the time zone data of the client environment.

    It’s a common practice that this kind of data is transferred in the form of Unix time based on UTC or ISO-8601 containing the offset information. In the example above, if 11:30 AM on Mar 11, 2017 in Seoul is to be converted into Unix time, it will be an integer type of which value is 1489199400. Under ISO-8601, it will be a string type of which value is 2017–03–11T11:30:00+09:00.

    If you’re working with this using JavaScript in a browser environment, you must convert the entered value as described above and then convert it back to fit the user’s time zone. The both of these two tasks have to be considered. In the sense of programming language, the former is called “parsing” and the latter “formatting”. Now let’s find out how these are handled in JavaScript.

    Even when you’re working with JavaScript in a server environment using Node.js, you might have to parse the data retrieved from the client depending on the case. However since servers normally have their time zone synced to the database and the task of formatting is usually left to clients, you have fewer factors to consider than in a browser environment. In this article, my explanation will be based on the browser environment.

    Date Object in JavaScript

    In JavaScript, tasks involving date or time are handled using a Date object. It is a native object defined in ECMAScript, like Array or Function. which is mostly implemented in native code such as C++. Its API is well described in MDN Documents. It is greatly influenced by Java’s java.util.Date class. As a result, it inherits some undesirable traits, such as the characteristics of mutable data and month beginning with 0.

    JavaScript’s Date object internally manages time data using absolute values, such as Unix time. However, constructors and methods such as parse() function, getHour()setHour(), etc. are affected by the client’s local time zone (the time zone of the OS running the browser, to be exact). Therefore, if you create a Date object directly using user input data, the data will directly reflect the client’s local time zone.

    As I mentioned earlier, JavaScript does not provide any arbitrary way to change time zone. Therefore, I will assume a situation here where the time zone setting of the browser can be directly used.

    Creating Date Object with User Input

    Let’s go back to the first example. Assume that a user entered 11:30 AM, Mar 11, 2017 in a device which follows the time zone of Seoul. This data is stored in 5 integers of 2017, 2, 11, 11, and 30 — each representing the year, month, day, hour, and minute, respectively. (Since the month begins with 0, the value must be 3–1=2.) With a constructor, you can easily create a Date object using the numeric values.

    const d1 = new Date(2017, 2, 11, 11, 30);
    d1.toString(); // Sat Mar 11 2017 11:30:00 GMT+0900 (KST)

    If you look at the value returned by d1.toString(), then you will know that the created object’s absolute value is 11:30 AM, Mar 11, 2017 based on the offset +09:00 (KST).

    You can also use the constructor together with string data. If you use a string value to the Date object, it internally calls Date.parse() and calculate the proper value. This function supports the RFC2888 specifications and the ISO-8601 specifications. However, as described in the MDN’s Date.parse() Document, the return value of this method varies from browser to browser, and the format of the string type can affect the prediction of exact value. Thus, it is recommended not to use this method.

    For example, a string like 2015–10–12 12:00:00 returns NaN on Safari and Internet Explorer while the same string returns the local time zone on Chrome and Firefox. In some cases, it returns the value based on the UTC standard.

    Creating Date Object Using Server Data

    Let’s now assume that you are going to receive data from the server. If the data is of the numerical Unix time value, you can simply use the constructor to create a Date object. Although I skipped the explanation earlier, when a Date constructor receives a single value as the only parameter, it is recognized as a Unix time value in millisecond. (Caution: JavaScript handles Unix time in milliseconds. This means that the second value must be multiplied by 1,000.) If you see the example below, the resultant value is the same as that of the previous example.

    const d1 = new Date(1489199400000);
    d1.toString(); // Sat Mar 11 2017 11:30:00 GMT+0900 (KST)

    Then what if a string type such as ISO-8601 is used instead of the Unix time? As I explained in the previous paragraph, the Date.parse() method is unreliable and better not be used. However since ECMAScript 5 or later versions specify the support of ISO-8601, you can use strings in the format specified by ISO-8601 for the Date constructor on Internet Explorer 9.0 or higher that supports ECMAScript 5 if carefully used.
    If you’re using a browser of not the latest version, make sure to keep the Z letter at the end. Without it, your old browser sometimes interprets it based on your local time instead of UTC. Below is an example of running it on Internet Explorer 10.

    const d1 = new Date('2017-03-11T11:30:00');
    const d2 = new Date('2017-03-11T11:30:00Z');
    d1.toString(); // "Sat Mar 11 11:30:00 UTC+0900 2017"
    d2.toString(); // "Sat Mar 11 20:30:00 UTC+0900 2017"

    According to the specifications, the resultant values of both cases should be the same. However, as you can see, the resultant values are different as d1.toString() and d2.toString(). On the latest browser, these two values will be the same. To prevent this kind of version problem, you should always add Z at the end of a string if there is no time zone data.

    Creating Data to be Transferred to Server

    Now use the Date object created earlier, and you can freely add or subtract time based on local time zones. But don’t forget to convert your data back to the previous format at the end of the processing before transferring it back to the server.

    If it’s Unix time, you can simply use the getTime() method to perform this. (Note the use of millisecond.)

    const d1 = new Date(2017, 2, 11, 11, 30);
    d1.getTime(); // 1489199400000

    What about strings of the ISO-8601 format? As explained earlier, Internet Explorer 9.0 or higher that supports ECMAScript 5 or higher supports the ISO-8601 format. You can create strings of the ISO-8601 format using the toISOString() or toJSON() method. (toJSON() can be used for recursive calls with JSON.stringify() or others.) The two methods yield the same results, except for the case in which it handles invalid data.

    const d1 = new Date(2017, 2, 11, 11, 30);
    d1.toISOString(); // "2017-03-11T02:30:00.000Z"
    d1.toJSON(); // "2017-03-11T02:30:00.000Z"

    const d2 = new Date('Hello');
    d2.toISOString(); // Error: Invalid Date
    d2.toJSON(); // null

    You can also use the toGMTString() or toUTCString() method to create strings in UTC. As they return a string that satisfies the RFC-1123 standard, you can leverage this as needed.

    Date objects include toString()toLocaleString(), and their extension methods. However, since these are mainly used to return a string based on local time zone, and they return varying values depending on your browser and OS used, they are not really useful.

    Changing Local Time Zone

    You can see now that JavaScript provides a bit of support for time zone. What if you want to change the local time zone setting within your application without following the time zone setting of your OS? Or what if you need to display a variety of time zones at the same time in a single application? Like I said several times, JavaScript does not allow manual change of local time zone. The only solution to this is adding or removing the value of the offset from the date provided that you already know the value of the time zone’s offset. Don’t get frustrated yet though. Let’s see if there is any solution to circumvent this.

    Let’s continue with the earlier example, assuming that the browser’s time zone is set to Seoul. The user enters 11:30 AM, Mar 11, 2017 based on the Seoul time and wants to see it in New York’s local time. The server transfers the Unix time data in milliseconds and notifies that New York’s offset value is -05:00. Then you can convert the data if you only know the offset of the local time zone.

    In this scenario, you can use the getTimeZoneOffset() method. This method is the only API in JavaScript that can be used to get the local time zone information. It returns the offset value of the current time zone in minutes.

    const seoul = new Date(1489199400000);
    seoul.getTimeZoneOffset(); // -540

    The return value of -540 means that the time zone is 540 minutes ahead of the target. Be warned that the minus sign in front of the value is opposite to Seoul’s plus sign (+09:00). I don’t know why, but this is how it is displayed. If we calculate the offset of New York using this method, we will get 60 * 5 = 300. Convert the difference of 840 into milliseconds and create a new Date object. Then you can use that object’s getXX methods to convert the value into a format of your choice. Let’s create a simple formatter function to compare the results.

    function formatDate(date) {
    return date.getFullYear() + '/' +
    (date.getMonth() + 1) + '/' +
    date.getDate() + ' ' +
    date.getHours() + ':' +
    date.getMinutes();
    }

    const seoul = new Date(1489199400000);
    const ny = new Date(1489199400000 - (840 * 60 * 1000));

    formatDate(seoul); // 2017/3/11 11:30
    formatDate(ny); // 2017/3/10 21:30

    formatDate() shows the correct date and time according to the time zone difference between Seoul and New York. It looks like we found a simple solution. Then can we convert it to the local time zone if we know the region’s offset? Unfortunately, the answer is “No.” Remember what I said earlier? That time zone data is a kind of database containing the history of all offset changes? To get the correct time zone value, you must know the value of the offset at the time of the date (not of the current date).

    Problem of Converting Local Time Zone

    If you keep working with the example above a little more, you will soon face with a problem. The user wants to check the time in New York local time and then change the date from 10th to 15th. If you use the setDate() method of Date object, you can change the date while leaving other values unchanged.

    ny.setDate(15);
    formatDate(ny); // 2017/3/15 21:30

    It looks simple enough, but there is a hidden trap here. What would you do if you have to transfer this data back to the server? Since the data has been changed, you can’t use methods such as getTime() or getISOString(). Therefore, you must revert the conversion before sending it back to the server.

    const time = ny.getTime() + (840 * 60 * 1000);  // 1489631400000

    Some of you may wonder why I added using the converted data when I have to convert it back anyway before returning. It looks like I can just process it without conversion and temporarily create a converted Date object only when I’m formatting. However, it is not what it seems. If you change the date of a Date object based on Seoul time from 11th to 15th, 4 days are added (24 * 4 * 60 * 60 * 1000). However, in New York local time, as the date has been changed from 10th to 15th, resultantly 5 days have been added (24* 5 * 60 * 60 * 1000). This means that you must calculate dates based on the local offset to get the precise result.

    The problem doesn’t stop here. There is another problem waiting where you won’t get wanted value by simply adding or subtracting offsets. Since Mar 12 is the starting date of DST in New York’s local time, the offset of Mar 15, 2017 should be -04:00 not -05:00. So when you revert the conversion, you should add 780 minutes, which is 60 minutes less than before.

    const time = ny.getTime() + (780 * 60 * 1000);  // 1489627800000

    On the contrary, if the user’s local time zone is New York and wants to know the time in Seoul, DST is applied unnecessarily, causing another problem.

    Simply put, you can’t use the obtained offset alone to perform the precise operations based on the time zone of your choice. If you recollect what we have discussed in the earlier part of this document, you would easily know that there is still a hole in this conversion if you know the summer time rules. To get the exact value, you need a database that contains the entire history of offset changes, such as IANA timezone Database.

    To solve this problem, one must store the entire time zone database and whenever date or time data is retrieved from the Date object, find the date and the corresponding offset, and then convert the value using the process above. In theory, this is possible. But in reality, this takes too much effort and testing the converted data’s integrity will also be tough. But don’t get disappointed yet. Until now, we discussed some problems of JavaScript and how to solve them. Now we’re ready to use a well built library.

    Moment Timezone

    Moment is a well established JavaScript library that is almost the standard for processing date. Providing a variety of date and formatting APIs, it is recognized by so many users recently as stable and reliable. And there is Moment Timezone, an extension module, that solves all the problems discussed above. This extension module contains the data of IANA Time Zone Database to accurately calculate offsets, and provides a variety of APIs that can be used to change and format time zone.

    In this article, I won’t discuss how to use library or the structure of library in details. I will just show you how simple it is to solve the problems I’ve discussed earlier. If anyone is interested, see Moment Timezone’s Document.

    Let’s solve the problem shown in the picture by using Moment Timezone.

    const seoul = moment(1489199400000).tz('Asia/Seoul');
    const ny = moment(1489199400000).tz('America/New_York');

    seoul.format(); // 2017-03-11T11:30:00+09:00
    ny.format(); // 2017-03-10T21:30:00-05:00

    seoul.date(15).format(); // 2017-03-15T11:30:00+09:00
    ny.date(15).format(); // 2017-03-15T21:30:00-04:00

    If you see the result, the offset of seoul stays the same while the offset of ny has been changed from -05:00 to -04:00. And if you use the format() function, you can get a string in the ISO-8601 format that accurately applied the offset. You will see how simple it is compared to what I explained earlier.

    Conclusion

    So far, we’ve discussed the time zone APIs supported by JavaScript and their issues. If you don’t need to manually change your local time zone, you can implement the necessary features even with basic APIs provided that you’re using Internet Explorer 9 or higher. However, if you need to manually change the local time zone, things get very complicated. In a region where there is no summer time and time zone policy hardly changes, you can partially implement it using getTimezoneOffset() to convert the data. But if you want full time zone support, do not implement it from scratch. Rather use a library like Moment Timezone.

    I tried to implement time zone myself, but I failed, which is not so surprising. The conclusion here after multiple failures is that it is better to “use a library.” When I first began writing this article, I didn’t know what conclusion I was going to write about, but here we go. As a conclusion, I would say that it’s not a recommended approach to blindly use external libraries without knowing what features they support in JavaScript and what kind of issues they have. As always, it’s important to choose the right tool for your own situation. I hope this article helped you in determining the right decision of your own.

    References