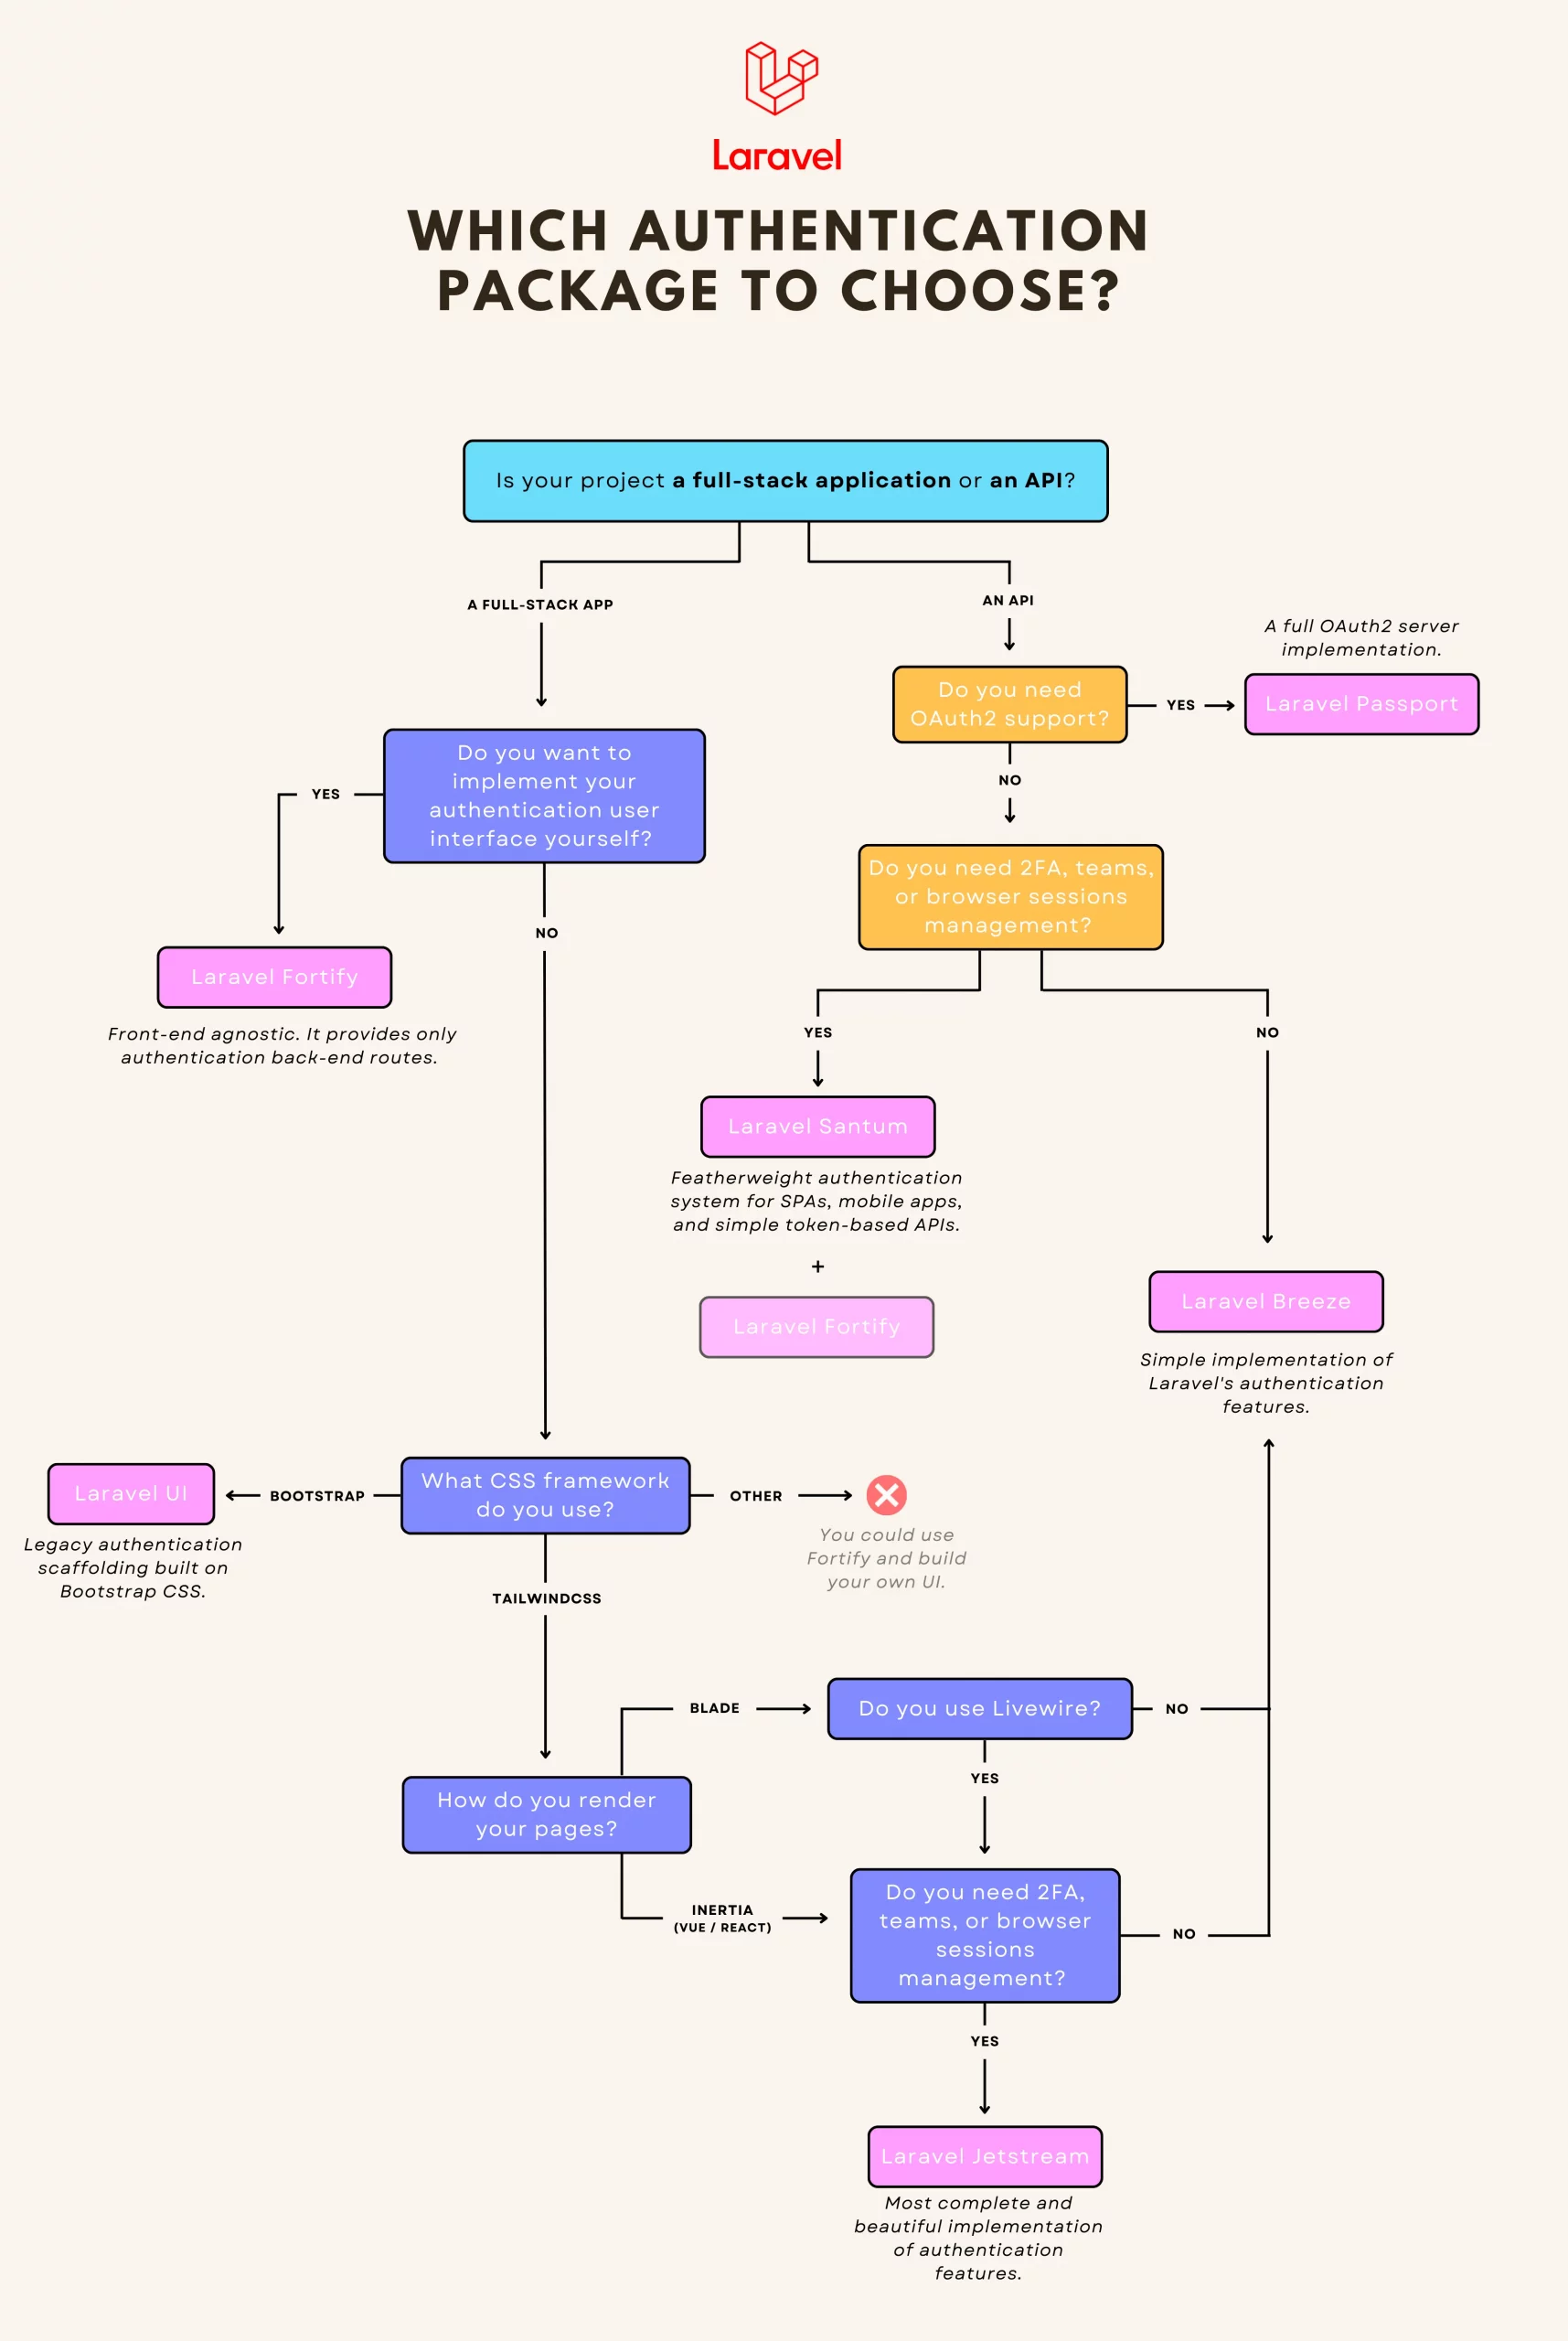
At its core, Laravel provides “guards” and “providers” to manage authentication. However, controllers, routes, and views still need to be implemented.
To achieve this, Laravel offers first-party packages that offer a complete authentication system, ready to use in just a few minutes. This is unique and the strength of Laravel: in no time, you can start developing your ideas.
However, multiple packages are related to authentication, and it can be challenging to know which one is adequate for your project.
Should you use Laravel Jetstream or Laravel Breeze? What are the differences between Laravel Passport and Laravel Sanctum? Is Laravel UI still an option?
To help you find your way around, I have made a diagram to help you understand their differences and make the best choice for your project.
Which Laravel authentication package to install for your project?
Laravel Breeze
Breeze is a minimal and simple implementation of Laravel’s authentication features. It works both for full-stack applications and APIs. This is an excellent choice if you like simplicity or are brand new to Laravel.
You can choose between Blade, Vue/React (with Inertia), or API
It uses Tailwind CSS when Blade or Inertia stacks are chosen
✅ Registration
✅ Login
✅ Profile Management
✅ Password Reset
✅ Email Verification
Laravel Jetstream
More complete and stylish, Jetstream is an interesting alternative to Breeze. It provides more features but requires that your project uses Livewire or Inertia.
You can choose between Blade + Livewire or Vue/React + Inertia
It uses Tailwind CSS
✅ Registration
✅ Login
✅ Profile Management
✅ Password Reset
✅ Email Verification
✅ Two-Factor Authentication (2FA)
✅ Teams Management
✅ Browser Sessions Management (let users see where they’re logged-in)
✅ API Tokens & Permissions (let users generate API tokens)
Laravel Fortify
Fortify is a front-end agnostic implementation of all authentication features. It provides all routes and controllers needed to implement your authentication logic but requires you to code the user interface yourself. There are no views out of the box!
This is a great choice if you don’t use Tailwind CSS, want to code your front end yourself, or are building an API.
❌ No views, no user interface
✅ Registration
✅ Login
✅ Profile Management
✅ Password Reset
✅ Email Verification
✅ Two-Factor Authentication (2FA)
✅ Teams Management
✅ Browser Sessions Management (let users see where they’re connected and logout sessions)
✅ API Tokens & Permissions (let users generate API tokens)
For info, Jetstream uses Fortify under the hood and adds the UI layer.
Laravel UI
Laravel UI is the legacy scaffolding and brings a basic authentication system built on the Bootstrap CSS framework. Today, the only reason to install it is that your project uses Bootstrap CSS.
You can choose between simple HTML, Vue, or React
✅ Registration
✅ Login
✅ Password Reset
✅ Email Verification
Laravel Passport
Passport provides a full OAuth2 server implementation
Laravel Sanctum
Sanctum offers a simple way to authenticate SPAs or mobile applications that need to communicate with your Laravel-powered API. If you don’t need full OAuth2 support, this is a much simpler alternative to Passport.
✅ Middleware to authenticate your SPA (using cookie-based sessions)
✅ Middleware to authenticate clients using API tokens
✅ API tokens generation & permissions
❌ No authentication routes or controllers
Using Sanctum, you still have to implement your own authentication logic (creating your routes and controllers) or use it in combination with Fortify.
If you use it to authenticate a SPA, it needs to be hosted on the same root domain as your API since it uses cookie-based sessions.
I hope that all the authentication packages and starter kits of Laravel have no more secrets for you and that this article has made your choice easier if you were hesitating between them.
👋 I offer tech consulting services for companies that need help with their Laravel applications. I can assist with upgrades, refactoring, testing, new features, or building new apps. Feel free to contact me through LinkedIn, or you can find my email on my GitHub profile.
The wonderful world of Whois!, if you do not know what it is or what it is for, this is probably not the publication for you. But if you know what I’m talking about, then you’re going to be excited to know that you can stop using third-party services to check this information, with a little effort and love for programming you can create your own service! (I’m trying to add excitement to a query for information that, as necessary as it is, is quite common.)
Come on!, join me again to walk the yellow brick path… a path full of wonders!.
What is Whois?
Whois is a public service that allows you to check who owns a domain, its status, expiration dates, renewal and other information of interest.
You can use a Whois query to determine if a domain is available for purchase, for example. (Warning: Your mileage may vary, whois is generally quite reliable but can produce results you don’t expect), use it with caution.
Where can you find the Whois servers of a TLD?
IANA (the entity in charge of regulating the allocation of IP addresses and root DNS for address resolution) has a list at the following link:
Root Zone Database
The Root Zone Database represents the delegation details of top-level domains, including gTLDs such as .com, and… www.iana.org
This list will help us later to scrape and extract information necessary for our PHP Whois query script.
Warning: Scraping itself is not bad, but misused it ruins everyone’s party, always be very responsible and respectful regarding the information you grab using this technique.
Structure of our solution
Our directory and solution files will be as follows:
/whois           # root directory (your web server must have access to it)
  /cache         # This directory will store json files that contain the whois
                 # server address for a given TLD, these files will be used to catch
                 # the scraping process results.
  - index.html   # This file will be our entry point and GUI interface to query
                 # whois information.
  - getwhois.php # This script will receive the whois request from index.html
                 # and return the result.
  - Whois.php    # Our class definition with all attributes and methods used
                 # to query whois information.
Remember that you must have a web development environment with PHP or at least that you can execute php scripts through a command console. This time we will use PHP 8.2 on an Apache web server.
We will write our code based on three large blocks as follows:
Scraping
Whois request/query
Interface and result presentation
1. Scraping
Let’s do some scraping to extract the Whois server from each domain type (TLD) available in https://www.iana.org/domains/root/db. We will do it “on demand”, we will only scrape as necessary, that is, when we do not have a previous cache file for the TLD, this way we will reduce traffic, respect the site where the information comes from and reduce response times while querying.
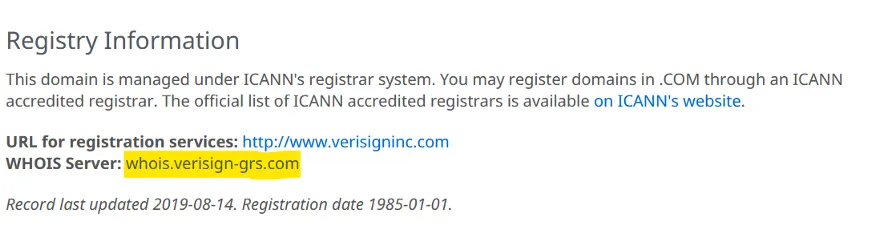
For example, we will visit the information of the TLD “.com”, the URL is https://www.iana.org/domains/root/db/com.html, general contact information will be shown and, at the bottom, the Whois server for this type of domains, like this:
iana.org whois
The address next to the text “WHOIS Server” will be the data of interest for our scrape process.
The first step will be to make a request to the website containing the required information and capture the HTML of the response. We can do this with our dear friend cURL like this:
    /**
     * This function downloads HTML content from a URL
     *
     * @param string $url URL to be queried
     *
     * @return string|bool HTML received in response from the website
     * if an error occurs it will return false
     */
    function curlDownload(string $url): string|bool
    {

        $curl = curl_init();

        curl_setopt($curl, CURLOPT_SSL_VERIFYHOST, 0);
        curl_setopt($curl, CURLOPT_SSL_VERIFYPEER, 0);
        curl_setopt($curl, CURLOPT_RETURNTRANSFER, true);
        curl_setopt($curl, CURLOPT_CONNECTTIMEOUT, 60);
        curl_setopt($curl, CURLOPT_HEADER, 0);
        curl_setopt($curl, CURLOPT_CUSTOMREQUEST, "GET");
        curl_setopt($curl, CURLOPT_USERAGENT, "Mozilla/5.0 (Macintosh; Intel Mac OS X 10_11_0) AppleWebKit/537.36 (KHTML, like Gecko) Chrome/74.0.3729.169 Safari/537.36");
        curl_setopt($curl, CURLOPT_URL, $url);

        $html = curl_exec($curl);
        curl_close($curl);

        return $html;
    }
In the User-Agent header, we set a value that simulates a visit from a desktop browser.
Now that we have got the content of the site, it is necessary to extract from the HTML received the address of the whois server, this can be done with a very useful tool, a tool that generates panic or immense hatred in the depths of the brave ones that dare to look it straight into its eyes, regular expressions.
No matter how you feel about it, always try to remember “Macho man” Randy Savage wise words:
You may not like it, but accept it! — “Macho Man” Randy Savage wisdom
We are going to review the content and create the regular expression, keep in mind that we are not going to cover in detail how it works, we will cover what is important, that it works for our present objective.
Let’s look at the source code of the page where the name of the whois server is located. The section we are interested in has this structure:
This expression looks for the text between the text pattern “<b>WHOIS Server:</b>” and the first match with the text “<p>”, using PHP we can capture the returned value and save it in a variable to use it later in our whois query.
Our sample code to understand this concept will look like this:
//Array that will be used to store the regex results.
$matchesWhois = array();

//Now we use our HTML download function created previously.
$html = curlDownload("https://www.iana.org/domains/root/db/com.html");
//Use the regex expression to extract the whois server from the HTML.
$resWhois = preg_match("#(?s)(?<=\<b\>WHOIS Server\:\<\/b\>)(.+?)(?=\<\/p\>)#", $html, $matchesWhois, PREG_OFFSET_CAPTURE);

//Now we remove the blank spaces from the result text, stored at the [0][0]
//element in the array
$matchesWhois[0][0] = trim($matchesWhois[0][0]);

//Finally assignt the whois server name to a variable.
$whoisServer = $matchesWhois[0][0];
2. Whois request/query
We already managed to query the name of the server to which we will request the whois information, now we need to implement the code to perform the query, for this we open a connection through sockets and send the domain name to receive a response with the whois data, like this:
//Open a connection to the whois server on port 43 with 20 seconds timeout limit.
$whoisSock = @fsockopen("whois.verisign-grs.com", 43, $errno, $errstr, 20);
//This variable will be used to store the whois result.
$whoisQueryResult = "";

//Send the domain name ending with new line.
fputs($whoisSock, "mytestdomain.com" . "\r\n");

$content = "";

//Read the server response.
while (!feof($whoisSock)) {
    $content .= fgets($whoisSock);
}

//Close the socket.
fclose($whoisSock);

//Convert the string to an array (one element for each line on the string)
$arrResponseLines = explode("\n", $content);

foreach ($arrResponseLines as $line) {

    $line = trim($line);

    //ignore if the line is empty or if it begins with "#" or "%"
    if (($line != '') && (!str_starts_with($line, '#')) && (!str_starts_with($line, '%'))) {
        //Append the line to the result variable.
        $whoisQueryResult .= $line . PHP_EOL;
    }
}

//Show the result.
echo $whoisQueryResult;
Now that we have the result, we will generate the code to query and display the result on the web.
3. Interface and result presentation
To query and show results we will create the Whois class that integrates the concepts previously shown, a file to receive query requests and the web interface to display the results.
Let’s start with our class, we will call it Whois.php and it has the following structure:
<?php

class Whois
{
    //Regex matches
    private array $matchesWhois;
    //Cache files path
    private string $_CACHE_PATH;
    //Regex used to detect the whois server while scraping the TLD URL
    private string $regexWhoisServer;
    //Cache files extension (.json)
    private string $_FILE_EXT;
    //Flag, True = using cache file, False = scraped result
    private bool $usingCache;
    //Domain name to being used to query the whois info.
    private string $domain;
    //Domain TLD
    private string $tld;
    //Cache file name
    private string $cacheFile;
    //URL used to scrape the whois server to be used.
    private string $urlWhoisDB;
    //Array that will contain the answer and errors generated during the whois query
    private array $response;
    //Array, contains the whois server address
    private array $whoisInfo;
    //Tag to be replaced by the domain TLD extracted from the domain name.
    private string $tldUrlTag;
    //Whois port, default 43
    private int $_WHOIS_PORT;
    //Whois query timeout in seconds, default 20
    private int $_WHOIS_TIMEOUT;
    //User Agent to be used to scrape the whois server info.
    private string $_CURL_USER_AGENT;


    /**
     * Class constructor
     */
    public function __construct()
    {
        $this->matchesWhois = array();
        $this->whoisInfo = array();
        $this->_CACHE_PATH = __DIR__ . "/cache/";
        $this->regexWhoisServer = '#(?s)(?<=\<b\>WHOIS Server\:\<\/b\>)(.+?)(?=\<\/p\>)#';
        $this->_FILE_EXT = ".json";
        $this->usingCache = false;
        $this->domain = "";
        $this->tld = "";
        $this->cacheFile = "";
        $this->tldUrlTag = "[TLD]";
        $this->urlWhoisDB = "https://www.iana.org/domains/root/db/{$this->tldUrlTag}.html";
        $this->response = array();
        $this->_WHOIS_PORT = 43;
        $this->_WHOIS_TIMEOUT = 20;
        $this->_CURL_USER_AGENT = "Mozilla/5.0 (Macintosh; Intel Mac OS X 10_11_0) AppleWebKit/537.36 (KHTML, like Gecko) Chrome/74.0.3729.169 Safari/537.36";
    }


    /**
     * Domain validation
     *
     * @param string $domain domain name to be validated i.e. "google.com"
     *
     * @return bool
     */
    public function isDomain(string $domain): bool
    {
        return filter_var($domain, FILTER_VALIDATE_DOMAIN);
    }


    /**
     * Extracts the TLD from the domain name
     *
     * @param mixed $domain domain name
     *
     * @return string
     */
    private function extractTld($domain): string
    {
        $arrDomain = explode(".", $domain);

        return end($arrDomain);
    }

    /**
     * Sets the cache filename for a given TLD, it also checks if the file exists and loads its content
     *
     * @param mixed $tld domain (TLD), i.e. "com", "net", "org".
     *
     * @return void
     */
    private function setCacheFileName($tld): void
    {
        $this->cacheFile = $this->_CACHE_PATH . $tld . $this->_FILE_EXT;

        if (file_exists($this->cacheFile)) {

            $tmpCache = file_get_contents($this->cacheFile);
            $this->whoisInfo = json_decode($tmpCache, true);

            $this->usingCache = true;
        }
    }

    /**
     * This function can be used to check if there where errors during the process
     *
     * @return bool true = there are errors, false = no errors
     */
    public function hasErrors(): bool
    {
        return isset($this->response["errors"]);
    }

    /**
     * Returns the response received including erros (if any).
     * @param bool $json Allows to select the response format, false = array, true = json
     *
     * @return array|string
     */
    public function getResponse(bool $json = false): array|string
    {
        return ($json) ? json_encode($this->response) : $this->response;
    }

    /**
     * This function downloads and returns the HTML returned from a URL
     *
     * @param string $url URL adddress
     *
     * @return string|bool string containing the HTML received, if there is an error return false.
     */
    private function curlDownload(string $url): string|bool
    {

        $curl = curl_init();

        curl_setopt($curl, CURLOPT_SSL_VERIFYHOST, 0);
        curl_setopt($curl, CURLOPT_SSL_VERIFYPEER, 0);
        curl_setopt($curl, CURLOPT_RETURNTRANSFER, true);
        curl_setopt($curl, CURLOPT_CONNECTTIMEOUT, 60);
        curl_setopt($curl, CURLOPT_HEADER, 0);
        curl_setopt($curl, CURLOPT_CUSTOMREQUEST, "GET");
        curl_setopt($curl, CURLOPT_USERAGENT, $this->_CURL_USER_AGENT);
        curl_setopt($curl, CURLOPT_URL, $url);

        $html = curl_exec($curl);
        curl_close($curl);

        return $html;
    }

    /**
     * Whois query entry point.
     *
     * @param string $domain domain name for which you want to check the whois
     *
     * @return void
     */
    public function getWhoisServerDetails(string $domain): void
    {

        $this->domain = $domain;
        $this->tld = $this->extractTld($domain);
        $this->setCacheFileName($this->tld);

        if (!$this->usingCache) {

            $urlWhoisDB = str_replace($this->tldUrlTag, $this->tld, $this->urlWhoisDB);
            $html = $this->curlDownload($urlWhoisDB);

            $resWhois = preg_match($this->regexWhoisServer, $html, $this->matchesWhois, PREG_OFFSET_CAPTURE);

            if ($resWhois != 1) {

                $this->response["errors"][] = array(
                    "error" => "TLD '{$this->tld}' not found!",
                    "domain" => $domain
                );

                return;
            }

            $this->matchesWhois[0][0] = trim($this->matchesWhois[0][0]);
            $this->whoisInfo["whois"] = $this->matchesWhois[0][0];

            file_put_contents($this->_CACHE_PATH . $this->tld . $this->_FILE_EXT, json_encode($this->whoisInfo, JSON_UNESCAPED_UNICODE));
        }

        if (!isset($this->whoisInfo["whois"])) {

            $this->response["errors"][] = array(
                "error" => "WhoIs Server for TLD {$this->tld} not found!.",
                "domain" => $domain
            );

            return;
        }

        $whoisSock = @fsockopen($this->whoisInfo["whois"], $this->_WHOIS_PORT, $errno, $errstr, $this->_WHOIS_TIMEOUT);
        $whoisQueryResult = "";

        if (!$whoisSock) {

            $this->response["errors"][] = array(
                "error" => "{$errstr} ({$errno})",
                "domain" => $domain
            );

            return;
        }

        fputs($whoisSock, $this->domain . "\r\n");

        $content = "";

        while (!feof($whoisSock)) {
            $content .= fgets($whoisSock);
        }

        fclose($whoisSock);

        if ((strpos(strtolower($content), "error") === false) && (strpos(strtolower($content), "not allocated") === false)) {

            $arrResponseLines = explode("\n", $content);

            foreach ($arrResponseLines as $line) {

                $line = trim($line);

                if (($line != '') && (!str_starts_with($line, '#')) && (!str_starts_with($line, '%'))) {
                    $whoisQueryResult .= $line . PHP_EOL;
                }
            }
        }

        $this->response["whoisinfo"] = $whoisQueryResult;
    }
}
In this class we will have all the main functions for scrape, whois server name extraction, domain name processing and final whois query. Note that error checking and handling routines were added, as well as functions to automate scraping from the domain type (TLD) queried and cache strategy to avoid making more queries than necessary to iana.org.
Now let’s create our file that will receive query requests, call it getwhois.php and it will have the following content:
<?php

//Include the class definition.
require("Whois.php");

//Decode the parameters received.
$paramsFetch = json_decode(
    file_get_contents("php://input"),
    true
);

//Create our whois object
$whoisObj = new Whois();
//Query the whois information
$whoisObj->getWhoisServerDetails($paramsFetch["domain"]);

//Return the response as JSON
echo $whoisObj->getResponse(true);
exit;
It is quite simple, it includes our Whois.php class, captures the parameters received from an HTML form that uses the javascript fetch function to send the request with the domain name, creates an instance of our class and makes the whois information query, then returns the result in JSON format and finishes the execution.
Now let’s go to the index.html file, this will be our graphical interface and the access point to the query and visualization of results. I use Bulma CSS for html controls an styling, it’s pretty straightforward, not intrusive, and you can generate results quickly. The file will look like this:
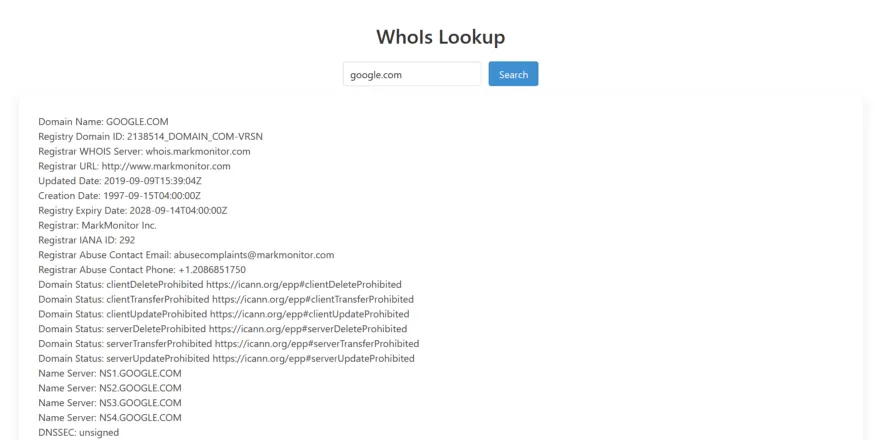
To perform tests it is only necessary point your browser to the path where our scripts are located, in my case http://localhost/whois, it will show the field to write the domain name and the “Search” button to request the Whois information. You can try a popular domain like “google.com”, the result will look like this:
After a successful whois query you will notice that in the /cache directory, a file will be created with the TLD, for example “com.json” and will contain the name of the corresponding whois server, this will allow us to avoid scraping again.
And that’s all, never forget that the one who is brave is really free, drink plenty of water, exercise and get enough sleep.
At Winkhosting.co we are much more than hosting. If you need shared hosting, domains or servers, stop by to visit us.
In the last part, we completed the Laravel Breeze API installation and validated the API using the Breeze Next front end.
In this blog, we going to test the API using the Postman application.
About Postman
Postman is software used to test the API by sending and receiving the request with multiple data formats along with auth.
Postman is an API platform for building and using APIs. Postman simplifies each step of the API lifecycle and streamlines collaboration so you can create better APIs — faster.
Install Postman
Click here and complete your Postman installation. After installation opens the Postman application.
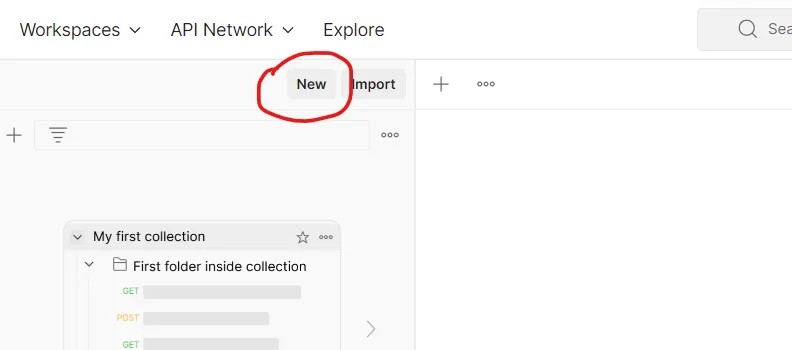
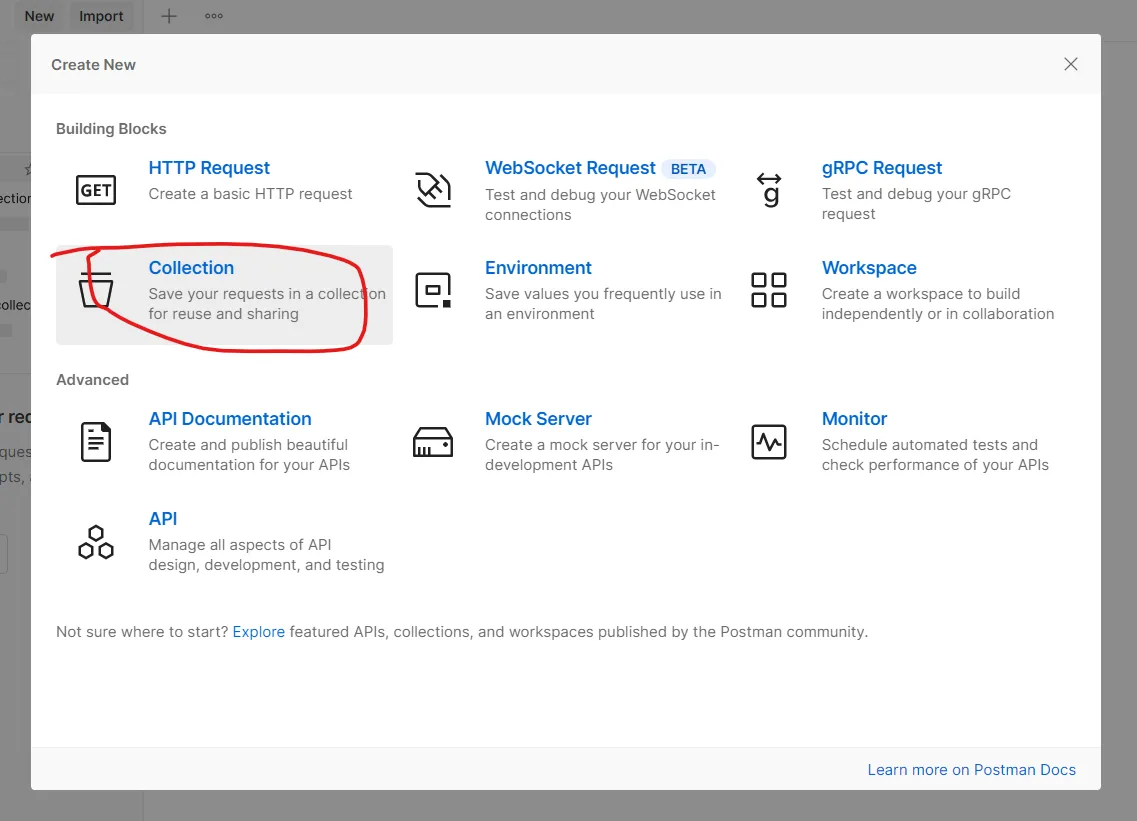
Create a new Postman Collection
Click the create new button
In the popup window click the collections
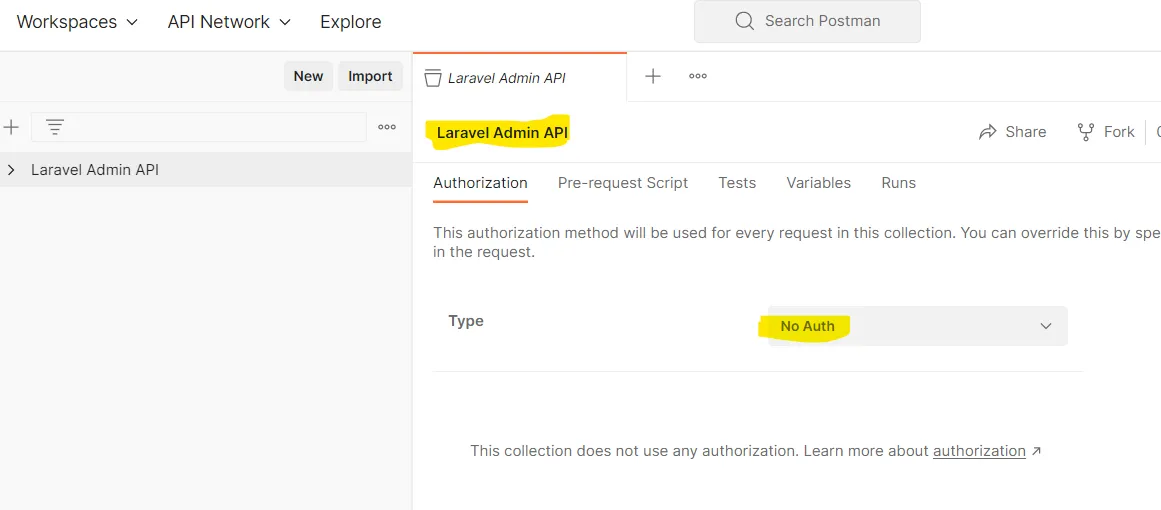
Enter the name “Laravel Admin API” and select auth type that is No auth.
Pre-request Script
In the Laravel Sanctum, we used SPA authentication. So it works by using Laravel’s built-in cookie-based session authentication services. So, we need to set the cookie for all the requests in Postman.
We can set the cookie by using the Postman Pre-request Script. Add the below code to Pre-request Script.
pm.sendRequest({
    url: pm.collectionVariables.get('base_url')+'/sanctum/csrf-cookie',
    method: 'GET'
}, function (error, response, {cookies}) {
    if (!error){
        pm.collectionVariables.set('xsrf-cookie', cookies.get('XSRF-TOKEN'))
    }
})
In this script, we used some variables. We will create variables in the next step.
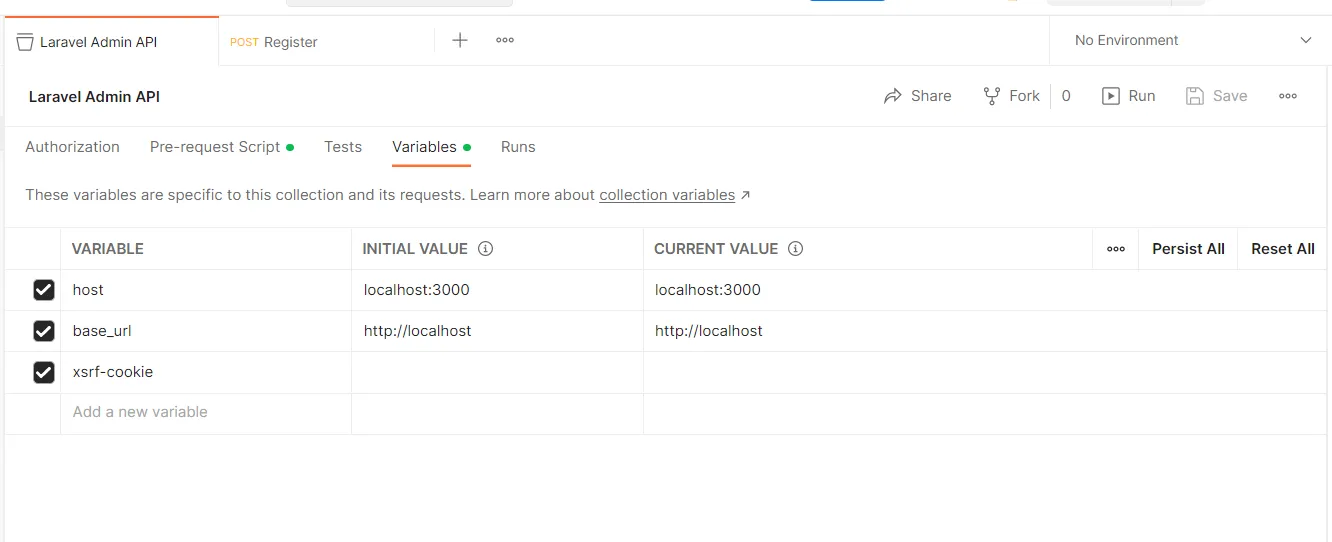
Postman Variables
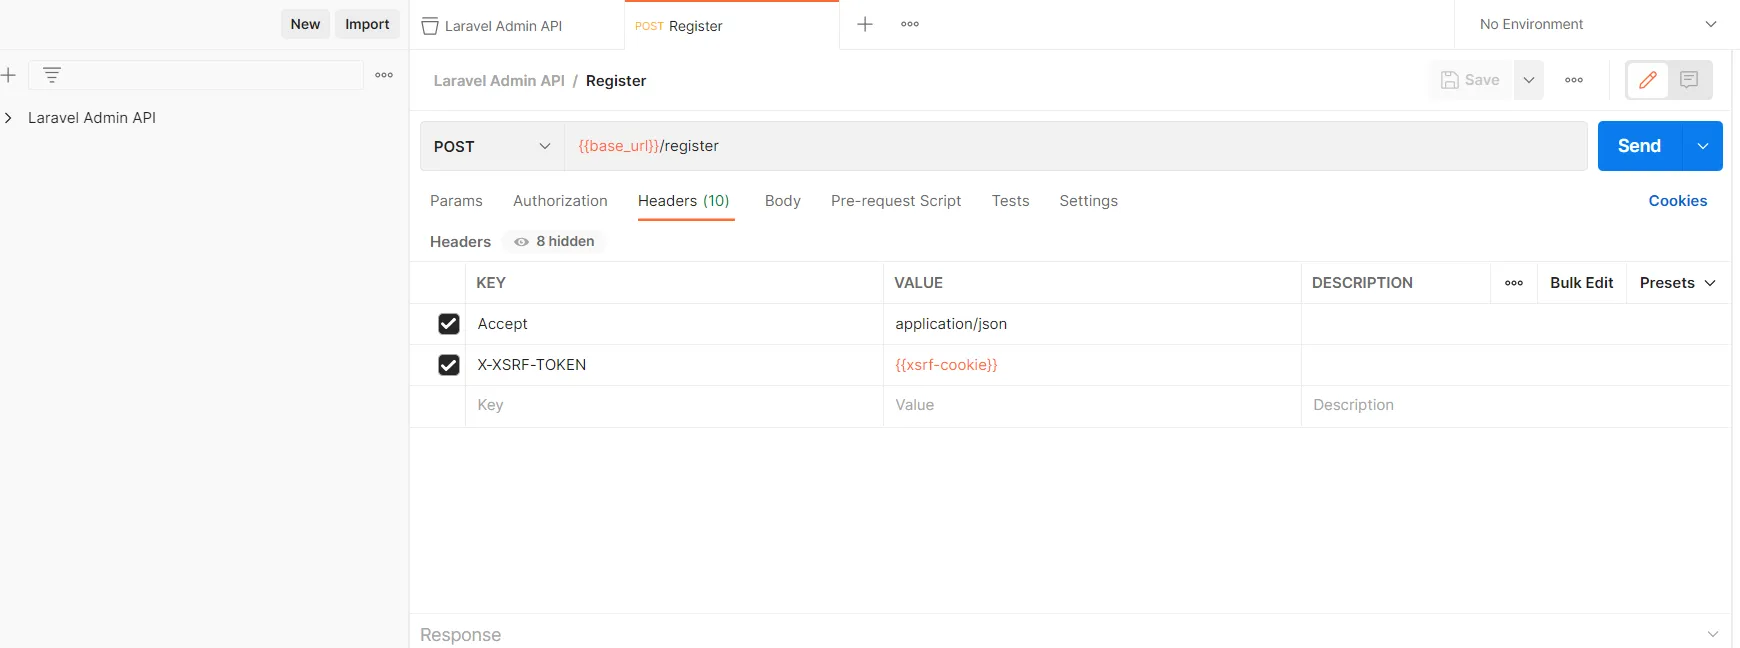
Add the host, base_url, and xsrf-cookie variables in the Postman variables section
Postman Add Request
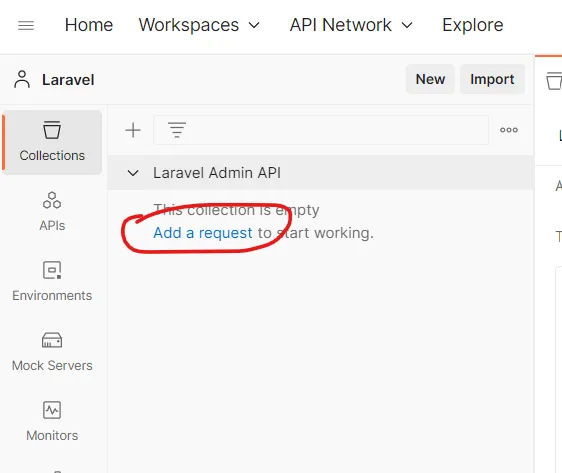
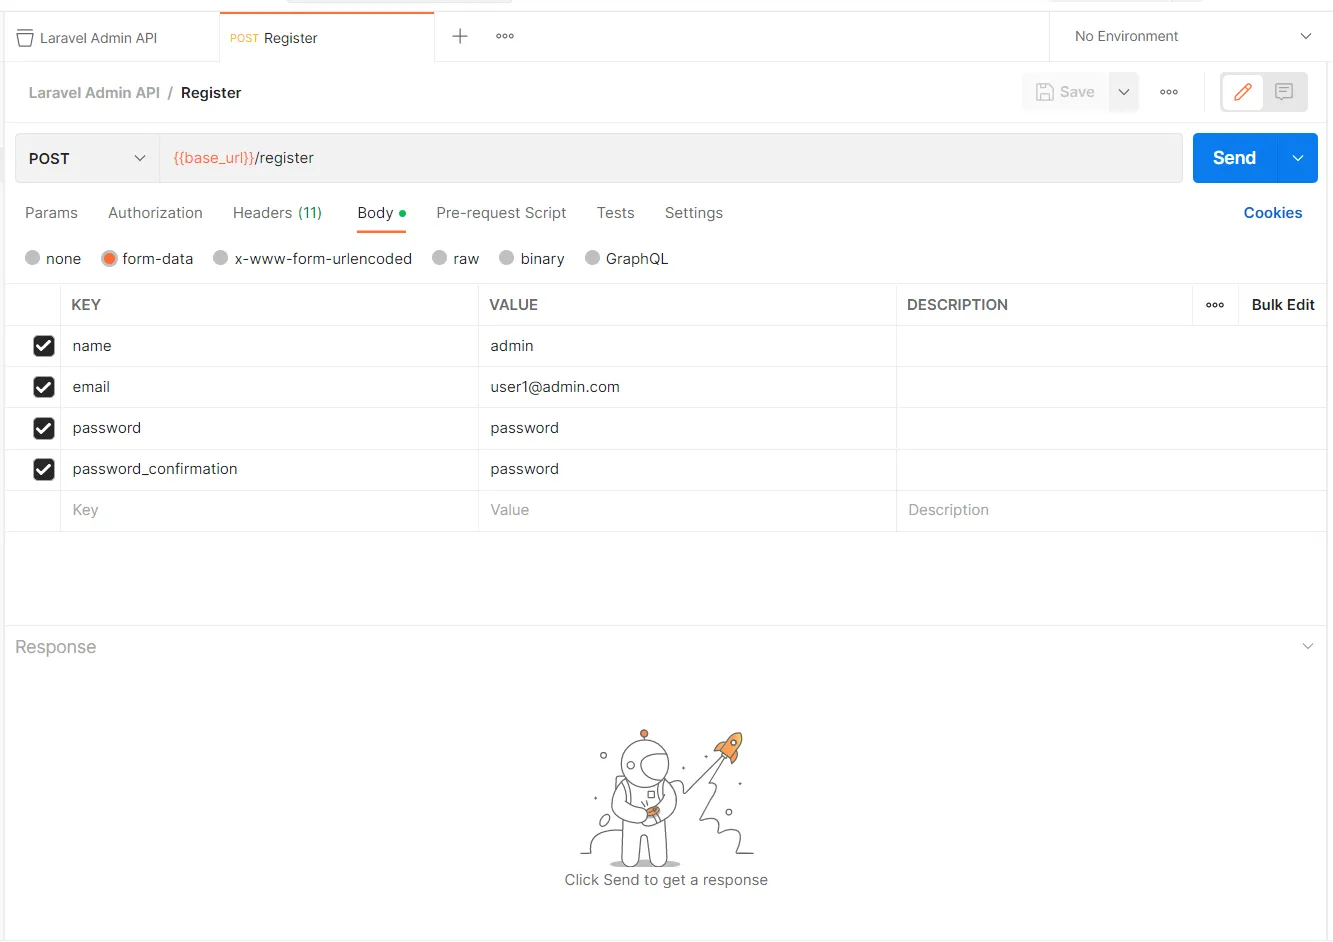
Click the “Add a request” link and create a new request for registration.
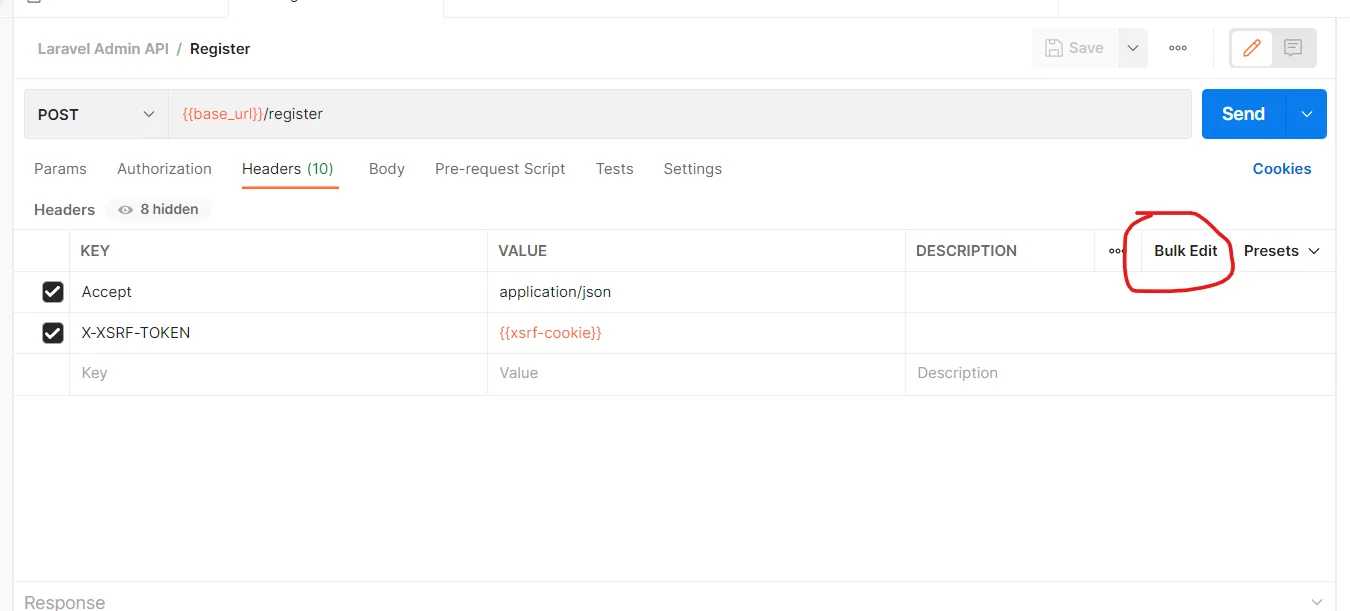
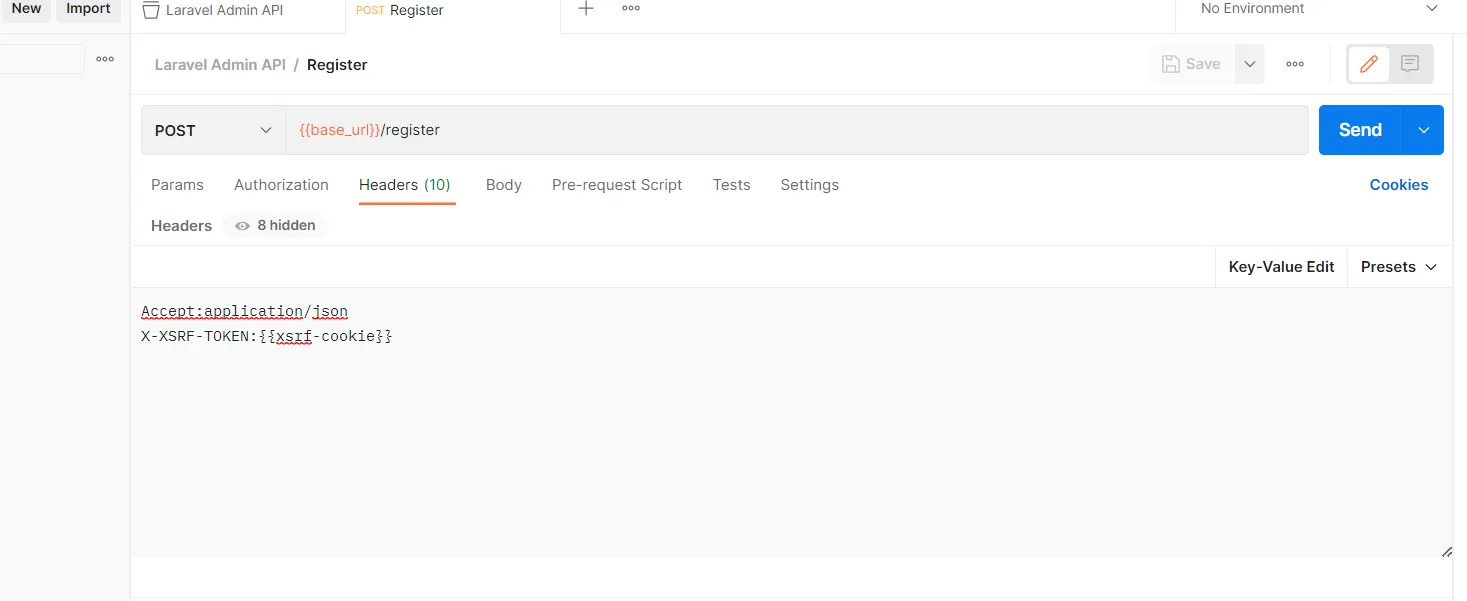
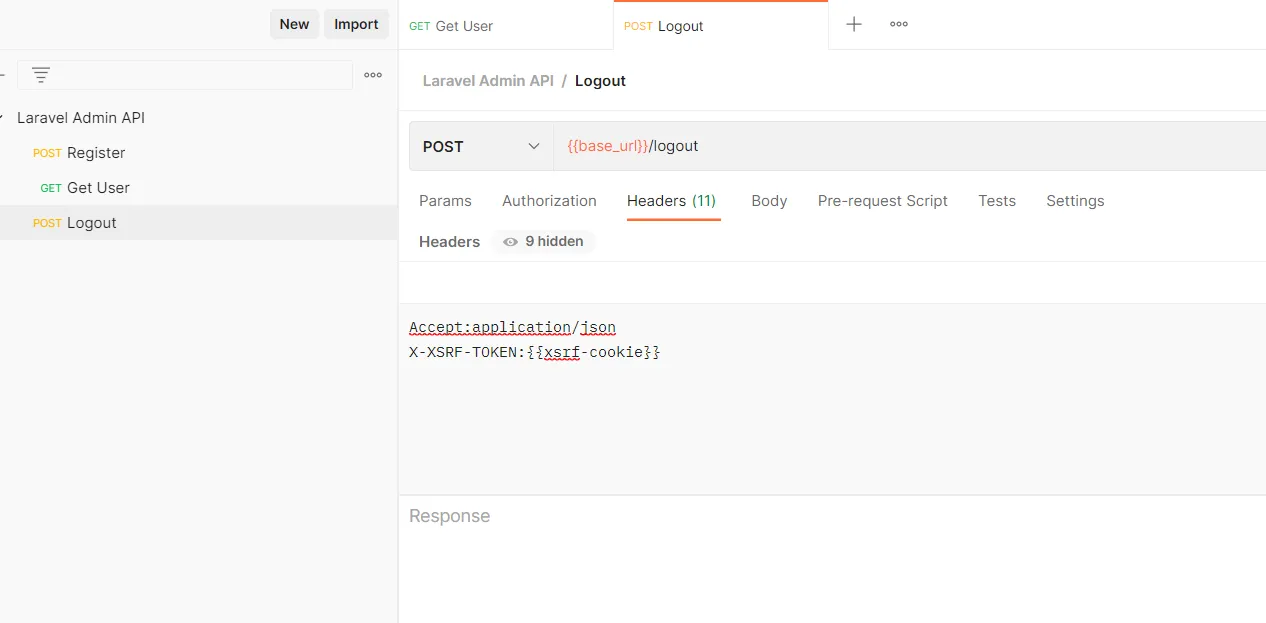
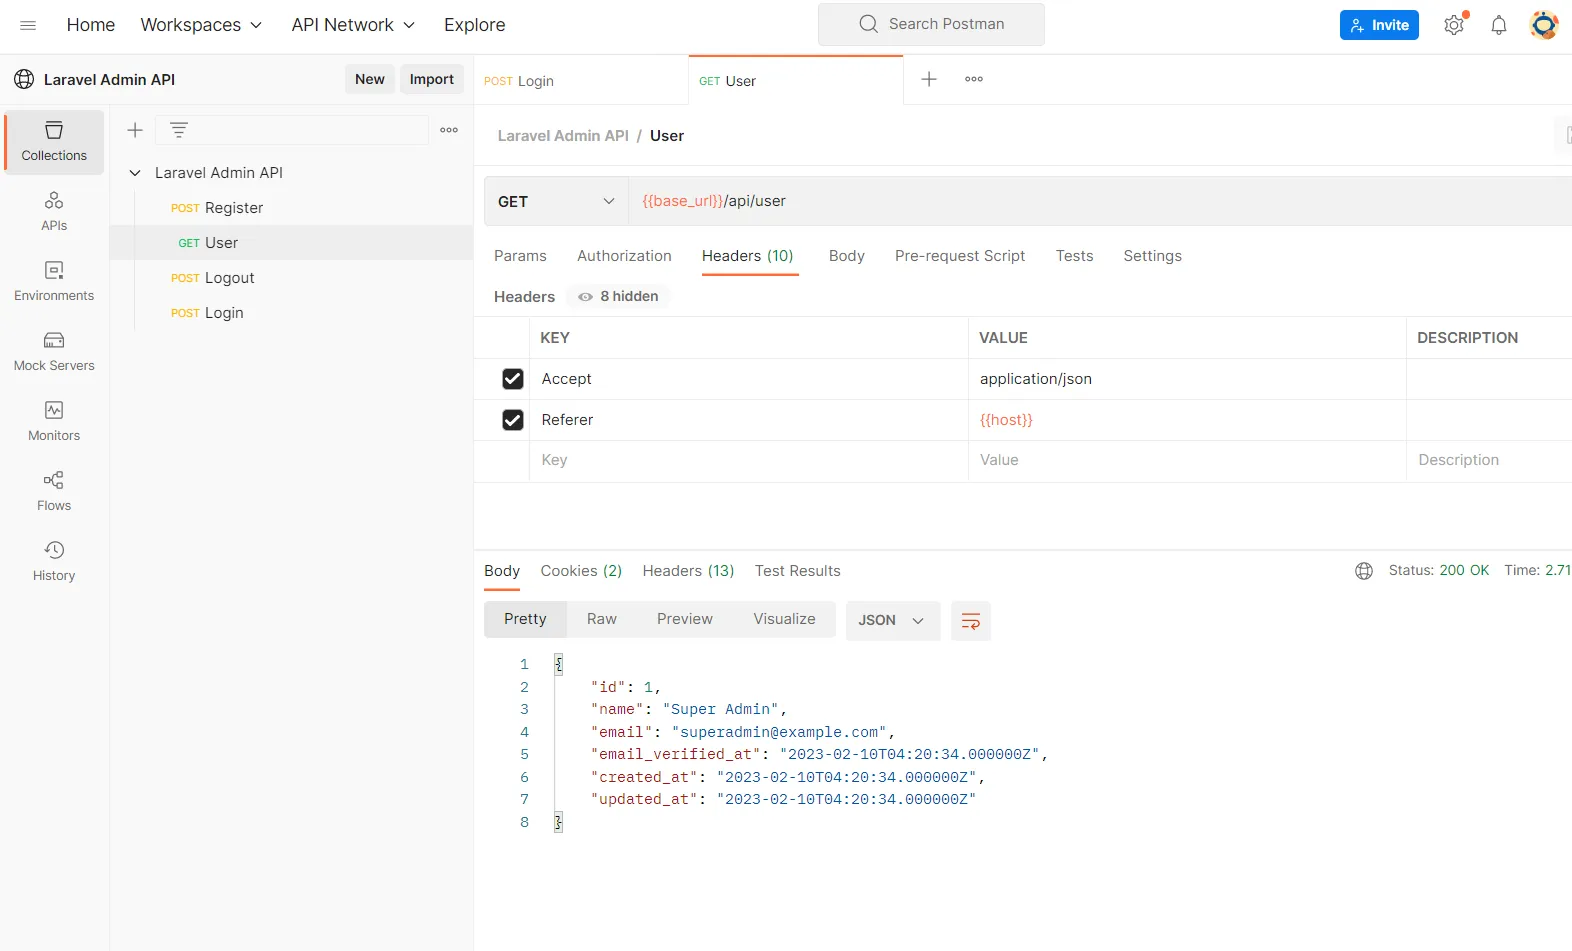
In the header section add the “Accept” and “X-XSRF-TOKEN” like below
Also, you can add plain text values by clicking the “Bulk Edit”
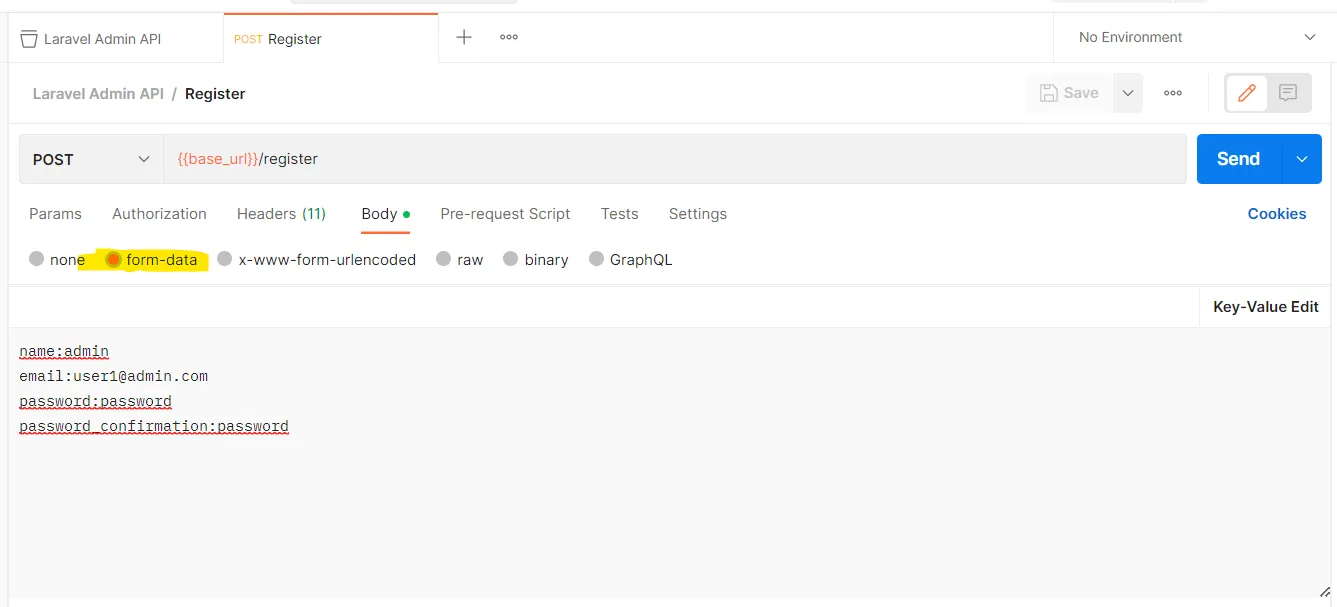
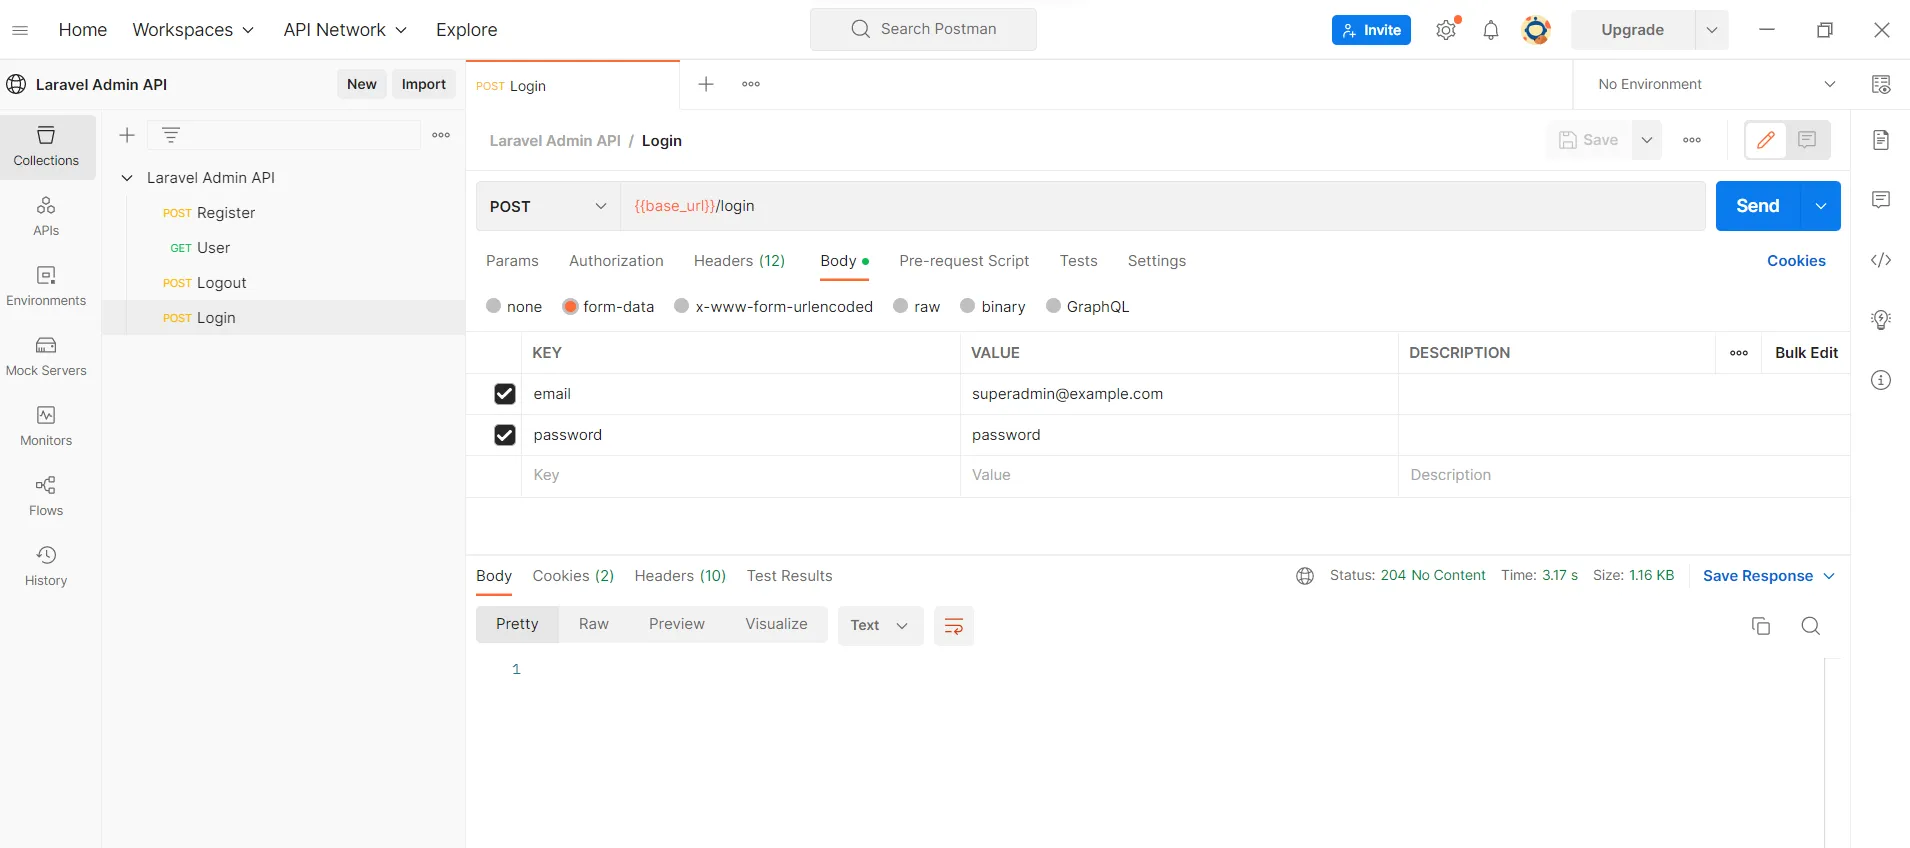
Body: Select form-data and insert the below values
email:user1@admin.com
password:password
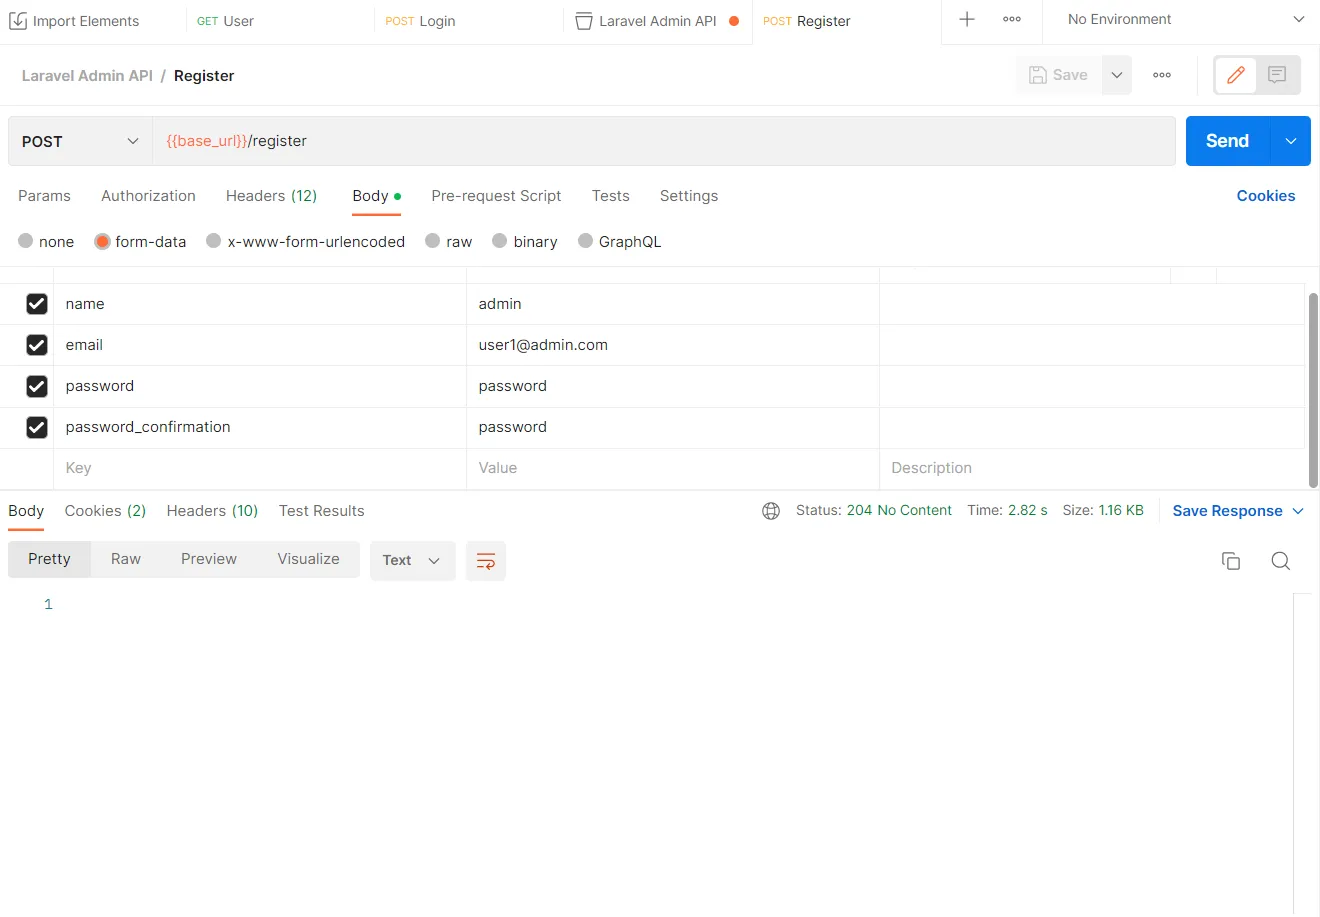
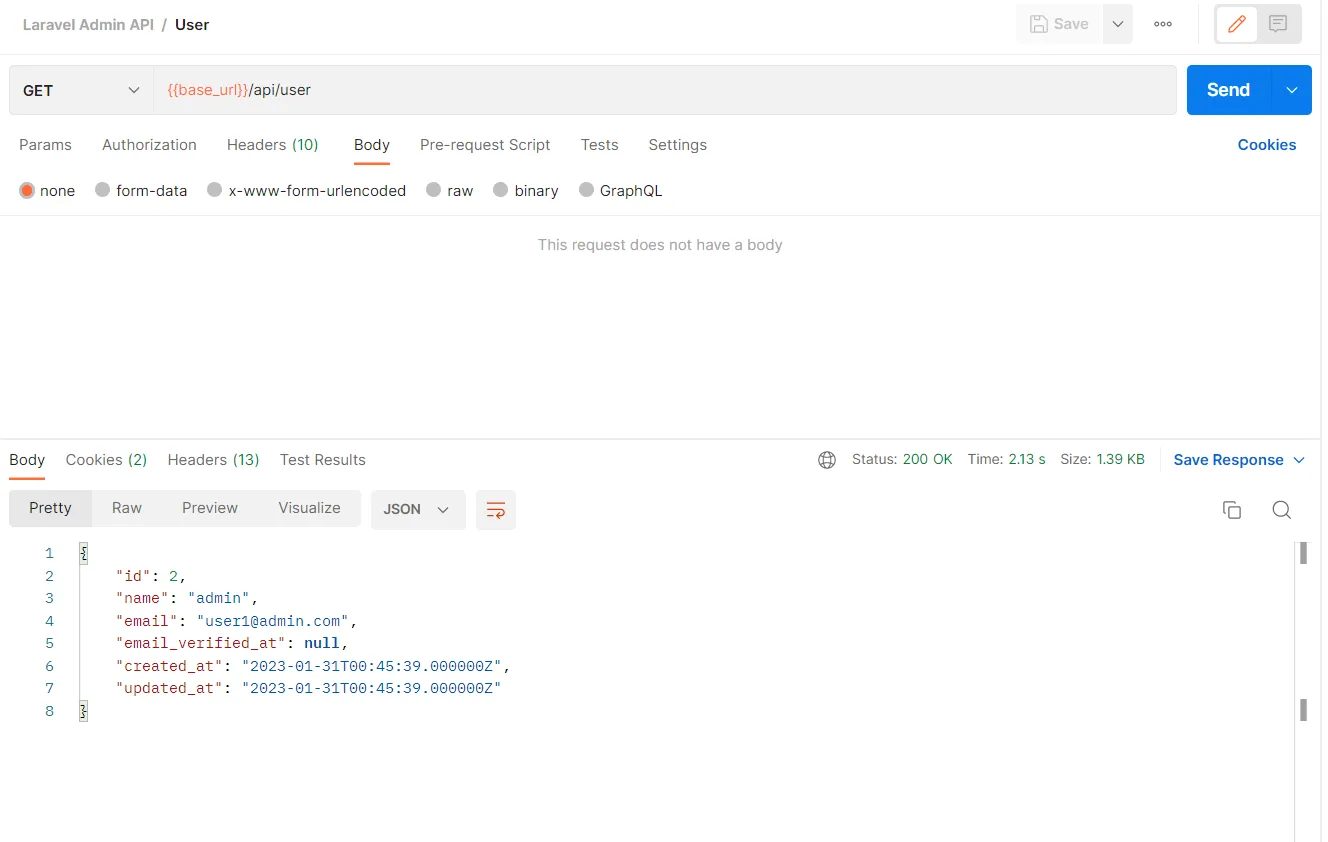
We have created 4 requests in Postman and validated our Admin API. You can import the below-exported data and use it in the Postman. Next part we add permission and roles to our admin API.
The vendor:publish artisan command is used to publish the package configuration to the config folder. Also, copy the migration files to the migration folder.
We need to add HasRoles Traits in the user model. Open the app/Models/User.php
<?php

.
.
.
.
.
use Spatie\Permission\Traits\HasRoles;

class User extends Authenticatable
{
    use HasApiTokens, HasFactory, Notifiable, HasRoles;

    /**
     * The attributes that are mass assignable.
     *
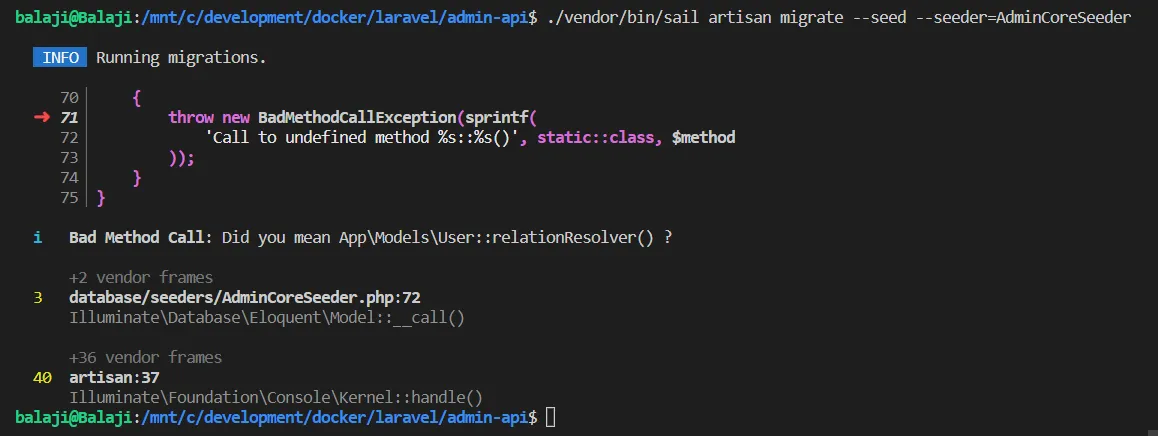
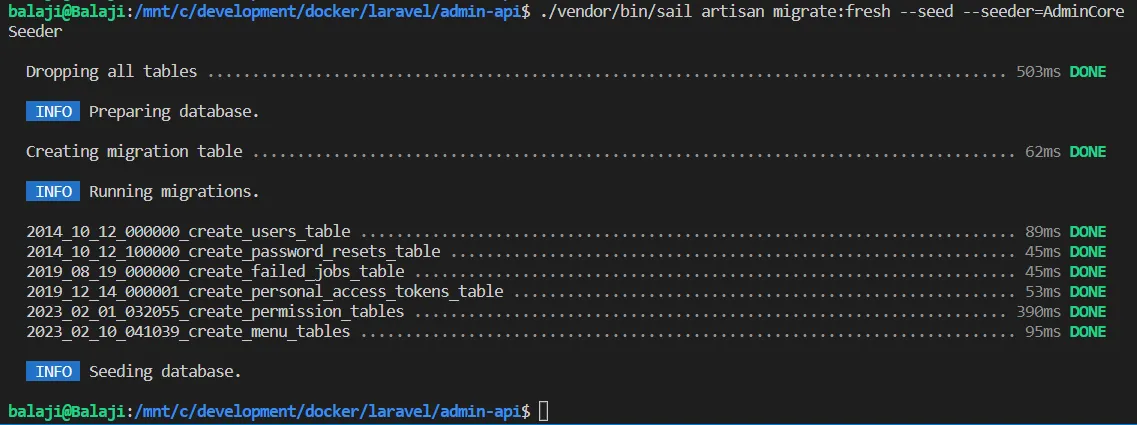
Try again to run the seeder with migrate:fresh. So it will drop all tables and re-run all of our migrations.
Pint is one the newest members of Laravel first-party packages and will help us to have more readable and consistent codes.
Installing and Configuring Laravel Pint is so easy and It is built on top of PHP-CS-Fixer so it has tones of rules to fix code style issues. (You don’t need Laravel 9 to use Pint and it’s a zero dependency package)
But running Pint is quite painful because every time we want to push our changes to the remote repository we have to run below command manually:
./vendor/bin/pint --dirty
The --dirty flag will run PHP-CS-Fixer for changed files only. If we want to check styles for all files just remove --dirty flag.
In this article we want to simply automate running code styles check with Pint before committing any changed file so even team developers will have a well defined code structure and don’t need to run Laravel Pint every time before we push our codes to remote repo!
Before we start, be careful this is a very simple setup and you can add as many options as you want to Laravel Pint.
In order to run ./vendor/bin/pint --dirty just before every commit, we should use the pre-commit hook inside .git folder.
First of all we will create a scripts folder inside our root Laravel directory. In this folder we will have a setup.sh file and pre-commit file without any extension.
Second of all, we should go to composer.json file and on the scripts object add this line: (If post-install-cmd key does not exist, you should create post-install-cmd part and then add below)
"post-install-cmd": [
            "bash scripts/setup.sh"
        ]
Third of all, we will require Pint package by this:
composer require laravel/pint --dev
And To be sure Don’t Forget to run:
composer install
The composer install command will add the pre-commit hook to our .git folder and after that we are ready to go!
From now on, we can simply write our code and just before we commit our changes the Pint command will run automatically and will fix our code styles!
Pint use Laravel code styles as defaultbut if you want to use psr-12 like me, you can create a pint.json file inside the root directory of your Laravel project and copy below json to have a more opinionated PHP code styles:
This is a simple config for our Pint command and will simplify null returns and define an equal indentation for arrays. You can check all PHP-CS-Fixer options here!
No matter if you’re brand new to Laravel or have been using it for years, there’s always something new to learn. The framework and its ecosystem are constantly evolving and growing to improve the overall developer experience. So, it can be quite important to keep up to date with the latest changes so that you don’t fall behind.
It’s also likely that you’ve run into a coding problem once or twice and needed to reach out to people online for a bit of advice and help. Let’s be honest, as developers we spend quite a lot of time searching online on a daily basis looking things up. Whether it be to jog our memory on a certain algorithm or to look at possible ways of tackling new pieces of code.
The list below shows you 8 different places you can go online to give help you learn Laravel, keep up to date with it and also ask community members questions:
Laracasts (Free and Paid)
Laracasts is an online platform that has over 1700 lessons that you can use to learn about Laravel and other web programming related topics. The great thing about Laracasts is that it doesn’t focus solely on Laravel; it also has lessons based around tooling, testing and different programming languages. For example, there is a series of lessons based around getting your IDE (integrated development environment) or text editor, such as PHPStorm or Visual Studio Code, set up to make your development experience more productive.
At the time of writing this article, some of the lessons on Laracasts are free and you can view them without having to spend any money at all! However, I would strongly recommend signing up for a paid account, which is $15/month, so that you can get full access to all of the tutorials.
Another great thing about the Laracasts are it’s forums and the helpful community. If you ever have any questions or an issue that you can’t figure out, you can post it on to the forum. A large majority of the time, someone will reply to you with an answer that helps you solve your problem.
Laravel News (Free)
Laravel News is the official Laravel news source. They post new articles, tutorials and tips on a daily-basis as well as provide a newsletter that is sent out regularly. These articles always have useful information about different topics or new Laravel packages that you can use within your code.
Although Laravel News doesn’t have a forum like Laracasts, the newsletter and podcast that they provide are extremely beneficial at keeping you up to date with the latest goings-on in the Laravel space.
As a side note, I’ve actually had two of my Laravel packages that I’ve built in the past (Laravel Exchange Rates and Laravel Executor) featured on the Laravel News website. If you’d like to check them out, the articles were: Laravel Exchange Rates API Package and Simplify Installing and Updating your App With Laravel Executor.
Laravel Documentation (Free)
One of the most useful resources for helping you learn how to use Laravel is the official Laravel documentation. The documentation is really detailed and covers a large amount of the framework that you would touch when working on projects.
Typically, huge amounts of documentation can feel overwhelming and can feel like being bombarded with too much information at once. However, I personally feel like the Laravel documentation does a really good job of splitting things out and making it easy to understand. Even after working with Laravel for years, I still always have the documentation open in a tab in my web browser just in case I need to quickly brush up on a topic.
Top tip: For any of you that use DuckDuckGo as your search engine, you can search for “!laravel” and it will take you straight to the Laravel documentation.
Udemy (Paid)
Udemy is a video platform that’s similar to Laracasts. It sells online video courses that you can use to learn about a range of topics. However, they have a section that is dedicated to Laravel and learning how to use it; ranging from beginner to advanced courses.
I’ve never personally used Udemy myself, but I know other developers that I work with that swear by it and find it extremely useful.
Stack Overflow (Free)
If you’ve ever done any type of software or web development, chances are you, you probably visit Stack Overflow on a daily basis. But if you’re just starting out as a developer, you might not have heard of it yet.
Stack Overflow is an online question-and-answer site for developers. As an example, say if you have a question about something or have a bug in your code, you could post your question on Stack Overflow and someone would try and answer it for you. However, the chances are that if you’ve got a problem, someone else has already had it, posted the question and got an answer that solved their issue. So, Stack Overflow can be a great resource that contains almost instant answers for any problems that you might run into.
If you need to ask a question though because it doesn’t already exist there, the community is usually really quick at answering.
GitHub (Free)
This resource is slightly different to some of the others above and might be a little more suitable for more experienced developers rather than any novices. There are countless Laravel projects and packages that you can find on public GitHub repositories. So, this means that there are a lot of places that you can look at to get ideas for development.
As an example, when I first started writing Laravel packages, I wasn’t too sure on where to start. So, after reading through the Laravel documentation, I also checked out how other packages had been written. I looked at some of the official Laravel packages, such as Telescope, and also looked at how some of the Spatie packages were written. Being able to look at real-life examples of code can sometimes be more valuable than just looking at documentation that explains something. It gives you an insight and context into how things are actually done in practice.
As a small side note as well, once you feel that you have enough experience with Laravel, you could maybe start contributing to open-source projects. This can be a little bit daunting at first but can feel extremely rewarding when your first pull request is accepted. When you make your pull request, the maintainers of the project will review your changes and additions to check that they’re okay to pull in. It’s usually during this stage that you get feedback on any changes you might need to make to get the pull request approved and merged. This feedback can really help you grow as a developer.
Reddit (Free)
Reddit is one of my personal favorite resources for keeping up to date with the latest Laravel and PHP topics. The r/laravel and r/php subreddits are made up of large communities of developers who can answer questions that you might have.
I have asked questions on Reddit many times in the past for suggestions on how to tackle issues and have always been able to find an answer. The r/laravel subreddit also has a weekly “No Stupid Questions” thread that you can use to comment on and ask questions. Just remember though, if you’re asking any questions in any of the subreddits that you follow their rules; otherwise your post will get deleted.
If you don’t want to post anything or ask any questions, the two subreddits can also be really helpful for keeping up to date with the latest news on the ecosystem.
Other Laravel Developers (Free and Paid)
One resource for learning Laravel that developers often overlook is possibly one of the most valuable… other developers. Sometimes, it can be really easy to sit and stare at a problem for a few hours without getting anywhere with it. Usually when this happens, it can be best to get an opinion from someone else who is looking at the problem from a different perspective. For this reason, it can be really useful to have other developers as friends or as someone you can contact.
If you only have a quick question, quite a lot of developers will probably be happy to help you out and lend a helping hand (I know I would!). But, obviously, you have to remember that other people also have things they need to do and won’t want to be spending too much time helping you out for free. So, if you do contact a developer for help, try not to do it too often as it might discourage them from wanting to help you.
Sometimes, you might also want to pay a more experienced developer to have a chat for an hour or two to go over some topics. Like I mentioned earlier, looking at documentation can give you an idea of how something is done, but speaking to someone can help you understand the “why”. Speaking to senior developers can be extremely helpful because it’s likely that if you run into a problem that they’ve already experienced something similar themselves and know any pitfalls that you should to try to avoid.
If you have any questions about anything Laravel related or need any Laravel web development doing, you can always feel free to contact me and have a chat.
Originally published at https://ashallendesign.co.uk.
Redis which stands for Remote Dictionary Server is an open-source (BSD licensed), in-memory data structure store, used as a database, cache, and message broker.
In basic words, Redis is a Key-Value Store that stores data in Key-Value pairs.
For Example:
How data is stored in Redis
Redis is a No-SQL database.
Basically, this means it does not have tables, rows, columns, functions, procedures, etc like in MySQL, Oracle DBs
It also does not use SELECT, INSERT, UPDATE, DELETE.
Instead, it uses data structures to store data.
Like,
String
Lists
Sorted Sets
Hashes
Sets
And,
Bitmaps (also called bit arrays, bit vectors, etc.)
Hyperloglogs ( It’s is a probabilistic data structure used to count unique values — or as it’s referred to in mathematics: calculating the cardinality of a set)
Geospatial Indexes (The geospatial index supports containment and intersection queries for various geometric 2D shapes.)
Interaction with data in Redis is command based.
One of the key differences between Redis and other key-value databases is Redis’s ability to store and manipulate high-level data types.
Redis is a popular choice for caching, session management, gaming, leader boards, real-time analytics, geospatial, ride-hailing, chat/messaging, media streaming, and pub/sub-apps.
To learn more about Redis you can visit their website, redis.io.
Getting Started
For this post, I’ll be working with Ubuntu 18.04 but any Linux Distro works.
The Redis configuration for your application can be found in config/database.php. In this file, you’ll find a Redis array containing the Redis servers utilized by your application.
The default configuration uses phpredis as it’s client, so you’ll have to change this to predis if you’ll be using the laravel predis package.
Interacting with Redis
You can interact with Redis by calling various methods on the Redis facade.
Redis facade supports dynamic methods, basically, this means that you could call any command on the facade and the command will be passed directly to Redis.
Here’s an example,
namespace App\Http\Controllers;

use App\Http\Controllers\Controller;
use Illuminate\Support\Facades\Redis;

class UserController extends Controller
{
    /**
     * Show the profile for the given user.
     *
     * @param int $id
     * @return Response
     */
    public function showProfile($id)
    {
        Redis::set('name', 'Taylor');
        $values = Redis::lrange('names', 5, 10);
        $name = Redis::get(‘name’.$id);
        // $values = Redis::command('lrange', ['name', 5, 10]);
        $user = [
            'name' => $name,
            'values' => $values
        ];

        return view(‘user.profile’, [‘user’ => $user]);
    }
}
For more commands like this, you can check out the laravel documentation on Redis here
One of the things I like from any PHP project is having global helpers. You know, those functions you can call anywhere and remove or save you many lines or verbosity into one, maybe two, while allocating in one place any logic.
$expected = from($this)->do('foo');
The problem with Laravel itself is that sometimes is not enough with the helpers it includes. The ones included are mostly quick access to Services (like cache()) or Factories (like response()), and some that help you having an expected result (like data_get).
For example, let’s say we want a function be called multiple times but sleep between executions, like we would need to avoid rate limiting for an external API. Without a helper, we will have to resort to create a Class and put the logic inside a public static method, and hopefully remember where it is located.
class Logics
{
    public static function logic_sleep($times, $sleep, $callback)
    {
        // Run and sleep between calls.
    }
}Logics::sleep(4, 10, function() {
    // ...
});
Using this technique makes your global not so globally. Since this is one of many thing I need in my projects, I decided to create a package with more global helpers:
The main idea of a global helper, at least to me, is to have a piece of code that offers simplicity, readability and flexibility. Think about them as small swiss knives that you may put in your pocket.
For example, the above can become its own global function, and we can call it literally anywhere.
public function handle()
{
    logic_sleep(10, 5, function () {
        $this->uploadRecords();
    });
}
The helper is very simple to operate, but we won’t know what the hell it does behind the scenes unless we dig into the source code, which is fair. In any case, having a global function of one or two words makes the whole code more readable. And since it’s our own helper, we can call it anything we want.
How to add your own helpers
But that’s is only one of the many helpers I decided to create for things I use a lot.
To add global helpers to your project, you can simply add a PHP file with the global functions you want anywhere in your project (preferably inside your PSR-4 root folder) and tell Composer to load it.
You are free to add how many files you want. I decided to separate them into categories like I did for my package to avoid having a wall of text full of functions.
Testing is an important yet often overlooked aspect of building successful Laravel applications. This article will provide an introduction to testing applications written using the Laravel Framework.
For our purposes we’ll be writing feature tests that make HTTP requests to our application and then make assertions about the responses and the state of the application’s database after the request is complete. We will make minimal changes to the authentication scaffolding provided by Laravel and focus on testing the Password Reset feature.
Getting Started
Assuming you are familiar with setting up a new Laravel project, use your terminal and the Laravel installer to create a new project.
If you aren’t familiar with setting up a development environment for a new Laravel application I encourage you to check out the documentation on installation and the Vagrant box Homestead.
Create a new Laravel application in the directory password-reset-testing.
$ laravel new password-reset-testing
Once composer has finished installing everything, change your working directory to that of the new project.
Again using Artisan, run the database migrations to create the users and password_resets tables.
$ php artisan migrate
Naming Each Route
As a best practice, each of our application’s routes should have a name. By using route names and the route helper function instead of hard-coding routes, the URI of a route can be easily changed in the future.
Open up routes/web.php and change the contents to match below.
<?php
// Welcome Route Route::get('/', function () { return view('welcome'); })->name('welcome');
// Home Route Route::get('/home', 'HomeController@index') ->name('home');
Note that we didn’t change any of the routes provided by the original Auth::routes() statement, we simply rewrote them to include names for every route.
Editing the Base Test Case
Before we write our tests, let’s quickly edit the base test case. Open up the file at tests/TestCase.php and edit the contents to match below.
<?php

namespace Tests;

use Illuminate\Foundation\Testing\DatabaseTransactions;
use Notification;
use Illuminate\Foundation\Testing\TestCase as BaseTestCase;

abstract class TestCase extends BaseTestCase
{
    use CreatesApplication;
    use DatabaseTransactions;

    /**
     * Set up the test case.
     */
    protected function setUp()
    {
        parent::setUp();

        Notification::fake();
    }
}
First we import the Illuminate\Foundation\Testing\DatabaseTransactions trait and the Notification facade.
The statement use DatabaseTransactions at the top of the class tells Laravel to create a database transaction before each test and roll back the transaction after each test. This will keep our tests from affecting the state of our database; the database will be in the same starting state for each test.
We override the setUp method which is called before running each test. In this method we first call the parent setUp method then call fake on the Notificationfacade. This will fake all notifications sent out during any of our tests. Within each test we can then use another method on the Notification facade to assert a notification would have been sent to the correct destination.
Creating the Test Class
Use artisan to generate a new feature test called PasswordResetTest.
$ php artisan make:test PasswordResetTest
Open the new file at tests/Feature/PasswordResetTest.php and edit the contents to match below.
<?php
namespace Tests\Feature;
use App\User; use Hash; use Illuminate\Auth\Notifications\ResetPassword; use Illuminate\Foundation\Testing\WithFaker; use Notification; use Password; use Tests\TestCase;
class PasswordResetTest extends TestCase { use WithFaker;
Here we’ve added import statements for the model App\User, the facadesHash, Notification, and Password, and the notification Illuminate\Auth\Notifications\ResetPassword. We’ve also added an import statement for the trait Illuminate\Foundation\Testing\WithFaker which conveniently instantiates a Faker factory for us for use within our tests. We simply specify our class is using the WithFaker trait and each test case will have an instance of a Faker factory at $this->faker.
Within our class we replaced the example test case with a statement specifying we’re using the WithFaker trait, constants for each route name we’ll be using, and a constant for the password test users will have.
Writing Test Cases
We will write tests for the following cases:
Showing the password reset request page
Submitting the password reset request page with an invalid email address
Submitting the password reset request page with an email address not in use
Submitting the password reset request page with a valid email address in use
Showing the reset password page
Submitting the reset password page with an invalid email address
Submitting the reset password page with an email address not in use
Submitting the reset password page with a valid email address in use and a password that does not match the password confirmation
Submitting the reset password page with a valid email address in use and a password that isn’t long enough
Submitting the reset password page with a valid email address in use and a valid password matching the password confirmation
After each new test, feel free to run PHPUnit using your terminal.
$ ./vendor/bin/phpunit
Testing Showing the Password Reset Request Page
Now it’s time to write our first test! Edit the PasswordResetTest class by adding the method below. By convention each test case method starts with test which is then recognized by PHPUnit.
/**
 * Testing showing the password reset request page.
 */
public function testShowPasswordResetRequestPage()
{
    $this
        ->get(route(self::ROUTE_PASSWORD_REQUEST))
        ->assertSuccessful()
        ->assertSee('Reset Password')
        ->assertSee('E-Mail Address')
        ->assertSee('Send Password Reset Link');
}
In this test case we use the method get to make a GET request to the specified URI. We generate the URI using the route helper method and the name of our route, which is stored in a constant. The assertSuccessful method asserts the response has a 200 level status code. Next we use the assertSee method to check for the presence of the text Reset Password, E-Mail Address, and Send Password Reset Link.
Testing Submitting the Password Reset Request Page
Our next few tests will be testing submitting the password reset request page with various inputs.
Add the next test shown below which tests submitting a password reset request with an invalid email address.
/**
 * Testing submitting the password reset request with an invalid
 * email address.
 */
public function testSubmitPasswordResetRequestInvalidEmail()
{
    $this
        ->followingRedirects()
        ->from(route(self::ROUTE_PASSWORD_REQUEST))
        ->post(route(self::ROUTE_PASSWORD_EMAIL), [
            'email' => str_random(),
        ])
        ->assertSuccessful()
        ->assertSee(__('validation.email', [
            'attribute' => 'email',
        ]));
}
When a request fails validation, Laravel will return a redirect to the location the request came from with validation error messages flashed to the session. To make assertions on the response the user will see, therefore, we need to follow redirects with the followingRedirects method. We also specify a location we’re making the request from using the from method.
Next we use the post method to issue a POST request to the password.email route (again using the route helper and a previously defined constant) with data specifying the email key as a random string (using the str_randomhelper method).
We assert the response is successful and check for the presence of a validation message. The __helper method is used to format the validation message using localization files. validation.email specifies the file resources/lang/{locale}/validation.php and the email array key, where {locale} is the application’s configured locale. The :attribute parameter in the string The :attribute must be a valid email address. will be replaced by the string email as specified by the associative array passed as the second argument to the __ method.
Next we’ll be testing submitting the password reset request page with a valid email address that is not in use by any user of the application.
Add the test shown below.
/**
 * Testing submitting the password reset request with an email
 * address not in the database.
 */
public function testSubmitPasswordResetRequestEmailNotFound()
{
    $this
        ->followingRedirects()
        ->from(route(self::ROUTE_PASSWORD_REQUEST))
        ->post(route(self::ROUTE_PASSWORD_EMAIL), [
            'email' => $this->faker->unique()->safeEmail,
        ])
        ->assertSuccessful()
        ->assertSee(e(__('passwords.user')));
}
Again we follow redirects and set the location where our request should originate from, but this time we use Faker to generate an email address that is not in use by anyone in the world (as the domains are example.com, example.net, and example.org). We use the unique method to ensure the email address returned has not been previously returned by Faker.
We assert the response is successful and check for the presence of the validation error message specified by the user key in the associative array in the file resources/lang/{locale}/passwords.php. This time the validation message contains a reserved HTML character, ', so we must use the ehelper method to replace the character with it’s corresponding character entity.
Finally it’s time to test successfully submitting the password reset request page with a valid email address present in our application’s database.
Add the test shown below.
/** * Testing submitting a password reset request. */ public function testSubmitPasswordResetRequest() { $user = factory(User::class)->create();
In this test we use the factoryhelper method to create a new user in our database. Then we follow redirects for the response to our POST request to the password.email route. Our request specifies the created user’s email address in the email key of the payload. We assert the response is successful and check for the presence of the string We have e-mailed your password reset link!, specified with the argument passwords.sent passed to the __ helper method.
Using the Notification facade’s method assertSentTo we assert the ResetPassword notification was sent to the $user. We can pass the model stored in the variable $user directly into the assertSentTo method because our User model, by default, uses the Illuminate\Notifications\Notifiabletrait. When routing emails for any model using the Notifiable trait, the email property on the model will be used by default.
Testing Showing the Password Reset Page
Next, to test showing the password reset page, add the test shown below.
/** * Testing showing the reset password page. */ public function testShowPasswordResetPage() { $user = factory(User::class)->create();
We again create a user using the factory helper method. Next we create a valid password reset token using the Password facade.
The value of $token is used to replace the token parameter in the password.reset route. We send a GET request to this route, assert the response is successful, and check for the presence of the text for page elements.
Testing Submitting the Password Rest Page
Next we’ll test submitting the password reset page, starting with using an invalid email address.
Continue our testing by adding the test shown below.
/** * Testing submitting the password reset page with an invalid * email address. */ public function testSubmitPasswordResetInvalidEmail() { $user = factory(User::class)->create([ 'password' => bcrypt(self::USER_ORIGINAL_PASSWORD), ]);
In this test we’re again using the factory helper method to create at test user but this time we explicitly set the user’s password. To do this we use the bcrypthelper method to hash the value of our constant.
We create another password reset token and generate a random string to use as the new password for our request’s payload. Again following redirects we POST to the password.reset.submit route with a request originating from the password.reset route. A random string is used for the email address in the request payload.
After asserting the response was successful and checking for the validation.email validation message we refresh the user model and use the check method on the Hash facade to assert the user’s password has not changed.
Next we’ll test submitting the password reset page with an email address not in use by our application’s database.
Add the test shown below.
/** * Testing submitting the password reset page with an email * address not in the database. */ public function testSubmitPasswordResetEmailNotFound() { $user = factory(User::class)->create([ 'password' => bcrypt(self::USER_ORIGINAL_PASSWORD), ]);
Nothing new on this test. We create a user, password reset token, and new password. Then the follow redirects, POST to the password.reset.submit route from the password.reset route using the token, a random and unique safe email, and the new password. We assert the response is successful, check for the presence of the passwords.user translated string (after swapping any html character entities in the string), refresh the user, and assert the user’s password hasn’t changed.
The next test will be testing submitting the password reset page with a password that doesn’t match the password confirmation.
Add the test shown below.
/** * Testing submitting the password reset page with a password * that doesn't match the password confirmation. */ public function testSubmitPasswordResetPasswordMismatch() { $user = factory(User::class)->create([ 'password' => bcrypt(self::USER_ORIGINAL_PASSWORD), ]);
Again nothing new on this test except we’re checking for a different validation message.
Our last invalid submission case to test for submitting the password reset page is using a new password that’s too short.
Add the test shown below.
/** * Testing submitting the password reset page with a password * that is not long enough. */ public function testSubmitPasswordResetPasswordTooShort() { $user = factory(User::class)->create([ 'password' => bcrypt(self::USER_ORIGINAL_PASSWORD), ]);
This time we pass an argument 5 to the str_random helper function to specify the length of the random returned string (as opposed to the default length of 16). Another difference in this test is we’re checking for the presence of a validation message, validation.min.string, with two parameters, attribute and min.
Notice how we can use dot notation to specify a translation string in a nested array. To learn more about these validation messages and translation strings, check out the file at resources/lang/{locale}/validation.php.
Finally, it’s time to test the happy path: submitting the password reset page with a valid email address belonging to a user with a valid password reset token and a password matching the confirmation password (that isn’t too short).
Add the final test shown below.
/** * Testing submitting the password reset page. */ public function testSubmitPasswordReset() { $user = factory(User::class)->create([ 'password' => bcrypt(self::USER_ORIGINAL_PASSWORD), ]);
In this test we use the Hash facade to assert the user’s password has changed to the given password, thus successfully completing the password reset.
Conclusion
This concludes our testing for Laravel’s password resets. In ten short tests we were able to do things like create test users and valid password reset tokens, make HTTP requests to our application, assert the response contains desired content, and check if the user’s password has changed as a result of the request.
Laravel has provided ample testing capabilities and I strongly recommend reading the documentation for a deeper look at the possibilities.
You can view the source code for this project on GitHub.
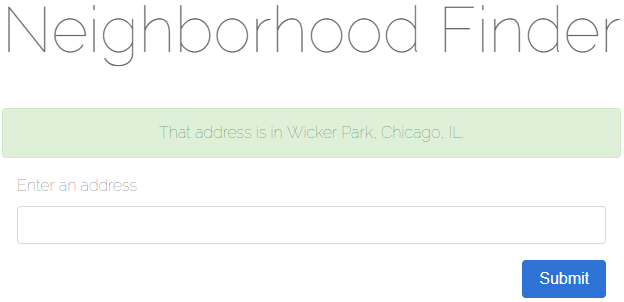
Today we’ll be learning about working with geospatial data, or data relating to geographical locations, in Laravel 5.6. As an exercise for working with this kind of data we’ll be building a simple USA Neighborhood Finder application.
screenshot of a successful result in our application
There are three main learning objectives for this article:
How to use Google’s Geocoding API to geocode an address into corresponding coordinates consisting of a longitude and latitude.
How to determine if a point (in this case a longitude and latitude) is contained by a geometry (in this case a neighborhood boundary).
Overview
The flow of our application is as follows:
A user enters an address and clicks “Submit”.
The name of the neighborhood which contains the address is displayed to the user (or an error message stating no location or neighborhood could be found).
For the purposes of this article we won’t be tracking down the neighborhood boundaries of every neighborhood in the USA; instead we’ll be using three example data sets but set things up so more data sources can easily be added in the future.
You can take a look at the data sources using these links:
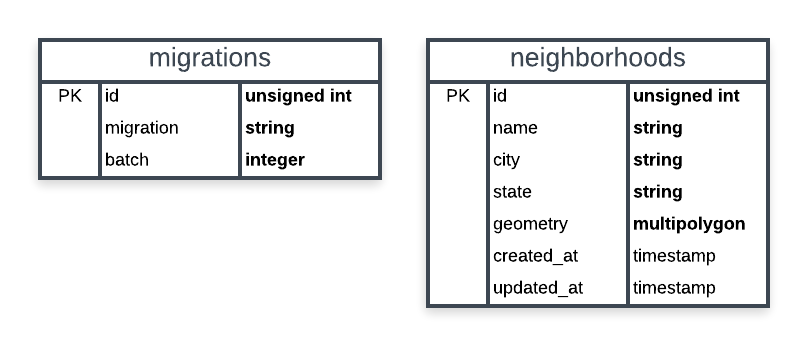
A basic schema of our application’s database is shown below. We only need two tables: Laravel’s table for migrations and a table for storing neighborhoods. Our spatial column will be named geometry and be of the multipolygon type. Think of a multipolygon as a collection of polygons. We’re using a multipolygon because a neighborhood may have more than one polygon to define its boundary. If a neighborhood uses a polygon to define its boundary we can always create multipolygon containing a single polygon (which we’ll be doing later).
schema of our application’s database
In addition to the Laravel Framework, we’ll be using two more packages to build our application:
We will also be using Bootstrap 4 for basic styling.
Creating Our Application
For this article it’s assumed you’re comfortable using a development environment for Laravel (such as Homestead).
Generating the Project
First, let’s create a new Laravel project using the terminal.
$ laravel new neighborhood-finder
Wait for the installation to finish and change directories to the root of the project.
$ cd neighborhood-finder/
Next let’s clean up some of the things Laravel comes with that we won’t be using for our application. This includes authentication controllers, the User model/migration/factory, and the password_resets table.
For our application each Neighborhood will have an (auto-incrementing) id, a name, a city, a state(abbreviation), and a geometry representing the neighborhood’s boundary as a multipolygon.
Open up the generated database/migrations/*_create_neighborhoods_table.php migration and edit the up method as shown below.
/**
 * Run the migrations.
 *
 * @return void
 */
public function up()
{
    Schema::create('neighborhoods', function (Blueprint $table) {
        $table->increments('id');
        $table->string('name');
        $table->string('city');
        $table->string('state', 2);
        $table->multiPolygon('geometry');
        $table->timestamps();
    });
}
Installing the First Package
Now let’s install our first package using composer: grimzy/laravel-mysql-spatial. This package will allow us to easily work with spatial data types.
$ composer require "grimzy/laravel-mysql-spatial"
Let composer install the package dependencies and regenerate autoload files.
The Neighborhood Model
Our Neighborhood model will be using the SpatialTrait found in the grimzy/laravel-mysql-spatial package. The package looks for any attributes defined in the $spatialFields array on a model using this trait.
Edit app/Models/Neighborhood.php to match below. Notice how a spatial field is still eligible to be fillable through mass assignment.
<?php

namespace App\Models;

use Grimzy\LaravelMysqlSpatial\Eloquent\SpatialTrait;
use Illuminate\Database\Eloquent\Model;

class Neighborhood extends Model
{
    use SpatialTrait;

    /**
     * The attributes that are mass-assignable.
     *
     * @var array
     */
    protected $fillable = [
        'name',
        'geometry',
    ];

    /**
     * The attributes that are spatial fields.
     *
     * @var array
     */
    protected $spatialFields = [
        'geometry'
    ];
}
Gathering Test Data
Many cities have data portals open to the public. To seed our database with neighborhoods including geospatial data for boundaries, our application will use Comma-separated values (CSV) files exported from three of these data portals.
Create a directory at database/seeds/flat-files for a place to store the flat files.
We want to ensure none of these flat files are checked into source control, so create a .gitignore file at database/seeds/flat-files/.gitignore containing the following:
*
!.gitignore
The * entry is a wildcard telling git to ignore all files in the directory. The !.gitignore entry excludes the .gitignore file from the wildcard so it is still checked into source control.
Download the following CSV files to each location specified below.
this CSV to database/seeds/flat-files/chicago-illinois.csv
this CSV to database/seeds/flat-files/baltimore-maryland.csv
this CSV to database/seeds/flat-files/east-baton-rouge-parish-louisiana.csv
Let’s take a quick peek at what this data looks like. Open up database/seeds/flat-files/chicago-illinois.csv and notice the file contains a header row specifying the columns. The two columns we want are PRI_NEIGH (primary neighborhood) and the_geom (the geometry data).
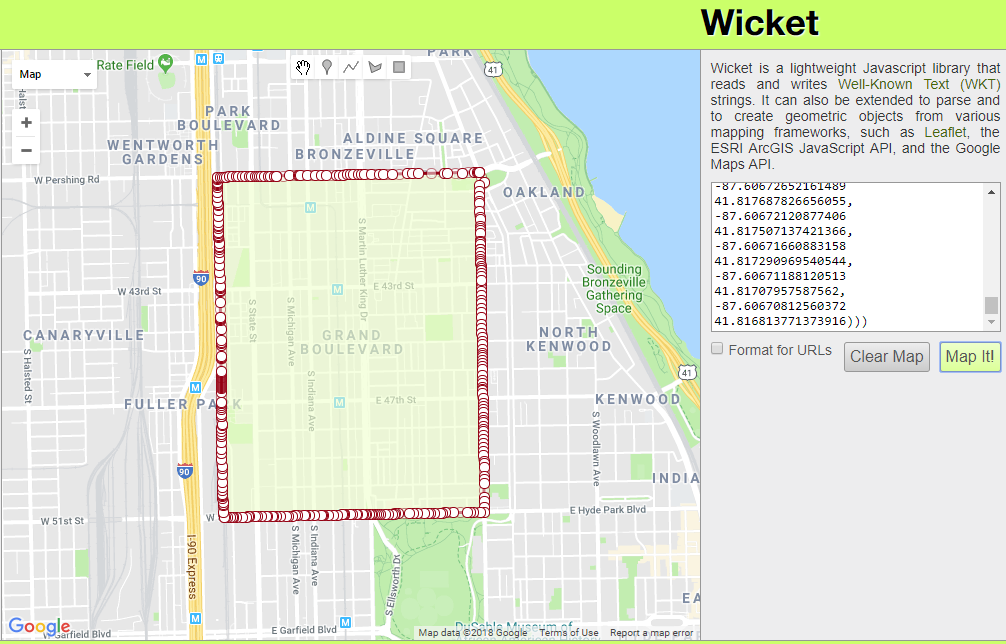
From the first row of data in the file, copy the MULTIPOLYGON(((...))) part. This is the WKT representation of the neighborhood’s boundary.
To visualize WKT data one of my favorite tools is Wicket by Arthur Endsley. Open up Wicket, paste the WKT data from your clipboard into the text box, and click “Map It!”. You’ll see the mapped multipolygon for Chicago’s neighborhood Grand Boulevard.
Creating Seeders
Now that we have our flat files and an understanding of what the data looks like let’s create some seeders.
For this exercise we’ll keep things simple with one seeder per file, each of which will extend a base class. The base class will hold logic for reading a CSV and creating a Neighborhood record. It will also contain an abstract method for transforming a geometry record into a Multipolygon. Each seeder extending the base class will implement this abstract method with logic specific to the file being processed. These seeders will also contain the run() method to be called by Laravel.
While this pattern works well for our purposes as we only have a few flat files to process, for a larger application with possibly hundreds of files I’d suggest a variation of this pattern and not defining one seeder per file.
First, let’s create our BaseNeighborhoodSeeder using artisan.
$ php artisan make:seeder BaseNeighborhoodSeeder
Update the created file at database/seeds/BaseNeighborhoodSeeder.php to match below.
<?php

use App\Models\Neighborhood;
use Grimzy\LaravelMysqlSpatial\Types\MultiPolygon;
use Illuminate\Database\Seeder;

abstract class BaseNeighborhoodSeeder extends Seeder
{
    /**
     * Mode for opening a file as read-only.
     */
    const FILE_MODE_READ = 'r';

    /**
     * Parses the given geometry value into a Multipolygon.
     *
     * @param mixed $geometry the geometry to parse
     * @return \Grimzy\LaravelMysqlSpatial\Types\MultiPolygon
     */
    protected abstract function parseGeometryToMultiPolygon($geometry): MultiPolygon;

    /**
     * Reads all records in a flat file, parses the geometry into a multipolygon,
     * and saves a Neighborhood in the database for each record.
     *
     * @param string $file_path path to the file to read data from
     * @param int $name_index the index of the column containing the neighborhood name
     * @param int $geometry_index the index of the column containing the neighborhood geometry
     * @param string $city the name of the neighborhoods' city
     * @param string $state the name of the neighborhoods' state
     * @param bool $skip_first_row if the first row of the file should be skipped (if there's a header row)
     * @param bool $use_title_case if the neighborhood names should be converted to Title Case
     * @throws \Throwable
     */
    protected function seedFromFlatFile(string $file_path,
                                        int $name_index,
                                        int $geometry_index,
                                        string $city,
                                        string $state,
                                        bool $skip_first_row,
                                        bool $use_title_case) {

        // throw an exception unless a file exists at the given location
        throw_unless(file_exists($file_path), new Exception("No file found at path '$file_path'"));

        try {
            // open the specified file at the given location
            $file = fopen($file_path, self::FILE_MODE_READ);

            // if the first row should be skipped, read the first row of the file
            if ($skip_first_row) {
                fgetcsv($file);
            }

            // while there's a row to be read in the file, read the next row
            while ($row = fgetcsv($file)) {
                // get the neighborhood name from the specified index
                $name = $row[$name_index];

                // if the name should be converted to Title Case, convert it
                if ($use_title_case) {
                    $name = title_case($name);
                }

                // parse the geometry at the specified index into a multipolygon
                $multipolygon = $this->parseGeometryToMultiPolygon($row[$geometry_index]);

                // make the new neighborhood model by filling the name, city, state, and geometry
                $neighborhood = new Neighborhood([
                    'name' => $name,
                    'city' => $city,
                    'state' => $state,
                    'geometry' => $multipolygon,
                ]);

                // throw an exception unless the neighborhood could be saved
                throw_unless($neighborhood->save(), new Exception("Failed to save neighborhood '$name'"));
            }
        } finally {
            // if the file has been opened, close it
            if (! empty($file)) {
                fclose($file);
            }
        }
    }
}
Here we’re defining an abstract class which cannot be instantiated; this class must be extended to be used. At the top of the class we have a constant for the file mode we’ll be using to open CSV files.
We define the abstract method parseGeometryToMulipolygon($geometry) and declare it returns a Multipolygon. This method must be implemented by any class extending BaseNeighborhoodSeeder and will contain the logic necessary for converting the geometry data in each CSV record to a Multipolygon. For our purposes this will always be parsing WKT but it could easily be parsing another format such as GeoJSON.
The seedFromFlatFile method contains parameters for the path to the file to read data from, the index of the neighborhood name column, the index of the neighborhood boundary geometry column, the name of the city for the neighborhoods, the name of the state for the neighborhoods, whether or not to skip the first row of the file (in case there is a header row), and whether or not the neighborhood name should be converted to Title Case before being saved.
In this method we first check if a file exists at $file_path using PHP’s file_exists function. If a file does not exist at the specified path we throw an exception.
Next, inside a try block, we open the file for reading using fopen with the file mode 'r'. If the $skip_first_row flag is true, we read the first row of the file using PHP’s function fgetcsv. Looping through each row, while there’s still a row left to read in the file, we use fgetcsv to parse the CSV row into an array of data.
Using the given $name_index we get the neighborhood name from the array and if $use_title_case is true we use Laravel’s helper method title_case to convert the string to Title Case. The neighborhood’s geometry is parsed into a MultiPolygon by passing the data of the geometry column into the parseGeometryToMultiPolygon method, which will be implemented by child classes.
Finally we create the new neighborhood record by passing an array of attributes to the Neighborhood model’s constructor. If the model could not be saved, an exception is thrown.
In the finally block we check if the $file variable has a value and if it does, we use fclose to close the file. Putting this logic inside the finally block ensures we close the file even if an exception is thrown.
With our base seeder class in place, we’re ready to create a seeder for each flat file. Start by creating ChicagoIllinoisNeighborhoodSeeder using artisan.
Update the file database/seeds/ChicagoIllinoisDatabaseSeeder.php with the content below.
<?php

use Grimzy\LaravelMysqlSpatial\Types\MultiPolygon;

class ChicagoIllinoisNeighborhoodSeeder extends BaseNeighborhoodSeeder
{
    /**
     * Index of the name column.
     */
    const COLUMN_INDEX_NAME = 0;

    /**
     * Index of the geometry column.
     */
    const COLUMN_INDEX_GEOMETRY = 1;

    /**
     * Name of the neighborhoods' city.
     */
    const CITY = 'Chicago';

    /**
     * Name of the neighborhoods' state.
     */
    const STATE = 'IL';

    /**
     * Path of the seed file relative to the `database` directory.
     */
    const DATABASE_FILE_PATH = 'seeds/flat-files/chicago-illinois.csv';

    /**
     * If the file has a header row.
     */
    const HAS_HEADER_ROW = true;

    /**
     * If the neighborhood names should be converted to Title Case.
     */
    const USE_TITLE_CASE = false;

    /**
     * Run the database seeds.
     *
     * @throws \Throwable
     */
    public function run()
    {
        // resolve the path of the seed file
        $file_path = database_path(self::DATABASE_FILE_PATH);

        // seed the neighborhoods from the flat file
        $this->seedFromFlatFile($file_path,
            self::COLUMN_INDEX_NAME,
            self::COLUMN_INDEX_GEOMETRY,
            self::CITY,
            self::STATE,
            self::HAS_HEADER_ROW,
            self::USE_TITLE_CASE);
    }

    /**
     * Parses the geometry to a multipolygon from well-known text.
     *
     * @param mixed $geometry
     * @return \Grimzy\LaravelMysqlSpatial\Types\MultiPolygon
     */
    protected function parseGeometryToMultiPolygon($geometry): MultiPolygon
    {
        return MultiPolygon::fromWKT($geometry);
    }
}
At the top of the file we have constants for the column indexes of the name and geometry data as well as constants for the neighborhood city, the neighborhood state, the file path relative to the database directory, whether or not the file has a header row, and whether or not the neighborhood names should be converted to Title Case.
Next we have the run method which is called by Laravel when executing the seeder. In this method we first resolve the path of the flat file using Laravel’s helper method database_path. Then we call the parent class’s method seedFromFlatFile using the file path and our constants as arguments.
Finally, we implement the parseGeometryToMultiPolygon method by using the fromWKT static method of Grimzy\LaravelMysqlSpatial\Types\Multipolygon to instantiate a new MultiPolygon and return it. Remember this method will be called by the base class during the execution of the seedFromFlatFile method.
Continuing with our seeders, use artisan to create BaltimoreMarylandSeeder.
$ php artisan make:seeder BaltimoreMarylandSeeder
Edit the file database/seeds/BaltimoreMarylandSeeder.php to match the contents below.
<?php

use Grimzy\LaravelMysqlSpatial\Types\MultiPolygon;

class BaltimoreMarylandSeeder extends BaseNeighborhoodSeeder
{
    /**
     * Index of the name column.
     */
    const COLUMN_INDEX_NAME = 3;

    /**
     * Index of the geometry column.
     */
    const COLUMN_INDEX_GEOMETRY = 1;

    /**
     * Name of the neighborhoods' city.
     */
    const CITY = 'Baltimore';

    /**
     * Name of the neighborhoods' state.
     */
    const STATE = 'MD';

    /**
     * Path of the seed file relative to the `database` directory.
     */
    const DATABASE_FILE_PATH = 'seeds/flat-files/baltimore-maryland.csv';

    /**
     * If the file has a header row.
     */
    const HAS_HEADER_ROW = true;

    /**
     * If the neighborhood names should be converted to Title Case.
     */
    const USE_TITLE_CASE = false;

    /**
     * Run the database seeds.
     *
     * @throws \Throwable
     */
    public function run()
    {
        // resolve the path of the seed file
        $file_path = database_path(self::DATABASE_FILE_PATH);

        // seed the neighborhoods from the flat file
        $this->seedFromFlatFile($file_path,
            self::COLUMN_INDEX_NAME,
            self::COLUMN_INDEX_GEOMETRY,
            self::CITY,
            self::STATE,
            self::HAS_HEADER_ROW,
            self::USE_TITLE_CASE);
    }

    /**
     * Parses the geometry to a multipolygon from well-known text.
     *
     * @param mixed $geometry
     * @return \Grimzy\LaravelMysqlSpatial\Types\MultiPolygon
     */
    protected function parseGeometryToMultiPolygon($geometry): MultiPolygon
    {
        return MultiPolygon::fromWKT($geometry);
    }
}
Notice how simple it was to implement a new flat file seeder because we abstracted away the logic into our base class.
Again using artisan, create our last seeder EastBatonRougeParishSeeder.
Open up the file database/seeds/EastBatonRougeParishSeeder.php and edit the contents to match below.
<?php

use Grimzy\LaravelMysqlSpatial\Types\MultiPolygon;
use Grimzy\LaravelMysqlSpatial\Types\Polygon;

class EastBatonRougeParishSeeder extends BaseNeighborhoodSeeder
{
    /**
     * Index of the name column.
     */
    const COLUMN_INDEX_NAME = 2;

    /**
     * Index of the geometry column.
     */
    const COLUMN_INDEX_GEOMETRY = 1;

    /**
     * Name of the neighborhoods' city.
     */
    const CITY = 'Baton Rouge';

    /**
     * Name of the neighborhoods' state.
     */
    const STATE = 'LA';

    /**
     * Path of the seed file relative to the `database` directory.
     */
    const DATABASE_FILE_PATH = 'seeds/flat-files/east-baton-rouge-parish-louisiana.csv';

    /**
     * If the file has a header row.
     */
    const HAS_HEADER_ROW = true;

    /**
     * If the neighborhood names should be converted to Title Case.
     */
    const USE_TITLE_CASE = true;

    /**
     * Run the database seeds.
     *
     * @throws \Throwable
     */
    public function run()
    {
        // resolve the path of the seed file
        $file_path = database_path(self::DATABASE_FILE_PATH);

        // seed the neighborhoods from the flat file
        $this->seedFromFlatFile($file_path,
            self::COLUMN_INDEX_NAME,
            self::COLUMN_INDEX_GEOMETRY,
            self::CITY,
            self::STATE,
            self::HAS_HEADER_ROW,
            self::USE_TITLE_CASE);
    }

    /**
     * Parses the geometry to a multipolygon from well-known text.
     *
     * @param mixed $geometry
     * @return \Grimzy\LaravelMysqlSpatial\Types\MultiPolygon
     */
    protected function parseGeometryToMultiPolygon($geometry): MultiPolygon
    {
        // parse the well-known text into a polygon
        $polygon = Polygon::fromWKT($geometry);

        // return a multipolygon containing the polygon
        return new MultiPolygon([$polygon]);
    }
}
This time the implementation of the parseGeometryToMultiPolygon method is different. If you check the east-baton-rouge-parish-louisiana.csv file you’ll notice the WKT contains polygons instead of multipolygons, but the method calls for a MultiPolygon to be returned. Therefore we first parse the Polygon from WKT and then create and return a new MutliPolygon using an array containing the Polygon passed to the constructor.
Next we need to edit database/seeds/DatabaseSeeder.php to call each of our seeders. Update the file to match the contents below.
<?php

use Illuminate\Database\Seeder;

class DatabaseSeeder extends Seeder
{
    /**
     * Seed the application's database.
     *
     * @return void
     */
    public function run()
    {
        $this->call([
            ChicagoIllinoisNeighborhoodSeeder::class,
            BaltimoreMarylandSeeder::class,
            EastBatonRougeParishSeeder::class,
        ]);
    }
}
Let’s quickly regenerate our autoload files using composer.
$ composer dump-autoload
Finally, let’s migrate and seed our database using an artisan command. This will create our neighborhoods table as well as seed all the neighborhoods from our flat files.
$ php artisan migrate --seed
Installing the Second Package
Use composer to require the toin0u/geocoder-laravel package we’ll be using to geocode addresses.
$ composer require "toin0u/geocoder-laravel"
While composer is running, this is a great time to get a Google API key for our project. We’ll be using Google’s Geocoding API.
For posterity’s sake let’s also add an entry in .env.example for the same key. Remember, don’t add your API key here; this file is only a template and is checked into source control.
GOOGLE_MAPS_API_KEY=
The Home Controller
Now let’s define our routes by editing routes/web.php, deleting the existing welcome route, and replacing it with the routes below.
The first route, named home.show, is for displaying the home page. The second route, named home.submit, will handle the submission of addresses and return a response containing the result of the search.
Next, create a HomeController using artisan.
$ php artisan make:controller HomeController
Edit app/Http/Controllers/HomeController.php to match the contents below.
<?php

namespace App\Http\Controllers;

use App\Models\Neighborhood;
use Grimzy\LaravelMysqlSpatial\Types\Point;
use Illuminate\Http\Request;

class HomeController extends Controller
{
    /**
     * The session key for storing the success message.
     */
    const SESSION_KEY_SUCCESS = 'success';

    /**
     * The session key for storing the error message.
     */
    const SESSION_KEY_ERROR = 'error';

    /**
     * The result message for an address that could not be geocoded.
     */
    const RESULT_BAD_ADDRESS = 'Failed to find a location for that address!';

    /**
     * The result message for an address that does not fall in any exiting Neighborhood's geometry.
     */
    const RESULT_NO_RESULTS = 'No results for that address!';

    /**
     * The result message prefix for a found Neighborhood.
     */
    const RESULT_NEIGHBORHOOD_PREFIX = 'That address is in ';

    /**
     * The route name for showing the home page.
     */
    const ROUTE_NAME_SHOW_HOME = 'home.show';

    /**
     * Shows the home page.
     *
     * @return \Illuminate\View\View
     */
    public function show()
    {
        return view('home');
    }

    /**
     * Handles submission of an address and returns a redirect to the home page with success or error message.
     *
     * @param \Illuminate\Http\Request $request
     * @return \Illuminate\Http\RedirectResponse
     */
    public function submit(Request $request)
    {
        // validate the request
        $this->validate($request, [
            'address' => 'required',
        ]);

        // get the given address from the request
        $address = $request->input('address');

        // make the geocoder
        $geocoder = app('geocoder');

        // geocode the address and get the first result
        $result = $geocoder->geocode($address)->get()->first();

        // if a result couldn't be found, redirect to the home page with a result message flashed to the session
        if (! $result) {
            return redirect(route(self::ROUTE_NAME_SHOW_HOME))->with(self::SESSION_KEY_ERROR, self::RESULT_BAD_ADDRESS);
        }

        // get the coordinates of the geocoding result
        $coordinates = $result->getCoordinates();

        // get the latitude of the coordinates
        $lat = $coordinates->getLatitude();

        // get the longitude of the coordinates
        $lng = $coordinates->getLongitude();

        // create a new point using the coordinates
        $point = new Point($lat, $lng);

        // get the first Neighborhood that has geometry containing the point
        $neighborhood = Neighborhood::contains('geometry', $point)->first();

        // if a Neighborhood couldn't be found, redirect to the home page with a result message flashed to the session
        if (! $neighborhood) {
            return redirect(route(self::ROUTE_NAME_SHOW_HOME))->with(self::SESSION_KEY_ERROR, self::RESULT_NO_RESULTS);
        }

        // format the result message for the found Neighborhood
        $message = $this->formatNeighborhoodResult($neighborhood);

        // redirect to the home page with the result message flashed to the session
        return redirect(route(self::ROUTE_NAME_SHOW_HOME))->with(self::SESSION_KEY_SUCCESS, $message);
    }

    /**
     * Format the result message for a found neighborhood.
     *
     * @param \App\Models\Neighborhood $neighborhood
     * @return string
     */
    private function formatNeighborhoodResult(Neighborhood $neighborhood) {
        return self::RESULT_NEIGHBORHOOD_PREFIX . $neighborhood->name . ', ' . $neighborhood->city . ', ' . $neighborhood->state . '.';
    }
}
In this file we first define constants for the session key storing success messages, the session key storing error messages, the text for result messages, and the home.show route name.
In the show method we simply return the view named home using the Laravel helper methodview.
The submit method accepts an argument of type Illuminate\Http\Request called $request. Laravel will automatically inject this variable containing the current request data.
First we validate the request by specifying a rule for address making the field required. The validated address is then retrieved using the input method on the $request variable. We use Laravel’s apphelper method which uses the service container to resolve an instance of the geocoder. Using method chaining we geocode the given address and get the first result. If a result couldn’t be found for the given address we redirect the user to the home page with an error message flashed to the session.
Next we get the longitude and latitude coordinates from the result and create a new Grimzy\LaravelMysqlSpatial\Types\Point instance by passing the coordinates into the constructor.
The eloquent query scopecontains provided by the grimzy/laravel-mysql-spaital package is then used to scope the query by records with a geometry containing the point. We use the first method to get the first result. This will generate a query along the lines of:
SELECT * FROM `neighborhoods` WHERE ST_Contains(`geometry`, ST_GeomFromText('POINT(0 0)')) LIMIT 1
In this case 'POINT(0 0)' is the WKT representation of our longitude and latitude (which won’t actually be 0, 0 unless our user lives in the middle of the ocean).
Notice that we are using MySQL to calculate if the the geometry contains the point. This is much faster than if we had chunked through all the records and had done the calculation in PHP.
Finally, if a resulting neighborhood containing the point couldn’t be found we return a redirect to the home page with an error message flashed to the session. Otherwise, we format the neighborhood name, city, and state into a success result message (using the formatNeighborhoodResult method) and return a redirect to the home page with the message flashed to the session.
The Home View
Rename the blade template at resources/views/welcome.blade.php to resources/views/home.blade.php and open the file.
Under the <!-- Styles --> comment, add a link to Bootstrap’s style sheet.
Here we use the blade directive @if to check if there’s a message in the success key of the current session. If there is one, we display an alert to the user containing the message. If there isn’t one, we use the blade directive @elseif to check if there’s a message in the error key of the current session, again displaying it to the user if it exists.
Next we define a form with an action specifying our submission route using the routehelper method. The @crsf blade directive is used to generate a Cross-Site Request Forgery field and token. If the $errors message bag contains an entry for address we add the has-error class to the form group div and display the error in a help block.
Conclusion
That’s it! Open the project in your browser and try out some different addresses! The address will be geocoded and a neighborhood will be returned if any neighborhoods in the database have a boundary containing the address’s coordinates. If no address coordinates or neighborhood could be found, an error message stating such will be returned.
Try some of these addresses:
1558 N Damen Ave, Chicago, IL 606221001 E Fayette St, Baltimore, MD 21202201 Community College Dr, Baton Rouge, LA 70806123 Fake St, NowhereYour Address