
Source: https://medium.com/beqode/using-laravel-passport-with-react-native-8e1d159df3f
Tag: Laravel
-
DO Repeat Yourself (Laravel Edition)
This story was originally published on beqode.com with proper code syntax highlighting and formatting. Read it there, give it a clap here.
OK, the title is clickbait, go against the “Don’t Repeat Yourself” (DRY) principle and you’ll trigger the Internet.
Obviously we don’t want to repeat ourselves a.k.a copy/paste, a.k.a spaghetti code ™, a.k.a “Don’t touch this piece”, a.k.a high maintenance cost code…
But there are (few) areas where it is even recommended to repeat yourself and I wanted to highlight them only because I made the mistakes myself when I was a junior developer.
Controllers
Here I refer to a controller as the method inside a
classcontroller, the direct “controller” of a view, resource, etc…Controllers can repeat themselves.
Well, that is if and only if you’ve been separating your domains properly:
- Repositories to query your DB/Model
- Services to extract your business logic
Once everything is separated, it is quite normal for 2 controllers to look alike:
class UserController
{
    protected $users;

    public function __construct(Users $users)
    {
        $this->users = $users;
    }

    public function show(Request $request, string $username)
    {
        $user = $this->users->findByUsername($username);

        if (!$user) {
            return abort(404);
        }

        return view('user.show', compact('user'));
    }

    public function edit(Request $request, string $username)
    {
        $user = $this->users->findByUsername($username);

        if (!$user) {
            return abort(404);
        }
        return view('user.edit', compact('user'));
    }
}
It’s obviously OK to repeat:
$user = $this->users->findByUsername($username);

if (!$user) {
    return abort(404);
}
Whereas if you did not have the
Usersrepository, that would not be acceptable:class UserController { public function show(Request $request, string $username) { $user = User::with('posts') ->whereNotNull('email_verified_at') ->whereNull('banned_at') ->where('username', $username) ->first(); // ... } public function edit(Request $request, string $username) { $user = User::with('posts') ->whereNotNull('email_verified_at') ->whereNull('banned_at') ->where('username', $username) ->first(); // ... } }To make my point even clearer: you should NOT attempt to group
showandedittogether in order to stay DRY:class UserController { // ... public function show(Request $request, string $username) { return $this->showOrEdit($request, $username, 'show'); } public function edit(Request $request, string $username) { return $this->showOrEdit($request, $username, 'edit'); } protected function showOrEdit(Request $request, string $username, string $action) { $user = $this->users->findByUsername($username); if (!$user) { return abort(404); } return view('user.' . $action, compact('user')); } }While this could seem like a good idea now (it is not), it is very likely the 2 controllers will evolve their own separate ways and you’ll end up with a
showOrEditfull ofifand very prone to errors ! It’s basically added complexity for very little gains and at the cost of readability.Even worse, trying to group
editandshowtogether inside the controller instead of properly extracting the business logic into theUsersrepository !class UserController { // ... protected function showOrEdit(Request $request, string $username, string $action) { $user = User::with('posts') ->whereNotNull('email_verified_at') ->whereNull('banned_at') ->where('username', $username) ->first(); // ... } }So do repeat your controllers, but only when they are composed with your different repositories & services.
You could even OOP’ing your class controllers (inheritance) in order to group functionalities and stay DRY, this is almost certainly a bad idea ! class controllers are merely connectors to your views and should not hold any business logic (which is what the inheritance pattern is likely trying to achieve).
All of the above comes down to the “Fat model, skinny controllers” mantra. You can have as many skinny controllers as you want, and because they are skinny, because all your business logic (repositories, services) has been extracted, they will be very similar and that’s completely fine ! Do repeat those skinny controllers!
Views
Another area where you shouldn’t sweat it too long for keeping your code DRY is Views. One with good intentions could spend way too much time trying to re-use views, splitting them into multiple partials, make use of layout inheritance, etc…
Views are very very likely to change over time (copy, CSS…) and trying to optimise reusability is in my experience/opinion, not worth the effort.
Views are very unique by definition, they fulfil a very specific (display) purpose. While it seems like 2 similar views could be grouped together in a partial, it’s rarely true, misleading and will almost certainly end up in unmaintainable code.
See Views as disposable pieces of code: Copy them, delete them, replace them without too much thinking.
A concrete example is trying to make one unique component for two different list items.
Say you have a
_booking-item.twigpartial, it displays a Booking item in a list of upcoming bookings in your Admin area:<article class="booking"> <h2 class="booking__title">New Booking #{{ booking.id }}</h2> <div class="booking__buttons"> <button>Accept</button> <button>Reject</button> </div> </article>Now you have a new requirement to display a list of archived bookings in a tab next to your upcoming bookings list.
It is tempting to reuse
_booking-item.twigand to write some conditional logic in it:<article class="booking{% if booking.isArchived() %} booking--archived{% endif %}"> {% if booking.isUpcoming() %} <h2 class="booking__title">New Booking #{{ booking.id }}</h2> {% else %} <h2 class="booking__title">Booking #{{ booking.id }}</h2> {% endif %} {% if booking.isArchived() %} <p>Processed on {{ booking.processed_at|date('M d, Y') }}</p> {% endif %} {% if booking->isUpcoming() %} <div class="booking__buttons"> <button>Accept</button> <button>Reject</button> </div> {% endif %} </article>While clean-ish, this is not (at all) scalable.
Also remember that the above is not a real world example, and I would even argue that this simple view is already bloated with needless logic that prevents me from understanding the final result of the view.
When I open a view I want to instantly have a feeling of what it will look like. Views are unimportant pieces of code, they are swappable, deletable, replaceable…
If we rewrite our
_booking-item.twigpartial into two different partials:{# resources/views/_booking-item.twig (Unchanged) #} <article class="booking"> <h2 class="booking__title">New Booking #{{ booking.id }}</h2> <div class="booking__buttons"> <button>Accept</button> <button>Reject</button> </div> </article> {# resources/views/_booking-archive-item.twig #} <article class="booking booking--archived"> <h2 class="booking__title">Booking #{{ booking.id }}</h2> <p>Processed on {{ booking.processed_at|date('M d, Y') }}</p> </article>I have a much better understanding of what the final result will look like.
Yes, if you change the
booking__titleclass name in your CSS tobooking__heading, you do have to edit 2+ files to change the class name in your views. That’s the trade-off for readability.There is no hard line of when to group or split your views, but in my experience don’t be afraid to repeat yourself in your views, this is very much unimportant.
The point I am trying to make is: Views may not be DRY. I would even say they should not be DRY. This will save you a lot of time, again, Views are disposable, write them, leave them, come back to them, edit them, delete them, they should not be in the way, they should not delay the greater Architecture you have to design in your business logic, they must take very little of your precious bandwidth.
Conclusion
There is a limit to DRY, and that limit is: Once you’ve been separating your different concerns properly, you can Repeat Yourself (RY) ™.
Especially (and only ?) in areas like Controllers & Views.
Source: https://medium.com/beqode/do-repeat-yourself-laravel-edition-c4a058f587f6
-
Laravel: Adding those missing helpers you always wanted
One of the things I like from any PHP project is having global helpers. You know, those functions you can call anywhere and remove or save you many lines or verbosity into one, maybe two, while allocating in one place any logic.
$expected = from($this)->do('foo');The problem with Laravel itself is that sometimes is not enough with the helpers it includes. The ones included are mostly quick access to Services (like
cache()) or Factories (likeresponse()), and some that help you having an expected result (likedata_get).For example, let’s say we want a function be called multiple times but sleep between executions, like we would need to avoid rate limiting for an external API. Without a helper, we will have to resort to create a Class and put the logic inside a public static method, and hopefully remember where it is located.
class Logics
{
    public static function logic_sleep($times, $sleep, $callback)
    {
        // Run and sleep between calls.
    }
}Logics::sleep(4, 10, function() {
    // ...
});
Using this technique makes your global not so globally. Since this is one of many thing I need in my projects, I decided to create a package with more global helpers:
Those helpers you always wanted
The main idea of a global helper, at least to me, is to have a piece of code that offers simplicity, readability and flexibility. Think about them as small swiss knives that you may put in your pocket.
For example, the above can become its own global function, and we can call it literally anywhere.
public function handle()
{
    logic_sleep(10, 5, function () {
        $this->uploadRecords();
    });
}
The helper is very simple to operate, but we won’t know what the hell it does behind the scenes unless we dig into the source code, which is fair. In any case, having a global function of one or two words makes the whole code more readable. And since it’s our own helper, we can call it anything we want.
How to add your own helpers
But that’s is only one of the many helpers I decided to create for things I use a lot.
To add global helpers to your project, you can simply add a PHP file with the global functions you want anywhere in your project (preferably inside your PSR-4 root folder) and tell Composer to load it.
You are free to add how many files you want. I decided to separate them into categories like I did for my package to avoid having a wall of text full of functions.
"autoload": {
    "psr-4": {
        "App\\": "app"
    },
    "files": [
        "app/Helpers/datetime.php",
        "app/Helpers/filesystem.php",
        "app/Helpers/http.php",
        "app/Helpers/objects.php",
        "app/Helpers/services.php"
    ]
},
I’m opened to suggestions too, so give it a go if you think it may be useful for you:
DarkGhostHunter/Larahelp
Supercharge your Laravel projects with more than 35 useful global helpers.
github.com

-

Laravel localization and multi-language functionality in web
MAKE USE OF LARAVEL FEATURES AND BEST PACKAGES FOR LOCALIZATION
Laravel localization and multi-language functionality in web
A step by step guide to implement multi-language functionality in your web projects
Laravel made it so easy to implement a multi-language website. You can implement it with Laravel localization and just some tricks. Also, there is plenty of Laravel translation packages which you can use in your project. In this post, I will explain how to implement multi-language functionality.
Creating a multi-language website requires two steps. Firstly, you need to detect user local language setting and change it bu user choice. Secondly, you need to translate messages and strings into user local language, in which we use Laravel localization.
DETECTING AND SETTING USER LOCALE
In order to detect user language setting, we need to create a language middleware. this middleware checks for locale setting in the user session. If there was no locale setting, the middleware sets a default locale setting. Then, it sets system locale by the user session setting.
if (is_null(session('locale'))) {
    session(['locale'=> "en"]);
}
app()->setLocale(session('locale'));
Setting locale is enough for Laravel localization to work. After that, we need a simple function To change the system language. This function gets a locale string and sets the user locale session.
public function change_lang($lang) {
    if (in_array($lang,['en','tr','fa'])) {
        session(['locale'=> $lang]);
    }
    return back();
}
In order to make sure the given string is a locale string, we check the language string against an array of locales.
Any route to that function, like a drop down to select language will work perfectly and will show your website multi-language functionality for users. So they can easily choose their languages.
Using Laravel localization to translate strings
Every string that needed to be translated must be in Laravel lang directive or __ function. For example, you can manage all message strings with inside messages.
@lang('messages.successful_login')In addition, you can find more useful information about localization like how to put variables inside translation strings in Laravel documentation.
Laravel Langman package is one of the useful packages for translation. In order to translate strings, every time you updated views with new strings, you just need to run Langman sync command:
php artisan langman:syncLaravel Langman has a lot more commands that would help you in your Laravel project localization. Reading through its documentation will add a lot.
Although this method is easy and enough, I realized that for SEO purposes and to share localized links to your website, you better consider concatenating user locale in your projects routes. Then, you can check user locale from the query string and the rest is just as same as I explained in this post.
Keep in touch and share your ideas about Laravel localization and how you implement multi-language functionality in your web projects. What other methods and Laravel packages do you use in your multi-language projects?
Also, you can read my other post about Laravel authorization and user’s permission management in Laravel.
If you find this multi-language functionality method useful in Laravel and you may want to implement this on your Laravel projects, share your ideas with me. Follow me on Twitter, Let’s connect on LinkedIn and give me a visit to amiryousefi.com
-
Testing Laravel Password Resets
Testing is an important yet often overlooked aspect of building successful Laravel applications. This article will provide an introduction to testing applications written using the Laravel Framework.
For our purposes we’ll be writing feature tests that make HTTP requests to our application and then make assertions about the responses and the state of the application’s database after the request is complete. We will make minimal changes to the authentication scaffolding provided by Laravel and focus on testing the Password Reset feature.
Getting Started
Assuming you are familiar with setting up a new Laravel project, use your terminal and the Laravel installer to create a new project.
If you aren’t familiar with setting up a development environment for a new Laravel application I encourage you to check out the documentation on installation and the Vagrant box Homestead.
Create a new Laravel application in the directory
password-reset-testing.$ laravel new password-reset-testing
Once composer has finished installing everything, change your working directory to that of the new project.
$ cd password-reset-testing/
Next use Artisan to generate the authentication scaffolding for our application.
$ php artisan make:auth
Again using Artisan, run the database migrations to create the
usersandpassword_resetstables.$ php artisan migrate
Naming Each Route
As a best practice, each of our application’s routes should have a name. By using route names and the route helper function instead of hard-coding routes, the URI of a route can be easily changed in the future.
Open up
routes/web.phpand change the contents to match below.<?php
// Welcome Route
Route::get('/', function () {
return view('welcome');
})->name('welcome');
// Authentication Routes
Route::get('login', 'Auth\LoginController@showLoginForm')
->name('login');
Route::post('login', 'Auth\LoginController@login')
->name('login.submit');
Route::post('logout', 'Auth\LoginController@logout')
->name('logout');
// Registration Routes
Route::get('register',
'Auth\RegisterController@showRegistrationForm')
->name('register');
Route::post('register',
'Auth\RegisterController@register')
->name('register.submit');
// Password Reset Routes
Route::get('password/reset',
'Auth\ForgotPasswordController@showLinkRequestForm')
->name('password.request');
Route::post('password/email',
'Auth\ForgotPasswordController@sendResetLinkEmail')
->name('password.email');
Route::get('password/reset/{token}',
'Auth\ResetPasswordController@showResetForm')
->name('password.reset');
Route::post('password/reset',
'Auth\ResetPasswordController@reset')
->name('password.reset.submit');
// Home Route
Route::get('/home', 'HomeController@index')
->name('home');Note that we didn’t change any of the routes provided by the original
Auth::routes()statement, we simply rewrote them to include names for every route.Editing the Base Test Case
Before we write our tests, let’s quickly edit the base test case. Open up the file at
tests/TestCase.phpand edit the contents to match below.<?php
namespace Tests;
use Illuminate\Foundation\Testing\DatabaseTransactions;
use Notification;
use Illuminate\Foundation\Testing\TestCase as BaseTestCase;
abstract class TestCase extends BaseTestCase
{
use CreatesApplication;
use DatabaseTransactions;
/**
* Set up the test case.
*/
protected function setUp()
{
parent::setUp();
Notification::fake();
}
}First we import the
Illuminate\Foundation\Testing\DatabaseTransactionstrait and theNotificationfacade.The statement
use DatabaseTransactionsat the top of the class tells Laravel to create a database transaction before each test and roll back the transaction after each test. This will keep our tests from affecting the state of our database; the database will be in the same starting state for each test.We override the
setUpmethod which is called before running each test. In this method we first call the parentsetUpmethod then callfakeon theNotificationfacade. This will fake all notifications sent out during any of our tests. Within each test we can then use another method on theNotificationfacade to assert a notification would have been sent to the correct destination.Creating the Test Class
Use artisan to generate a new feature test called
PasswordResetTest.$ php artisan make:test PasswordResetTest
Open the new file at
tests/Feature/PasswordResetTest.phpand edit the contents to match below.<?php
namespace Tests\Feature;
use App\User;
use Hash;
use Illuminate\Auth\Notifications\ResetPassword;
use Illuminate\Foundation\Testing\WithFaker;
use Notification;
use Password;
use Tests\TestCase;
class PasswordResetTest extends TestCase
{
use WithFaker;
const ROUTE_PASSWORD_EMAIL = 'password.email';
const ROUTE_PASSWORD_REQUEST = 'password.request';
const ROUTE_PASSWORD_RESET = 'password.reset';
const ROUTE_PASSWORD_RESET_SUBMIT = 'password.reset.submit';
const USER_ORIGINAL_PASSWORD = 'secret';
}Here we’ve added import statements for the model
App\User, the facadesHash,Notification, andPassword, and the notificationIlluminate\Auth\Notifications\ResetPassword. We’ve also added an import statement for the traitIlluminate\Foundation\Testing\WithFakerwhich conveniently instantiates a Faker factory for us for use within our tests. We simply specify our class is using theWithFakertrait and each test case will have an instance of a Faker factory at$this->faker.Within our class we replaced the example test case with a statement specifying we’re using the
WithFakertrait, constants for each route name we’ll be using, and a constant for the password test users will have.Writing Test Cases
We will write tests for the following cases:
- Showing the password reset request page
- Submitting the password reset request page with an invalid email address
- Submitting the password reset request page with an email address not in use
- Submitting the password reset request page with a valid email address in use
- Showing the reset password page
- Submitting the reset password page with an invalid email address
- Submitting the reset password page with an email address not in use
- Submitting the reset password page with a valid email address in use and a password that does not match the password confirmation
- Submitting the reset password page with a valid email address in use and a password that isn’t long enough
- Submitting the reset password page with a valid email address in use and a valid password matching the password confirmation
After each new test, feel free to run PHPUnit using your terminal.
$ ./vendor/bin/phpunit
Testing Showing the Password Reset Request Page
Now it’s time to write our first test! Edit the
PasswordResetTestclass by adding the method below. By convention each test case method starts withtestwhich is then recognized by PHPUnit./**
* Testing showing the password reset request page.
*/
public function testShowPasswordResetRequestPage()
{
$this
->get(route(self::ROUTE_PASSWORD_REQUEST))
->assertSuccessful()
->assertSee('Reset Password')
->assertSee('E-Mail Address')
->assertSee('Send Password Reset Link');
}In this test case we use the method
getto make aGETrequest to the specified URI. We generate the URI using theroutehelper method and the name of our route, which is stored in a constant. TheassertSuccessfulmethod asserts the response has a200level status code. Next we use theassertSeemethod to check for the presence of the textReset Password,E-Mail Address, andSend Password Reset Link.Testing Submitting the Password Reset Request Page
Our next few tests will be testing submitting the password reset request page with various inputs.
Add the next test shown below which tests submitting a password reset request with an invalid email address.
/**
 * Testing submitting the password reset request with an invalid
 * email address.
 */
public function testSubmitPasswordResetRequestInvalidEmail()
{
    $this
        ->followingRedirects()
        ->from(route(self::ROUTE_PASSWORD_REQUEST))
        ->post(route(self::ROUTE_PASSWORD_EMAIL), [
            'email' => str_random(),
        ])
        ->assertSuccessful()
        ->assertSee(__('validation.email', [
            'attribute' => 'email',
        ]));
}
When a request fails validation, Laravel will return a redirect to the location the request came from with validation error messages flashed to the session. To make assertions on the response the user will see, therefore, we need to follow redirects with the
followingRedirectsmethod. We also specify a location we’re making the request from using thefrommethod.Next we use the
postmethod to issue aPOSTrequest to thepassword.emailroute (again using the route helper and a previously defined constant) with data specifying theemailkey as a random string (using thestr_randomhelper method).We assert the response is successful and check for the presence of a validation message. The
__helper method is used to format the validation message using localization files.validation.emailspecifies the fileresources/lang/{locale}/validation.phpand theemailarray key, where{locale}is the application’s configured locale. The:attributeparameter in the stringThe :attribute must be a valid email address.will be replaced by the stringemailas specified by the associative array passed as the second argument to the__method.
Next we’ll be testing submitting the password reset request page with a valid email address that is not in use by any user of the application.
Add the test shown below.
/**
 * Testing submitting the password reset request with an email
 * address not in the database.
 */
public function testSubmitPasswordResetRequestEmailNotFound()
{
    $this
        ->followingRedirects()
        ->from(route(self::ROUTE_PASSWORD_REQUEST))
        ->post(route(self::ROUTE_PASSWORD_EMAIL), [
            'email' => $this->faker->unique()->safeEmail,
        ])
        ->assertSuccessful()
        ->assertSee(e(__('passwords.user')));
}
Again we follow redirects and set the location where our request should originate from, but this time we use Faker to generate an email address that is not in use by anyone in the world (as the domains are
example.com,example.net, andexample.org). We use theuniquemethod to ensure the email address returned has not been previously returned by Faker.We assert the response is successful and check for the presence of the validation error message specified by the
userkey in the associative array in the fileresources/lang/{locale}/passwords.php. This time the validation message contains a reserved HTML character,', so we must use theehelper method to replace the character with it’s corresponding character entity.
Finally it’s time to test successfully submitting the password reset request page with a valid email address present in our application’s database.
Add the test shown below.
/**
 * Testing submitting a password reset request.
 */
public function testSubmitPasswordResetRequest()
{
    $user = factory(User::class)->create();

    $this
        ->followingRedirects()
        ->from(route(self::ROUTE_PASSWORD_REQUEST))
        ->post(route(self::ROUTE_PASSWORD_EMAIL), [
            'email' => $user->email,
        ])
        ->assertSuccessful()
        ->assertSee(__('passwords.sent'));

    Notification::assertSentTo($user, ResetPassword::class);
}
In this test we use the
factoryhelper method to create a new user in our database. Then we follow redirects for the response to ourPOSTrequest to thepassword.emailroute. Our request specifies the created user’s email address in theemailkey of the payload. We assert the response is successful and check for the presence of the stringWe have e-mailed your password reset link!, specified with the argumentpasswords.sentpassed to the__helper method.Using the
Notificationfacade’s methodassertSentTowe assert theResetPasswordnotification was sent to the$user. We can pass the model stored in the variable$userdirectly into theassertSentTomethod because ourUsermodel, by default, uses theIlluminate\Notifications\Notifiabletrait. When routing emails for any model using theNotifiabletrait, theemailproperty on the model will be used by default.Testing Showing the Password Reset Page
Next, to test showing the password reset page, add the test shown below.
/**
 * Testing showing the reset password page.
 */
public function testShowPasswordResetPage()
{
    $user = factory(User::class)->create();

    $token = Password::broker()->createToken($user);

    $this
        ->get(route(self::ROUTE_PASSWORD_RESET, [
            'token' => $token,
        ]))
        ->assertSuccessful()
        ->assertSee('Reset Password')
        ->assertSee('E-Mail Address')
        ->assertSee('Password')
        ->assertSee('Confirm Password');
}
We again create a user using the
factoryhelper method. Next we create a valid password reset token using thePasswordfacade.The value of
$tokenis used to replace thetokenparameter in thepassword.resetroute. We send aGETrequest to this route, assert the response is successful, and check for the presence of the text for page elements.Testing Submitting the Password Rest Page
Next we’ll test submitting the password reset page, starting with using an invalid email address.
Continue our testing by adding the test shown below.
/**
 * Testing submitting the password reset page with an invalid
 * email address.
 */
public function testSubmitPasswordResetInvalidEmail()
{
    $user = factory(User::class)->create([
        'password' => bcrypt(self::USER_ORIGINAL_PASSWORD),
    ]);

    $token = Password::broker()->createToken($user);

    $password = str_random();

    $this
        ->followingRedirects()
        ->from(route(self::ROUTE_PASSWORD_RESET, [
            'token' => $token,
        ]))
        ->post(route(self::ROUTE_PASSWORD_RESET_SUBMIT), [
            'token' => $token,
            'email' => str_random(),
            'password' => $password,
            'password_confirmation' => $password,
        ])
        ->assertSuccessful()
        ->assertSee(__('validation.email', [
            'attribute' => 'email',
        ]));

    $user->refresh();

    $this->assertFalse(Hash::check($password, $user->password));

    $this->assertTrue(Hash::check(self::USER_ORIGINAL_PASSWORD,
        $user->password));
}
In this test we’re again using the
factoryhelper method to create at test user but this time we explicitly set the user’s password. To do this we use thebcrypthelper method to hash the value of our constant.We create another password reset token and generate a random string to use as the new password for our request’s payload. Again following redirects we
POSTto thepassword.reset.submitroute with a request originating from thepassword.resetroute. A random string is used for the email address in the request payload.After asserting the response was successful and checking for the
validation.emailvalidation message we refresh the user model and use thecheckmethod on theHashfacade to assert the user’s password has not changed.
Next we’ll test submitting the password reset page with an email address not in use by our application’s database.
Add the test shown below.
/**
 * Testing submitting the password reset page with an email
 * address not in the database.
 */
public function testSubmitPasswordResetEmailNotFound()
{
    $user = factory(User::class)->create([
        'password' => bcrypt(self::USER_ORIGINAL_PASSWORD),
    ]);

    $token = Password::broker()->createToken($user);

    $password = str_random();

    $this
        ->followingRedirects()
        ->from(route(self::ROUTE_PASSWORD_RESET, [
            'token' => $token,
        ]))
        ->post(route(self::ROUTE_PASSWORD_RESET_SUBMIT), [
            'token' => $token,
            'email' => $this->faker->unique()->safeEmail,
            'password' => $password,
            'password_confirmation' => $password,
        ])
        ->assertSuccessful()
        ->assertSee(e(__('passwords.user')));

    $user->refresh();

    $this->assertFalse(Hash::check($password, $user->password));

    $this->assertTrue(Hash::check(self::USER_ORIGINAL_PASSWORD,
        $user->password));
}
Nothing new on this test. We create a user, password reset token, and new password. Then the follow redirects,
POSTto thepassword.reset.submitroute from thepassword.resetroute using the token, a random and unique safe email, and the new password. We assert the response is successful, check for the presence of thepasswords.usertranslated string (after swapping any html character entities in the string), refresh the user, and assert the user’s password hasn’t changed.
The next test will be testing submitting the password reset page with a password that doesn’t match the password confirmation.
Add the test shown below.
/**
 * Testing submitting the password reset page with a password
 * that doesn't match the password confirmation.
 */
public function testSubmitPasswordResetPasswordMismatch()
{
    $user = factory(User::class)->create([
        'password' => bcrypt(self::USER_ORIGINAL_PASSWORD),
    ]);

    $token = Password::broker()->createToken($user);

    $password = str_random();
    $password_confirmation = str_random();

    $this
        ->followingRedirects()
        ->from(route(self::ROUTE_PASSWORD_RESET, [
            'token' => $token,
        ]))
        ->post(route(self::ROUTE_PASSWORD_RESET_SUBMIT), [
            'token' => $token,
            'email' => $user->email,
            'password' => $password,
            'password_confirmation' => $password_confirmation,
        ])
        ->assertSuccessful()
        ->assertSee(__('validation.confirmed', [
            'attribute' => 'password',
        ]));

    $user->refresh();

    $this->assertFalse(Hash::check($password, $user->password));

    $this->assertTrue(Hash::check(self::USER_ORIGINAL_PASSWORD,
        $user->password));
}
Again nothing new on this test except we’re checking for a different validation message.
Our last invalid submission case to test for submitting the password reset page is using a new password that’s too short.
Add the test shown below.
/**
 * Testing submitting the password reset page with a password
 * that is not long enough.
 */
public function testSubmitPasswordResetPasswordTooShort()
{
    $user = factory(User::class)->create([
        'password' => bcrypt(self::USER_ORIGINAL_PASSWORD),
    ]);

    $token = Password::broker()->createToken($user);

    $password = str_random(5);

    $this
        ->followingRedirects()
        ->from(route(self::ROUTE_PASSWORD_RESET, [
            'token' => $token,
        ]))
        ->post(route(self::ROUTE_PASSWORD_RESET_SUBMIT), [
            'token' => $token,
            'email' => $user->email,
            'password' => $password,
            'password_confirmation' => $password,
        ])
        ->assertSuccessful()
        ->assertSee(__('validation.min.string', [
            'attribute' => 'password',
            'min' => 6,
        ]));

    $user->refresh();

    $this->assertFalse(Hash::check($password, $user->password));

    $this->assertTrue(Hash::check(self::USER_ORIGINAL_PASSWORD,
        $user->password));
}
This time we pass an argument
5to thestr_randomhelper function to specify the length of the random returned string (as opposed to the default length of16). Another difference in this test is we’re checking for the presence of a validation message,validation.min.string, with two parameters,attributeandmin.Notice how we can use dot notation to specify a translation string in a nested array. To learn more about these validation messages and translation strings, check out the file at
resources/lang/{locale}/validation.php.
Finally, it’s time to test the happy path: submitting the password reset page with a valid email address belonging to a user with a valid password reset token and a password matching the confirmation password (that isn’t too short).
Add the final test shown below.
/**
 * Testing submitting the password reset page.
 */
public function testSubmitPasswordReset()
{
    $user = factory(User::class)->create([
        'password' => bcrypt(self::USER_ORIGINAL_PASSWORD),
    ]);

    $token = Password::broker()->createToken($user);

    $password = str_random();

    $this
        ->followingRedirects()
        ->from(route(self::ROUTE_PASSWORD_RESET, [
            'token' => $token,
        ]))
        ->post(route(self::ROUTE_PASSWORD_RESET_SUBMIT), [
            'token' => $token,
            'email' => $user->email,
            'password' => $password,
            'password_confirmation' => $password,
        ])
        ->assertSuccessful()
        ->assertSee(__('passwords.reset'));

    $user->refresh();

    $this->assertFalse(Hash::check(self::USER_ORIGINAL_PASSWORD,
        $user->password));

    $this->assertTrue(Hash::check($password, $user->password));
}
In this test we use the
Hashfacade to assert the user’s password has changed to the given password, thus successfully completing the password reset.Conclusion
This concludes our testing for Laravel’s password resets. In ten short tests we were able to do things like create test users and valid password reset tokens, make HTTP requests to our application, assert the response contains desired content, and check if the user’s password has changed as a result of the request.
Laravel has provided ample testing capabilities and I strongly recommend reading the documentation for a deeper look at the possibilities.
You can view the source code for this project on GitHub.
-
Getting Started with Geospatial Data in Laravel
Today we’ll be learning about working with geospatial data, or data relating to geographical locations, in Laravel 5.6. As an exercise for working with this kind of data we’ll be building a simple USA Neighborhood Finder application.
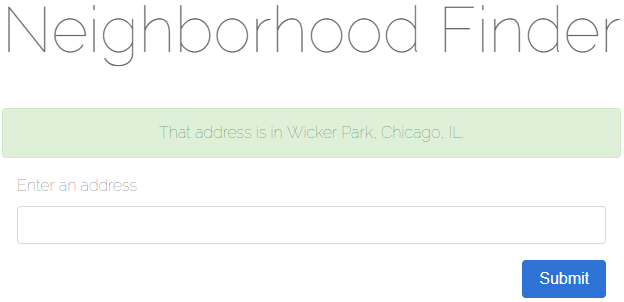
screenshot of a successful result in our application There are three main learning objectives for this article:
- How to use Google’s Geocoding API to geocode an address into corresponding coordinates consisting of a longitude and latitude.
- How to import geospatial data in Well-Known Text (WKT) format into a spatial column in MySQL.
- How to determine if a point (in this case a longitude and latitude) is contained by a geometry (in this case a neighborhood boundary).
Overview
The flow of our application is as follows:
- A user enters an address and clicks “Submit”.
- The name of the neighborhood which contains the address is displayed to the user (or an error message stating no location or neighborhood could be found).
For the purposes of this article we won’t be tracking down the neighborhood boundaries of every neighborhood in the USA; instead we’ll be using three example data sets but set things up so more data sources can easily be added in the future.
You can take a look at the data sources using these links:
- Chicago, IL neighborhood boundaries
- Baltimore, MD neighborhood boundaries
- East Baton Rouge Parish, Baton Rouge, LA neighborhood boundaries
A basic schema of our application’s database is shown below. We only need two tables: Laravel’s table for migrations and a table for storing neighborhoods. Our spatial column will be named
geometryand be of themultipolygontype. Think of a multipolygon as a collection of polygons. We’re using a multipolygon because a neighborhood may have more than one polygon to define its boundary. If a neighborhood uses a polygon to define its boundary we can always create multipolygon containing a single polygon (which we’ll be doing later).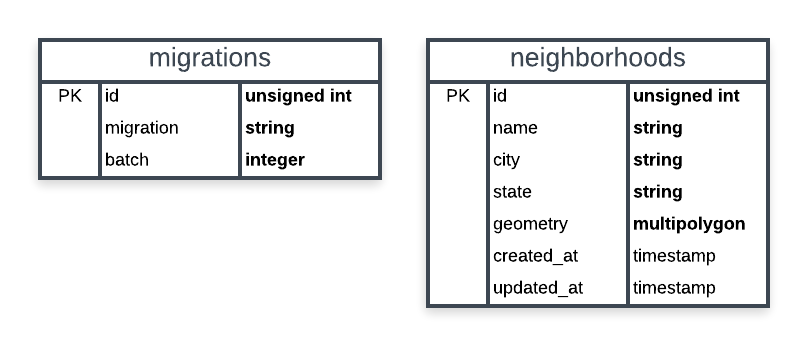
schema of our application’s database In addition to the Laravel Framework, we’ll be using two more packages to build our application:
- toin0u/geocoder-laravel for using Google’s Geocoding API
- grimzy/laravel-mysql-spatial for parsing WKT geometries and determining if a multipolygon contains a point.
We will also be using Bootstrap 4 for basic styling.
Creating Our Application
For this article it’s assumed you’re comfortable using a development environment for Laravel (such as Homestead).
Generating the Project
First, let’s create a new Laravel project using the terminal.
$ laravel new neighborhood-finder
Wait for the installation to finish and change directories to the root of the project.
$ cd neighborhood-finder/
Next let’s clean up some of the things Laravel comes with that we won’t be using for our application. This includes authentication controllers, the
Usermodel/migration/factory, and thepassword_resetstable.- delete the
app/Http/Controllers/Authdirectory - delete
app/User.php - delete
database/factories/UserFactory.php - delete
database/migrations/*_create_users_table.php - delete
database/migrations/*_create_password_resets_table.php
Now we’re ready to create the model and migration for a
Neighborhood. Note how we’re creating the model in theApp\Modelsnamespace.$ php artisan make:model Models\\Neighborhood --migration
For our application each
Neighborhoodwill have an (auto-incrementing)id, aname, acity, astate(abbreviation), and ageometryrepresenting the neighborhood’s boundary as a multipolygon.Open up the generated
database/migrations/*_create_neighborhoods_table.phpmigration and edit theupmethod as shown below./**
* Run the migrations.
*
* @return void
*/
public function up()
{
Schema::create('neighborhoods', function (Blueprint $table) {
$table->increments('id');
$table->string('name');
$table->string('city');
$table->string('state', 2);
$table->multiPolygon('geometry');
$table->timestamps();
});
}Installing the First Package
Now let’s install our first package using composer:
grimzy/laravel-mysql-spatial. This package will allow us to easily work with spatial data types.$ composer require "grimzy/laravel-mysql-spatial"
Let composer install the package dependencies and regenerate autoload files.
The Neighborhood Model
Our
Neighborhoodmodel will be using theSpatialTraitfound in thegrimzy/laravel-mysql-spatialpackage. The package looks for any attributes defined in the$spatialFieldsarray on a model using this trait.Edit
app/Models/Neighborhood.phpto match below. Notice how a spatial field is still eligible to be fillable through mass assignment.<?php
namespace App\Models;
use Grimzy\LaravelMysqlSpatial\Eloquent\SpatialTrait;
use Illuminate\Database\Eloquent\Model;
class Neighborhood extends Model
{
use SpatialTrait;
/**
* The attributes that are mass-assignable.
*
* @var array
*/
protected $fillable = [
'name',
'geometry',
];
/**
* The attributes that are spatial fields.
*
* @var array
*/
protected $spatialFields = [
'geometry'
];
}Gathering Test Data
Many cities have data portals open to the public. To seed our database with neighborhoods including geospatial data for boundaries, our application will use Comma-separated values (CSV) files exported from three of these data portals.
Create a directory at
database/seeds/flat-filesfor a place to store the flat files.We want to ensure none of these flat files are checked into source control, so create a
.gitignorefile atdatabase/seeds/flat-files/.gitignorecontaining the following:*
!.gitignoreThe
*entry is a wildcard telling git to ignore all files in the directory. The!.gitignoreentry excludes the.gitignorefile from the wildcard so it is still checked into source control.Download the following CSV files to each location specified below.
- this CSV to
database/seeds/flat-files/chicago-illinois.csv - this CSV to
database/seeds/flat-files/baltimore-maryland.csv - this CSV to
database/seeds/flat-files/east-baton-rouge-parish-louisiana.csv
Let’s take a quick peek at what this data looks like. Open up
database/seeds/flat-files/chicago-illinois.csvand notice the file contains a header row specifying the columns. The two columns we want arePRI_NEIGH(primary neighborhood) andthe_geom(the geometry data).From the first row of data in the file, copy the
MULTIPOLYGON(((...)))part. This is the WKT representation of the neighborhood’s boundary.To visualize WKT data one of my favorite tools is Wicket by Arthur Endsley. Open up Wicket, paste the WKT data from your clipboard into the text box, and click “Map It!”. You’ll see the mapped multipolygon for Chicago’s neighborhood
Grand Boulevard.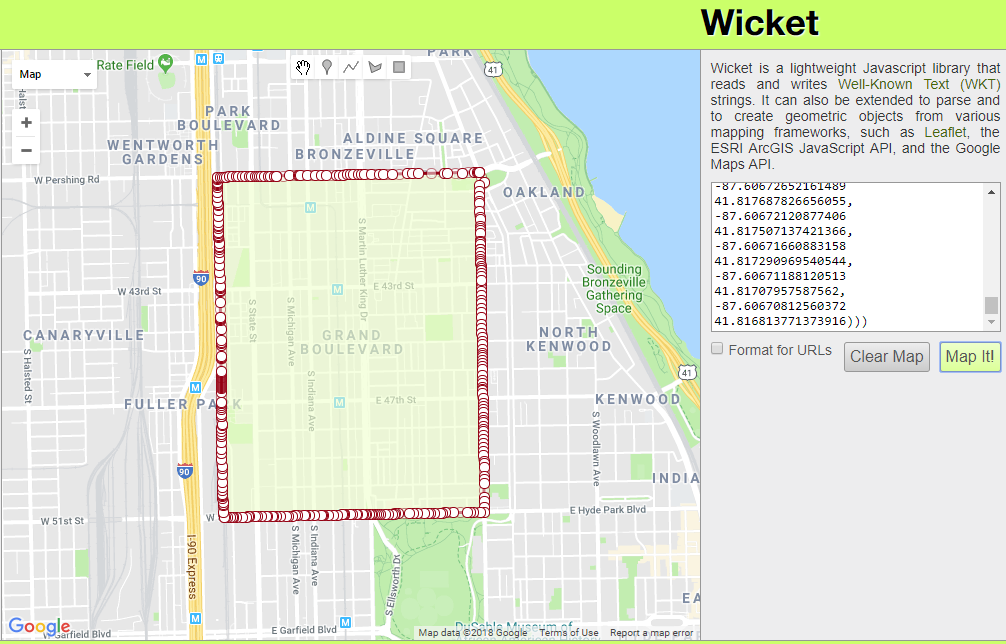
Creating Seeders
Now that we have our flat files and an understanding of what the data looks like let’s create some seeders.
For this exercise we’ll keep things simple with one seeder per file, each of which will extend a base class. The base class will hold logic for reading a CSV and creating a
Neighborhoodrecord. It will also contain an abstract method for transforming a geometry record into aMultipolygon. Each seeder extending the base class will implement this abstract method with logic specific to the file being processed. These seeders will also contain therun()method to be called by Laravel.While this pattern works well for our purposes as we only have a few flat files to process, for a larger application with possibly hundreds of files I’d suggest a variation of this pattern and not defining one seeder per file.
First, let’s create our
BaseNeighborhoodSeederusing artisan.$ php artisan make:seeder BaseNeighborhoodSeeder
Update the created file at
database/seeds/BaseNeighborhoodSeeder.phpto match below.<?php
use App\Models\Neighborhood;
use Grimzy\LaravelMysqlSpatial\Types\MultiPolygon;
use Illuminate\Database\Seeder;
abstract class BaseNeighborhoodSeeder extends Seeder
{
/**
* Mode for opening a file as read-only.
*/
const FILE_MODE_READ = 'r';
/**
* Parses the given geometry value into a Multipolygon.
*
* @param mixed $geometry the geometry to parse
* @return \Grimzy\LaravelMysqlSpatial\Types\MultiPolygon
*/
protected abstract function parseGeometryToMultiPolygon($geometry): MultiPolygon;
/**
* Reads all records in a flat file, parses the geometry into a multipolygon,
* and saves a Neighborhood in the database for each record.
*
* @param string $file_path path to the file to read data from
* @param int $name_index the index of the column containing the neighborhood name
* @param int $geometry_index the index of the column containing the neighborhood geometry
* @param string $city the name of the neighborhoods' city
* @param string $state the name of the neighborhoods' state
* @param bool $skip_first_row if the first row of the file should be skipped (if there's a header row)
* @param bool $use_title_case if the neighborhood names should be converted to Title Case
* @throws \Throwable
*/
protected function seedFromFlatFile(string $file_path,
int $name_index,
int $geometry_index,
string $city,
string $state,
bool $skip_first_row,
bool $use_title_case) {
// throw an exception unless a file exists at the given location
throw_unless(file_exists($file_path), new Exception("No file found at path '$file_path'"));
try {
// open the specified file at the given location
$file = fopen($file_path, self::FILE_MODE_READ);
// if the first row should be skipped, read the first row of the file
if ($skip_first_row) {
fgetcsv($file);
}
// while there's a row to be read in the file, read the next row
while ($row = fgetcsv($file)) {
// get the neighborhood name from the specified index
$name = $row[$name_index];
// if the name should be converted to Title Case, convert it
if ($use_title_case) {
$name = title_case($name);
}
// parse the geometry at the specified index into a multipolygon
$multipolygon = $this->parseGeometryToMultiPolygon($row[$geometry_index]);
// make the new neighborhood model by filling the name, city, state, and geometry
$neighborhood = new Neighborhood([
'name' => $name,
'city' => $city,
'state' => $state,
'geometry' => $multipolygon,
]);
// throw an exception unless the neighborhood could be saved
throw_unless($neighborhood->save(), new Exception("Failed to save neighborhood '$name'"));
}
} finally {
// if the file has been opened, close it
if (! empty($file)) {
fclose($file);
}
}
}
}Here we’re defining an abstract class which cannot be instantiated; this class must be extended to be used. At the top of the class we have a constant for the file mode we’ll be using to open CSV files.
We define the abstract method
parseGeometryToMulipolygon($geometry)and declare it returns aMultipolygon. This method must be implemented by any class extendingBaseNeighborhoodSeederand will contain the logic necessary for converting the geometry data in each CSV record to aMultipolygon. For our purposes this will always be parsing WKT but it could easily be parsing another format such as GeoJSON.The
seedFromFlatFilemethod contains parameters for the path to the file to read data from, the index of the neighborhood name column, the index of the neighborhood boundary geometry column, the name of the city for the neighborhoods, the name of the state for the neighborhoods, whether or not to skip the first row of the file (in case there is a header row), and whether or not the neighborhood name should be converted to Title Case before being saved.In this method we first check if a file exists at
$file_pathusing PHP’sfile_existsfunction. If a file does not exist at the specified path we throw an exception.Next, inside a
tryblock, we open the file for reading usingfopenwith the file mode'r'. If the$skip_first_rowflag istrue, we read the first row of the file using PHP’s functionfgetcsv. Looping through each row, while there’s still a row left to read in the file, we usefgetcsvto parse the CSV row into an array of data.Using the given
$name_indexwe get the neighborhood name from the array and if$use_title_caseistruewe use Laravel’s helper methodtitle_caseto convert the string to Title Case. The neighborhood’s geometry is parsed into aMultiPolygonby passing the data of the geometry column into theparseGeometryToMultiPolygonmethod, which will be implemented by child classes.Finally we create the new neighborhood record by passing an array of attributes to the
Neighborhoodmodel’s constructor. If the model could not be saved, an exception is thrown.In the
finallyblock we check if the$filevariable has a value and if it does, we usefcloseto close the file. Putting this logic inside thefinallyblock ensures we close the file even if an exception is thrown.
With our base seeder class in place, we’re ready to create a seeder for each flat file. Start by creating
ChicagoIllinoisNeighborhoodSeederusing artisan.$ php artisan make:seeder ChicagoIllinoisNeighborhoodSeeder
Update the file
database/seeds/ChicagoIllinoisDatabaseSeeder.phpwith the content below.<?php
use Grimzy\LaravelMysqlSpatial\Types\MultiPolygon;
class ChicagoIllinoisNeighborhoodSeeder extends BaseNeighborhoodSeeder
{
/**
* Index of the name column.
*/
const COLUMN_INDEX_NAME = 0;
/**
* Index of the geometry column.
*/
const COLUMN_INDEX_GEOMETRY = 1;
/**
* Name of the neighborhoods' city.
*/
const CITY = 'Chicago';
/**
* Name of the neighborhoods' state.
*/
const STATE = 'IL';
/**
* Path of the seed file relative to the `database` directory.
*/
const DATABASE_FILE_PATH = 'seeds/flat-files/chicago-illinois.csv';
/**
* If the file has a header row.
*/
const HAS_HEADER_ROW = true;
/**
* If the neighborhood names should be converted to Title Case.
*/
const USE_TITLE_CASE = false;
/**
* Run the database seeds.
*
* @throws \Throwable
*/
public function run()
{
// resolve the path of the seed file
$file_path = database_path(self::DATABASE_FILE_PATH);
// seed the neighborhoods from the flat file
$this->seedFromFlatFile($file_path,
self::COLUMN_INDEX_NAME,
self::COLUMN_INDEX_GEOMETRY,
self::CITY,
self::STATE,
self::HAS_HEADER_ROW,
self::USE_TITLE_CASE);
}
/**
* Parses the geometry to a multipolygon from well-known text.
*
* @param mixed $geometry
* @return \Grimzy\LaravelMysqlSpatial\Types\MultiPolygon
*/
protected function parseGeometryToMultiPolygon($geometry): MultiPolygon
{
return MultiPolygon::fromWKT($geometry);
}
}At the top of the file we have constants for the column indexes of the name and geometry data as well as constants for the neighborhood city, the neighborhood state, the file path relative to the
databasedirectory, whether or not the file has a header row, and whether or not the neighborhood names should be converted to Title Case.Next we have the
runmethod which is called by Laravel when executing the seeder. In this method we first resolve the path of the flat file using Laravel’s helper methoddatabase_path. Then we call the parent class’s methodseedFromFlatFileusing the file path and our constants as arguments.Finally, we implement the
parseGeometryToMultiPolygonmethod by using thefromWKTstatic method ofGrimzy\LaravelMysqlSpatial\Types\Multipolygonto instantiate a newMultiPolygonand return it. Remember this method will be called by the base class during the execution of theseedFromFlatFilemethod.
Continuing with our seeders, use artisan to create
BaltimoreMarylandSeeder.$ php artisan make:seeder BaltimoreMarylandSeeder
Edit the file
database/seeds/BaltimoreMarylandSeeder.phpto match the contents below.<?php
use Grimzy\LaravelMysqlSpatial\Types\MultiPolygon;
class BaltimoreMarylandSeeder extends BaseNeighborhoodSeeder
{
/**
* Index of the name column.
*/
const COLUMN_INDEX_NAME = 3;
/**
* Index of the geometry column.
*/
const COLUMN_INDEX_GEOMETRY = 1;
/**
* Name of the neighborhoods' city.
*/
const CITY = 'Baltimore';
/**
* Name of the neighborhoods' state.
*/
const STATE = 'MD';
/**
* Path of the seed file relative to the `database` directory.
*/
const DATABASE_FILE_PATH = 'seeds/flat-files/baltimore-maryland.csv';
/**
* If the file has a header row.
*/
const HAS_HEADER_ROW = true;
/**
* If the neighborhood names should be converted to Title Case.
*/
const USE_TITLE_CASE = false;
/**
* Run the database seeds.
*
* @throws \Throwable
*/
public function run()
{
// resolve the path of the seed file
$file_path = database_path(self::DATABASE_FILE_PATH);
// seed the neighborhoods from the flat file
$this->seedFromFlatFile($file_path,
self::COLUMN_INDEX_NAME,
self::COLUMN_INDEX_GEOMETRY,
self::CITY,
self::STATE,
self::HAS_HEADER_ROW,
self::USE_TITLE_CASE);
}
/**
* Parses the geometry to a multipolygon from well-known text.
*
* @param mixed $geometry
* @return \Grimzy\LaravelMysqlSpatial\Types\MultiPolygon
*/
protected function parseGeometryToMultiPolygon($geometry): MultiPolygon
{
return MultiPolygon::fromWKT($geometry);
}
}Notice how simple it was to implement a new flat file seeder because we abstracted away the logic into our base class.
Again using artisan, create our last seeder
EastBatonRougeParishSeeder.$ php artisan make:seeder EastBatonRougeParishSeeder
Open up the file
database/seeds/EastBatonRougeParishSeeder.phpand edit the contents to match below.<?php
use Grimzy\LaravelMysqlSpatial\Types\MultiPolygon;
use Grimzy\LaravelMysqlSpatial\Types\Polygon;
class EastBatonRougeParishSeeder extends BaseNeighborhoodSeeder
{
/**
* Index of the name column.
*/
const COLUMN_INDEX_NAME = 2;
/**
* Index of the geometry column.
*/
const COLUMN_INDEX_GEOMETRY = 1;
/**
* Name of the neighborhoods' city.
*/
const CITY = 'Baton Rouge';
/**
* Name of the neighborhoods' state.
*/
const STATE = 'LA';
/**
* Path of the seed file relative to the `database` directory.
*/
const DATABASE_FILE_PATH = 'seeds/flat-files/east-baton-rouge-parish-louisiana.csv';
/**
* If the file has a header row.
*/
const HAS_HEADER_ROW = true;
/**
* If the neighborhood names should be converted to Title Case.
*/
const USE_TITLE_CASE = true;
/**
* Run the database seeds.
*
* @throws \Throwable
*/
public function run()
{
// resolve the path of the seed file
$file_path = database_path(self::DATABASE_FILE_PATH);
// seed the neighborhoods from the flat file
$this->seedFromFlatFile($file_path,
self::COLUMN_INDEX_NAME,
self::COLUMN_INDEX_GEOMETRY,
self::CITY,
self::STATE,
self::HAS_HEADER_ROW,
self::USE_TITLE_CASE);
}
/**
* Parses the geometry to a multipolygon from well-known text.
*
* @param mixed $geometry
* @return \Grimzy\LaravelMysqlSpatial\Types\MultiPolygon
*/
protected function parseGeometryToMultiPolygon($geometry): MultiPolygon
{
// parse the well-known text into a polygon
$polygon = Polygon::fromWKT($geometry);
// return a multipolygon containing the polygon
return new MultiPolygon([$polygon]);
}
}This time the implementation of the
parseGeometryToMultiPolygonmethod is different. If you check theeast-baton-rouge-parish-louisiana.csvfile you’ll notice the WKT contains polygons instead of multipolygons, but the method calls for aMultiPolygonto be returned. Therefore we first parse thePolygonfrom WKT and then create and return a newMutliPolygonusing an array containing thePolygonpassed to the constructor.Next we need to edit
database/seeds/DatabaseSeeder.phpto call each of our seeders. Update the file to match the contents below.<?php
use Illuminate\Database\Seeder;
class DatabaseSeeder extends Seeder
{
/**
* Seed the application's database.
*
* @return void
*/
public function run()
{
$this->call([
ChicagoIllinoisNeighborhoodSeeder::class,
BaltimoreMarylandSeeder::class,
EastBatonRougeParishSeeder::class,
]);
}
}Let’s quickly regenerate our autoload files using composer.
$ composer dump-autoload
Finally, let’s migrate and seed our database using an artisan command. This will create our
neighborhoodstable as well as seed all the neighborhoods from our flat files.$ php artisan migrate --seed
Installing the Second Package
Use composer to require the
toin0u/geocoder-laravelpackage we’ll be using to geocode addresses.$ composer require "toin0u/geocoder-laravel"
While composer is running, this is a great time to get a Google API key for our project. We’ll be using Google’s Geocoding API.
- Go to the Google Cloud Console and log in using a Google account.
- Create a new project.
- Under the
APIs & Servicesdashboard, clickENABLE APIS AND SERVICES. - Enable the Geocoding API by searching for
Geocoding API, clicking on the result, and then clicking the button labeledENABLE. - Under
APIs & Servicesgo toCredentials. - Click
Createand selectAPI Key. - Copy the generated API key to your clipboard.
Now we’re going to add the necessary configuration for the geocoding package we just installed.
Edit the
.envenvironment file at the root of our project, adding the keyGOOGLE_MAPS_API_KEYand pasting in the value of your API key.GOOGLE_MAPS_API_KEY=***************************************
For posterity’s sake let’s also add an entry in
.env.examplefor the same key. Remember, don’t add your API key here; this file is only a template and is checked into source control.GOOGLE_MAPS_API_KEY=
The Home Controller
Now let’s define our routes by editing
routes/web.php, deleting the existing welcome route, and replacing it with the routes below.Route::get('/', 'HomeController@show')->name('home.show');
Route::post('/', 'HomeController@submit')->name('home.submit');The first route, named
home.show, is for displaying the home page. The second route, namedhome.submit, will handle the submission of addresses and return a response containing the result of the search.Next, create a
HomeControllerusing artisan.$ php artisan make:controller HomeController
Edit
app/Http/Controllers/HomeController.phpto match the contents below.<?php
namespace App\Http\Controllers;
use App\Models\Neighborhood;
use Grimzy\LaravelMysqlSpatial\Types\Point;
use Illuminate\Http\Request;
class HomeController extends Controller
{
/**
* The session key for storing the success message.
*/
const SESSION_KEY_SUCCESS = 'success';
/**
* The session key for storing the error message.
*/
const SESSION_KEY_ERROR = 'error';
/**
* The result message for an address that could not be geocoded.
*/
const RESULT_BAD_ADDRESS = 'Failed to find a location for that address!';
/**
* The result message for an address that does not fall in any exiting Neighborhood's geometry.
*/
const RESULT_NO_RESULTS = 'No results for that address!';
/**
* The result message prefix for a found Neighborhood.
*/
const RESULT_NEIGHBORHOOD_PREFIX = 'That address is in ';
/**
* The route name for showing the home page.
*/
const ROUTE_NAME_SHOW_HOME = 'home.show';
/**
* Shows the home page.
*
* @return \Illuminate\View\View
*/
public function show()
{
return view('home');
}
/**
* Handles submission of an address and returns a redirect to the home page with success or error message.
*
* @param \Illuminate\Http\Request $request
* @return \Illuminate\Http\RedirectResponse
*/
public function submit(Request $request)
{
// validate the request
$this->validate($request, [
'address' => 'required',
]);
// get the given address from the request
$address = $request->input('address');
// make the geocoder
$geocoder = app('geocoder');
// geocode the address and get the first result
$result = $geocoder->geocode($address)->get()->first();
// if a result couldn't be found, redirect to the home page with a result message flashed to the session
if (! $result) {
return redirect(route(self::ROUTE_NAME_SHOW_HOME))->with(self::SESSION_KEY_ERROR, self::RESULT_BAD_ADDRESS);
}
// get the coordinates of the geocoding result
$coordinates = $result->getCoordinates();
// get the latitude of the coordinates
$lat = $coordinates->getLatitude();
// get the longitude of the coordinates
$lng = $coordinates->getLongitude();
// create a new point using the coordinates
$point = new Point($lat, $lng);
// get the first Neighborhood that has geometry containing the point
$neighborhood = Neighborhood::contains('geometry', $point)->first();
// if a Neighborhood couldn't be found, redirect to the home page with a result message flashed to the session
if (! $neighborhood) {
return redirect(route(self::ROUTE_NAME_SHOW_HOME))->with(self::SESSION_KEY_ERROR, self::RESULT_NO_RESULTS);
}
// format the result message for the found Neighborhood
$message = $this->formatNeighborhoodResult($neighborhood);
// redirect to the home page with the result message flashed to the session
return redirect(route(self::ROUTE_NAME_SHOW_HOME))->with(self::SESSION_KEY_SUCCESS, $message);
}
/**
* Format the result message for a found neighborhood.
*
* @param \App\Models\Neighborhood $neighborhood
* @return string
*/
private function formatNeighborhoodResult(Neighborhood $neighborhood) {
return self::RESULT_NEIGHBORHOOD_PREFIX . $neighborhood->name . ', ' . $neighborhood->city . ', ' . $neighborhood->state . '.';
}
}In this file we first define constants for the session key storing success messages, the session key storing error messages, the text for result messages, and the
home.showroute name.In the
showmethod we simply return the view namedhomeusing the Laravel helper methodview.The
submitmethod accepts an argument of typeIlluminate\Http\Requestcalled$request. Laravel will automatically inject this variable containing the current request data.First we validate the request by specifying a rule for
addressmaking the field required. The validated address is then retrieved using theinputmethod on the$requestvariable. We use Laravel’sapphelper method which uses the service container to resolve an instance of the geocoder. Using method chaining we geocode the given address and get the first result. If a result couldn’t be found for the given address we redirect the user to the home page with an error message flashed to the session.Next we get the longitude and latitude coordinates from the result and create a new
Grimzy\LaravelMysqlSpatial\Types\Pointinstance by passing the coordinates into the constructor.The eloquent query scope
containsprovided by thegrimzy/laravel-mysql-spaitalpackage is then used to scope the query by records with a geometry containing the point. We use thefirstmethod to get the first result. This will generate a query along the lines of:SELECT * FROM `neighborhoods` WHERE ST_Contains(`geometry`, ST_GeomFromText('POINT(0 0)')) LIMIT 1In this case
'POINT(0 0)'is the WKT representation of our longitude and latitude (which won’t actually be0, 0unless our user lives in the middle of the ocean).Notice that we are using MySQL to calculate if the the geometry contains the point. This is much faster than if we had chunked through all the records and had done the calculation in PHP.
Finally, if a resulting neighborhood containing the point couldn’t be found we return a redirect to the home page with an error message flashed to the session. Otherwise, we format the neighborhood name, city, and state into a success result message (using the
formatNeighborhoodResultmethod) and return a redirect to the home page with the message flashed to the session.The Home View
Rename the blade template at
resources/views/welcome.blade.phptoresources/views/home.blade.phpand open the file.Under the
<!-- Styles -->comment, add a link to Bootstrap’s style sheet.<link rel="stylesheet" href="https://maxcdn.bootstrapcdn.com/bootstrap/4.0.0-alpha.6/css/bootstrap.min.css" integrity="sha384-rwoIResjU2yc3z8GV/NPeZWAv56rSmLldC3R/AZzGRnGxQQKnKkoFVhFQhNUwEyJ" crossorigin="anonymous">
Next, in the
.titleclass definition, change the font size to something smaller..title {
font-size: 64px;
}Just before the closing
</body>tag, add script tags for Bootstrap’s dependencies jQuery, Popper.js, and Bootstrap’s minified JavaScript file.<script src="https://code.jquery.com/jquery-3.1.1.slim.min.js" integrity="sha384-A7FZj7v+d/sdmMqp/nOQwliLvUsJfDHW+k9Omg/a/EheAdgtzNs3hpfag6Ed950n" crossorigin="anonymous"></script>
<script src="https://cdnjs.cloudflare.com/ajax/libs/tether/1.4.0/js/tether.min.js" integrity="sha384-DztdAPBWPRXSA/3eYEEUWrWCy7G5KFbe8fFjk5JAIxUYHKkDx6Qin1DkWx51bBrb" crossorigin="anonymous"></script>
<script src="https://maxcdn.bootstrapcdn.com/bootstrap/4.0.0-alpha.6/js/bootstrap.min.js" integrity="sha384-vBWWzlZJ8ea9aCX4pEW3rVHjgjt7zpkNpZk+02D9phzyeVkE+jo0ieGizqPLForn" crossorigin="anonymous"></script>Because our application has no authentication, remove the entire
@if (Route::has(‘login’))directive including the contents and closing directive.Finally, edit the contents of the
<div class="content">div to match below.<div class="content">
<div class="title m-b-md">
Neighborhood Finder
</div>
@if (session('success'))
<div class="alert alert-success">
{{ session('success') }}
</div>
@elseif (session('error'))
<div class="alert alert-danger">
{{ session('error') }}
</div>
@endif
<div class="col-12 text-left">
<form class="form-horizontal" method="POST" action="{{ route('home.submit') }}">
@csrf
<div class="form-group{{ $errors->has('address') ? ' has-error' : '' }}">
<label for="address" class="control-label">Enter an address</label>
<input id="address" name="address" type="text" class="form-control" required autofocus>
@if ($errors->has('address'))
<span class="help-block">
<strong>{{ $errors->first('address') }}</strong>
</span>
@endif
</div>
<div class="form-group text-right">
<button type="submit" class="btn btn-primary">
Submit
</button>
</div>
</form>
</div>
</div>Here we use the blade directive
@ifto check if there’s a message in thesuccesskey of the current session. If there is one, we display an alert to the user containing the message. If there isn’t one, we use the blade directive@elseifto check if there’s a message in theerrorkey of the current session, again displaying it to the user if it exists.Next we define a form with an action specifying our submission route using the
routehelper method. The@crsfblade directive is used to generate a Cross-Site Request Forgery field and token. If the$errorsmessage bag contains an entry foraddresswe add thehas-errorclass to the form groupdivand display the error in a help block.Conclusion
That’s it! Open the project in your browser and try out some different addresses! The address will be geocoded and a neighborhood will be returned if any neighborhoods in the database have a boundary containing the address’s coordinates. If no address coordinates or neighborhood could be found, an error message stating such will be returned.
Try some of these addresses:
1558 N Damen Ave, Chicago, IL 606221001 E Fayette St, Baltimore, MD 21202201 Community College Dr, Baton Rouge, LA 70806123 Fake St, NowhereYour Address
Additional Resources
For additional data sources I encourage you to check out this Forbes article as well as Open Data Inception.
You can view the source code for this project on GitHub.