Tag: Laravel

  • Which Laravel authentication package to choose?

    At its core, Laravel provides “guards” and “providers” to manage authentication. However, controllers, routes, and views still need to be implemented.

    To achieve this, Laravel offers first-party packages that offer a complete authentication system, ready to use in just a few minutes. This is unique and the strength of Laravel: in no time, you can start developing your ideas.

    However, multiple packages are related to authentication, and it can be challenging to know which one is adequate for your project.

    Should you use Laravel Jetstream or Laravel Breeze? What are the differences between Laravel Passport and Laravel Sanctum? Is Laravel UI still an option?

    To help you find your way around, I have made a diagram to help you understand their differences and make the best choice for your project.
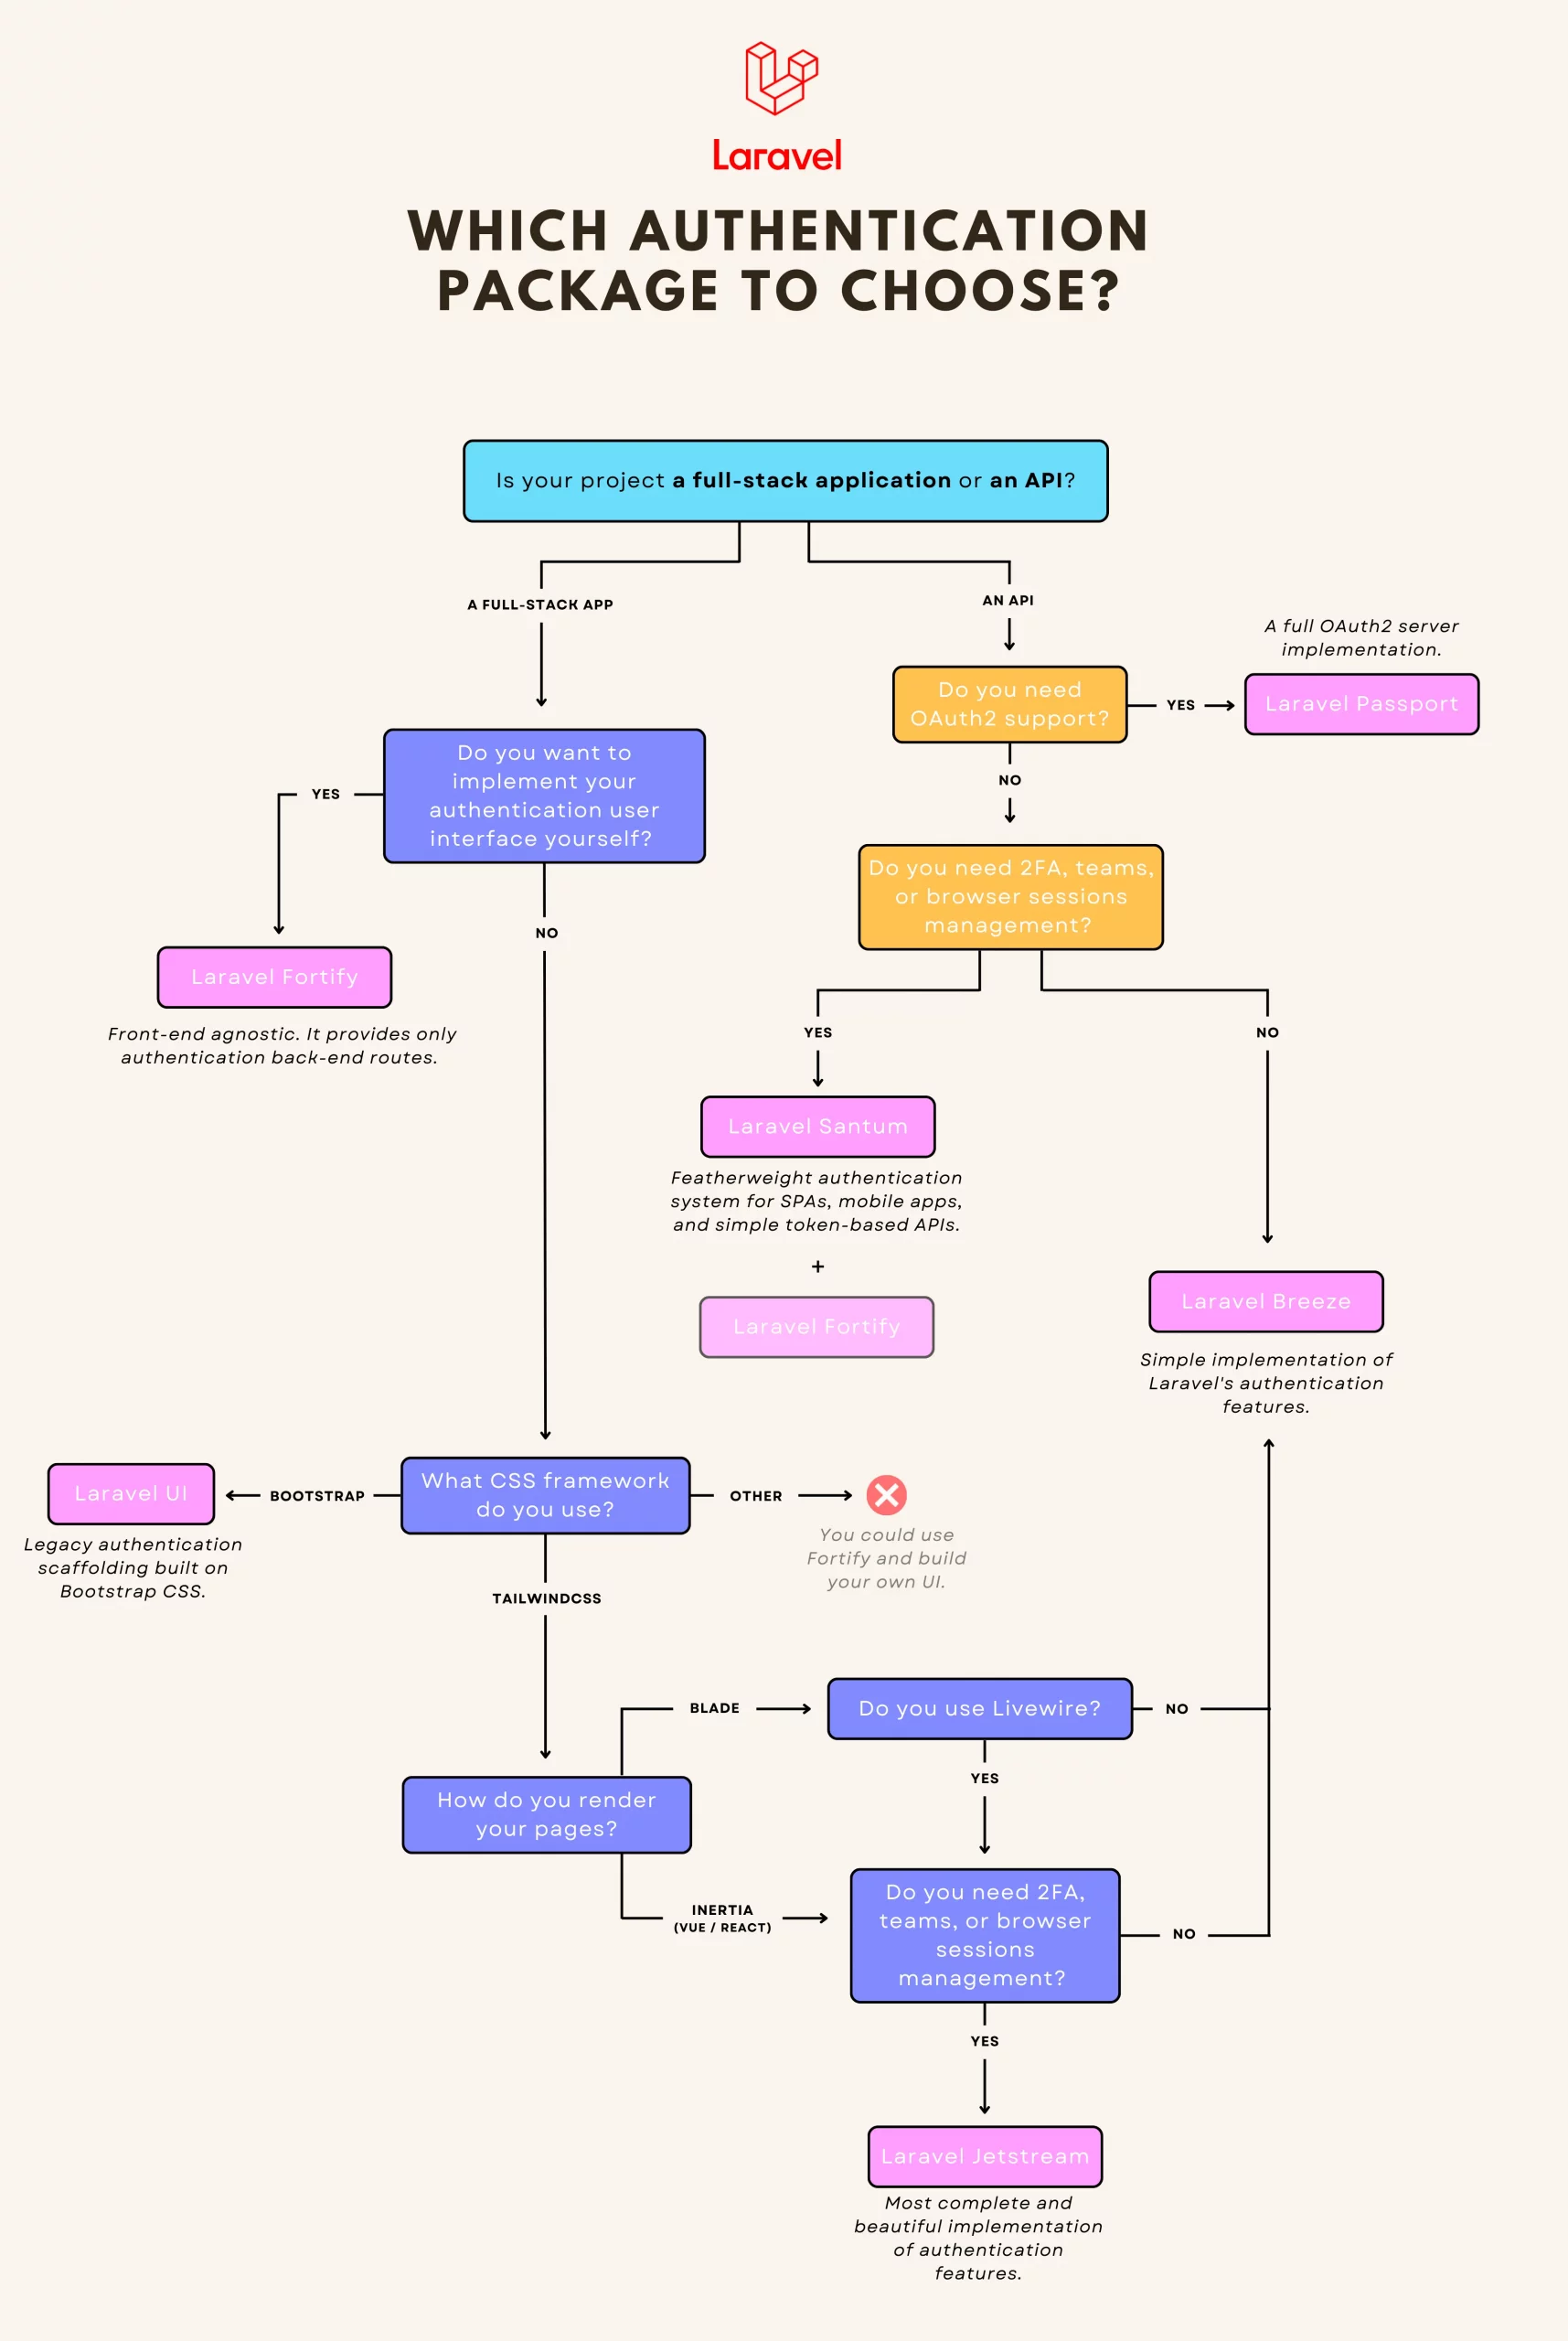
    Which Laravel authentication package to install for your project?

    Laravel Breeze

    Breeze is a minimal and simple implementation of Laravel’s authentication features. It works both for full-stack applications and APIs. This is an excellent choice if you like simplicity or are brand new to Laravel.

    • You can choose between Blade, Vue/React (with Inertia), or API
    • It uses Tailwind CSS when Blade or Inertia stacks are chosen
    • ✅ Registration
    • ✅ Login
    • ✅ Profile Management
    • ✅ Password Reset
    • ✅ Email Verification

    Laravel Jetstream

    More complete and stylish, Jetstream is an interesting alternative to Breeze. It provides more features but requires that your project uses Livewire or Inertia.

    • You can choose between Blade + Livewire or Vue/React + Inertia
    • It uses Tailwind CSS
    • ✅ Registration
    • ✅ Login
    • ✅ Profile Management
    • ✅ Password Reset
    • ✅ Email Verification
    • ✅ Two-Factor Authentication (2FA)
    • ✅ Teams Management
    • ✅ Browser Sessions Management (let users see where they’re logged-in)
    • ✅ API Tokens & Permissions (let users generate API tokens)

    Laravel Fortify

    Fortify is a front-end agnostic implementation of all authentication features. It provides all routes and controllers needed to implement your authentication logic but requires you to code the user interface yourself. There are no views out of the box!

    This is a great choice if you don’t use Tailwind CSS, want to code your front end yourself, or are building an API.

    • ❌ No views, no user interface
    • ✅ Registration
    • ✅ Login
    • ✅ Profile Management
    • ✅ Password Reset
    • ✅ Email Verification
    • ✅ Two-Factor Authentication (2FA)
    • ✅ Teams Management
    • ✅ Browser Sessions Management (let users see where they’re connected and logout sessions)
    • ✅ API Tokens & Permissions (let users generate API tokens)

    For info, Jetstream uses Fortify under the hood and adds the UI layer.


    Laravel UI

    Laravel UI is the legacy scaffolding and brings a basic authentication system built on the Bootstrap CSS framework. Today, the only reason to install it is that your project uses Bootstrap CSS.

    • You can choose between simple HTML, Vue, or React
    • ✅ Registration
    • ✅ Login
    • ✅ Password Reset
    • ✅ Email Verification

    Laravel Passport

    Passport provides a full OAuth2 server implementation


    Laravel Sanctum

    Sanctum offers a simple way to authenticate SPAs or mobile applications that need to communicate with your Laravel-powered API. If you don’t need full OAuth2 support, this is a much simpler alternative to Passport.

    • ✅ Middleware to authenticate your SPA (using cookie-based sessions)
    • ✅ Middleware to authenticate clients using API tokens
    • ✅ API tokens generation & permissions
    • ❌ No authentication routes or controllers

    Using Sanctum, you still have to implement your own authentication logic (creating your routes and controllers) or use it in combination with Fortify.

    If you use it to authenticate a SPA, it needs to be hosted on the same root domain as your API since it uses cookie-based sessions.


    I hope that all the authentication packages and starter kits of Laravel have no more secrets for you and that this article has made your choice easier if you were hesitating between them.

    👋 I offer tech consulting services for companies that need help with their Laravel applications. I can assist with upgrades, refactoring, testing, new features, or building new apps. Feel free to contact me through LinkedIn, or you can find my email on my GitHub profile.

    sumber: https://medium.com/@antoine.lame/which-laravel-authentication-package-to-choose-290551a82a44
  • How to test Laravel with Sanctum API using the Postman

    In the last part, we completed the Laravel Breeze API installation and validated the API using the Breeze Next front end.

    In this blog, we going to test the API using the Postman application.

    About Postman

    Postman is software used to test the API by sending and receiving the request with multiple data formats along with auth.

    Postman is an API platform for building and using APIs. Postman simplifies each step of the API lifecycle and streamlines collaboration so you can create better APIs — faster.

    Install Postman

    Click here and complete your Postman installation. After installation opens the Postman application.

    Create a new Postman Collection

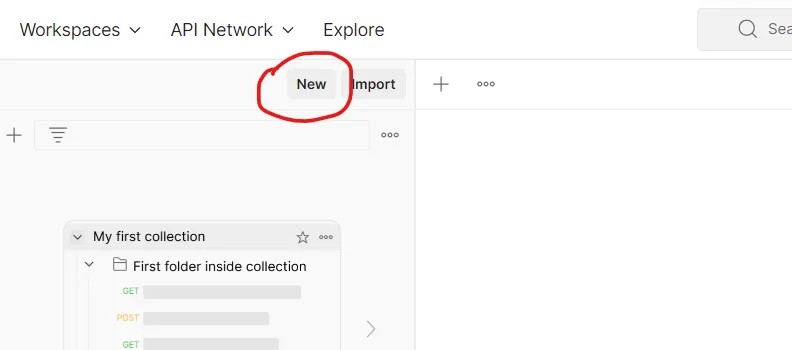
    Click the create new button

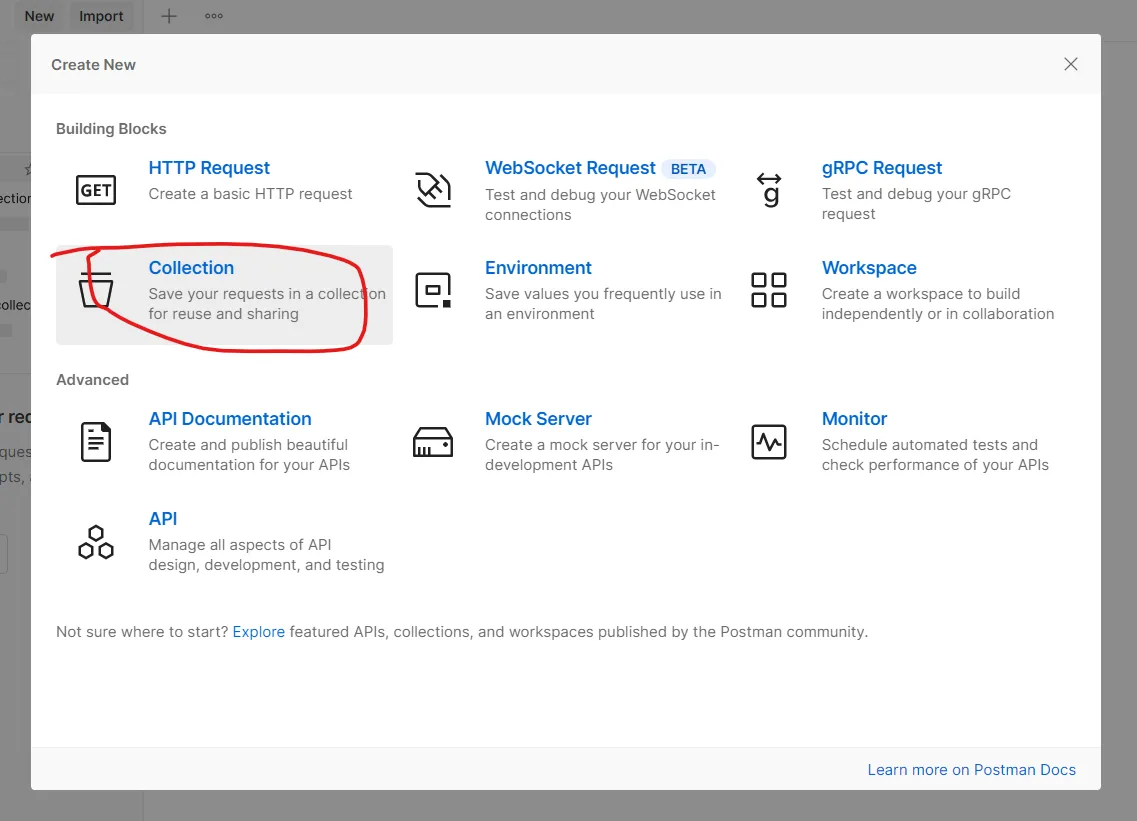
    In the popup window click the collections

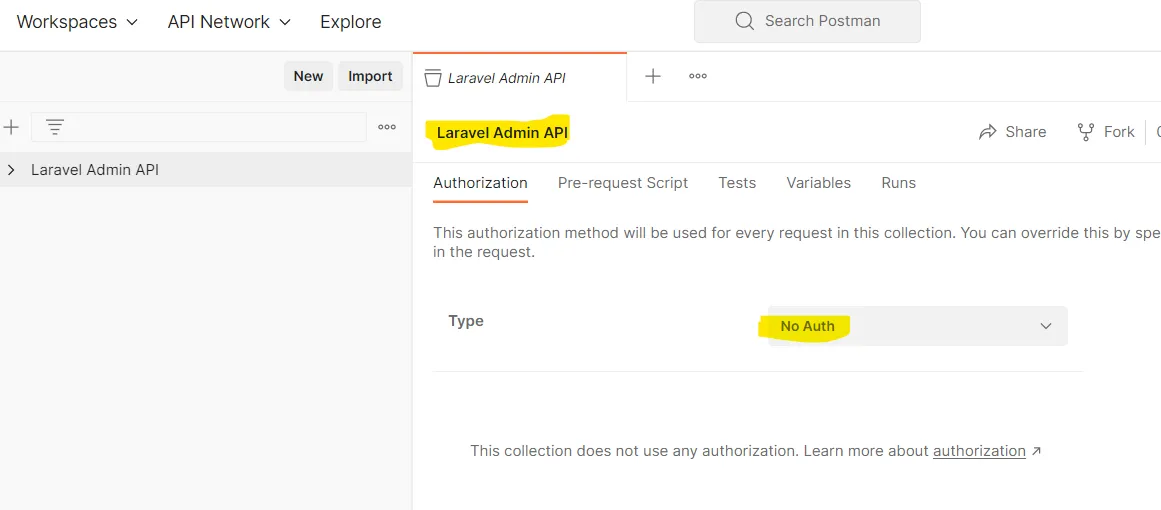
    Enter the name “Laravel Admin API” and select auth type that is No auth.


    Pre-request Script

    In the Laravel Sanctum, we used SPA authentication. So it works by using Laravel’s built-in cookie-based session authentication services. So, we need to set the cookie for all the requests in Postman.

    We can set the cookie by using the Postman Pre-request Script. Add the below code to Pre-request Script.

    pm.sendRequest({
        url: pm.collectionVariables.get('base_url')+'/sanctum/csrf-cookie',
        method: 'GET'
    }, function (error, response, {cookies}) {
        if (!error){
            pm.collectionVariables.set('xsrf-cookie', cookies.get('XSRF-TOKEN'))
        }
    })

    In this script, we used some variables. We will create variables in the next step.


    Postman Variables

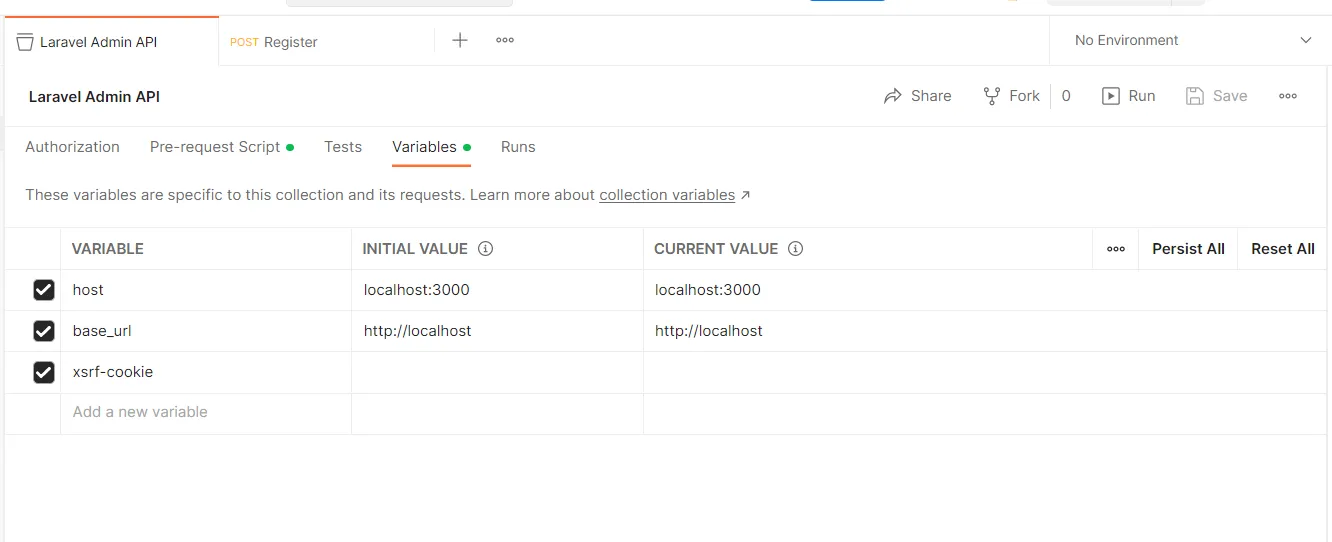
    Add the host, base_url, and xsrf-cookie variables in the Postman variables section


    Postman Add Request

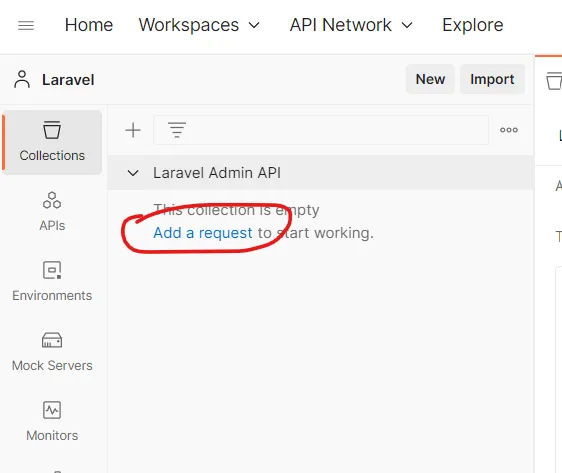
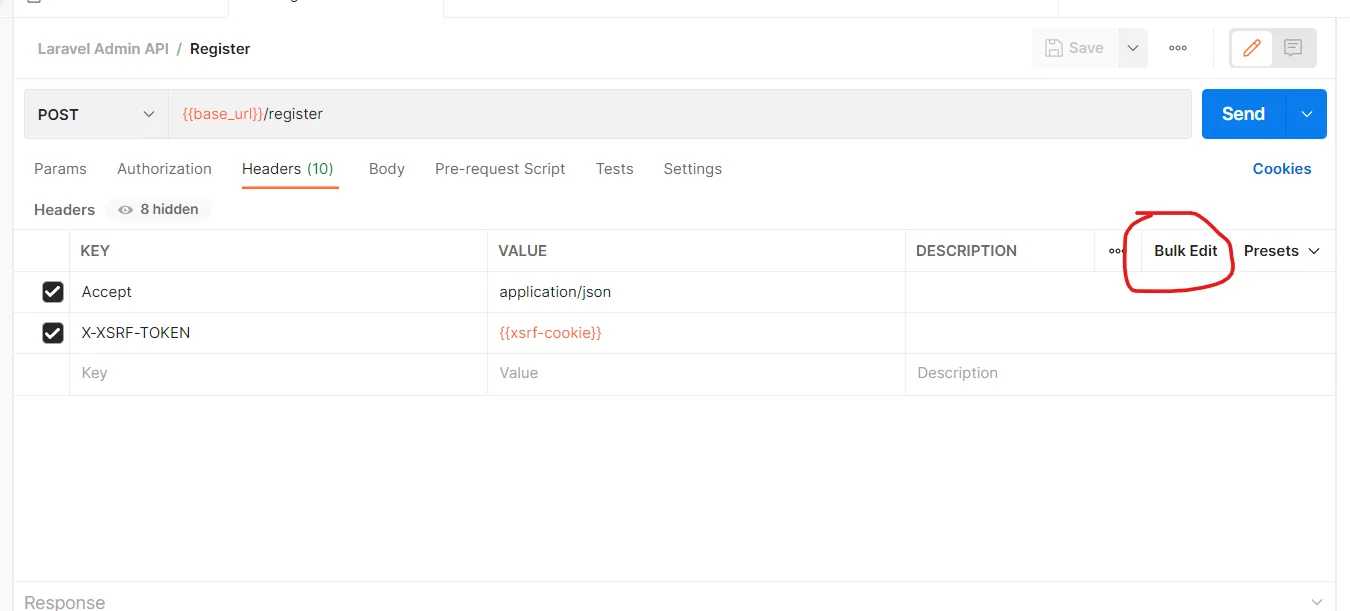
    Click the “Add a request” link and create a new request for registration.

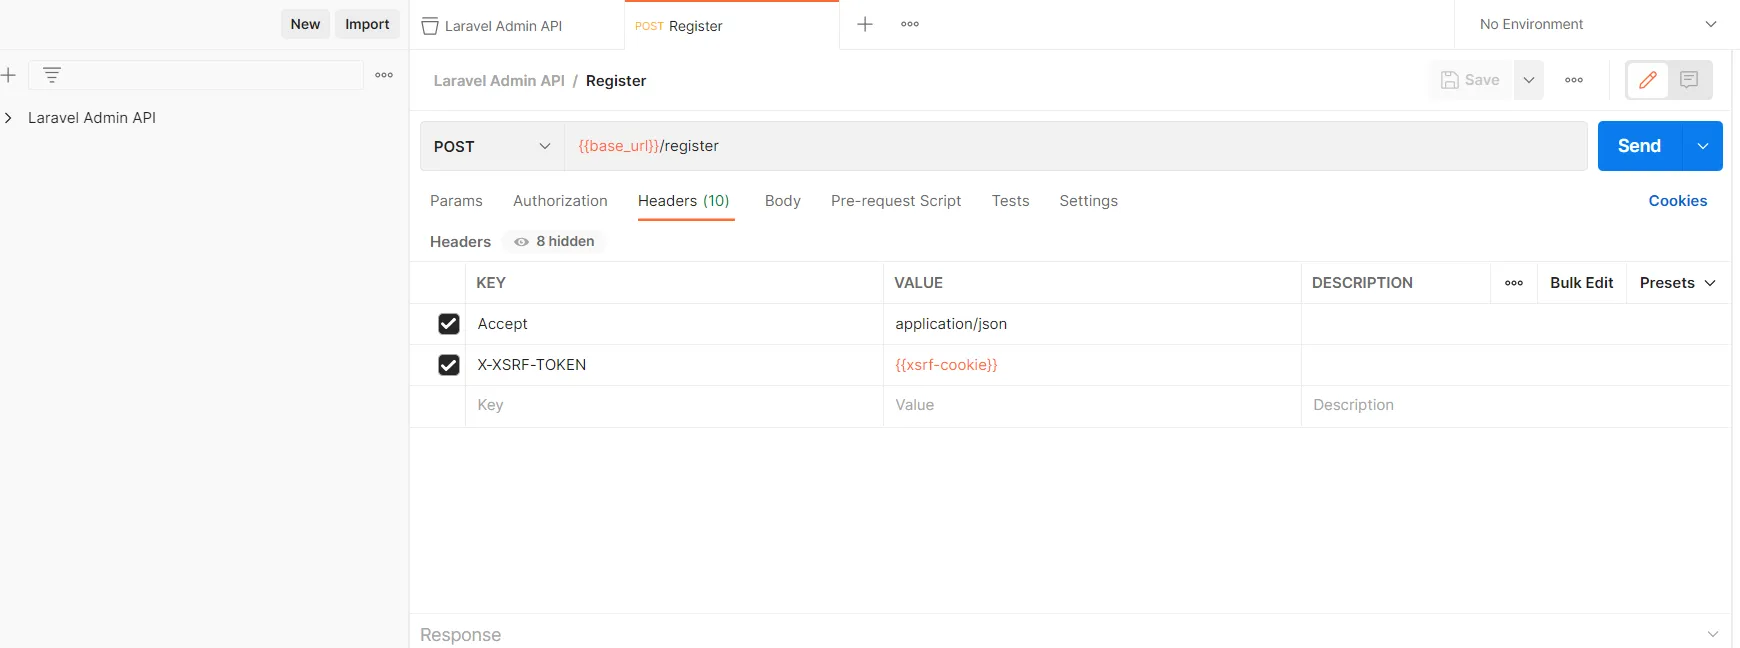
    In the header section add the “Accept” and “X-XSRF-TOKEN” like below

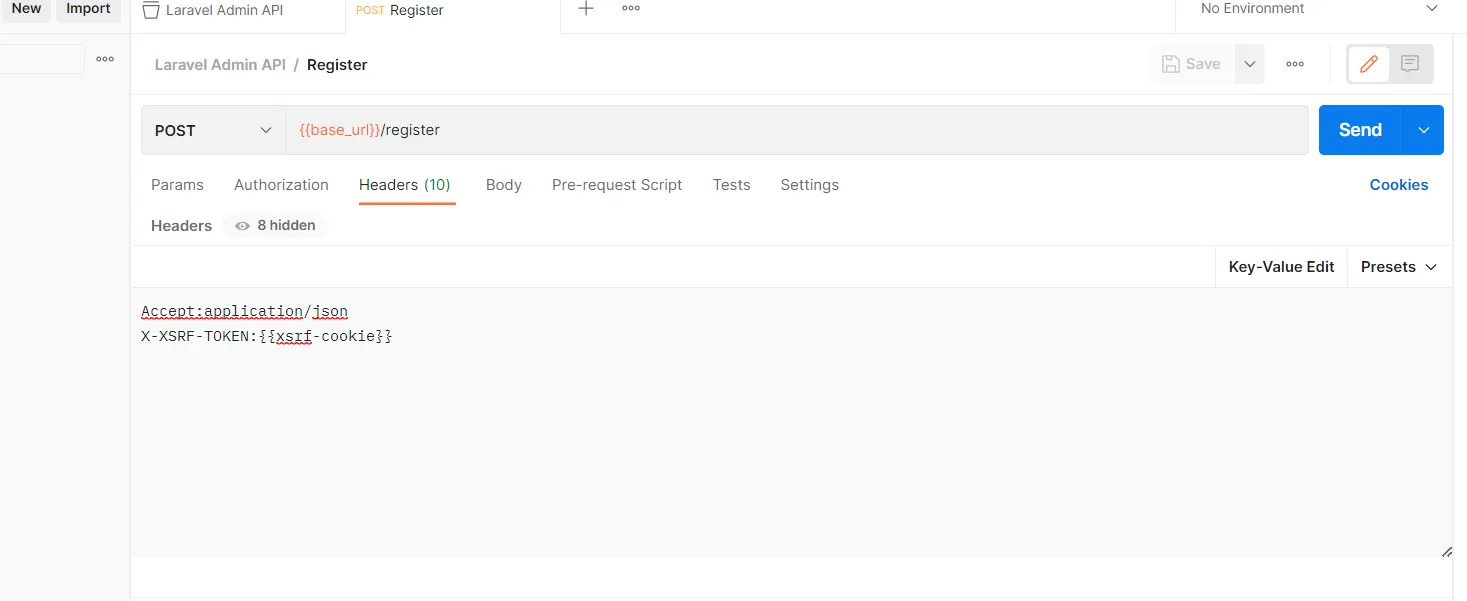
    Also, you can add plain text values by clicking the “Bulk Edit”

    Accept:application/json
    X-XSRF-TOKEN:{{xsrf-cookie}}

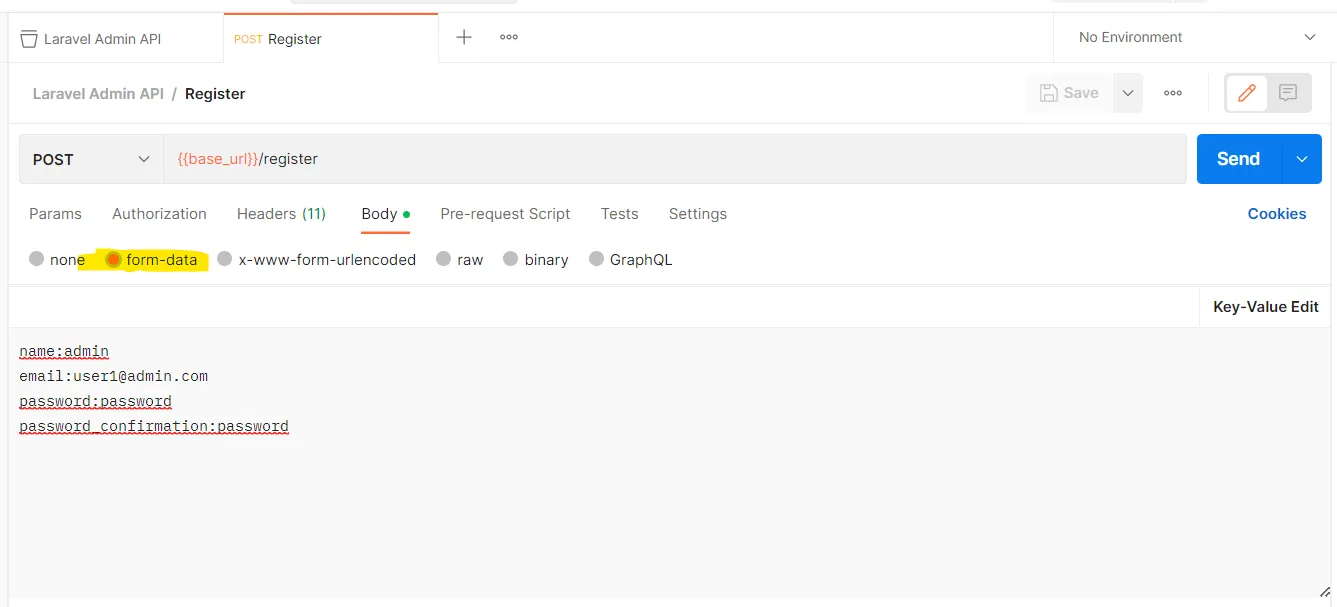
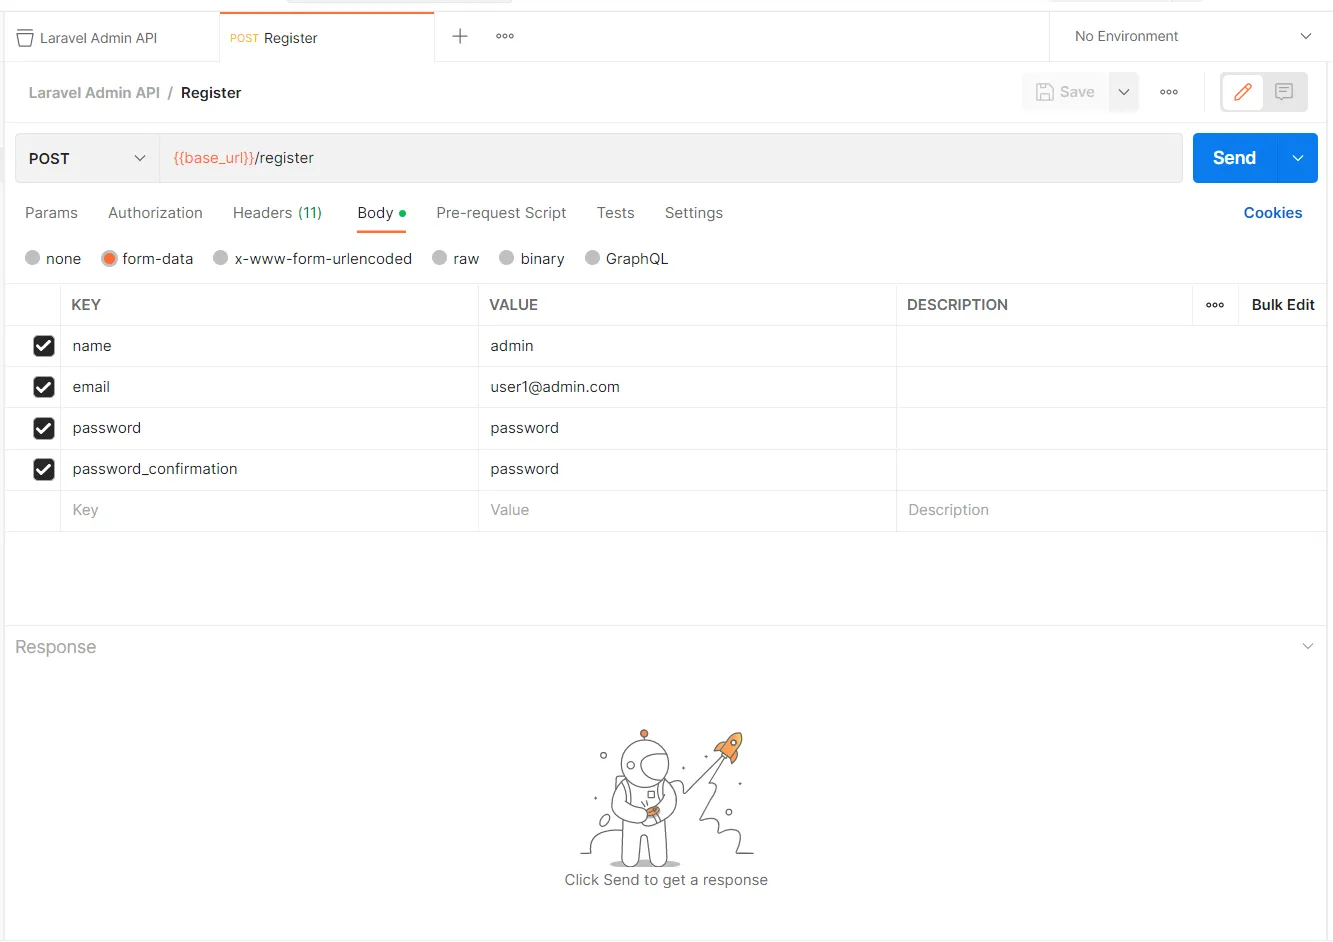
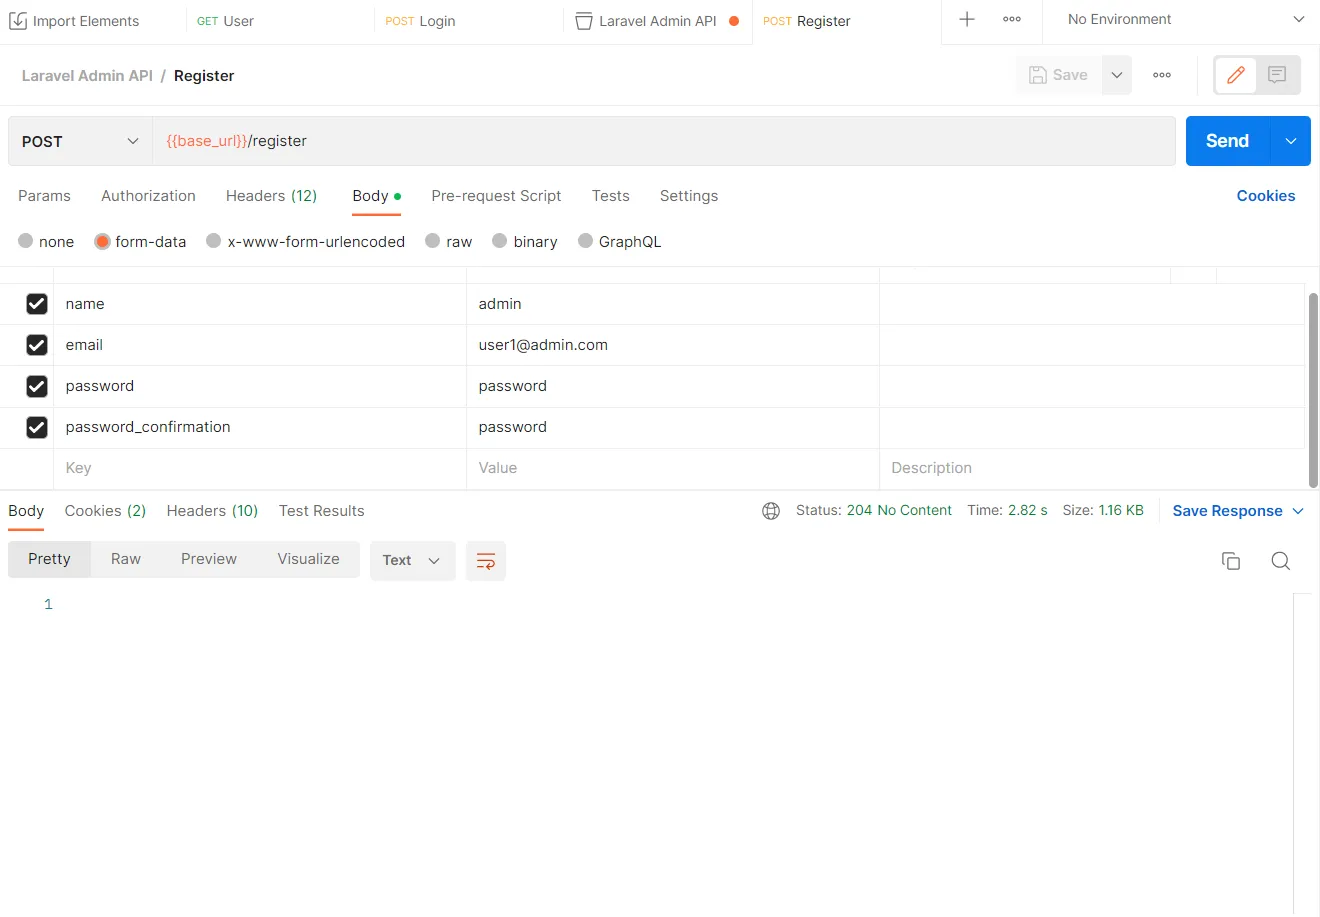
    In the request Body, add the below values on form-data

    name:admin
    email:user1@admin.com
    password:password
    password_confirmation:password

    Register API request

    Click the “send” button

    You will get an empty response if the user is registered successfully


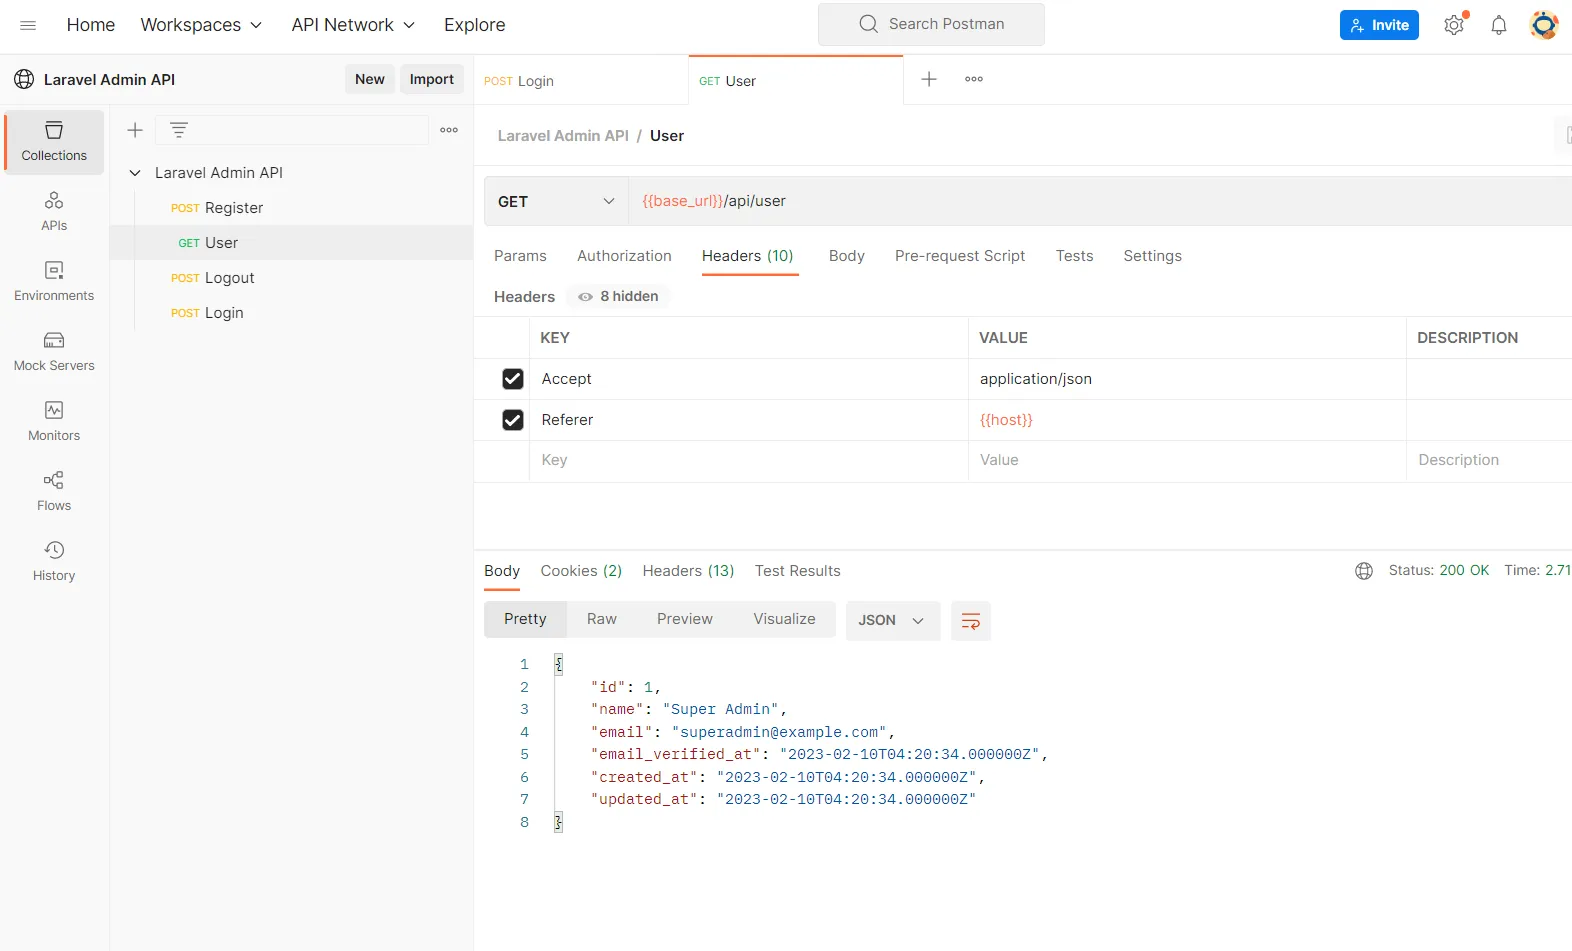
    Get User API request

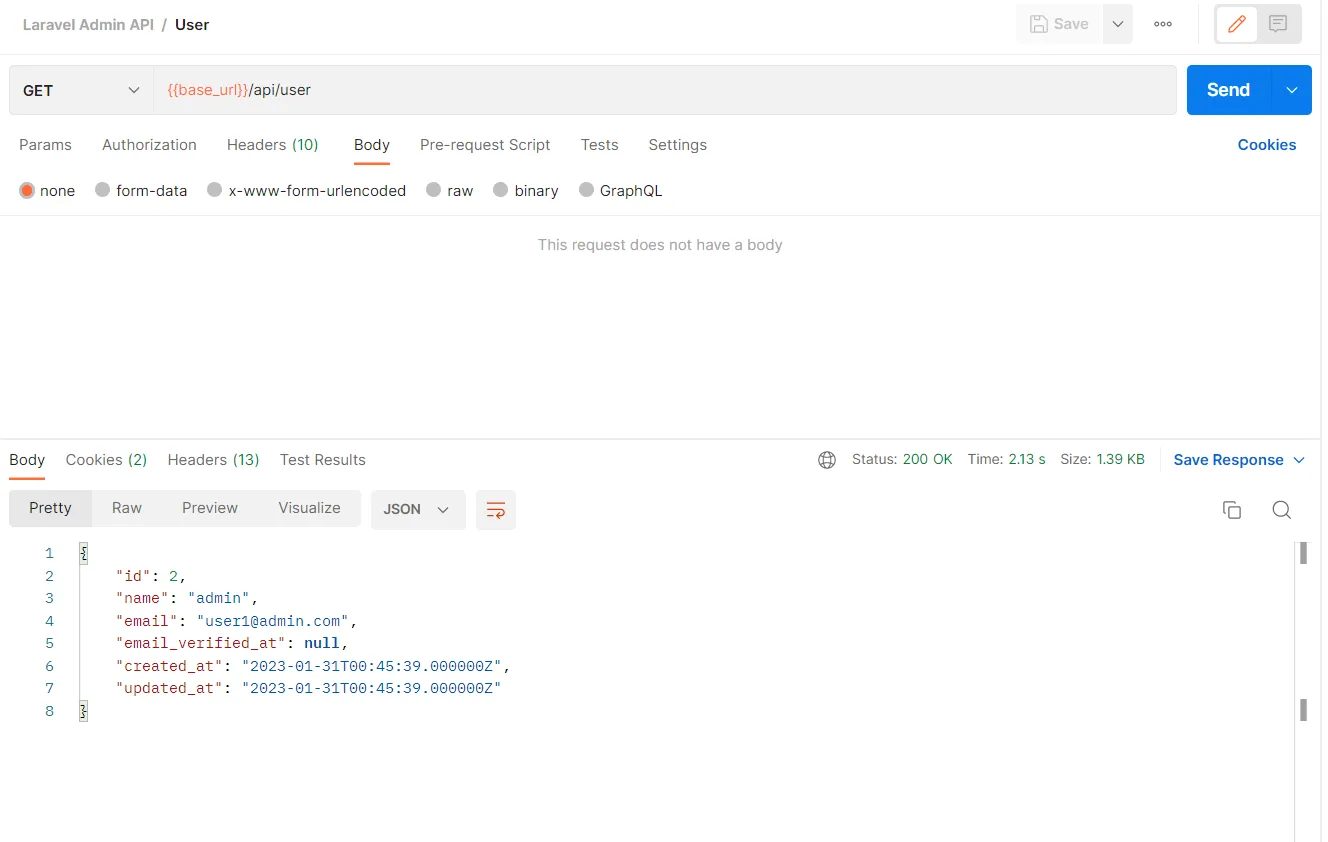
    Now we going to create an API to get the current user details. Click and create a New Request with the get method.

    The API URL is /api/user and also add the below headers.

    Accept:application/json
    Referer:{{host}}

    For this request, the body is none, and then click send the request. You will get the current user details in the response.


    Logout Request

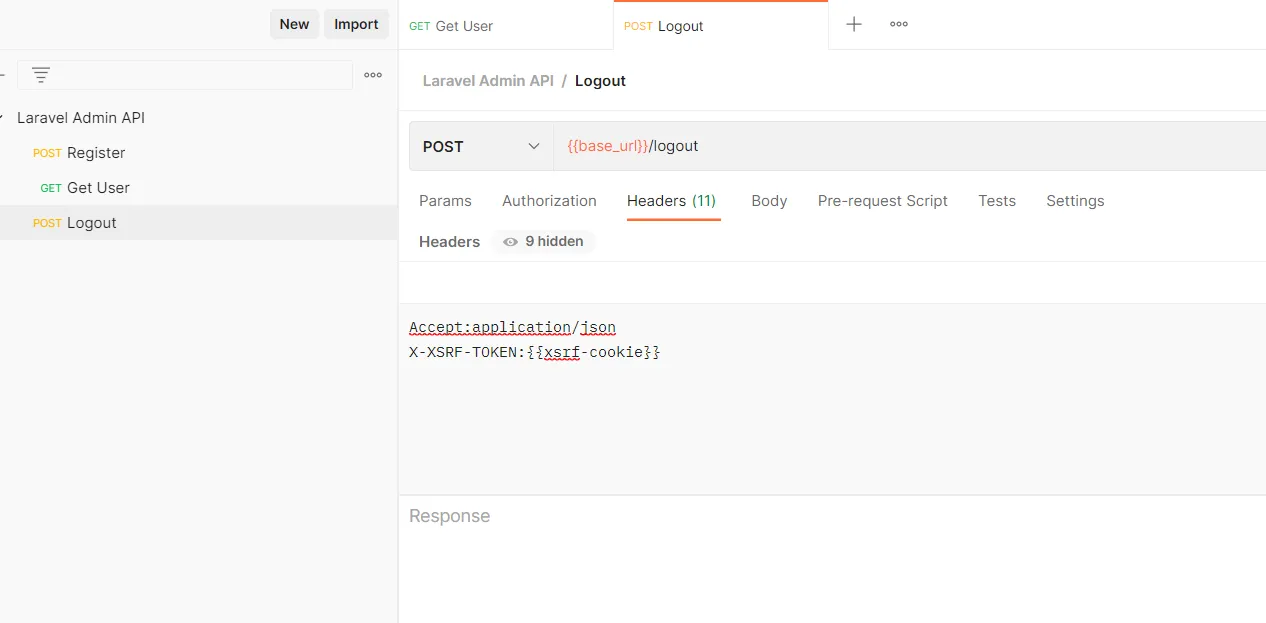
    Create the logout request with /logout URL with the post method. Also, add the headers.

    Accept:application/json
    X-XSRF-TOKEN:{{xsrf-cookie}}

    You will get an empty response after sending the request.


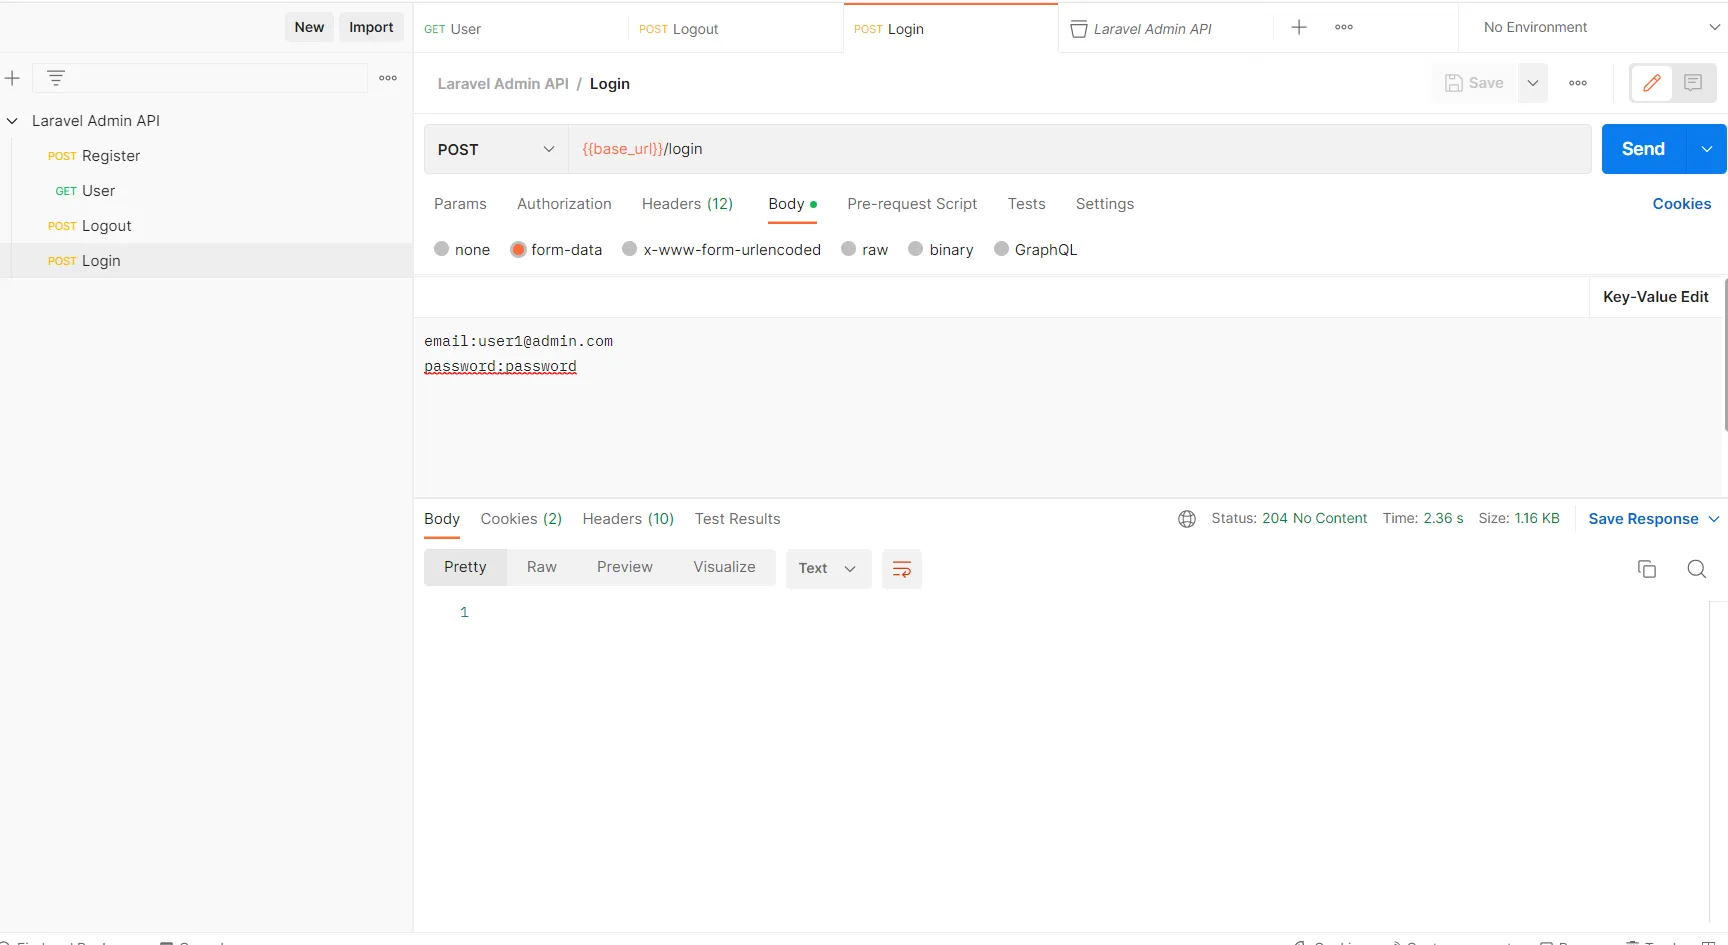
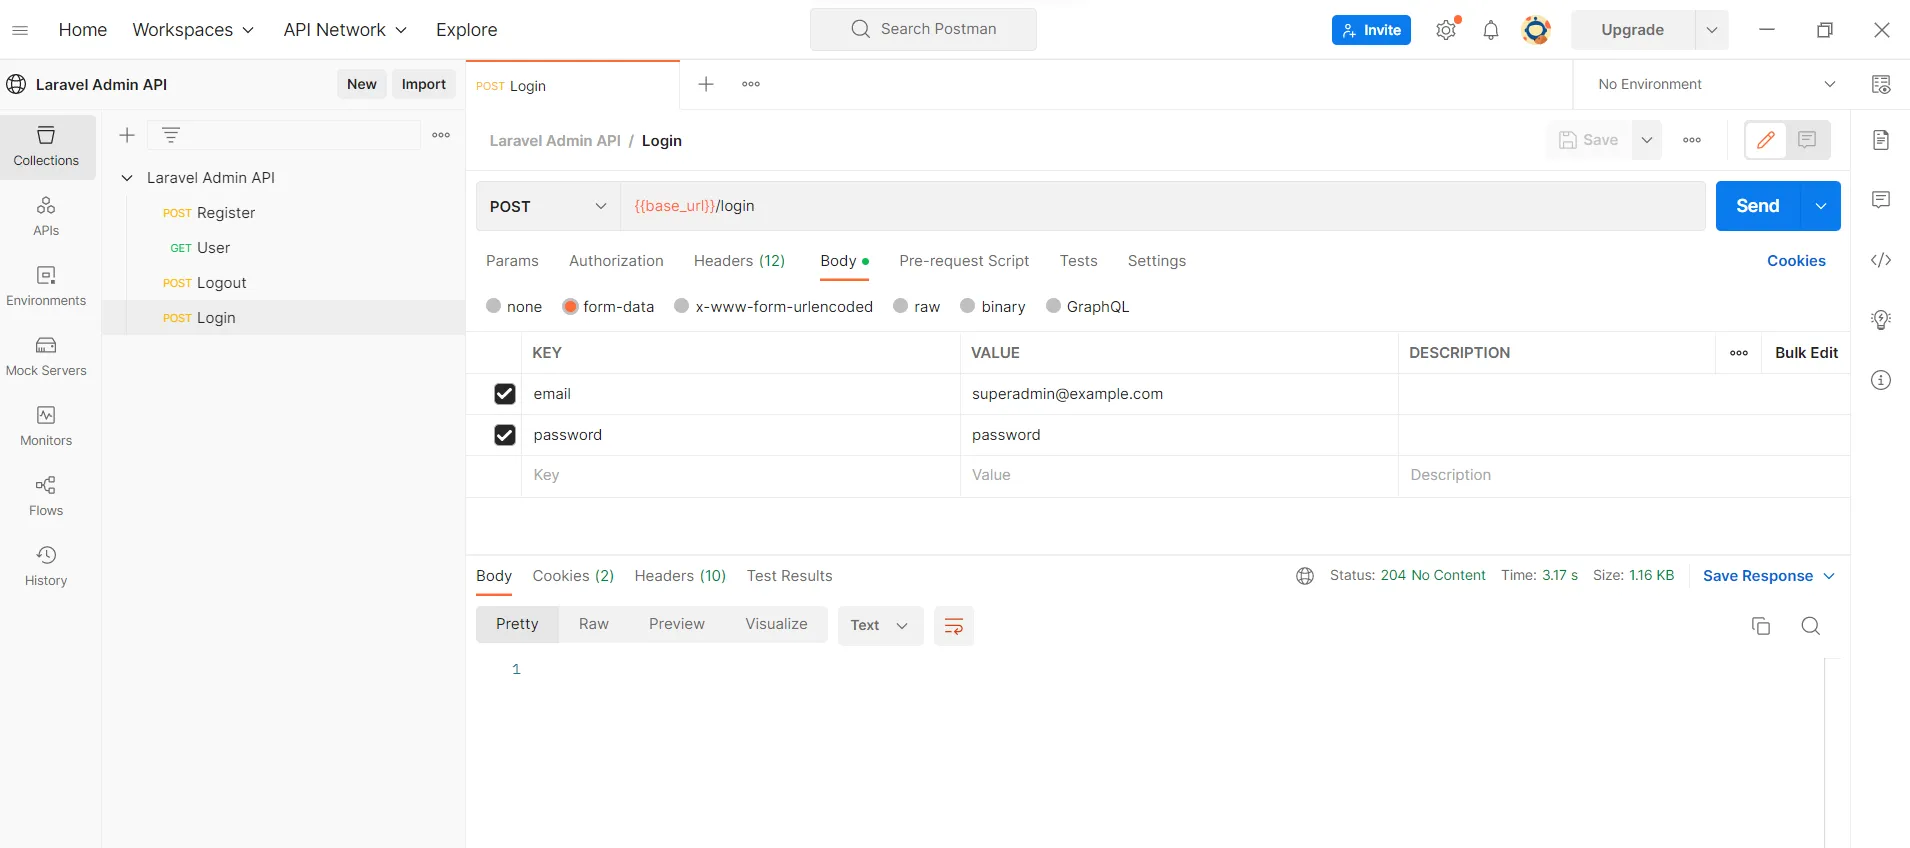
    Login Request

    We have completed the user register, get the user, and logout. Only login is pending.

    Header

    Accept:application/json
    X-XSRF-TOKEN:{{xsrf-cookie}}

    Body: Select form-data and insert the below values

    email:user1@admin.com
    password:password

    We have created 4 requests in Postman and validated our Admin API. You can import the below-exported data and use it in the Postman. Next part we add permission and roles to our admin API.

    {
     "info": {
      "_postman_id": "6822504e-2244-46f9-bba8-115dc36644f6",
      "name": "Laravel Admin API",
      "schema": "https://schema.getpostman.com/json/collection/v2.1.0/collection.json",
      "_exporter_id": "25059912"
     },
     "item": [
      {
       "name": "Register",
       "request": {
        "method": "POST",
        "header": [
         {
          "key": "Accept",
          "value": "application/json",
          "type": "text"
         },
         {
          "key": "X-XSRF-TOKEN",
          "value": "{{xsrf-cookie}}",
          "type": "text"
         }
        ],
        "body": {
         "mode": "formdata",
         "formdata": [
          {
           "key": "name",
           "value": "admin",
           "type": "text"
          },
          {
           "key": "email",
           "value": "user1@admin.com",
           "type": "text"
          },
          {
           "key": "password",
           "value": "password",
           "type": "text"
          },
          {
           "key": "password_confirmation",
           "value": "password",
           "type": "text"
          }
         ]
        },
        "url": {
         "raw": "{{base_url}}/register",
         "host": [
          "{{base_url}}"
         ],
         "path": [
          "register"
         ]
        }
       },
       "response": []
      },
      {
       "name": "User",
       "request": {
        "method": "GET",
        "header": [
         {
          "key": "Accept",
          "value": "application/json",
          "type": "text"
         },
         {
          "key": "Referer",
          "value": "{{host}}",
          "type": "text"
         }
        ],
        "url": {
         "raw": "{{base_url}}/api/user",
         "host": [
          "{{base_url}}"
         ],
         "path": [
          "api",
          "user"
         ]
        }
       },
       "response": []
      },
      {
       "name": "Logout",
       "request": {
        "method": "POST",
        "header": [
         {
          "key": "Accept",
          "value": "application/json",
          "type": "text"
         },
         {
          "key": "X-XSRF-TOKEN",
          "value": "{{xsrf-cookie}}",
          "type": "text"
         }
        ],
        "url": {
         "raw": "{{base_url}}/logout",
         "host": [
          "{{base_url}}"
         ],
         "path": [
          "logout"
         ]
        }
       },
       "response": []
      },
      {
       "name": "Login",
       "request": {
        "method": "POST",
        "header": [
         {
          "key": "Accept",
          "value": "application/json",
          "type": "text"
         },
         {
          "key": "X-XSRF-TOKEN",
          "value": "{{xsrf-cookie}}",
          "type": "text"
         }
        ],
        "body": {
         "mode": "formdata",
         "formdata": [
          {
           "key": "email",
           "value": "user1@admin.com",
           "type": "text"
          },
          {
           "key": "password",
           "value": "password",
           "type": "text"
          }
         ]
        },
        "url": {
         "raw": "{{base_url}}/login",
         "host": [
          "{{base_url}}"
         ],
         "path": [
          "login"
         ]
        }
       },
       "response": []
      }
     ],
     "event": [
      {
       "listen": "prerequest",
       "script": {
        "type": "text/javascript",
        "exec": [
         "pm.sendRequest({",
         "    url: pm.collectionVariables.get('base_url')+'/sanctum/csrf-cookie',",
         "    method: 'GET'",
         "}, function (error, response, {cookies}) {",
         "    if (!error){",
         "        pm.collectionVariables.set('xsrf-cookie', cookies.get('XSRF-TOKEN'))",
         "    }",
         "})"
        ]
       }
      },
      {
       "listen": "test",
       "script": {
        "type": "text/javascript",
        "exec": [
         ""
        ]
       }
      }
     ],
     "variable": [
      {
       "key": "host",
       "value": "localhost:3000",
       "type": "string"
      },
      {
       "key": "base_url",
       "value": "http://localhost",
       "type": "string"
      },
      {
       "key": "xsrf-cookie",
       "value": "",
       "type": "string"
      }
     ]
    }
    

    Also, all the Request is available in below Postman public workspace

    https://www.postman.com/balajidharma/workspace/laravel-admin-api/collection/25059912-6822504e-2244-46f9-bba8-115dc36644f6?action=share&creator=25059912

  • Add Role and Permissions based authentication to Laravel API

    To manage roles & permission, we going to add the Spatie Laravel-permission package to our Laravel Admin API.

    The following steps are involved to install the Laravel permission package for our Laravel Admin API.

    • Install Spatie Laravel-permission package
    • Publish the configuration and migration file
    • Running Migration

    Install Spatie Laravel-permission package

    Install the package using the composer command

    ./vendor/bin/sail composer require spatie/laravel-permission

    Publish the configuration and migration file

    The vendor:publish artisan command is used to publish the package configuration to the config folder. Also, copy the migration files to the migration folder.

    ./vendor/bin/sail artisan vendor:publish --provider="Spatie\Permission\PermissionServiceProvider"

    Running Migration

    Run the migrations using artisan migrate

    ./vendor/bin/sail artisan migrate

    Now we need to add some roles & permission. Then need to assign the role to users. So we need to create seeders.

    I created an Admin core package with seeders and common functionality when I was working on Basic Laravel Admin Panel & Laravel Vue admin panel

    Add the admin core package to our Admin API

    ./vendor/bin/sail composer require balajidharma/laravel-admin-core

    This admin core package will install the Laravel Menu package. So run the below publish commands

    ./vendor/bin/sail artisan vendor:publish --provider="BalajiDharma\LaravelAdminCore\AdminCoreServiceProvider"
    ./vendor/bin/sail artisan vendor:publish --provider="BalajiDharma\LaravelMenu\MenuServiceProvider"

    Now run the migration with the seeder

    ./vendor/bin/sail artisan migrate --seed --seeder=AdminCoreSeeder

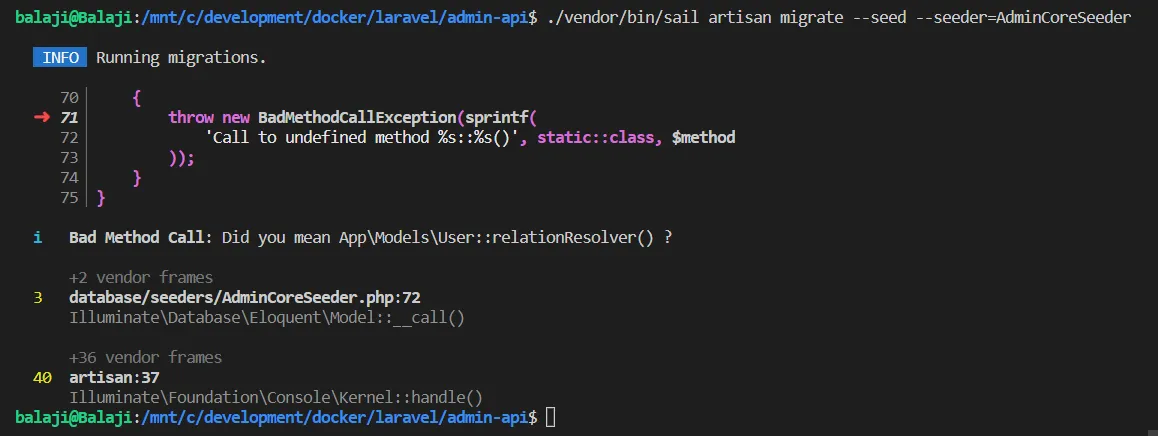
    The seeder throws the error

    We need to add HasRoles Traits in the user model. Open the app/Models/User.php

    <?php
    
    .
    .
    .
    .
    .
    use Spatie\Permission\Traits\HasRoles;
    
    class User extends Authenticatable
    {
        use HasApiTokens, HasFactory, Notifiable, HasRoles;
    
        /**
         * The attributes that are mass assignable.
         *

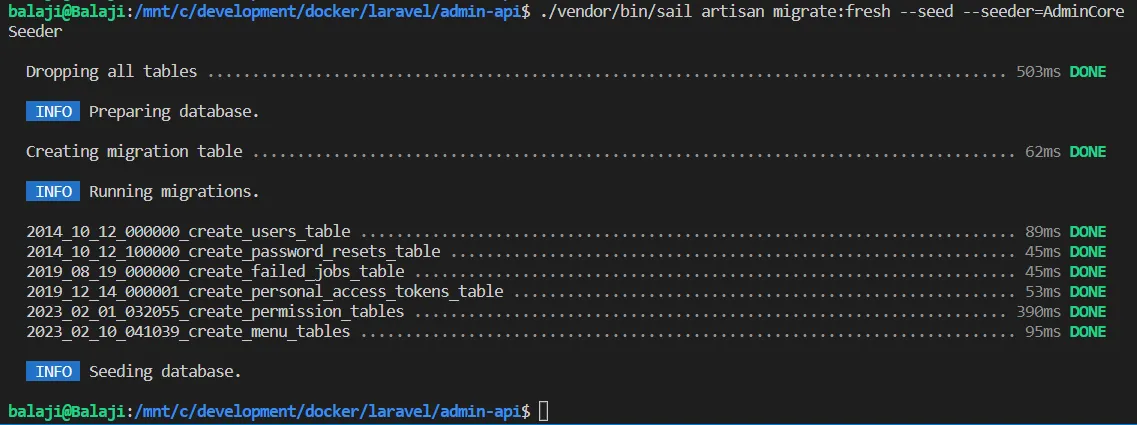
    Try again to run the seeder with migrate:fresh. So it will drop all tables and re-run all of our migrations.

    ./vendor/bin/sail artisan migrate:fresh --seed --seeder=AdminCoreSeeder

    Open the Postman application and test the new user login. In the login, change the form data to the below email and password

    Email — superadmin@example.com

    Password — password

    After login, runs the get user request. You will get the super admin details on the response.


    We will create an API for Permission CRUD operations in the next blog.

  • Laravel: Automate Code Formatting!

    Pint is one the newest members of Laravel first-party packages and will help us to have more readable and consistent codes.

    Installing and Configuring Laravel Pint is so easy and It is built on top of PHP-CS-Fixer so it has tones of rules to fix code style issues. (You don’t need Laravel 9 to use Pint and it’s a zero dependency package)

    But running Pint is quite painful because every time we want to push our changes to the remote repository we have to run below command manually:

    ./vendor/bin/pint --dirty

    The --dirty flag will run PHP-CS-Fixer for changed files only. If we want to check styles for all files just remove --dirty flag.

    In this article we want to simply automate running code styles check with Pint before committing any changed file so even team developers will have a well defined code structure and don’t need to run Laravel Pint every time before we push our codes to remote repo!

    Before we start, be careful this is a very simple setup and you can add as many options as you want to Laravel Pint.

    In order to run ./vendor/bin/pint --dirty just before every commit, we should use the pre-commit hook inside .git folder.

    First of all we will create a scripts folder inside our root Laravel directory. In this folder we will have a setup.sh file and pre-commit file without any extension.

    scripts/
    setup.sh
    pre-commit

    Inside our setup.sh we have:

    #! /usr/bin/env bash
    
    cp scripts/pre-commit .git/hooks/pre-commit
    chmod +x .git/hooks/pre-commit

    And write the following lines on pre-commit file:

    #! /usr/bin/env bash
    
    echo "Check php code styles..."
    echo "Running PHP cs-fixer"
     ./vendor/bin/pint --dirty
     git add .
    echo "Done!"

    Second of all, we should go to composer.json file and on the scripts object add this line: (If post-install-cmd key does not exist, you should create post-install-cmd part and then add below)

    "post-install-cmd": [
                "bash scripts/setup.sh"
            ]

    Third of all, we will require Pint package by this:

    composer require laravel/pint --dev

    And To be sure Don’t Forget to run:

    composer install

    The composer install command will add the pre-commit hook to our .git folder and after that we are ready to go!

    From now on, we can simply write our code and just before we commit our changes the Pint command will run automatically and will fix our code styles!

    Pint use Laravel code styles as defaultbut if you want to use psr-12 like me, you can create a pint.json file inside the root directory of your Laravel project and copy below json to have a more opinionated PHP code styles:

    {
        "preset": "psr12",
        "rules": {
            "simplified_null_return": true,
            "blank_line_before_statement": {
                "statements": ["return", "try"]
            },
            "binary_operator_spaces": {
                "operators": {
                    "=>": "align_single_space_minimal"
                }
            },
            "trim_array_spaces": false,
            "new_with_braces": {
                "anonymous_class": false
            }
        }
    }

    This is a simple config for our Pint command and will simplify null returns and define an equal indentation for arrays. You can check all PHP-CS-Fixer options here!

    READ MORE:

  • API Authentication with LDAP and Laravel Passport

    This article takes us through installation and configuration of LDAP and Laravel Passport on a Laravel project. This will enable API authentication with access and refresh tokens using existing Active Directory accounts.

    Laravel comes with a fluent auth out of the box. For those wanting to use it as an API that manages its own API authentication, Passport does a fantastic job in that regard. Going further, some enterprise systems will require you to use their existing Active Directory accounts so everyone is saved from having to save gazillion passwords. And yes, Laravel LDAP does that well too.

    Wait, it looks like there is no case where this article can come in after all. Maybe not just yet. What if you are required to develop an API for a mobile app but to be used by an enterprise? They require their Active Directory. They memorize one password. And you, on the other hand, require Laravel Passport to manage the app’s authentication with those tokens. Let’s crack this one up!

    First, let’s set up the laravel application with

    laravel new ldap-passport

    Then install the two composer packages

    cd ldap-passport
    composer require adldap2/adldap2-laravel
    composer require laravel/passport

    You can find the config details of adaldap installation on their docs

    Since traditionally you cannot use LDAP and Passport together out of the box, we will draw their lines in our auth config file and in LoginController so that LDAP handles the authentication with Active Directory, and pass on to Passport to issue tokens to the client.

    To achieve this, first we change the api guard to passport and users provider to ldap as in the code snippet below.

    <?php
    
    return [
    
        // ...
    
        'guards' => [
            'web' => [
                'driver' => 'session',
                'provider' => 'users',
            ],
    
            'api' => [
                // Change the driver to 'passport'
                'driver' => 'passport',
                'provider' => 'users',
                'hash' => false,
            ],
        ],
    
        'providers' => [
            'users' => [
                // Change the driver to 'ldap'
                'driver' => 'ldap',
                'model' => App\User::class,
            ],
        ],
    
        // ...
    
    ];

    Next we proceed to our login controller. We will attempt to login with our user provider defined above

    Auth::attempt(['username' => request('username'), 'password' => request('password'), true)

    Then we fetch the passport client to use with the request. We assume (of course we require) the consumers of the API to pass their client’s API key in the request header.

    $client = PassportClient::findClientBySecret(request()->header("apiKey"));

    And then we use the client to generate API tokens to return to the client

    $passport = (new PassportAuthenticator($request))->authenticate($client, request('username'), request('password'));

    And finally we have out API tokens!

    return response()->json([
        "access_token" => $passport->access_token,
        "expires_in" => $passport->expires_in,
        "refresh_token" => $passport->refresh_token,
    ], 200),

    The complete login controller should like the one below

    <?php
    
    namespace App\Http\Controllers\Auth;
    
    use App\Http\Controllers\Controller;
    use App\Models\Passport\Authenticator as PassportAuthenticator;
    use App\Models\Passport\PassportClient;
    use App\User;
    use Illuminate\Foundation\Auth\AuthenticatesUsers;
    use Illuminate\Http\JsonResponse;
    use Psr\Http\Message\ServerRequestInterface;
    
    class LoginController extends Controller
    {
    
        use AuthenticatesUsers;
    
        protected $redirectTo = '/home';
    
        public function __construct()
        {
            $this->middleware('guest')->except('logout');
        }
    
        public function username()
        {
            return 'username';
        }
    
        /**
         * @param ServerRequestInterface $request
         * @param LoginInterface $login
         * @return JsonResponse
         */
        public function login(ServerRequestInterface $request, LoginInterface $login): JsonResponse
        {
            // Attempt logging in with ldap auth provider
            if (!Auth::attempt(['username' => $username, 'password' => $password], true))
                return response()->json(["error" => "The credentials provided do not match our records"], 401);
    
            if (!request()->header("apiKey"))
              return response()->json(["error" => "Your client is not allowed on this app"], 401);
    
            // get the passport client using the API key passed in the request header
            $client = PassportClient::findClientBySecret(request()->header("apiKey"));
    
            // generate passport tokens
            $passport = (new PassportAuthenticator($request))
                ->authenticate($client, request('username'), request('password'));
    
            // return the tokens to the client
            return respose()->json([
                "access_token" => $passport->access_token,
                "expires_in" => $passport->expires_in,
                "refresh_token" => $passport->refresh_token,
            ], 200);
        }
    }

    That sorts us out, right? Not just yet. At this stage, when subsequent requests are made, the API will try to authenticate with auth:api guard and that won’t work. So we will modify the Kernel to pass our custom middleware (which will refer to Passport Middleware anyway). Here is how…

    'passport' => \Laravel\Passport\Http\Middleware\CheckClientCredentials::class,

    We add that to the routeMiddleware array of our Http Kernel. So instead of using auth:api in our protected routes, we will use passport.

    Route::post('blog', 'BlogController@store')-&gt;middleware('passport');

    The very last thing, as you might have noticed, we did some abstraction in the Login Controller. There is a little more happening in PassportClient and PassportAuthenticator classes. That was necessary to keep our code concise and focus on the main objective of the tutorial. You can see what’s happening behind the scenes in the snippets below:

    <?php
    
    namespace App\Models\Passport;
    
    use Laravel\Passport\Client;
    
    class PassportClient extends Client
    {
        public static function findClientBySecret($clientSecret): PassportClient
        {
            return static::where('secret', $clientSecret)->get()->first();
        }
    }
    <?php
    
    // Credits to @ceekays
    
    namespace App\Models\Passport;
    
    
    use Laravel\Passport\Http\Controllers\HandlesOAuthErrors;
    use Laravel\Passport\TokenRepository;
    use Lcobucci\JWT\Parser as JwtParser;
    use League\OAuth2\Server\AuthorizationServer;
    use Psr\Http\Message\ServerRequestInterface;
    use Zend\Diactoros\Response as Psr7Response;
    
    class Authenticator
    {
        use HandlesOAuthErrors;
    
        private $tokens;
        private $server;
        private $jwt;
        private $request = null;
    
        public function __construct(ServerRequestInterface $request)
        {
            $this->jwt = resolve(JwtParser::class);
            $this->server = resolve(AuthorizationServer::class);
            $this->tokens = resolve(TokenRepository::class);
            $this->request = $request;
        }
    
        public function authenticate(PassportClient $client, $username, $password)
        {
            $request = $this->request->withParsedBody([
                "username" => $username,
                "password" => $password,
                "client_id" => $client->id,
                "client_secret" => $client->secret,
                "grant_type" => "password"
            ]);
    
            $response = $this->withErrorHandling(function () use ($request) {
                return $this->convertResponse($this->server->respondToAccessTokenRequest($request, new Psr7Response));
            })->content();
    
            return json_decode($response);
        }
    
    }

    Surce: https://medium.com/@saulchelewani/api-authentication-with-ldap-and-laravel-passport-d6f2f3d7c1bb

  • Top 8 Free and Paid Resources for Learning Laravel

    Introduction

    No matter if you’re brand new to Laravel or have been using it for years, there’s always something new to learn. The framework and its ecosystem are constantly evolving and growing to improve the overall developer experience. So, it can be quite important to keep up to date with the latest changes so that you don’t fall behind.

    It’s also likely that you’ve run into a coding problem once or twice and needed to reach out to people online for a bit of advice and help. Let’s be honest, as developers we spend quite a lot of time searching online on a daily basis looking things up. Whether it be to jog our memory on a certain algorithm or to look at possible ways of tackling new pieces of code.

    The list below shows you 8 different places you can go online to give help you learn Laravel, keep up to date with it and also ask community members questions:

    Laracasts (Free and Paid)

    Laracasts is an online platform that has over 1700 lessons that you can use to learn about Laravel and other web programming related topics. The great thing about Laracasts is that it doesn’t focus solely on Laravel; it also has lessons based around tooling, testing and different programming languages. For example, there is a series of lessons based around getting your IDE (integrated development environment) or text editor, such as PHPStorm or Visual Studio Code, set up to make your development experience more productive.

    At the time of writing this article, some of the lessons on Laracasts are free and you can view them without having to spend any money at all! However, I would strongly recommend signing up for a paid account, which is $15/month, so that you can get full access to all of the tutorials.

    Another great thing about the Laracasts are it’s forums and the helpful community. If you ever have any questions or an issue that you can’t figure out, you can post it on to the forum. A large majority of the time, someone will reply to you with an answer that helps you solve your problem.

    Laravel News (Free)

    Laravel News is the official Laravel news source. They post new articles, tutorials and tips on a daily-basis as well as provide a newsletter that is sent out regularly. These articles always have useful information about different topics or new Laravel packages that you can use within your code.

    Although Laravel News doesn’t have a forum like Laracasts, the newsletter and podcast that they provide are extremely beneficial at keeping you up to date with the latest goings-on in the Laravel space.

    As a side note, I’ve actually had two of my Laravel packages that I’ve built in the past (Laravel Exchange Rates and Laravel Executor) featured on the Laravel News website. If you’d like to check them out, the articles were: Laravel Exchange Rates API Package and Simplify Installing and Updating your App With Laravel Executor.

    Laravel Documentation (Free)

    One of the most useful resources for helping you learn how to use Laravel is the official Laravel documentation. The documentation is really detailed and covers a large amount of the framework that you would touch when working on projects.

    Typically, huge amounts of documentation can feel overwhelming and can feel like being bombarded with too much information at once. However, I personally feel like the Laravel documentation does a really good job of splitting things out and making it easy to understand. Even after working with Laravel for years, I still always have the documentation open in a tab in my web browser just in case I need to quickly brush up on a topic.

    Top tip: For any of you that use DuckDuckGo as your search engine, you can search for “!laravel” and it will take you straight to the Laravel documentation.

    Udemy (Paid)

    Udemy is a video platform that’s similar to Laracasts. It sells online video courses that you can use to learn about a range of topics. However, they have a section that is dedicated to Laravel and learning how to use it; ranging from beginner to advanced courses.

    I’ve never personally used Udemy myself, but I know other developers that I work with that swear by it and find it extremely useful.

    Stack Overflow (Free)

    If you’ve ever done any type of software or web development, chances are you, you probably visit Stack Overflow on a daily basis. But if you’re just starting out as a developer, you might not have heard of it yet.

    Stack Overflow is an online question-and-answer site for developers. As an example, say if you have a question about something or have a bug in your code, you could post your question on Stack Overflow and someone would try and answer it for you. However, the chances are that if you’ve got a problem, someone else has already had it, posted the question and got an answer that solved their issue. So, Stack Overflow can be a great resource that contains almost instant answers for any problems that you might run into.

    If you need to ask a question though because it doesn’t already exist there, the community is usually really quick at answering.

    GitHub (Free)

    This resource is slightly different to some of the others above and might be a little more suitable for more experienced developers rather than any novices. There are countless Laravel projects and packages that you can find on public GitHub repositories. So, this means that there are a lot of places that you can look at to get ideas for development.

    As an example, when I first started writing Laravel packages, I wasn’t too sure on where to start. So, after reading through the Laravel documentation, I also checked out how other packages had been written. I looked at some of the official Laravel packages, such as Telescope, and also looked at how some of the Spatie packages were written. Being able to look at real-life examples of code can sometimes be more valuable than just looking at documentation that explains something. It gives you an insight and context into how things are actually done in practice.

    As a small side note as well, once you feel that you have enough experience with Laravel, you could maybe start contributing to open-source projects. This can be a little bit daunting at first but can feel extremely rewarding when your first pull request is accepted. When you make your pull request, the maintainers of the project will review your changes and additions to check that they’re okay to pull in. It’s usually during this stage that you get feedback on any changes you might need to make to get the pull request approved and merged. This feedback can really help you grow as a developer.

    Reddit (Free)

    Reddit is one of my personal favorite resources for keeping up to date with the latest Laravel and PHP topics. The r/laravel and r/php subreddits are made up of large communities of developers who can answer questions that you might have.

    I have asked questions on Reddit many times in the past for suggestions on how to tackle issues and have always been able to find an answer. The r/laravel subreddit also has a weekly “No Stupid Questions” thread that you can use to comment on and ask questions. Just remember though, if you’re asking any questions in any of the subreddits that you follow their rules; otherwise your post will get deleted.

    If you don’t want to post anything or ask any questions, the two subreddits can also be really helpful for keeping up to date with the latest news on the ecosystem.

    Other Laravel Developers (Free and Paid)

    One resource for learning Laravel that developers often overlook is possibly one of the most valuable… other developers. Sometimes, it can be really easy to sit and stare at a problem for a few hours without getting anywhere with it. Usually when this happens, it can be best to get an opinion from someone else who is looking at the problem from a different perspective. For this reason, it can be really useful to have other developers as friends or as someone you can contact.

    If you only have a quick question, quite a lot of developers will probably be happy to help you out and lend a helping hand (I know I would!). But, obviously, you have to remember that other people also have things they need to do and won’t want to be spending too much time helping you out for free. So, if you do contact a developer for help, try not to do it too often as it might discourage them from wanting to help you.

    Sometimes, you might also want to pay a more experienced developer to have a chat for an hour or two to go over some topics. Like I mentioned earlier, looking at documentation can give you an idea of how something is done, but speaking to someone can help you understand the “why”. Speaking to senior developers can be extremely helpful because it’s likely that if you run into a problem that they’ve already experienced something similar themselves and know any pitfalls that you should to try to avoid.

    If you have any questions about anything Laravel related or need any Laravel web development doing, you can always feel free to contact me and have a chat.

    Originally published at https://ashallendesign.co.uk.

    Source: https://ashallendesign-uk.medium.com/top-8-free-and-paid-resources-for-learning-laravel-4927b0174cab

  • What Is Laravel Jetstream And Why Is Every Laravel Development Company Talking About It

    Laravel is an open-source PHP framework and it keeps adopting new versions to perform on various projects. After Laravel 7.27.0, Laravel 8 projects are going to float over the internet. Here is a brand new Scaffolding package for Laravel 8 projects that are named ‘Laravel Jetstream’ for every Laravel development company to use. Laravel Jetstream is an open-source package derived by the Laravel team. This free package goes beyond Authentication Scaffolding.

    Now, Laravel Installer includes support for Jetstream. The latest Laravel version 8 is coming into existence with a new feature Laravel Jetstream to set it with better improvements. This enhances the Laravel development services by performing in the changed package of Laravel/UI.
    With the latest version, Laravel is moving ahead from the jQuery and Bootstrap based scaffolding. Laravel was stuck to these scaffolding and the change was indeed needed. Laravel Jetstream is the one that not only brings the change but also gives a more intuitive way of development to Laravel developers.

    The Change Cum Revolution with Laravel

    • Laravel Mix helps to compile SASS files to plain CSS. The ‘package.json’ of Laravel includes the ‘bootstrap’ package after installing the ‘laravel/ui’ composer package. It further generates the frontend scaffolding. Now, on the other hand, Laravel Jetstream has changed the things from Laravel/UI package. Tailwind has taken the place for CSS. Tailwind CSS is a low-level CSS framework, which is highly customizable too.
    • Developers use ‘Presets’ to handle frontend. They allow developers for adding additional methods to the ‘UiCommand’ class at runtime. Presets are ‘macroable’ that needs to be declared in a service provider. Laravel Jetstream includes ‘Inertia.js’ or ‘Livewire’ to replace presets in Laravel/UI.

    Tailwind

    Tailwind is a highly customizable and utility-first CSS framework. It helps to build rapid custom designs. Tailwind serves the developers with bespoke designs where they need not to worry much about those annoying opinionated styles.

    Most CSS frameworks perform too much with all sorts of predesigned components. They often create a mess with cards, buttons, and alerts, etc. When a business looks to hire Laravel developer, it needs to make sure whether the team can perform with customer design or not. But Tailwind is so different and easy to optimize. It provides low-level utility classes and replaces the opinionated pre-designed components.

    Tailwind drives custom designs without ever leaving HTML. This is completely your thing if you are just fed up with battling specificity wars, overriding unwanted styles, etc. Listing a few features of Tailwind that are contributing to making it different –

    Livewire

    Livewire is a full-stack framework that helps the developer for building dynamic interfaces. Every business looks for modern app development. This development becomes much hard with tools like Reach and Vue. Though these tools and extremely powerful, the complexity causes fatigue.

    Livewire comes with the comfort of Laravel. If you will into its codes, you can find out the difference and uniqueness of performance. It keeps improving with the real-time search component that the user sees after typing into the search input.

    It works swiftly and the performance is here –

    • SEO friendly performance with the page
    • AJAX request to the server at an interaction
    • Mutates DOM as the things changed

    Inertia.js

    Developers can build single-page apps with Inertia.js. There is no such requirement of building an API as Interia.js lets you build modern single-page apps with React, Vue, and Svelte. A Laravel development company uses classic server-side routing and controllers to perform the required task.

    First of all, Inertia.js is not a framework. This is completely a new approach, also known as a modern monolith. It neither has client-side routing nor requires an API. Inertia performs by leveraging existing server-side frameworks. Developers can simply build controllers and page views.

    There are three official client-side adapters where the developers actually perform. These are Vue.js, React, and Svelte. Additionally, two server-side adapters are also here Laravel and Rails. Inertia is designated to work with existing client-side and server-side frameworks. Inertia comes with Vue.js as a default adapter.

    Availability of Laravel Jetstream

    Laravel keeps evolving with its various versions. These versions are coming with some revolutionary changes, every time. Laravel team brings major changes with its every version. They keep a 6-month interval between their two Laravel versions’ releases. Laravel 8 Non-LTS is a general version that provides six-months bug fixes and one-year security-fixes. WebOccult keeps itself informed and equipped with every technological development in the relevant realm.

    Since the latest version of Laravel is Laravel 8, the expectations for Laravel Jetstream also revolve around that date. 8th September 2020 is the date when Laravel 8 is coming out with some supreme features. Laravel Jetstream can also follow it after the arrival or one/two weak later. Thus, it is just nothing to hire a Laravel developer. A business must ensure that the developer (or development team) is well-aware of every latest technology and versions before hiring them.

    Features of Laravel Jetstream

    Laravel Jetstream offers amazing scaffolding for Laravel applications. It is a new Laravel ecosystem. This open-source platform is completely free for developers. Laravel Jetstream includes much cool and development-friendly stuff. A few of its useful features are mentioned below –

    User Profile Management

    User Profile Management is, somehow, the key feature of Laravel Jetstream that sets it different from others. Here, the user can update various relevant information, easily. It includes information like –

    • Users can update a profile picture.
    • Users can update their name, along with email and password.
    • Users can view the Browser Sessions and log out from there.
    • Users can delete their account, completely.
    • Developers enjoy full control as all functionality and its code is available to them.
    • Two Factor Authentications is available with Recovery codes and QR code.

    Team Management

    Though it has been very usual that developers do use the ‘teams’ feature in every SAAS application, Laravel Jetstream has clubbed it in a very unique as well as a better way. It adds ‘teams’ entry in the ‘jetstream.php’ config file with to enable you to –

    API Tokens

    This is an ultimate feature of Laravel jetstream where it uses Laravel Sanctum to generate API tokens, under-the-hood. A Laravel developer can perform by adding a single line of code in the ‘jetstream.php’ config file to enable the user form generating their own tokens. Even if it is not required, if your Laravel app exposes an API, the developer should give this flexibility to its users.

    With the suggested configuration, a new page will be added automatically, namely, user/api-tokens. Additionally, the user can also manage token permissions on this page, which are defined in ‘JetstreamServiceProvider’.

    Final words

    Laravel 8 is going to give a kick to Laravel development. Laravel Jetstream is like a non-billing part of Laravel Spark that is offered by the Laravel team. Since the intuitive and futuristic approach of the team is unquestionable, Laravel Jetstream can add much more to the Laravel development. We, at WebOccult Technologies, provide unerring Laravel development services to the clients where we keep adopting every new trend of the technology.

    All we can say is that Laravel Jetstream will work effectively. It looks quite appealing and promising in the first look, let’s see how far it walks with us!

    Originally published at https://www.weboccult.com.

    Source: https://mahipal-weboccult.medium.com/what-is-laravel-jetstream-and-why-is-every-laravel-development-company-talking-about-it-a0635d43d572

  • Getting Started with Redis As A PHP (Laravel) Guy Or Girl

    What is Redis?

    Redis which stands for Remote Dictionary Server is an open-source (BSD licensed), in-memory data structure store, used as a database, cache, and message broker.

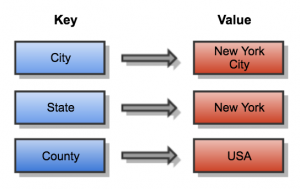
    In basic words, Redis is a Key-Value Store that stores data in Key-Value pairs.

    For Example:

    How data is stored in Redis

    Redis is a No-SQL database.

    Basically, this means it does not have tables, rows, columns, functions, procedures, etc like in MySQL, Oracle DBs

    It also does not use SELECT, INSERT, UPDATE, DELETE.

    Instead, it uses data structures to store data.

    Like,

    • String
    • Lists
    • Sorted Sets
    • Hashes
    • Sets

    And,

    • Bitmaps (also called bit arrays, bit vectors, etc.)
    • Hyperloglogs ( It’s is a probabilistic data structure used to count unique values — or as it’s referred to in mathematics: calculating the cardinality of a set)
    • Geospatial Indexes (The geospatial index supports containment and intersection queries for various geometric 2D shapes.)

    Interaction with data in Redis is command based.

    One of the key differences between Redis and other key-value databases is Redis’s ability to store and manipulate high-level data types.

    Redis is a popular choice for caching, session management, gaming, leader boards, real-time analytics, geospatial, ride-hailing, chat/messaging, media streaming, and pub/sub-apps.

    To learn more about Redis you can visit their website, redis.io.

    Getting Started

    For this post, I’ll be working with Ubuntu 18.04 but any Linux Distro works.

    You’ll need PHP (Laravel) installed, Follow the instructions here to get it installed https://panjeh.medium.com/install-laravel-on-ubuntu-18-04-with-apache-mysql-php7-lamp-stack-5512bb93ab3f;

    For test purposes, You’ll also need Redis installed locally.

    To do this simply run,

    sudo apt-get update

    Then,

    sudo apt-get install redis-server

    Finally;

    sudo systemctl enable redis-server.service

    One more thing,

    sudo nano /etc/redis/redis.conf

    Optionally, you can increase or decrease the memory limit is available on your host machine.

    maxmemory 256mb
    maxmemory-policy allkeys-lru

    Then finally restart your Redis server.

    sudo systemctl restart redis-server.service

    and start it up by running

    redis-server

    By default, it runs on host: 127.0.0.1 and port: 6379.

    Finally, Getting Started

    We’ll be using a test project for our example.

    • So open up your terminal with CTRL+ALT+T, and type in the command below in the directory of your choice;
    composer create-project — prefer-dist laravel/laravel redis-example
    • Navigate to the folder
    cd redis-example

    Install the predis/predis package via Composer

    composer require predis/predis

    Configuration

    The Redis configuration for your application can be found in config/database.php. In this file, you’ll find a Redis array containing the Redis servers utilized by your application.

    'redis' => [
        'client' => env('REDIS_CLIENT', 'predis'),
    
        'default' => [
            'host' => env('REDIS_HOST', '127.0.0.1'),
            'password' => env('REDIS_PASSWORD', null),
            'port' => env('REDIS_PORT', 6379),
            'database' => env('REDIS_DB', 0),
        ],
    
        'cache' => [
            'host' => env('REDIS_HOST', '127.0.0.1'),
            'password' => env('REDIS_PASSWORD', null),
            'port' => env('REDIS_PORT', 6379),
            'database' => env('REDIS_CACHE_DB', 1),
        ],
    ],

    The default configuration uses phpredis as it’s client, so you’ll have to change this to predis if you’ll be using the laravel predis package.

    Interacting with Redis

    You can interact with Redis by calling various methods on the Redis facade.

    Redis facade supports dynamic methods, basically, this means that you could call any command on the facade and the command will be passed directly to Redis.

    Here’s an example,

    namespace App\Http\Controllers;
    
    use App\Http\Controllers\Controller;
    use Illuminate\Support\Facades\Redis;
    
    class UserController extends Controller
    {
        /**
         * Show the profile for the given user.
         *
         * @param int $id
         * @return Response
         */
        public function showProfile($id)
        {
            Redis::set('name', 'Taylor');
            $values = Redis::lrange('names', 5, 10);
            $name = Redis::get(‘name’.$id);
            // $values = Redis::command('lrange', ['name', 5, 10]);
            $user = [
                'name' => $name,
                'values' => $values
            ];
    
            return view(‘user.profile’, [‘user’ => $user]);
        }
    }

    For more commands like this, you can check out the laravel documentation on Redis here

    Source: https://olat-nji.medium.com/getting-started-with-redis-as-a-php-laravel-guy-or-girl-6a8d875a4166