Tag: Authentication

  • Which Laravel authentication package to choose?

    At its core, Laravel provides “guards” and “providers” to manage authentication. However, controllers, routes, and views still need to be implemented.

    To achieve this, Laravel offers first-party packages that offer a complete authentication system, ready to use in just a few minutes. This is unique and the strength of Laravel: in no time, you can start developing your ideas.

    However, multiple packages are related to authentication, and it can be challenging to know which one is adequate for your project.

    Should you use Laravel Jetstream or Laravel Breeze? What are the differences between Laravel Passport and Laravel Sanctum? Is Laravel UI still an option?

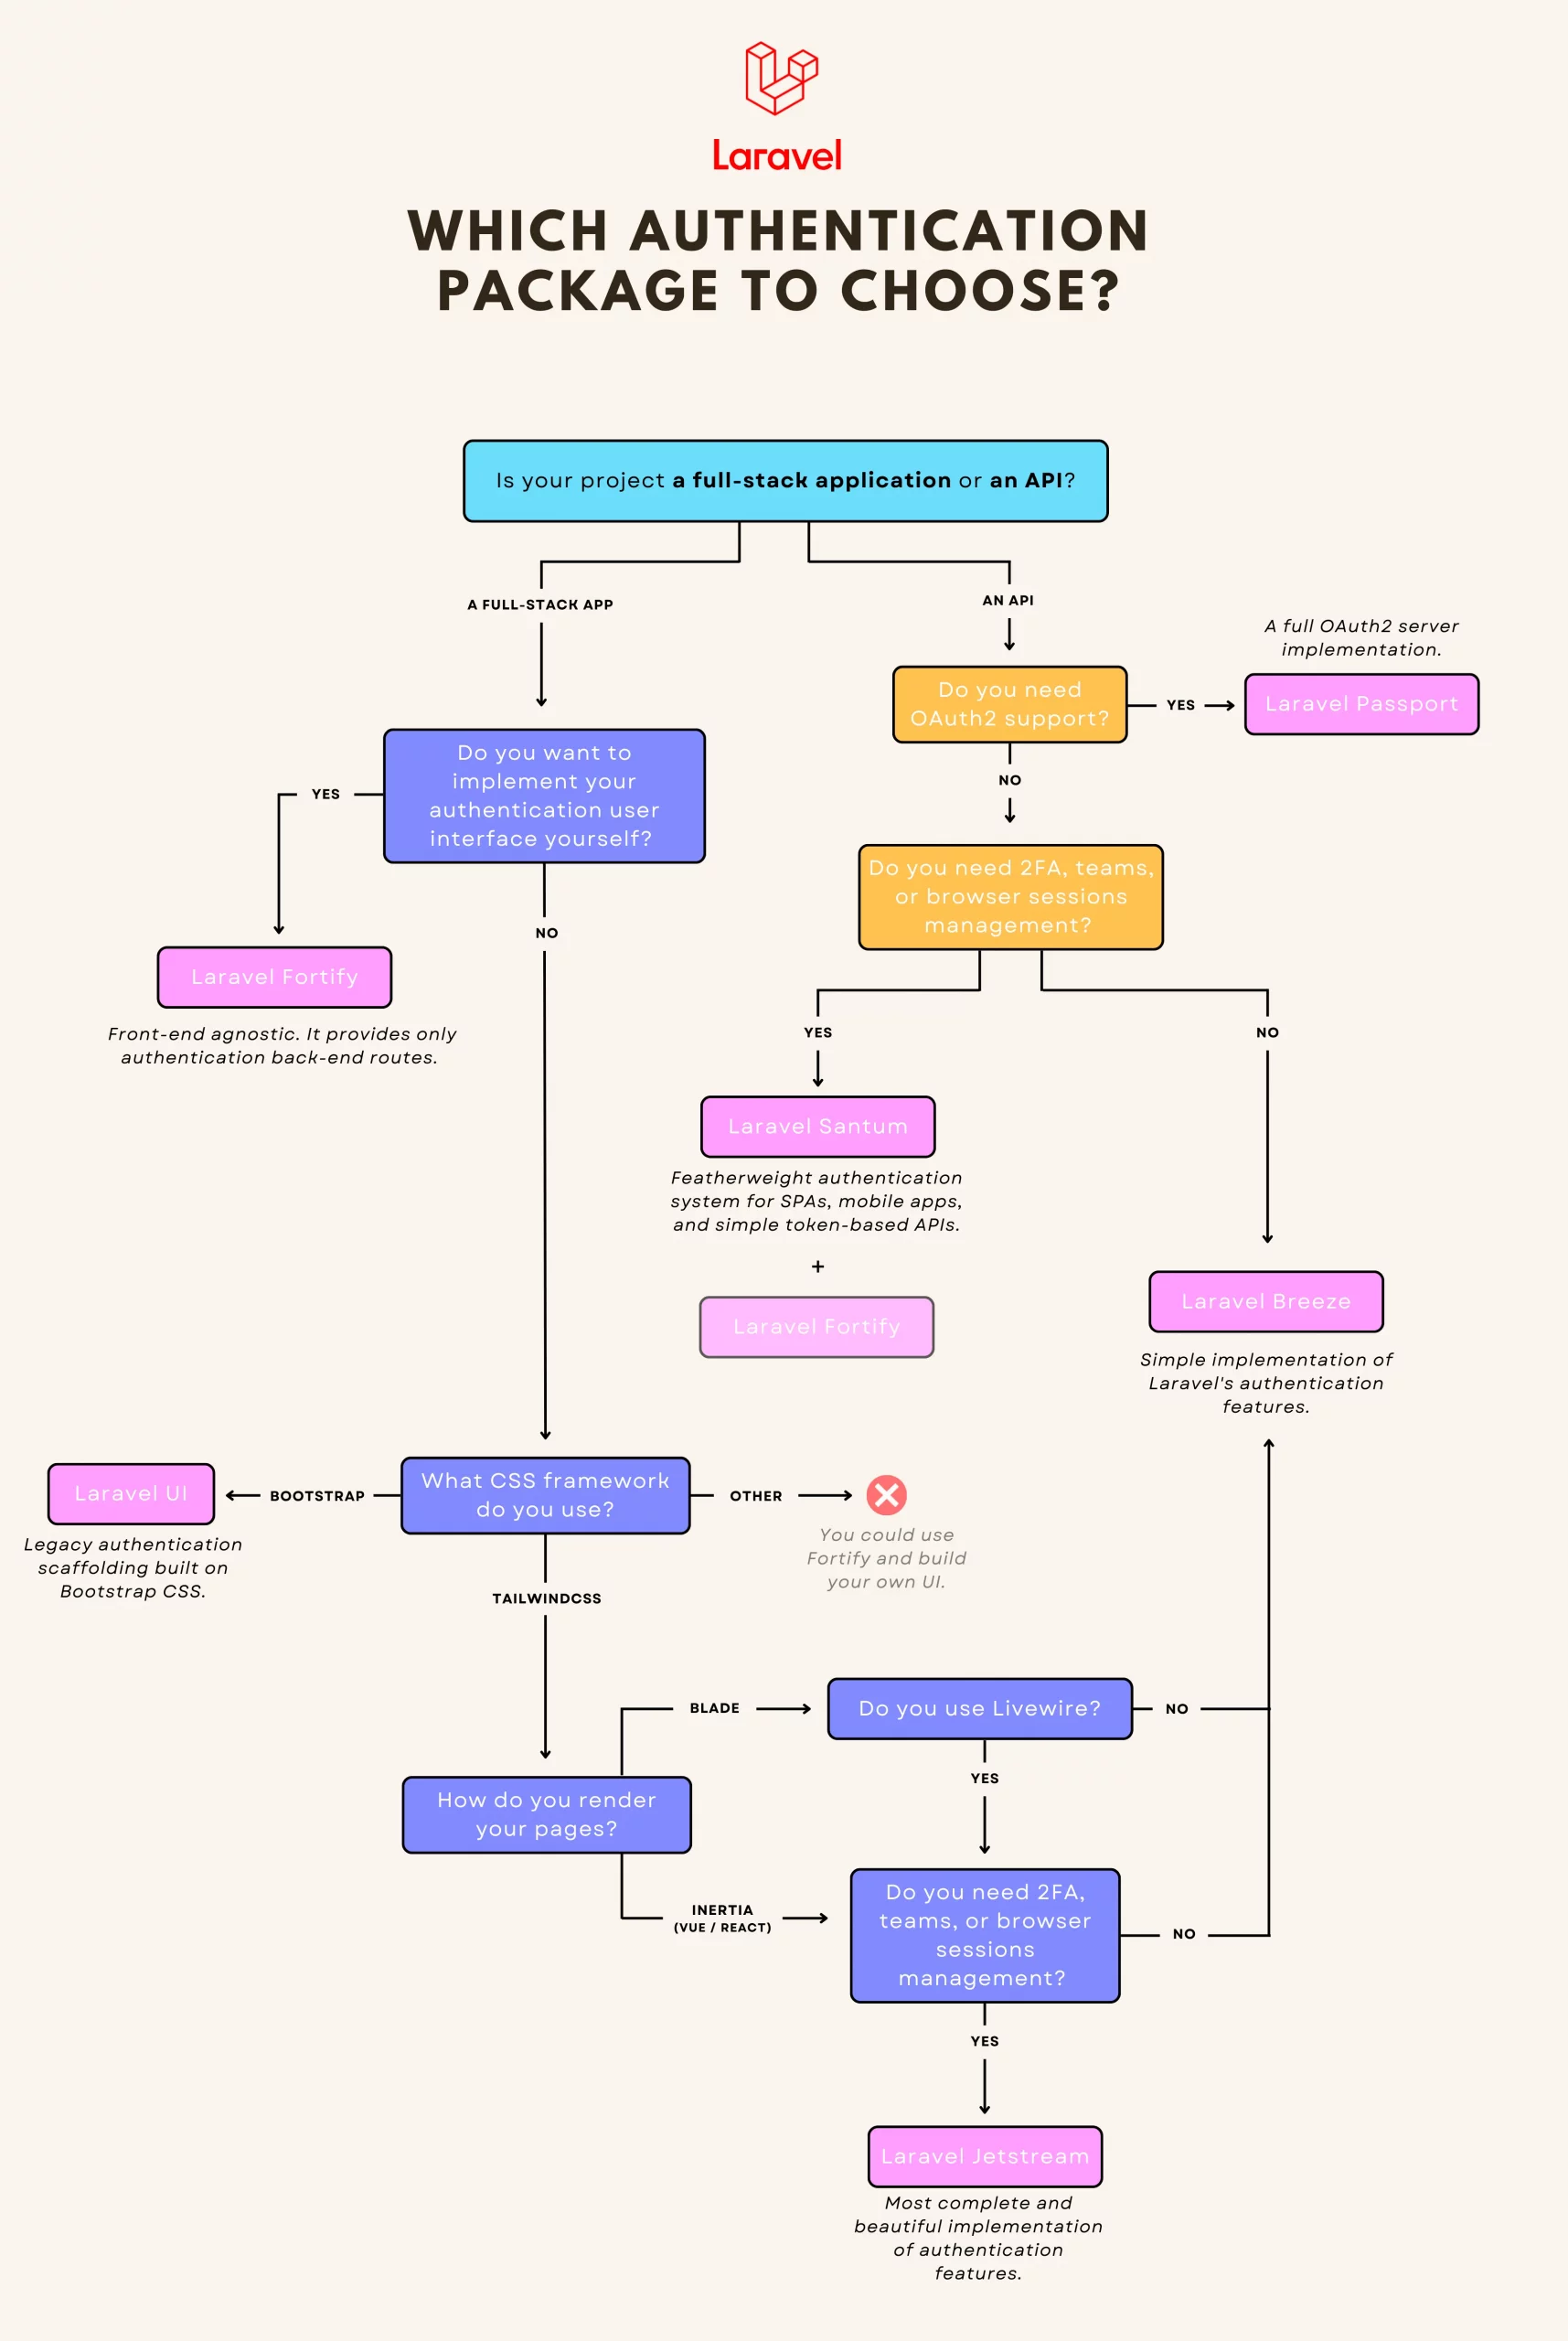
    To help you find your way around, I have made a diagram to help you understand their differences and make the best choice for your project.

    Which Laravel authentication package to install for your project?

    Laravel Breeze

    Breeze is a minimal and simple implementation of Laravel’s authentication features. It works both for full-stack applications and APIs. This is an excellent choice if you like simplicity or are brand new to Laravel.

    • You can choose between Blade, Vue/React (with Inertia), or API
    • It uses Tailwind CSS when Blade or Inertia stacks are chosen
    • ✅ Registration
    • ✅ Login
    • ✅ Profile Management
    • ✅ Password Reset
    • ✅ Email Verification

    Laravel Jetstream

    More complete and stylish, Jetstream is an interesting alternative to Breeze. It provides more features but requires that your project uses Livewire or Inertia.

    • You can choose between Blade + Livewire or Vue/React + Inertia
    • It uses Tailwind CSS
    • ✅ Registration
    • ✅ Login
    • ✅ Profile Management
    • ✅ Password Reset
    • ✅ Email Verification
    • ✅ Two-Factor Authentication (2FA)
    • ✅ Teams Management
    • ✅ Browser Sessions Management (let users see where they’re logged-in)
    • ✅ API Tokens & Permissions (let users generate API tokens)

    Laravel Fortify

    Fortify is a front-end agnostic implementation of all authentication features. It provides all routes and controllers needed to implement your authentication logic but requires you to code the user interface yourself. There are no views out of the box!

    This is a great choice if you don’t use Tailwind CSS, want to code your front end yourself, or are building an API.

    • ❌ No views, no user interface
    • ✅ Registration
    • ✅ Login
    • ✅ Profile Management
    • ✅ Password Reset
    • ✅ Email Verification
    • ✅ Two-Factor Authentication (2FA)
    • ✅ Teams Management
    • ✅ Browser Sessions Management (let users see where they’re connected and logout sessions)
    • ✅ API Tokens & Permissions (let users generate API tokens)

    For info, Jetstream uses Fortify under the hood and adds the UI layer.


    Laravel UI

    Laravel UI is the legacy scaffolding and brings a basic authentication system built on the Bootstrap CSS framework. Today, the only reason to install it is that your project uses Bootstrap CSS.

    • You can choose between simple HTML, Vue, or React
    • ✅ Registration
    • ✅ Login
    • ✅ Password Reset
    • ✅ Email Verification

    Laravel Passport

    Passport provides a full OAuth2 server implementation


    Laravel Sanctum

    Sanctum offers a simple way to authenticate SPAs or mobile applications that need to communicate with your Laravel-powered API. If you don’t need full OAuth2 support, this is a much simpler alternative to Passport.

    • ✅ Middleware to authenticate your SPA (using cookie-based sessions)
    • ✅ Middleware to authenticate clients using API tokens
    • ✅ API tokens generation & permissions
    • ❌ No authentication routes or controllers

    Using Sanctum, you still have to implement your own authentication logic (creating your routes and controllers) or use it in combination with Fortify.

    If you use it to authenticate a SPA, it needs to be hosted on the same root domain as your API since it uses cookie-based sessions.


    I hope that all the authentication packages and starter kits of Laravel have no more secrets for you and that this article has made your choice easier if you were hesitating between them.

    👋 I offer tech consulting services for companies that need help with their Laravel applications. I can assist with upgrades, refactoring, testing, new features, or building new apps. Feel free to contact me through LinkedIn, or you can find my email on my GitHub profile.

    sumber: https://medium.com/@antoine.lame/which-laravel-authentication-package-to-choose-290551a82a44

  • Laravel authorization and roles permission management

    EASY AND FLEXIBLE USERS PERMISSIONS MANAGEMENT

    Laravel authorization and roles permission management

    a simple guide for a flexible authentication and authorization

    Inmany web projects, we have different user roles interacting with the system. Each role has its own permission. Every feature of the system can be enabled or disabled for these roles. We can define users permissions in our codes and check if they are authorized to do the requested action or not. A better way, mostly in more flexible systems, is to create a role and authorization management system. I’ll explain how to implement a Laravel authorization system and define users permission based on their roles.

    In this post, firstly we manage users in groups we called roles. Every role has different permissions. In order to avoid permissions conflict, we assume each user has only one role. Secondly, Laravel authorization implemented by middleware. This middleware checks for the user’s role permission and authorizes user requests.

    CREATING ROLES AND PERMISSIONS

    In order to implement Laravel authorization, we will create roles and permissions table. To assign a role for users, we create a roles table. The migration for roles table is as simple as this:

    Schema::create(‘roles’, function (Blueprint $table) {
        $table->increments(‘id’);
        $table->string(‘name’);
        $table->string(‘description’)->nullable();
        $table->timestamps();
    });

    We have an ID and name for roles. All users will be managed in these roles. There is also a description field, because you may need a short note on roles to describe each role for yourself.

    After that, we add a foreign key, role_id, in the user table. Adding this field to the default user model helps us for Laravel authorization.

    $table->unsignedInteger(‘role_id’)->index();
    $table->foreign(‘role_id’)->references(‘id’)->on(‘roles’);

    Now let’s talk about the permissions table. Every request leads to a method of a controller. So we store a list of all methods and their controller’s name in the permissions table. Later, we explain how we gather this list and how we check users authorization in Laravel by this permissions table.

    Schema::create(‘permissions’, function (Blueprint $table) {
        $table->increments(‘id’);
        $table->string(‘name’)->nullable();
        $table->string(‘key’)->nullable();
        $table->string(‘controller’);
        $table->string(‘method’);
        $table->timestamps();
    });

    Finally, a relationship created between roles and permission.

    Schema::create(‘permission_role’, function (Blueprint $table) {
        $table->unsignedInteger(‘permission_id’);
        $table->unsignedInteger(‘role_id’);$table->foreign(‘permission_id’)
            ->references(‘id’)
            ->on(‘permissions’)
            ->onDelete(‘cascade’);$table->foreign(‘role_id’)
            ->references(‘id’)
            ->on(‘roles’)
            ->onDelete(‘cascade’);$table->primary([‘permission_id’, ‘role_id’]);
    });

    We created a complete users->roles->permissions architecture. After that, an access list will be stored in these tables. So, we can easily implement Laravel authorization by checking requests against this list.

    Read Laravel migration documentation for further information about creating tables.

    CREATING AN ACCESS LIST FOR USER PERMISSIONS

    The whole purpose of this post is about being dynamic. Especially, in systems with a different type of roles. We need to create a list of permissions in the system. Also, this list must be updated as the system developed. List of controllers and methods is a good representation of all permissions in the system. Every route is leading to a method of a controller. So, it’s a good idea to make a list of permissions using the routes list.

    In order to do that, I used a Laravel database seeder. Firstly, let’s write a role seeder. It creates basic roles we need and stores them in the roles table. Running this artisan command will create RolesSeeder for you:

    php artisan make:seeder RolesTableSeeder

    Inside this RolesTableSeeder, we create our basic roles:

    DB::table(‘roles’)->insert([
        [‘name’ => ‘admin’],
        [‘name’ => ‘operator’],
        [‘name’ => ‘customer’],
    ]);

    You can add as many roles as you need. Also, you can create new roles from your website whenever you need a new one.

    The second step is to create an authorization list for each role. we create another Laravel seeder in which populate permissions table:

    php artisan make:seeder PermissionTableSeeder

    Firstly, we get all routes list. Then, We check up with the database if the permission already stored. After that, if this permission is not in the table already, we insert new permissions in the permissions table. After all, we attach all permissions to the admin role.

    $permission_ids = []; // an empty array of stored permission IDs
    // iterate though all routes
    foreach (Route::getRoutes()->getRoutes() as $key => $route) {
        // get route action
        $action = $route->getActionname(); // separating controller and method
        $_action = explode(‘@’, $action);
    
        $controller = $_action[0];
        $method = end($_action);
    
        // check if this permission is already exists
        $permission_check = Permission::where(
            [‘controller’ => $controller, ’method’ => $method]
        )->first();
        if (!$permission_check) {
            $permission = new Permission;
            $permission->controller = $controller;
            $permission->method = $method;
            $permission->save();
    
            // add stored permission id in array
            $permission_ids[] = $permission->id;
        }
    } // find admin role.
    $admin_role = Role::where(‘name’, ’admin’)->first(); // atache all permissions to admin role
    $admin_role->permissions()->attach($permission_ids);

    LARAVEL AUTHORIZATION USING MIDDLEWARE

    Every request in Laravel goes through middleware. Knowing that creating RolesAuth middleware will do Laravel authorization. You can create the middleware manually or by an artisan command:

    php artisan make:middleware RolesAuth

    Inside this middleware, we get all permissions for logged in user. Then, we check if the requested action is in the permissions list. If requested action can’t be found in permissions list, a 403 error response returns.

    // get user role permissions
    $role = Role::findOrFail(auth()->user()->role_id);
    $permissions = $role->permissions; // get requested action
    $actionName = class_basename($request->route()->getActionname()); // check if requested action is in permissions list
    foreach ($permissions as $permission) {
        $_namespaces_chunks = explode(‘\’, $permission->controller);
        $controller = end($_namespaces_chunks);
        if ($actionName == $controller . ‘@’ . $permission->method) {
            // authorized request
            return $next($request);
        }
    } // none authorized request
    return response(‘Unauthorized Action’, 403);

    Finally, you can register this middleware in Laravel and use it according to your requirements.

    I started publishing my experience about Laravel development, here you can see my post about Laravel localization. Comment your questions about this post or any other Laravel development questions in this area.

    Update 2020:
    Now you can use my Laravel permission package build based this article. It just got better, cleaner, and easier to understand.
    https://github.com/amiryousefi/laravel-permission