Category: Tak Berkategori

  • 12 Jenis Bahan Satin dan Tips Memilih Busana Satin yang Tepat!

    12 Jenis Bahan Satin dan Tips Memilih Busana Satin yang Tepat!

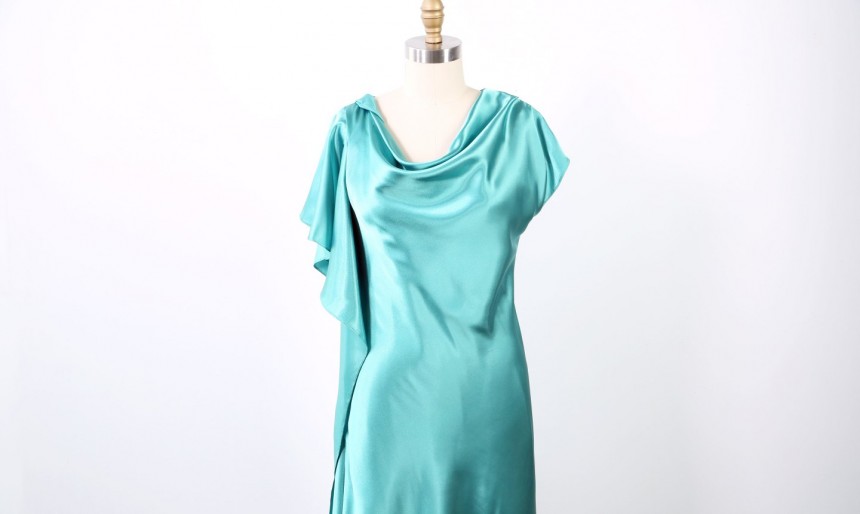
    Kain satin adalah salah satu jenis produk tekstil yang sangat populer di Indonesia. Berbagai macam busana maupun aksesori dari bahan satin bisa dijumpai dengan mudah di mana saja, dari yang murah meriah hingga yang super mahal.

    Mengapa harganya bisa sangat bervariasi? Jawabannya, karena satin memiliki banyak jenis dengan kualitas yang berbeda pula. Tulisan ini akan mengulas jenis-jenis satin yang ada di Indonesia, ciri-cirinya, dan cara memilih kain satin yang tepat.

    Karakteristik dan Kelebihan Satin

    Bahan Satin Duchesse

    Tenun satin berasal dari Kota Zayton atau Zaitun di Cina, yang kemudian diekspor ke berbagai belahan dunia. Pada mulanya, satin hanya dibuat dari benang sutra. Keindahan kain ini membuat Italia melakukan impor besar-besaran selama abad ke-12 dan ke-13.

    Penggunaan benang sutra dan penenunan secara tradisional membuat kain satin menjadi sangat mahal. Di Italia, bahan satin hanya dikenakan oleh kalangan bangsawan.

    Namun, berkat penemuan alat tenun listrik pada masa revolusi industri, kain satin bisa diproduksi secara massal dan lebih murah.

    Kain satin memiliki kemiripan dengan sutra, tetapi dibuat dari serat yang berbeda. Satin ditenun dengan serat buatan, seperti poliester, sedangkan sutra dibuat dari serat alami. Hasilnya, kedua sisi kain sutra bersifat licin dan glossy, sedangkan kain satin hanya pada salah satu sisinya.

    Bahan satin memiliki banyak kelebihan, terutama jika dibuat menjadi pakaian.

    • Permukaan yang mengilap membuat busana dari satin terlihat glamor, mewah, dan feminin.
    • Saat menyentuh kulit, permukaan satin terasa halus dan lembut sehingga nyaman saat dikenakan.
    • Saat ini, kain satin diproduksi dengan beragam jenis sehingga Anda bisa memilih yang paling sesuai dengan gaya yang ingin ditampilkan dan tentu saja bujet.

    Cara merawat kain satin relatif kurang lebih sama dengan cara merawat bahan wollycrepe. Selalu cuci busana satin dengan tangan, gunakan air dingin dan detergen lembut.

    Pakaian satin cukup dikeringkan dengan cara diangin-anginkan dan saat menyetrika, gunakan suhu yang tidak terlalu panas.

    Jenis-Jenis yang Bagus

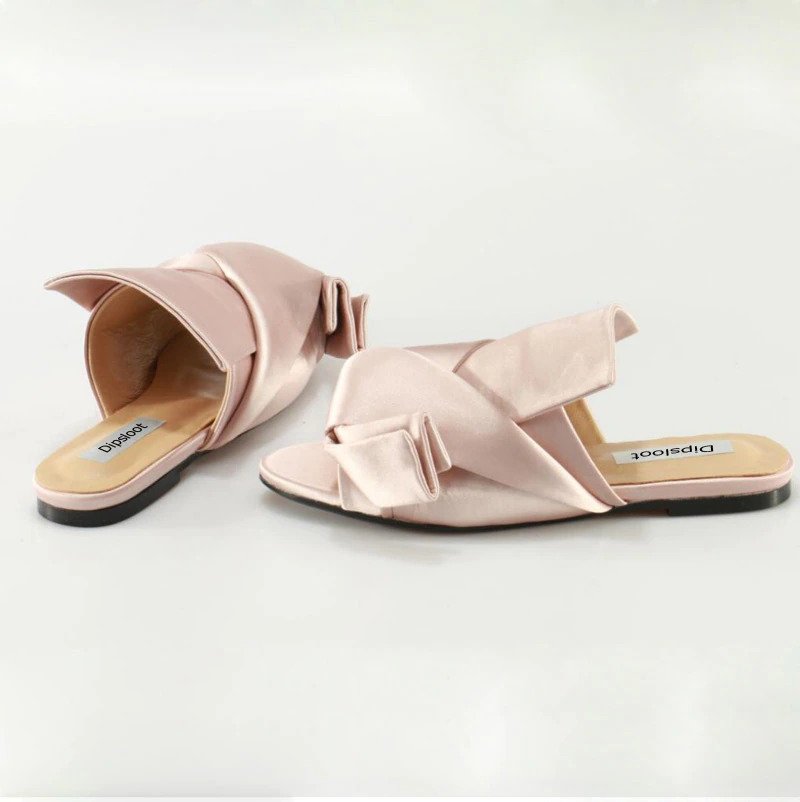
    Bahan Satin Untuk Sandal

    Mengetahui beberapa jenis kain satin akan membuat Anda lebih bijak sebelum memutuskan untuk membelinya, berikut diantaranya:

    Satin Duchesse (Satin Bridal)

    Kain ini disebut satin duchesse (bangsawan) karena sering digunakan untuk membuat gaun pengantin mewah layaknya seorang bangsawan. Sifat bahan ini agak berat dan kaku.

    Satin Faconne (Satin Jacquard)

    Memiliki berat dan kualitas bervariasi, kain ini lebih lembut dibanding duchesse. Biasanya, satin faconne memiliki motif, seperti garis-garis, paisley, atau lainnya.

    Satin Slipper

    Stin slipper sering digunakan untuk membuat sepatu balet. Ciri khasnya adalah kainnya cukup unik dan bisa dicelup.

    Satin Delustered

    Berbeda dari jenis lainnya, satin delustered atau peau de soie tidak berkilau dan memiliki tekstur yang ringan.

    Satin Damask

    Keunggulan kain ini adalah adanya pola-pola rumit nan indah, selain karena dibuat dari sutra dan memiliki pola timbul dari bahan velvet.

    Satin Cloth

    Karena diproses dari wol Perancis yang ditenun dengan teknik satin, kain ini disebut juga satin de laine atau “satin wol”. Bahannya kuat, awet, dan bercahaya.

    Sateen

    Satin berbeda dengan sateen. Satin menggunakan serat filamen seperti sutra, sedangkan sateen menggunakan serat katun atau shord-stap. Namun, keduanya ditenun dengan teknik yang sama.

    Satin Kahatex

    Karena sifatnya sedikit kaku dan tebal, satin kahatex lebih tepat digunakan untuk dekorasi furnitur, hiasan, atau aksesori.

    Satin Clarisa

    Kain ini sangat laku karena harganya murah. Dengan karakter tipis dan tidak kaku, satin clarisa digunakan untuk berbagai macam keperluan.

    Satin Silk (Satin Sutra)

    Berharga relatif murah, kain ini sangat lembut, tipis, dan dingin. Warna-warninya pun sangat beragam dan biasanya berjenis doff.

    Satin Velvet (Double Satin)

    Karena dibuat dari kombinasi bahan-bahan kaos, satin velvet dua kali lebih tebal dari satin biasa dengan karakter jatuh dan berat.

    Satin Roberto Cavali

    Inilah jenis satin yang paling mahal dan dibuat dari dua bahan, yaitu satin silk dan double hycon. Selain jatuh, tebal, dan menyerap keringat, dua sisi kain ini memiliki warna sejenis, tetapi sedikit berbeda.

    Tips Memilih Baju Satin

    Jika Anda ingin tampil menarik dan elegan, busana dari satin, baik gaun, blus, maupun gamis, adalah pilihan yang paling tepat.

    Namun, dengan begitu banyaknya jenis pakaian yang ada di pasaran, Anda perlu berhati-hati agar tidak mendapatkan produk berkualitas rendah, apalagi palsu.

    Berikut adalah beberapa hal yang wajib Anda teliti sebelum membeli baju satin.

    Permukaan Kain

    Ciri khas satin adalah satu sisi permukaannya licin, mengilap, dan tidak mudah kusut. Jadi, saat memilih busana, cek permukaan kain, apakah memiliki ciri seperti itu, karena tak jarang ada penjual yang mengatakan bahwa baju tersebut berbahan satin, padahal bukan.

    Kualitas Tenunan

    Satin dibuat dengan cara ditenun sehingga helaian seratnya rentan terlepas dan terurai. Hal ini tentunya akan membuat pakaian Anda mudah rusak. Karena itu, telitilah apakah ada helaian yang terlepas pada busana yang hendak dibeli.

    Kekuatan Jahitan

    Kekuatan jahitan harus menjadi perhatian utama saat memilih pakaian, terlebih lagi pada busana yang dibuat dari kain hasil tenun seperti satin. Pastikan seluruh jahitan rapi dan kuat agar pakaian lebih tahan lama.

    Kenyamanan

    Ada baiknya Anda mencoba memakai baju yang hendak dibeli dan rasakan saat kain menempel di kulit. Seperti halnya bahan monalisa, kain satin asli akan terasa nyaman, tidak panas, dan halus saat dipakai.

    Memilih jenis kain dari sebuah produk pakaian memang harus dilakukan dengan cermat agar tidak menyesal karena membeli busana berkualitas rendah.

    Mengetahui jenis-jenis bahan satin membantu Anda memilih dengan tepat sehingga tidak hanya bisa tampil “wah”, tetapi juga nyaman.

    Sumber: https://notepam.com/bahan-satin/

  • Bahan Taiga: Populer Karena Dipakai Louis Vuitton, Mau Tau?

    Bahan Taiga: Populer Karena Dipakai Louis Vuitton, Mau Tau?

    Anda pasti kenal Louis Vuitton (LV). Brand fashion favorit sosialita dan selebriti papan atas dunia ini begitu populer lewat produk-produk tasnya. Bukan hanya tas Speedy, produk terpopuler mereka, tetapi juga bahan taiga yang banyak ditiru produsen aksesori dunia.

    Jajaran produk taiga khusus diperuntukkan bagi pria. LV menggunakan bahan tersebut dalam produksi koper dan berbagai aksesori travelling lainnya. Contohnya, seperti tas jinjing, tas slempang, dompet, sepatu, sabuk, dan aksesori pria lainnya.

    Apa Itu Taiga?

    Sebenarnya Taiga adalah nama sebuah hutan yang berada di wilayah Siberia Timur, Rusia. Daerah tersebut dikenal ekstrem dengan suhu dingin yang membekukan. Temperatur selama musim dingin bisa mencapai minus 62 derajat Celsius.

    Sementara, kulit taiga merupakan jenis kulit semisintetik dari kulit sapi pilihan. LV meluncurkan lini produk Taiga Leather pada 1993 dan popularitasnya masih bertahan sampai sekarang. Bahkan varian kulit ini pun diadopsi oleh banyak produsen aksesori lainnya di dunia.

    Kulit taiga yang beredar di Indonesia memiliki karakteristik hampir serupa dengan kepunyaan LV, tetapi dengan kualitas berada di bawahnya. Ibaratnya seperti pada bahan wolfis premium dan standar, di mana kulit taiga dari Louis Vuitton adalah premiumnya.

    Jika bahan balotelly dibuat menggunakan campuran antara serat alami dan buatan, taiga terbuat dari campuran polivinil klorida (PVC) atau poliuretan (PU) dan diolah sedemikian rupa agar mirip dengan kulit asli.

    Cirinya lembut dan cukup lentur, mudah diwarnai, awet, serta memiliki daya tahan terhadap panas tinggi sehingga tak mudah leleh.

    Kulit sintetik dari polimer ini mempunyai karakter berbeda di kedua sisinya. Permukaan luarnya bertekstur kasar, bergaris-garis atau tampak seperti serat-serat halus yang menonjol, dan mengilap.

    Sementara di sisi dalamnya padat, seperti serat-serat untuk membuat bahan twiscone, dan cenderung lebih halus.

    Sifatnya yang kokoh dan tidak mudah menyerap air membuat kulit sintetik taiga banyak dipakai dalam pembuatan tas. Saat ini, bukan hanya LV yang memiliki lini produk taiga, tetapi juga produsen-produsen tas dan spesialis kulit lainnya di dunia, termasuk di Indonesia.

    Jika dibandingkan dengan taiga asli milik Louis Vuitton, harga bahan taiga yang banyak beredar di pasaran lokal berada jauh di bawahnya. Sebut saja salah satu varian tas LV, Taiga Leather Moskova Briefcase RI0052, yang dibanderol sekitar $995 atau hampir Rp 14 jutaan.

    Sedangkan di sini, kulit taiga berkualitas A berkisar mulai Rp 35 ribuan saja per yar (91 cm). Sementara, untuk produk tas lokal dari taiga asli paling mahal hanya dibanderol di angka sekitar Rp 4 jutaan. Benar-benar selisih harga yang cukup fantastis, bukan?

    Membuat Tas dari Taiga

    Untuk membuat tas dari bahan taiga ada beberapa tahap yang mesti Anda lakukan, berikut diantaranya:

    Persiapan

    Pertama-tama siapkan peralatan dan bahannya. Anda akan membutuhkan bahan taiga dan flanel sesuai ukuran tas yang diinginkan, misalnya 100×50 cm untuk masing-masing bahan tersebut.

    Anda perlu mempersiapkan juga bahan untuk tali tas. Bisa dengan memakai dua potong kulit taiga berukuran 4×25 cm, atau jenis tali lain yang biasa dijual sebagai sparepart tas. Lalu, mata ayam berdiameter maksimal 1 cm dan tang keling untuk memasangnya.

    Terakhir, siapkan peralatan menjahit, seperti mesin jahit, jarum pentul dan jarum khusus untuk kulit, serta benang. Jangan lupakan penggaris dan kapur jahit untuk menandai pola, serta gunting untuk memotong bahan yang digunakan.

    Menjahit Bahan

    Lipat kulit taiga dan kain flanel tadi menjadi ukuran 50×50 cm, lalu lekatkan keduanya dengan jarum pentul, masih dalam bentuk lipatan. Kain flanel berfungsi sebagai pelapis bagian dalam tas agar lebih lembut saat disentuh.

    Anda akan mendapatkan kantung kulit berlapis flanel yang tampak di bagian dalamnya. Kemudian jahitlah sisi kanan dan kirinya, meninggalkan satu lubang di bagian atas agar kantung tersebut mulai dapat berfungsi. Pastikan jahitan menutup kuat kedua sisinya.

    Membuat Tali Tas

    Potongan kulit taiga dilipat mengikuti lebarnya. Jadi, Anda akan mendapatkan bentuk lipatan dengan ukuran 2×25 cm. Jahit memanjang pada sisi di mana ujung kain saling bertemu, untuk membuat tali tas yang cukup tebal dan kuat.

    Pasang mata ayam di lokasi yang dinginkan untuk menempatkan tali. Biasanya, berada di sekitar lubang kantung tas, beberapa sentimeter di bawah pucuk tas. Pastikan posisinya benar-benar presisi, gunakan kapur dan penggaris untuk menentukan letaknya secara tepat.

    Kemudian, selundupkan ujung-ujung tali tas ke dalam lubang mata ayam yang telah Anda pasang tadi. Masukkan dari sisi luar, lalu kunci dengan membuat simpul mati pada setiap ujungnya agar tali tidak mudah copot. Tas taiga simpel siap Anda pakai bepergian.

    Langkah-langkah di atas masih bisa Anda aplikasikan meski tanpa menggunakan kulit taiga. Ada banyak material kain yang bisa Anda pakai untuk membuat kerajinan tas sendiri di rumah. Bisa kanvas, katun, atau bahkan bahan linen, tergantung kebutuhan dan kreativitas Anda.

    Tips Perawatan Tas dari Kulit Taiga

    Apa artinya punya barang bagus jika tak bisa merawatnya dengan baik? Meski taiga terkenal dengan keawetannya, material ini juga mudah rusak jika dipakai serampangan dan dirawat apa adanya.

    Perawatan kulit sintetik tergolong gampang. Jika tas Anda kotor, bersihkan hanya dengan menggunakan kain lembut, tanpa perlu detergen atau zat keras penghilang noda lainnya. Sebagai penggantinya, gunakan air hangat bercampur sabun bayi untuk noda membandel.

    Anda dapat menjaga tas dengan bahan taiga kw agar berumur lebih lama. Sehabis dipakai seharian, istirahatkan selama 1–2 hari sebelum menggunakannya lagi.

    Lindungi permukaannya dengan lapisan silikon wax dan simpanlah di tempat tersendiri, terpisah dari tas dengan bahan taiga asli. Dengan demikian, Anda dapat menggunakan tas-tas tersebut dalam jangka waktu yang lama.

  • Bahan Polyester: 6 Fakta Menarik Mengapa Banyak Orang Menjualnya

    Bahan Polyester: 6 Fakta Menarik Mengapa Banyak Orang Menjualnya

    Tentu Anda sudah sangat sering mendengar tentang bahan polyester. Ya, bahan ini seolah ada di mana-mana dan bisa didapatkan dengan mudah. Yang tidak banyak orang sadari adalah bahan ini sebenarnya ada hampir di seluruh barang berkain di sekitar.

    Bahan polyester bisa dipakai untuk membuat apa saja, mulai dari baju, celana, rok, selimut, sofa, bahkan tirai jendela sekalipun. Polyester bukanlah merupakan bahan yang diproduksi secara alamiah. Lalu, dengan cara apa?

    Proses dan Makna Polyester

    Polyester dibuat melalui proses kimiawi yang dilakukan oleh manusia. Polyester sendiri berasal dari dua kata, yakni polimer yang berarti plastik dan ester yang berarti campuran antara asam karboksilat, alkohol, serta minyak bumi.

    Karena bisa dibuat dengan proses kimiawi, kain polyester ini sangat mudah untuk diproduksi dan tentu saja hal ini memengaruhi harganya. Harga polyester sangatlah terjangkau dan bahannya pun tidak langka alias mudah ditemukan.

    Jenis-Jenis

    Seperti bahan jersey, ada beberapa tipe polyester yang beredar di pasaran.

    PET

    Tipe PET atau polietilena tereftalat merupakan polyester yang paling banyak digunakan sebagai bahan utama pakaian, bahan dasar botol air, bahan dasar minuman bersoda, serta botol-botol plastik lainnya.

    Supaya PET bisa menjadi kain, ia harus divakum dalam ruangan hampa yang bersuhu tinggi. Proses ini cukup rumit dan hanya bisa dilakukan oleh pabrik-pabrik besar.

    PCDT

    PCDT (poly-1,4-cyclohexylene-dimethylene). Bahan yang satu ini memiliki struktur yang lebih elastis apabila dibandingkan dengan PET. PCDT sering digunakan sebagai bahan dasar untuk taplak, tirai jendela, atau untuk karpet tipis.

    Filamen

    Benang filamen dapat diproses menjadi kain polyester yang unik. Kain polyester dengan bahan filamen ini adalah kain yang seolah terlihat seperti berasal dari bahan yang alami, sehingga terasa lembut.

    Kelebihan

    Ada beberapa kelebihan kain polyester bila dibandingkan dengan kain lainnya, seperti bahan crepe, misalnya. Berikut adalah beberapa kelebihan dari kain polyester yang bisa menguntungkan Anda.

    • Terjangkau dan mudah ditemukan. Lantaran terbuat dari bahan kimia, beragam pabrik bisa memproduksi kain ini dengan mudah. Jadi, keberadaan kain ini jelas tidak langka dan bisa ditemukan di mana saja, sama seperti bahan polycotton.
    • Tahan lama. Bahan kimia sebagai material-material dasar pembuat polyester menjadikan bahan yang satu ini lebih tahan lama dan awet apabila dibandingkan dengan kain-kain lain yang murni terbuat dari kapas. Jadi, meskipun Anda mencucinya berkali-kali dan menggunakannya dalam jangka waktu lama, baju dengan bahan dasar polyester tidak akan mudah rusak.
    • Tidak gampang berkerut. Kelebihan lain dari kain polyester adalah tidak mudah berkerut dan juga tidak mudah kusut seperti bahan crepe. Jadi, Anda tak perlu ragu atau bingung saat akan menyimpan kain ini di dalam lemari. Proses penyetrikaan kain ini pun juga mudah. Dengan menggunakan suhu sedang, maka kain polyester pun bisa menjadi halus dalam waktu yang cepat.
    • Cepat kering. Anda tidak perlu menunggu kain polyester kering dalam waktu lama. Pasalnya, kain yang satu ini amat cepat kering dan cenderung tahan air. Maka dari itu, selain bahan spandek, bahan baju renang pun juga menggunakan polyester.

    Kekurangan

    Polyester juga memiliki beberapa kekurangan. Beberapa kekurangan polyester antara lain sebagai berikut.

    • Mudah terbakar. Lantaran bahan-bahan dasar dari polyester adalah plastik, maka sudah tentu kain ini akan mudah sekali tersulut api. Maka dari itu, baju-baju berbahan polyester sebaiknya dijauhkan dari api dan bahan-bahan lain yang mudah terbakar.
    • Panas. Polyester adalah bahan yang mudah yang panas dan juga tidak memiliki sirkulasi udara yang bagus. Pori-porinya kecil dan juga tidak menyerap keringat.

    Jadi, ketika menggunakan pakaian yang berbahan dasar polyester, Anda akan merasa lebih panas. Baju berbahan polyester memang sebaiknya dikenakan di ruangan yang tidak pengap.

    Perawatan

    Secara umum, polyester tidak membutuhkan perawatan rumit. Maklum, karena dibuat melalui proses kimia, polyester bukanlah bahan yang mudah rusak dan juga usang. Proses perawatan baju polyester adalah sebagai berikut.

    • Pertama, cuci busana, baik secara manual maupun dengan mesin. Keduanya sama-sama tidak akan merusak polyester.
    • Kedua, gunakan detergen standar yang bisa Anda temukan di supermarket terdekat. Kain polyester tidak rentan terhadap jenis detergen tertentu dan mudah untuk beradaptasi.
    • Yang ketiga, gunakan panas sedang saat menyetrika baju polyester. Ya, baju polyester mudah terbakar sehingga sebaiknya tidak menggunakan suhu tinggi di mesin setrika.
    • Dan yang terakhir, lipatlah polyester dengan cara biasa, bahan ini tidak mudah kusut. Meski begitu, jangan menyimpannya dengan asal-asalan, karena hal ini berpotensi membuat polyester lebih mudah rusak dan rapuh.

    Bisnis dengan Polyester

    Kalimat “you gotta have style” dari Diana Vreeland nampaknya mampu menggambarkan fleksibilitas dari polyester.

    Ada banyak bisnis yang bisa Anda lakukan dengan kain polyester. Misalnya, bisnis baju kasual, bisnis seragam reuni, bisnis goodybag, bisnis tas tote bag murah, atau bisnis kardigan.

    Polyester adalah bahan yang sangat mudah dijadikan apa saja. Lagipula, kain ini harganya murah. Jadi, Anda bisa mendapatkan keuntungan yang berlipat ganda saat berbisnis pakaian dan aksesori yang berbahan dasar polyester.

    Selain itu, amat mudah mencetak berbagai macam desain dan warna di atas baju dengan bahan dasar polyester.

    Dilihat dari segi ekonomi, polyester akan membawa keuntungan banyak. Pasalnya, bahan ini mudah diolah dan harganya pun amat terjangkau. Maklum, polyester memang bukan barang langka dan harganya tidak akan pernah naik secara drastis.

    Kini Anda sudah tahu kelebihan, kekurangan, dan serba-serbi lain terkait bahan polyester. Nah, bila tertarik, Anda bisa mencari bahan ini di toko kain terdekat.

  • Bahan Cordura: 6 Fakta Menarik Tentang Waterproof!

    Bahan Cordura: 6 Fakta Menarik Tentang Waterproof!

    Jika Anda adalah seorang awam di dunia bisnis kain dan busana, bahan cordura mungkin terdengar asing. Ya, bahan yang satu ini memang sering disebut, tetapi tak banyak yang benar-benar paham seperti apa dan bagaimana kegunaan bahan ini.

    Nah, apa yang dimaksud dengan kain cordura? Apakah bahan ini bermanfaat untuk Anda? Kenali serba-serbi bahan cordura waterproof di sini, mulai dari kelebihan, kekurangan, hingga untuk apa bahan ini biasa digunakan dalam keseharian.

    Pengertian

    Kain cordura awalnya diproduksi oleh perusahaan yang bernama E.I du Pont de Nemours and Company pada tahun 1929. Nah, dibuat dari apakah kain yang satu ini?

    Cordura dibuat dari campuran berbagai jenis bahan seperti nilon, kapas, serta bahan polyester. Melihat rumitnya proses pembuatan kain cordura, maka tak mengherankan apabila kain ini dianggap berkualitas dan juga merupakan kain yang kuat.

    Pemanfaatan

    Kain cordura bisa dimanfaatkan menjadi berbagai macam hal, seperti misalnya jaket, baju, dan tentu saja tas. Kain cordura memiliki serat-serat yang rapat dan juga mampu menahan beban berat.

    Tas yang terbuat dari kain cordura pun mampu menampung banyak barang di dalamnya, tetapi tetap ringan.

    Cordura memberikan kesan yang sporty dan juga modern. Tas berbahan cordura biasanya adalah tas untuk keperluan goodybag berkelas, tas olahraga, atau tas ransel sekolah.

    Sementara itu, baju yang terbuat dari bahan kain cordura biasanya merupakan jaket yang memang diperuntukkan di cuaca yang dingin, berbeda dengan bahan polycotton yang bisa dipakai di cuaca panas sekalipun.

    Kelebihan

    Kelebihan banyaknya produk yang menggunakan bahan dasar kain cordura menunjukkan betapa baik kualitas dari kain yang satu ini. Untuk lebih jelasnya, berikut beberapa kelebihan dari kain cordura yang sebaiknya Anda ketahui.

    Kuat

    Seperti yang sudah disebutkan sebelumnya, bahan cordura sangatlah kuat dan juga tidak mudah sobek. Kekuatan bahan ini berasal dari serat-serat rapat dan juga bahan nilon yang amat kuat dan berkualitas tinggi. Maka, tali pada tas outdoor juga dibuat dari cordura.

    Mampu menampilkan warna cerah

    Kain cordura mampu menampilkan warna dengan cerah, sehingga, barang-barang yang dibuat dari kain cordura terlihat mampu menarik perhatian banyak orang. Tidak mengherankan apabila tas sekolah dibuat dengan bahan ini.

    Ringan

    Meskipun mampu menampung banyak barang dan tidak mudah sobek, tetapi tas berbahan dasar cordura ini sangat ringan. Jadi, jika membawa tas cordura, Anda tidak akan merasa keberatan. Ini tentu berbeda dengan tas yang terbuat dari kulit.

    Antiair

    Mengapa ada banyak peralatan outdoor yang menggunakan cordura? Tentu saja ini karena sifat cordura yang antiair. Jadi, hujan ataupun hal lainnya tidak akan mudah menembus kain ini dan hal tersebut tentu sangat menguntungkan bagi petualang.

    Memang ada begitu banyak kelebihan yang bisa anda dapatkan dari cordura. Maka dari itu, tidak mengherankan apabila kain ini senantiasa laris manis dan diproduksi dalam jumlah banyak.

    Kekurangan

    Meskipun kain ini merupakan salah satu kain primadona, tetapi ada beberapa kekurangan dari kain ini yang sebaiknya Anda perhatikan. Nah, apa sajakah kekurangan dari kain berbahan dasar cordura?

    Yang pertama adalah penampilannya yang kurang mewah. Cordura tidak pernah memberikan kesan mewah, melainkan kesan sporty dan kasual.

    Maka dari itu, sulit menemukan tas mewah yang dibuat dari cordura. Kebanyakan tas mewah akan menggunakan kulit sebagai bahan dasarnya. Cordura sendiri biasanya dipakai untuk jaket sport, tas olahraga, serta tas-tas bernuansa kasual.

    Yang kedua, bahannya yang panas. Cordura tidak menyerap keringat dan tentu saja cukup pengap. Itulah alasan mengapa tidak ada banyak baju yang dibuat dari kain cordura, tidak seperti bahan lain, seperti bahan spandek, misalnya.

    Cordura biasanya dipakai untuk membuat jaket atau membuat rompi yang bisa menahan angin khusus untuk para pengendara sepeda motor.

    Yang ketiga, permukaan kain cordura kasar. Hal ini membuat cordura tidak bisa sepenuhnya dijadikan bahan pembuat pakaian. Perlu tambahan furing yang halus supaya kain ini bisa dipakai.

    Pemanfaatan untuk Bisnis

    Bila Anda ingin bisnis tas yang laris manis, cordura bisa dijadikan bahan utama. Sifatnya yang kuat tidak akan mengecewakan pelanggan.

    Selain itu, desain dan warna yang tercetak di atas kain cordura akan menimbulkan kesan yang unik, sehingga membuat produk Anda terlihat menawan.

    Cordura bisa juga dimanfaatkan sebagai bahan dasar sabuk. Ini merupakan alternatif dari sabuk kulit yang memang terkenal mahal. Sabuk cordura cocok dikenakan oleh anak muda dan juga cukup kuat.

    Anda juga bisa berbisnis peralatan outdoor, seperti tali untuk naik gunung, tali rompi, dan sebagainya. Sungguh luas peluang bisnis dari kain cordura ini, bukan?

    Perawatan

    Kain cordura memang tidak mudah kusut dan tidak perlu disetrika. Meski begitu, harus diakui bahwa kain cordura sulit untuk dibersihkan.

    Bila ada noda yang menempel, maka segera bersihkan cordura. Bila Anda menunda hal tersebut, kotoran akan meresap dan semakin sulit dihilangkan. Ini tentu membuat aksesori cordura Anda menjadi tidak enak dilihat.

    Gunakan detergen yang keras untuk menghilangkan noda membandel pada kain cordura. Bila perlu, gosok kotoran dengan menggunakan sikat gigi.

    Selain itu, menjemur kain cordura memang membutuhkan waktu yang lebih lama. Kain cordura cenderung menahan air di sela-sela seratnya.

    Bagaimana? Menarik bukan kain yang satu ini? Bahan cordura memang bukan bahan yang mudah dicari di mana-mana. Hanya toko kain tertentu yang menjualnya. Meski begitu, kain ini cukup unik dan tentu punya manfaat spesifik yang bisa dijadikan peluang bisnis.

  • zsh: illegal hardware instruction

    For people running Homebrew (brew), and getting ‘Illegal Instruction: 4’ with certain software, but specifically wget. They recently switched brew to compile with ‘Nehalem’ instructions. The oldest architecture still officially supported by Mojave.

    You can switch back to ‘core2’ instructions by editing /usr/local/Homebrew/Library/Homebrew/extend/os/mac/hardware.rb. Replace the elsif version and else branch result with “:core2” like this:
    Code:

    # frozen_string_literal: true
    
    module Hardware
      def self.oldest_cpu(version = MacOS.version)
        if CPU.arch == :arm64
          :arm_vortex_tempest
        elsif version >= :mojave
          :core2
        else
          :core2
        end
      end
    end

    Add this to /etc/hosts to break access to the pre-built packages:
    Code:

    0.0.0.0 homebrew.bintray.com
    

    You can then reinstall wget from source:
    Code:

    brew reinstall openssl wget --build-from-source
    

    A “roll your own brew upgrade”; This oneliner will stuff all the upgradable packages on a single brew reinstall line. Maybe that will work but it may fail with some bash error like a ‘commandline too long’. I had a pretty long list so you’ll probably be fine.
    Code:

    nice -n20 brew reinstall $(brew upgrade --dry-run | grep -v 'Updating Homebrew...' | grep -v '==> Would upgrade .* outdated packages:' | sed 's/\(.*\) .* .* .*$/\1/g') --build-from-source
    

    To check if you have any other pre-built packages installed, list all ‘internet bottles’ (needs jq):
    Code:

    brew install jq --build-from-source
    brew info --json=v1 --installed | jq -r "map(select(.installed[].poured_from_bottle) | .name) | unique | .[]"
    

    Reinstall all bottles that were not built yourself, but poored from an internet source (needs jq):
    Code:

    brew install jq --build-from-source
    for p in $(brew info --json=v1 --installed | jq -r "map(select(.installed[].poured_from_bottle) | .name) | unique | .[]"); do
      nice -n20 brew reinstall $p --build-from-source
    done
    

    Oneliner version:
    Code:

    nice -n20 brew reinstall $(brew info --json=v1 --installed | jq -r "map(select(.installed[].poured_from_bottle) | .name) | unique | .[]") --build-from-source
    

    Adapted from: https://stackoverflow.com/a/55038073/273668

    You’ll probably need to run that a couple of times, since dependencies may be poured from an internet bottle.

    https://forums.macrumors.com/threads/macos-10-14-mojave-on-unsupported-macs-thread.2121473/post-27026470

  • Creating the Front End in Laravel using Jetstream, Livewire, Sanctum, and Tailwind

    This tutorial would be the last part of our laravel-news application. We have already completed the migrations and modelsrelationships among models, and creating and consuming RESTful API. To create the user interface for admin users I have planned to use JetstreamLivewireSanctum, and Tailwind.

    The admin dashboard needs to be secure. Laravel comes with Laravel Jetstream which provides login, registration, email verification, two-factor authentication, session management, API support via Laravel Sanctum, and optional team management. Jetstream is designed using Tailwind CSS and offers your choice of Livewire or Inertia scaffolding.

    We have already used Laravel Sanctum to secure RESTful API in the previous tutorial.

    If you like Vue.js as a templating language then choose the Inertia.js stack provided by Jetstream.

    I am sticking to Blade as the templating language so I will use Livewire provided by Jetstream.

    Laravel Livewire is a library that makes it simple to build modern, reactive, dynamic interfaces. When using Livewire, you may pick and choose which portions of your application will be a Livewire component, while the remainder of your application can be rendered as the traditional Blade templates you are used to.

    Now let’s dive into code. There is make:livewire command which creates two files, one in app\Http\Livewire directory and another in resources\views\livewire directory.

    Different versions of this command are as follows:

    php artisan make:livewire foo
    # Creates Foo.php & foo.blade.php

    php artisan make:livewire foo-bar
    # Creates FooBar.php & foo-bar.blade.php

    php artisan make:livewire Foo\\Bar

    php artisan make:livewire Foo/Bar

    php artisan make:livewire foo.bar
    # Creates Foo/Bar.php & foo/bar.blade.php

    php artisan make:livewire foo --inline
    # Creates only Foo.php

    Before we start with our planned application, let us make few required edits in registration and profile update files provided by Laravel as there are first_name and last_name in our users table instead of the default name.

    If you have not changed the default migration for users table then you may skip this step.

    Open resources\views\auth\register.blade.php

    <div>
    <x-jet-label for="name" value="{{ __('Name') }}" />
    <x-jet-input id="name" class="block mt-1 w-full" type="text" name="name" :value="old('name')" required autofocus autocomplete="name" />
    </div>

    and replace the above code with the following code

    <div>
    <x-jet-label for="first_name" value="{{ __('First Name') }}" />
    <x-jet-input id="first_name" class="block mt-1 w-full" type="text" name="first_name" :value="old('first_name')" required autofocus autocomplete="first_name" />
    </div><div>
    <x-jet-label for="last_name" value="{{ __('Last Name') }}" />
    <x-jet-input id="last_name" class="block mt-1 w-full" type="text" name="last_name" :value="old('last_name')" required autocomplete="last_name" />
    </div>

    Open resources\views\profile\update-profile-information-form.blade.php

    <!-- Name -->
    <div class="col-span-6 sm:col-span-4">
    <x-jet-label for="name" value="{{ __('Name') }}" />
    <x-jet-input id="name" type="text" class="mt-1 block w-full" wire:model.defer="state.name" autocomplete="name" />
    <x-jet-input-error for="name" class="mt-2" />
    </div>

    and replace the above code with the following code

    <!-- First Name -->
    <div class="col-span-6 sm:col-span-4">
    <x-jet-label for="first_name" value="{{ __('First Name') }}" />
    <x-jet-input id="first_name" type="text" class="mt-1 block w-full" wire:model.defer="state.first_name" autocomplete="first_name" />
    <x-jet-input-error for="first_name" class="mt-2" />
    </div><!-- Last Name -->
    <div class="col-span-6 sm:col-span-4">
    <x-jet-label for="last_name" value="{{ __('Last Name') }}" />
    <x-jet-input id="last_name" type="text" class="mt-1 block w-full" wire:model.defer="state.last_name" autocomplete="last_name" />
    <x-jet-input-error for="last_name" class="mt-2" />
    </div>

    Then open app\Actions\Fortify\CreateNewUser.php and replace the create() with the following code:

    public function create(array $input)
    {
    Validator::make($input, [
    'first_name' => ['required', 'string', 'max:255'],
    'last_name' => ['required', 'string', 'max:255'],
    'email' => ['required', 'string', 'email', 'max:255', 'unique:users'],
    'password' => $this->passwordRules(),
    ])->validate();return User::create([
    'first_name' => ['required', 'string', 'max:255'],
    'last_name' => ['required', 'string', 'max:255'],
    'email' => $input['email'],
    'password' => Hash::make($input['password']),
    ]);
    }

    After that open app\Actions\Fortify\UpdateUserProfileInformation.php and replace update() and updateVerifiedUser() functions with the following code:

    public function update($user, array $input)
    {
    Validator::make($input, [
    'first_name' => ['required', 'string', 'max:255'],
    'last_name' => ['required', 'string', 'max:255'],
    'email' => ['required', 'email', 'max:255', Rule::unique('users')->ignore($user->id)],
    'photo' => ['nullable', 'image', 'max:1024'],
    ])->validateWithBag('updateProfileInformation');if (isset($input['photo'])) {
    $user->updateProfilePhoto($input['photo']);
    }if ($input['email'] !== $user->email && $user instanceof MustVerifyEmail) {
    $this->updateVerifiedUser($user, $input);
    } else {
    $user->forceFill([
    'first_name' => $input['first_name'],
    'last_name' => $input['last_name'],
    'email' => $input['email'],
    ])->save();
    }
    }protected function updateVerifiedUser($user, array $input)
    {
    $user->forceFill([
    'first_name' => $input['first_name'],
    'last_name' => $input['last_name'],
    'email' => $input['email'],
    'email_verified_at' => null,
    ])->save();
    $user->sendEmailVerificationNotification();
    }

    At this point, we are ready to go with Laravel’s default registration and profile update functionality.

    Now move on to create pages to manage CategoriesTags, and Posts of our News Application.

    Our Category page will look like the following and have the functionality to list all categories, edit a category, show all posts of a category, delete a category, and create a new category.

    To create this page follow the below-mentioned steps:

    php artisan make:livewire Categories\\categories

    It will create Component and View files as discussed before.

    Open app\Http\Livewire\Categories\Categories.php and write the following code

    <?php
    namespace App\Http\Livewire\Categories;use App\Models\Category;
    use Livewire\Component;class Categories extends Component
    {
    public $categories, $title, $color, $category_id;
    public $isOpen = 0;public function render()
    {
    $this->categories = Category::all();
    return view('livewire.categories.categories');
    }public function store()
    {
    $this->validate([
    'title' => 'required',
    'color' => 'required',
    ]);Category::updateOrCreate(['id' => $this->category_id], [
    'title' => $this->title,
    'color' => $this->color
    ]);session()->flash('message', $this->category_id ? 'Category Updated Successfully.' : 'Category Created Successfully.');$this->closeModal();$this->resetInputFields();
    }public function delete($id)
    {
    Category::find($id)->delete();
    session()->flash('message', 'Category Deleted Successfully.');
    }public function edit($id)
    {
    $category = Category::findOrFail($id);
    $this->category_id = $id;
    $this->title = $category->title;
    $this->color = $category->color;
    $this->openModal();
    }public function create()
    {
    $this->resetInputFields();
    $this->openModal();
    }public function openModal()
    {
    $this->isOpen = true;
    }public function closeModal()
    {
    $this->isOpen = false;
    }private function resetInputFields()
    {
    $this->title = '';
    $this->color = '';
    $this->category_id = '';
    }
    }

    In the above code all the public properties are available to the view returned by render() method. List of all categories are passed to categories view by $categories variable.

    To create or update a category the store() method is wired in the view. In this method after validation a category is added or updated in the database and accordingly message is flushed.

    To delete a category delete() method is wired to delete button of view. The id of category to be deleted is passed to delete method from view and the same is deleted and message is flushed.

    The edit() method is wired to edit button of the view. It passes id of the category. Then the category data is fetched by this id and all the public variables are populted with that data which will now be available to model form.

    Then open resources\views\livewire\categories\categories.blade.php and write the following code

    <x-slot name="header">
    <h2 class="font-semibold text-xl text-gray-800 leading-tight">
    Categories
    </h2>
    </x-slot><div class="py-12">
    <div class="max-w-7xl mx-auto sm:px-6 lg:px-8">
    <div class="bg-white overflow-hidden shadow-xl sm:rounded-lg px-4 py-4">
    @if (session()->has('message'))
    <div class="bg-teal-100 border-t-4 border-teal-500 rounded-b text-teal-900 px-4 py-3 shadow-md my-3" role="alert">
    <div class="flex">
    <div>
    <p class="text-sm">{{ session('message') }}</p>
    </div>
    </div>
    </div>
    @endif<button
    wire:click="create()"
    class="inline-flex items-center px-4 py-2 my-3 bg-gray-800 border border-transparent rounded-md font-semibold text-xs text-white uppercase tracking-widest hover:bg-gray-700 active:bg-gray-900 focus:outline-none focus:border-gray-900 focus:shadow-outline-gray disabled:opacity-25 transition ease-in-out duration-150">
    Create New Category
    </button>@if($isOpen)
    @include('livewire.categories.create')
    @endif<table class="table-fixed w-full">
    <thead>
    <tr class="bg-gray-100">
    <th class="px-4 py-2 w-20">No.</th>
    <th class="px-4 py-2">Title</th>
    <th class="px-4 py-2">Color</th>
    <th class="px-4 py-2">Action</th>
    </tr>
    </thead>
    <tbody>
    <?php $count = 1; ?>
    @foreach($categories as $category)
    <tr>
    <td class="border px-4 py-2"><?php echo $count++; ?></td>
    <td class="border px-4 py-2">{{ $category->title }}</td>
    <td class="border px-4 py-2"><span style="background-color: {{ $category->color }};">&emsp;</span> {{ $category->color }}</td>
    <td class="border px-4 py-2">
    <button
    wire:click="edit({{ $category->id }})"
    class="inline-flex items-center px-4 py-2 bg-gray-800 border border-transparent rounded-md font-semibold text-xs text-white uppercase tracking-widest hover:bg-gray-700 active:bg-gray-900 focus:outline-none focus:border-gray-900 focus:shadow-outline-gray disabled:opacity-25 transition ease-in-out duration-150">
    Edit
    </button>
    <a href="{{ url('dashboard/categories/'. $category->id .'/posts') }}" class="inline-flex items-center px-4 py-2 bg-gray-800 border border-transparent rounded-md font-semibold text-xs text-white uppercase tracking-widest hover:bg-gray-700 active:bg-gray-900 focus:outline-none focus:border-gray-900 focus:shadow-outline-gray disabled:opacity-25 transition ease-in-out duration-150">
    Show All Posts
    </a>
    <button
    wire:click="delete({{ $category->id }})"
    class="inline-flex items-center justify-center px-4 py-2 bg-red-600 border border-transparent rounded-md font-semibold text-xs text-white uppercase tracking-widest hover:bg-red-500 focus:outline-none focus:border-red-700 focus:shadow-outline-red active:bg-red-600 transition ease-in-out duration-150">
    Delete
    </button>
    </td>
    </tr>
    @endforeach
    </tbody>
    </table>
    </div>
    </div>
    </div>

    Create one more view resources\views\livewire\categories\create.blade.php which will act as model to create and edit the category

    <div class="fixed z-10 inset-0 overflow-y-auto ease-out duration-400">
    <div class="flex items-end justify-center min-h-screen pt-4 px-4 pb-20 text-center sm:block sm:p-0">
    <div class="fixed inset-0 transition-opacity">
    <div class="absolute inset-0 bg-gray-500 opacity-75"></div>
    </div><!-- This element is to trick the browser into centering the modal contents. --><span class="hidden sm:inline-block sm:align-middle sm:h-screen"></span>​<div
    class="inline-block align-bottom bg-white rounded-lg text-left overflow-hidden shadow-xl transform transition-all sm:my-8 sm:align-middle sm:max-w-lg sm:w-full"
    role="dialog" aria-modal="true" aria-labelledby="modal-headline"><form>
    <div class="bg-white px-4 pt-5 pb-4 sm:p-6 sm:pb-4">
    <div class="">
    <div class="mb-4">
    <label for="exampleFormControlInput1" class="block text-gray-700 text-sm font-bold mb-2">Title:</label>
    <input type="text" class="shadow appearance-none border rounded w-full py-2 px-3 text-gray-700 leading-tight focus:outline-none focus:shadow-outline" id="exampleFormControlInput1" placeholder="Enter Title" wire:model="title">
    @error('title') <span class="text-red-500">{{ $message }}</span>@enderror
    </div>
    <div class="mb-4">
    <label for="exampleFormControlInput2"
    class="block text-gray-700 text-sm font-bold mb-2">Color:</label><textarea
    class="shadow appearance-none border rounded w-full py-2 px-3 text-gray-700 leading-tight focus:outline-none focus:shadow-outline" id="exampleFormControlInput2" wire:model="color" placeholder="Enter Color"></textarea>
    @error('color') <span class="text-red-500">{{ $message }}</span>@enderror
    </div>
    </div>
    </div>
    <div class="bg-gray-50 px-4 py-3 sm:px-6 sm:flex sm:flex-row-reverse">
    <span class="flex w-full rounded-md shadow-sm sm:ml-3 sm:w-auto">
    button wire:click.prevent="store()" type="button" class="inline-flex items-center px-4 py-2 my-3 bg-gray-800 border border-transparent rounded-md font-semibold text-xs text-white uppercase tracking-widest hover:bg-gray-700 active:bg-gray-900 focus:outline-none focus:border-gray-900 focus:shadow-outline-gray disabled:opacity-25 transition ease-in-out duration-150">
    Save
    </button>
    </span>
    <span class="mt-3 flex w-full rounded-md shadow-sm sm:mt-0 sm:w-auto">
    <button wire:click="closeModal()" type="button" class="inline-flex items-center px-4 py-2 my-3 bg-white border border-gray-300 rounded-md font-semibold text-xs text-gray-700 uppercase tracking-widest shadow-sm hover:text-gray-500 focus:outline-none focus:border-blue-300 focus:shadow-outline-blue active:text-gray-800 active:bg-gray-50 transition ease-in-out duration-150">
    Cancel
    </button>
    </span>
    </form>
    </div>
    </div>
    </div>
    </div>

    To show all the posts belonging to a category create app\Http\Livewire\Categories\Categoryposts.php file and write the following code

    <?php
    namespace App\Http\Livewire\Categories;use App\Models\Category;
    use App\Models\Post;
    use App\Models\Tag;
    use Illuminate\Support\Facades\Auth;
    use Illuminate\Support\Facades\DB;
    use Livewire\Component;
    use Livewire\WithPagination;class Categoryposts extends Component
    {
    use WithPagination;
    public $title, $content, $category, $post_id;
    public $tagids = array();
    public $isOpen = 0;
    public $cid;public function mount($id)
    {
    $this->cid = $id;
    }public function render()
    {
    return view('livewire.posts.posts', [
    'posts' => Post::where('category_id', $this->cid)->orderBy('id', 'desc')->paginate(),
    'categories' => Category::all(),
    'tags' => Tag::all(),
    ]);
    }public function store()
    {
    $this->validate([
    'title' => 'required',
    'content' => 'required',
    'category' => 'required',
    ]);$post = Post::updateOrCreate(['id' => $this->post_id], [
    'title' => $this->title,
    'content' => $this->content,
    'category_id' => intVal($this->category),
    'author_id' => Auth::user()->id,
    ]);if (count($this->tagids) > 0) {
    DB::table('post_tag')->where('post_id', $post->id)->delete();
    foreach ($this->tagids as $tagid) {
    DB::table('post_tag')->insert([
    'post_id' => $post->id,
    'tag_id' => intVal($tagid),
    'created_at' => now(),
    'updated_at' => now(),
    ]);
    }
    }
    session()->flash('message', $this->post_id ? 'Post Updated Successfully.' : 'Post Created Successfully.');$this->closeModal();$this->resetInputFields();
    }public function delete($id)
    {
    Post::find($id)->delete();
    session()->flash('message', 'Post Deleted Successfully.');
    }public function edit($id)
    {
    $post = Post::with('tags')->findOrFail($id);
    $this->post_id = $id;
    $this->title = $post->title;
    $this->content = $post->content;
    $this->category = $post->category_id;
    $this->tagids = $post->tags->pluck('id');
    $this->openModal();
    }public function create()
    {
    $this->resetInputFields();
    $this->openModal();
    }public function openModal()
    {
    $this->isOpen = true;
    }public function closeModal()
    {
    $this->isOpen = false;
    }private function resetInputFields()
    {
    $this->title = '';
    $this->content = '';
    $this->category = null;
    $this->tagids = null;
    $this->post_id = '';
    }
    }

    In the above code we are doing pagination as there might be many posts belonging to a category. To do so use Livewire\WithPagination then use paginate() method to get paginated records.

    In the above code block we have used mount() method, we use mount() method to intercept parameters. To get the id of category from URL we will use this method.

    This time we are passing posts, categories, and tags to view so we will pass these as an array in the second parameter while returning view.

    Rest of the code is mostly repetative. So I am ignoring for now.

    Now lets work on Posts. Posts page will look like this:

    Once again run make:livewire as follows:

    php artisan make:livewire Posts\\posts

    Open app\Http\Livewire\Posts\Posts.php file and paste the following code:

    <?php
    namespace App\Http\Livewire\Posts;
    use App\Models\Category;
    use App\Models\Image;
    use App\Models\Post;
    use App\Models\Tag;
    use Illuminate\Support\Facades\Auth;
    use Illuminate\Support\Facades\DB;
    use Illuminate\Support\Str;
    use Livewire\Component;
    use Livewire\WithFileUploads;
    use Livewire\WithPagination;class Posts extends Component
    {
    use WithPagination;
    use WithFileUploads;
    public $title, $content, $category, $post_id;
    public $tagids = array();
    public $photos = [];
    public $isOpen = 0;public function render()
    {
    return view('livewire.posts.posts', [
    'posts' => Post::orderBy('id', 'desc')->paginate(),
    'categories' => Category::all(),
    'tags' => Tag::all(),
    ]);
    }public function store()
    {
    $this->validate([
    'title' => 'required',
    'content' => 'required',
    'category' => 'required',
    'photos.*' => 'image|max:1024',
    ]);// Update or Insert Post
    $post = Post::updateOrCreate(['id' => $this->post_id], [
    'title' => $this->title,
    'content' => $this->content,
    'category_id' => intVal($this->category),
    'author_id' => Auth::user()->id,
    ]);// Image upload and store name in db
    if (count($this->photos) > 0) {
    Image::where('post_id', $post->id)->delete();
    $counter = 0;
    foreach ($this->photos as $photo) {
    $storedImage = $photo->store('public/photos');
    $featured = false;
    if($counter == 0 ){
    $featured = true;
    }Image::create([
    'url' => url('storage'. Str::substr($storedImage, 6)),
    'title' => '-',
    'post_id' => $post->id,
    'featured' => $featured
    ]);
    $counter++;
    }
    }// Post Tag mapping
    if (count($this->tagids) > 0) {
    DB::table('post_tag')->where('post_id', $post->id)->delete();
    foreach ($this->tagids as $tagid) {
    DB::table('post_tag')->insert([
    'post_id' => $post->id,
    'tag_id' => intVal($tagid),
    'created_at' => now(),
    'updated_at' => now(),
    ]);
    }
    }session()->flash('message', $this->post_id ? 'Post Updated Successfully.' : 'Post Created Successfully.');$this->closeModal();$this->resetInputFields();
    }public function delete($id)
    {
    Post::find($id)->delete();
    DB::table('post_tag')->where('post_id', $id)->delete();session()->flash('message', 'Post Deleted Successfully.');
    }public function edit($id)
    {
    $post = Post::with('tags')->findOrFail($id);
    $this->post_id = $id;
    $this->title = $post->title;
    $this->content = $post->content;
    $this->category = $post->category_id;
    $this->tagids = $post->tags->pluck('id');
    $this->openModal();
    }public function create()
    {
    $this->resetInputFields();
    $this->openModal();
    }public function openModal()
    {
    $this->isOpen = true;
    }public function closeModal()
    {
    $this->isOpen = false;
    }private function resetInputFields()
    {
    $this->title = null;
    $this->content = null;
    $this->category = null;
    $this->tagids = null;
    $this->photos = null;
    $this->post_id = null;
    }
    }

    The above code follows the same pattern as previous codes. Here I am uploading multiple files. To upload file use Livewire\WithFileUploads. Read more here about Livewire file upload.

    Open resources\views\livewire\posts\posts.blade.php and paste the following code:

    <x-slot name="header">
    <h2 class="font-semibold text-xl text-gray-800 leading-tight">
    Posts
    </h2>
    </x-slot><div class="py-12">
    <div class="max-w-7xl mx-auto sm:px-6 lg:px-8">
    <div class="bg-white overflow-hidden shadow-xl sm:rounded-lg px-4 py-4">
    @if (session()->has('message'))
    <div class="bg-teal-100 border-t-4 border-teal-500 rounded-b text-teal-900 px-4 py-3 shadow-md my-3"
    role="alert">
    <div class="flex">
    <div>
    <p class="text-sm">{{ session('message') }}</p>
    </div>
    </div>
    </div>
    @endif
    @if (Request::getPathInfo() == '/dashboard/posts')
    <button wire:click="create()" class="inline-flex items-center px-4 py-2 my-3 bg-gray-800 border border-transparent rounded-md font-semibold text-xs text-white uppercase tracking-widest hover:bg-gray-700 active:bg-gray-900 focus:outline-none focus:border-gray-900 focus:shadow-outline-gray disabled:opacity-25 transition ease-in-out duration-150">
    Create New Post
    </button>
    @endif@if ($isOpen)
    @include('livewire.posts.create')
    @endif<div class="grid grid-flow-row grid-cols-3 gap-4">
    @foreach ($posts as $post)
    <div class="max-w-sm rounded overflow-hidden shadow-lg">
    <div class="px-6 py-4">
    <div class="font-bold text-xl mb-2">{{ $post->title }}</div>
    <p class="text-gray-700 text-base">
    {{ Str::words($post->content, 20, '...') }}
    </p>
    </div>
    <div class="px-6 pt-4 pb-2">
    <a href="{{ url('dashboard/posts', $post->id) }}"
    class="inline-flex items-center px-4 py-2 bg-gray-800 border border-transparent rounded-md font-semibold text-xs text-white uppercase tracking-widest hover:bg-gray-700 active:bg-gray-900 focus:outline-none focus:border-gray-900 focus:shadow-outline-gray disabled:opacity-25 transition ease-in-out duration-150">
    Read post
    </a><button wire:click="edit({{ $post->id }})"
    class="inline-flex items-center px-4 py-2 bg-gray-800 border border-transparent rounded-md font-semibold text-xs text-white uppercase tracking-widest hover:bg-gray-700 active:bg-gray-900 focus:outline-none focus:border-gray-900 focus:shadow-outline-gray disabled:opacity-25 transition ease-in-out duration-150">
    Edit
    </button><button wire:click="delete({{ $post->id }})"
    class="inline-flex items-center justify-center px-4 py-2 bg-red-600 border border-transparent rounded-md font-semibold text-xs text-white uppercase tracking-widest hover:bg-red-500 focus:outline-none focus:border-red-700 focus:shadow-outline-red active:bg-red-600 transition ease-in-out duration-150">
    Delete
    </button>
    </div>
    </div>
    @endforeach
    </div>
    </div>
    <div class="py-4">
    {{ $posts->links() }}
    </div>
    </div>
    </div>

    Then create file resources\views\livewire\posts\create.blade.php to be used as model for post create and edit and paste the following code:

    <div class="fixed z-10 inset-0 overflow-y-auto ease-out duration-400">
    <div class="flex items-end justify-center min-h-screen pt-4 px-4 pb-20 text-center sm:block sm:p-0">
    <div class="fixed inset-0 transition-opacity">
    <div class="absolute inset-0 bg-gray-500 opacity-75"></div>
    </div><!-- This element is to trick the browser into centering the modal contents. -->
    <span class="hidden sm:inline-block sm:align-middle sm:h-screen"></span>​<div class="inline-block align-bottom bg-white rounded-lg text-left overflow-hidden shadow-xl transform transition-all sm:my-8 sm:align-middle sm:max-w-lg sm:w-full" role="dialog" aria-modal="true" aria-labelledby="modal-headline">
    <form>
    <div class="bg-white px-4 pt-5 pb-4 sm:p-6 sm:pb-4">
    <div class="">
    <div class="mb-4">
    <label for="title" class="block text-gray-700 text-sm font-bold mb-2">Title:</label>
    <input type="text" class="shadow appearance-none border rounded w-full py-2 px-3 text-gray-700 leading-tight focus:outline-none focus:shadow-outline" id="title" placeholder="Enter Title" wire:model="title">
    @error('title') <span class="text-red-500">{{ $message }}</span>@enderror
    </div><div class="mb-4">
    <label for="content" class="block text-gray-700 text-sm font-bold mb-2">Content:</label>
    <textarea rows="10" class="shadow appearance-none border rounded w-full py-2 px-3 text-gray-700 leading-tight focus:outline-none focus:shadow-outline" id="content" wire:model="content" placeholder="Enter Content"></textarea>
    @error('content') <span class="text-red-500">{{ $message }}</span>@enderror
    </div><div class="mb-4">
    <label for="category" class="block text-gray-700 text-sm font-bold mb-2">Category:</label>
    <select name="category" id="category" wire:model="category" class="shadow appearance-none w-full border text-gray-700 py-3 px-4 pr-8 rounded leading-tight focus:outline-none focus:shadow-outline"><option value="" selected>Select Category</option>
    @foreach ($categories as $category)
    <option value="{{ $category->id }}">{{ $category->title }}</option>
    @endforeach
    </select>
    @error('category') <span class="text-red-500">{{ $message }}</span>@enderror
    </div><div class="mb-4">
    <div x-data="{ isUploading: false, progress: 0 }"
    x-on:livewire-upload-start="isUploading = true"
    x-on:livewire-upload-finish="isUploading = false"
    x-on:livewire-upload-error="isUploading = false"
    x-on:livewire-upload-progress="progress = $event.detail.progress"><div class="flex">
    <label for="photos" class="block text-gray-700 text-sm font-bold mb-2">Images:</label>
    {{-- <div class="px-2" wire:loading
    wire:target="photos">Uploading</div> --}}
    <div x-show="isUploading" class="px-2">
    <progress max="100" x-bind:value="progress"></progress>
    </div>
    </div>
    <input type="file" multiple name="photos" id="photos" class="shadow appearance-none border rounded w-full py-2 px-3 text-gray-700 leading-tight focus:outline-none focus:shadow-outline" wire:model="photos">
    @error('photos') <span class="text-red-500">{{ $message }}</span>@enderror
    </div>
    </div><div class="mb-4">
    <label for="tagids" class="block text-gray-700 text-sm font-bold mb-2">Tags:</label>
    <select multiple name="tagids[]" id="tagids[]" wire:model="tagids" class="shadow appearance-none w-full border text-gray-700 py-3 px-4 pr-8 rounded leading-tight focus:outline-none focus:shadow-outline">
    @foreach ($tags as $tag)
    <option value="{{ $tag->id }}">{{ $tag->title }}</option>
    @endforeach
    </select>
    </div>
    </div>
    </div><div class="bg-gray-50 px-4 py-3 sm:px-6 sm:flex sm:flex-row-reverse">
    <span class="flex w-full rounded-md shadow-sm sm:ml-3 sm:w-auto"><button wire:click.prevent="store()" type="button" class="inline-flex items-center px-4 py-2 my-3 bg-gray-800 border border-transparent rounded-md font-semibold text-xs text-white uppercase tracking-widest hover:bg-gray-700 active:bg-gray-900 focus:outline-none focus:border-gray-900 focus:shadow-outline-gray disabled:opacity-25 transition ease-in-out duration-150">
    Save
    </button>
    </span>
    <span class="mt-3 flex w-full rounded-md shadow-sm sm:mt-0 sm:w-auto">
    <button wire:click="closeModal()" type="button" class="inline-flex items-center px-4 py-2 my-3 bg-white border border-gray-300 rounded-md font-semibold text-xs text-gray-700 uppercase tracking-widest shadow-sm hover:text-gray-500 focus:outline-none focus:border-blue-300 focus:shadow-outline-blue active:text-gray-800 active:bg-gray-50 transition ease-in-out duration-150">
    Cancel
    </button>
    </span>
    </form>
    </div>
    </div>
    </div>
    </div>

    To show single post create file app\Http\Livewire\Posts\Post.php and paste the following code:

    <?php
    namespace App\Http\Livewire\Posts;
    use App\Models\Post as PostModel;
    use Livewire\Component;class Post extends Component
    {
    public $post;
    public function mount($id)
    {
    $this->post = PostModel::with(['author', 'comments', 'category', 'images', 'videos', 'tags'])->find($id);
    }public function render()
    {
    return view('livewire.posts.post');
    }
    }

    Now create view for the single post resources\views\livewire\posts\post.blade.php and paste the following code:

    <x-slot name="header">
    <h2 class="font-semibold text-xl text-gray-800 leading-tight">
    Post
    </h2>
    </x-slot><div class="py-12">
    <div class="max-w-7xl mx-auto sm:px-6 lg:px-8">
    <div class="bg-white overflow-hidden shadow-xl sm:rounded-lg px-4 py-4">
    <div class="grid gap-4">
    <div class="font-bold text-xl mb-2">{{ $post->title }}</div>
    <div class="flex">
    by&nbsp;<span class="italic">{{ $post->author->first_name . ' ' . $post->author->last_name }}</span>
    &nbsp;in&nbsp;<a href="{{ url('dashboard/category/' . $post->category->id . '/posts') }}" class="underline">{{ $post->category->title }}</a>&nbsp;on&nbsp;{{ $post->updated_at->format('F, d Y') }}</div><div class="grid grid-flow-col">
    @foreach ($post->images as $image)
    <div class="px-6 py-4">
    <img src="{{ $image->url }}" alt="{{ $image->description }}" width="300" height="200">
    </div>
    @endforeach
    </div><div class="grid grid-flow-col">
    @foreach ($post->videos as $video)
    <div class="px-6 py-4">
    <img src="{{ $video->url }}" alt="{{ $video->title }}" width="300" height="200">
    </div>
    @endforeach
    </div><div class="text-gray-700 text-base">
    {!! $post->content !!}
    </div><div class="flex">
    @php
    $tags=$post->tags->pluck('id', 'title');
    @endphp
    @if (count($tags) > 0)
    Tags:
    @foreach ($tags as $key => $tag)
    <a href="{{ url('dashboard/tags/' . $tag . '/posts') }}" class="underline px-1">{{ $key }}</a>
    @endforeach
    @endif
    </div>@if ($post->comments->count())
    <div class="text-base">
    <p class="text-gray-900 pt-2 pb-4">{{ $post->comments->count() }}
    @if ($post->comments->count() > 1) Responses @else Response
    @endif
    </p><div class="bg-gray-100 overflow-hidden shadow-xl px-6 pt-4">
    @foreach ($post->comments as $comment)
    <div>
    <p class="text-gray-500 font-bold">
    {{ $comment->author->first_name . ' ' . $comment->author->last_name }}</p>
    <p class="text-gray-400 text-xs">{{ $comment->created_at->format('F, d Y g:i a') }}
    </p>
    <p class="text-gray-500 pb-4">{{ $comment->content }}</p>
    </div>
    @endforeach
    </div>
    </div>
    @endif
    </div>
    </div>
    </div>
    </div>
    {{-- https://www.php.net/manual/en/datetime.format.php --}}

    This completes Categories and Posts. Now Tags and navigation menus are remaining. I will update that here very soon.

    The source code is available at Github for you to refer to.

    Read the previous part, Creating and consuming RESTful API in Laravel of this tutorial.

    Twitter: kotagin

    GitHub: mdutt247

    E-mail: m.dutt@mditech.net

  • Creating and Consuming RESTful API in Laravel

    Nice Tutorial to get started with APIs in Laravel.

    Madhavendra DuttDec 1·6 min read

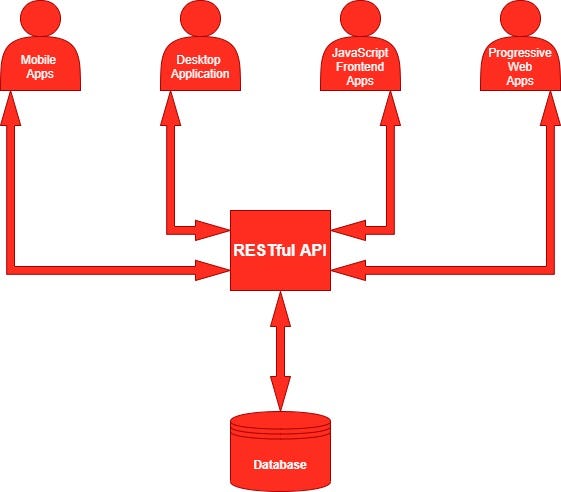
    RESTful API
    RESTful API

    What is API?

    An API — Application Programming Interface, is a computing interface that defines interactions between multiple software intermediaries. It is a way to programmatically interact with a separate software component or resource.

    What is REST?

    REST is an acronym for REpresentational State Transfer. This term was coined by Roy Fielding in 2000. It is an architecture style for designing loosely coupled applications over HTTP, that is often used in the development of web services.

    REST defines 6 architectural constraints that make any web service a true RESTful API.

    1. Client-server — By separating the user interface from the data storage, we improve the portability of the user interface across multiple platforms and improve scalability by simplifying the server components.
    2. Stateless — Each request from the client to the server must contain all of the information necessary to understand the request, and cannot take advantage of any stored context on the server. Session state is therefore kept entirely on the client.
    3. Cacheable — Cache constraints require that the data within a response to a request be implicitly or explicitly labeled as cacheable or non-cacheable. If a response is cacheable, then a client cache is given the right to reuse that response data for later, equivalent requests.
    4. Uniform interface — By applying the principle of generality to the component interface, the overall system architecture is simplified and the visibility of interactions is improved.
    5. Layered system — The layered system style allows an architecture to be composed of hierarchical layers by constraining component behavior such that each component cannot “see” beyond the immediate layer with which they are interacting.
    6. Code on demand (optional) — REST allows client functionality to be extended by downloading and executing code in the form of applets or scripts. This simplifies clients by reducing the number of features required to be pre-implemented.

    Now let’s jump into creating and consuming RESTful API in Laravel. I would recommend to read and implement Migration and data seeding & Creating Relationships before you dive into this tutorial.

    Consumers of our API will be able to perform a few limited tasks. There would be the following endpoints:

    API endpoints for the unauthenticated route

    Related to category:

    • Get all categories GET /categories
    • Get all posts of a category GET /categories/{id}/posts

    Related to the post:

    • Get all posts GET /posts
    • Get a post by ID GET /posts/{id}
    • Get all comments on a post GET /posts/{id}/comments

    Related to the author:

    • Get details of an author GET /authors/{id}
    • Get all posts by an author GET /authors/posts
    • Get all comments by an author GET /authors/{id}/comments

    Related to the tag:

    • Get all posts of a tag GET /tags/{id}/posts

    API endpoint for the authenticated route

    Related to comment:

    • Store user comment POST /comments/posts/{id}

    You have to create API ResourcesControllers, and API Routes for the above-mentioned API endpoints.

    Step 1: Let’s first create API Resources. To do so follow the below-mentioned steps (don’t forget to implement the Migration and Relationship part):

    When building an API, you may need a transformation layer that sits between your Eloquent models and the JSON responses that are actually returned to your application’s users. Laravel’s resource classes allow you to expressively and easily transform your models and model collections into JSON.

    Run the command php artisan make:resource CategoryResource. It will create CategoryResource in app\Http\Resources directory.

    Open this file and return the desired data, eg. category_id in place of id. You can do a lot more than just masking the field names or number of fields to be returned like- we can return additional information with API, etc.

    public function toArray($request)
    {
    return [
    'category_id' => $this->id,
    'category_title' => $this->title,
    'category_color' => $this->color,
    ];
    }// (Optional) Additional code is attached to the response
    public function with($request){
    return [
    'version' => "1.0.0",
    'author_url' => "https://mditech.net"
    ];
    }

    The same way you have to create other required resources — CommentResourcePostResourceTagResourceUserResourceImageResource, and VideoResource. Create these resources or check them out from the repository.

    Step 2: The next activity is to create the required controllers. To do so follow the below steps:

    Run the command php artisan make:controller Api\\CategoryApiController. It will create CategoryApiController in theapp\Http\Controllers\Api directory. Open that file and write the methods to perform actions.

    public function index()
    {
    $categories = Category::all();
    return CategoryResource::collection($categories);
    }public function posts($id)
    {
    $posts = Post::where('category_id', $id)->orderBy('id', 'desc')->paginate();
    return PostResource::collection($posts);
    }

    Here you created two methods index and posts inside CategoryApiController.

    The index method will return all the categories wrapped inside CategoryResource.

    The posts method will return all the posts belonging to a specific category wrapped inside PostResource.

    The same way create the desired methods in CommentApiControllerPostApiControllerTagApiController, and UserApiController or checkout repository.

    Step 3: The last step is to create routes for the API. Proceed to the routes directory and open the api.php file and create the API endpoints that will reference the methods created in CategoryApiControllerCommentApiControllerPostApiControllerTagApiController, and UserApiController.

    <?php
    use App\Http\Controllers\Api\CategoryApiController;
    use App\Http\Controllers\Api\CommentApiController;
    use App\Http\Controllers\Api\PostApiController;
    use App\Http\Controllers\Api\TagApiController;
    use App\Http\Controllers\Api\UserApiController;
    use Illuminate\Support\Facades\Route;Route::get('authors/{id}', [UserApiController::class, 'show']);
    Route::get('authors/{id}/posts', [UserApiController::class, 'posts']);
    Route::get('authors/{id}/comments', [UserApiController::class, 'comments']);
    Route::get('categories', [CategoryApiController::class, 'index']);
    Route::get('categories/{id}/posts', [CategoryApiController::class, 'posts']);
    Route::get('posts', [PostApiController::class, 'index']);
    Route::get('posts/{id}', [PostApiController::class, 'show']);
    Route::get('posts/{id}/comments', [PostApiController::class, 'comments']);
    Route::get('tags/{id}/posts', [TagApiController::class, 'posts']);
    Route::middleware('auth:sanctum')->group(function () {
    Route::post('comments/posts', [CommentApiController::class, 'store']);
    });

    Testing the API endpoints

    Start the database and run php artisan serve command. Laravel development server will start on http://127.0.0.1:8000

    Open Postman and test all routes defined in api.php, but make sure to append your route with /api/

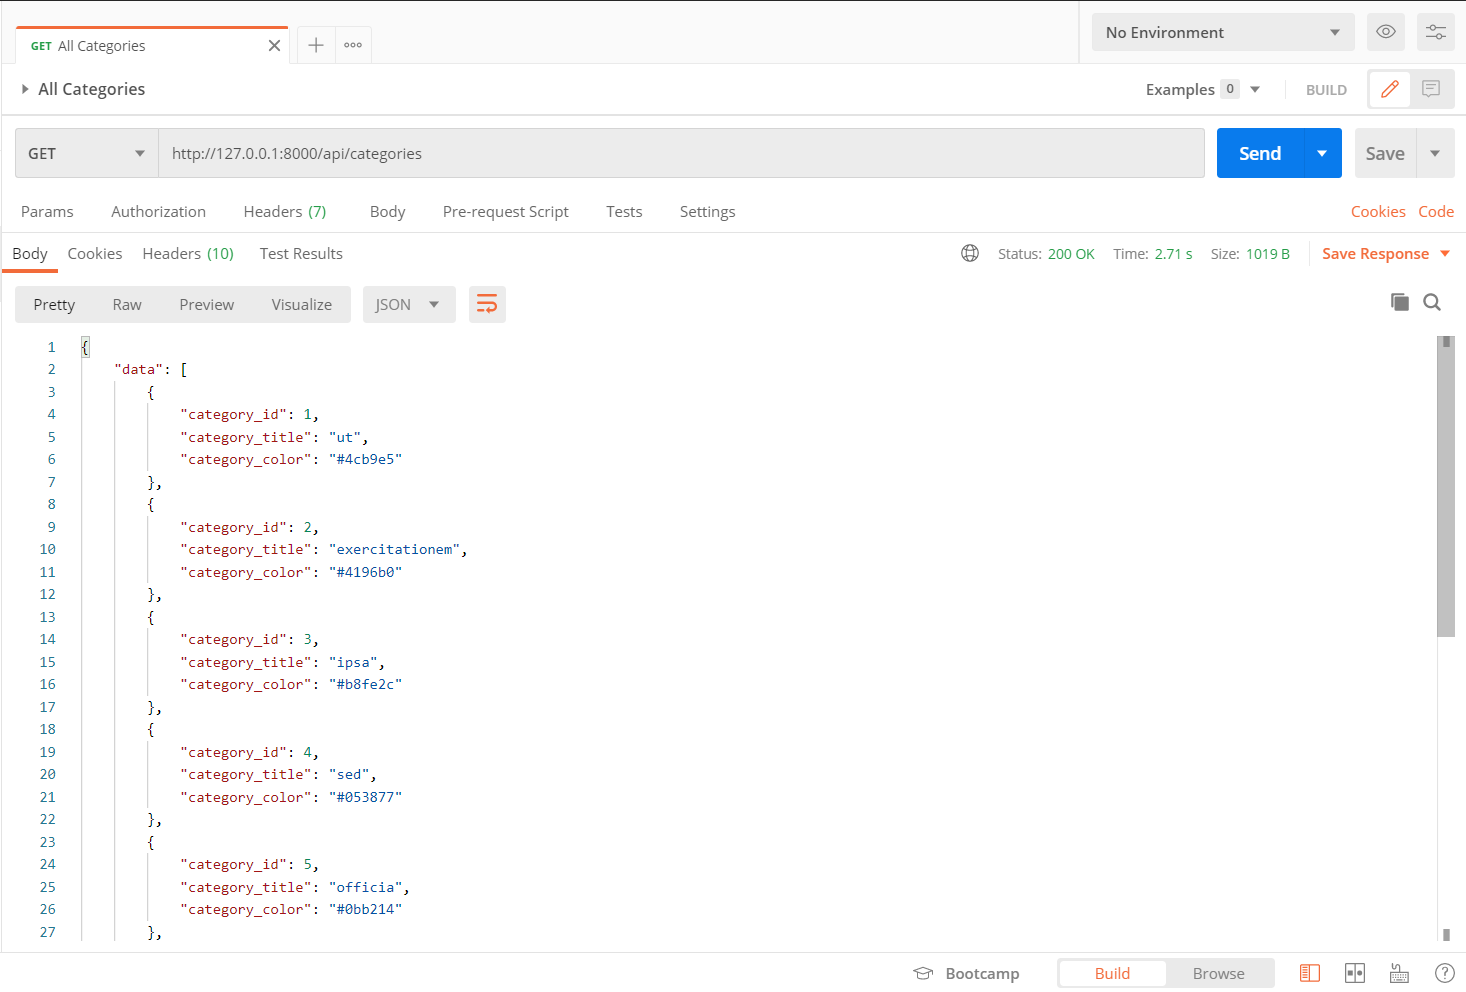
    To get all categories you should send a GET request to http://127.0.0.1:8000/api/categories

    categories
    RESTful API Returning Response

    Now lets test authenticated route as well. There is only one authenticated route for storing comment of logged in user on a post.

    We are using Laravel Sanctum for authentication and authorization. We will issue an API token and use that in Postman to authenticate the request.

    Laravel Sanctum provides a featherweight authentication system for SPAs (single page applications), mobile applications, and simple, token based APIs. Sanctum allows each user of your application to generate multiple API tokens for their account. These tokens may be granted abilities / scopes which specify which actions the tokens are allowed to perform.

    To issuse an API token we will run tinker command

    php artisan tinker

    It will now allow us to interact with the Laravel application from the command line. Here you need to create an API token for a user using createToken() method.

    Copy plainTextToken, to be used in Postman.

    Now open Postman and do the following:

    • New POST request to http://127.0.0.1:8000/api/comments/posts
    • In Authorization tab select Type as Bearer Token and paste the plainTextToken in Token text box.
    • Then in Headers tab Key as Accept and Value as application/json.
    • Then in Body tab select form-data radio button and in KeyValue write id — 159comment — Testing some comment on post 159
    • Now hit the send button and you will get back the newly created comment.

    In this article, we have been able to build and consume (Consumer was Postman)RESTful API using Laravel. We covered the API Resource creation, API Controller creation, and tested Authenticated and Non-Authenticated API Routes.

    The source code is available at Github for you to refer to.

    Read the previous part, Creating Relationships of this tutorial.

    Read the next part, Creating the Front End for Admin user.

    Twitter: kotagin

    GitHub: mdutt247

    E-mail: m.dutt@mditech.net
    Madhavendra Dutt

    Facilitator | Freelancer | Software Develop

  • LARAVEL 8: HOW TO CREATE RESTful APIs WITH LUMEN 8

    Open in appSamson Omojola

    Image for post

    WHAT WE’LL BE BUILDING

    In this tutorial, you’ll learn how to use Laravel Lumen (version 8) to create REST APIs.

    We’ll be creating a Lumen microservice that implements all the types of HTTP requests. Our microservice will help us manage users. So, from any frontend application we connect to our microservice, we should be able to:

    – Create a new user (POST Request)

    – Edit the details of a user (PUT Request)

    – Request for the details of users (GET Request)

    – Delete a user (DELETE Request)

    Here’s a link to the GitHub repo of this project: Repo

    Tools Required:

    · You need to have PHP installed. The minimum PHP version that is compatible with Lumen 8 is PHP 7.3. If you have the latest XAMPP, WAMP, or LAMP installed, you should be good to go.

    · You also need to have Composer installed. If you don’t have it, click here to get it.

    Knowledge Required:

    • Basic knowledge of Laravel will help you follow along.

    Let’s Get Started!

    Install lumen on your system by running the command below via a CLI:

    composer global require “laravel/lumen-installer”

    Next, in your CLI, navigate to the directory that you want your project to be located in and create a lumen project using the command:

    composer create-project — prefer-dist laravel/lumen projectName

    NB: Replace “projectName” with whatever you want to name your project.

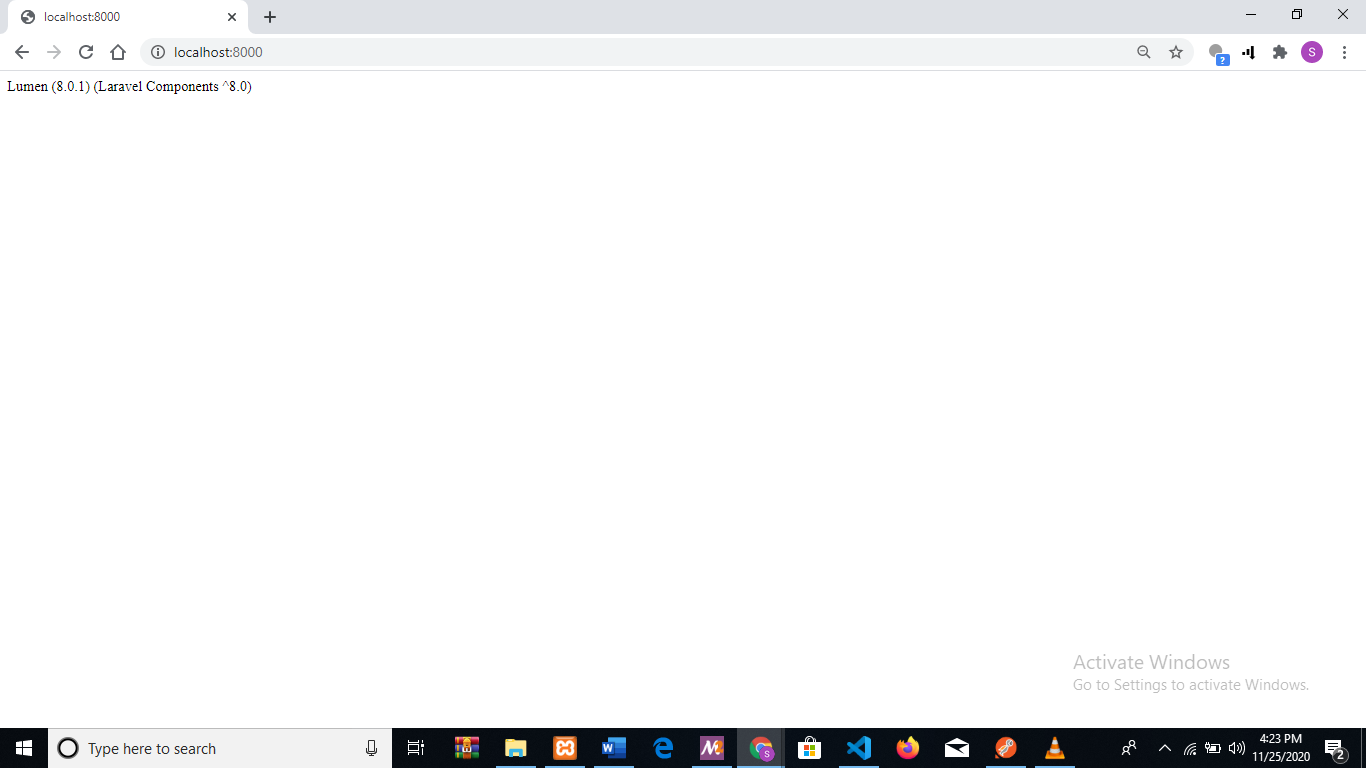
    Lumen comes with some boilerplate code; a simple template that we can build upon. If you want to take a quick look at it, run php -S localhost:8000 -t public via your CLI and run localhost:8000 in your browser. You should see something like this:

    Image for post

    Now, let’s continue with creating our microservice.

    The next thing we want to do is create a database for our microservice. This is where all the details of our users will be stored. There are a number of ways to do this. I’m going to stick with MySQL, and I’ll make use of PHPmyAdmin. Feel free to use whatever option you deem best.

    Make sure your server is running(XAMPP, WAMP, or LAMP). Go to your browser and enter localhost/phpmyadmin. Create a new database and take note of the name you used.

    Next, let’s add our database details to our lumen project, so as to connect both together.

    Open the newly created lumen project with any code editor of your choice, navigate to the .env file, and update the name of the database, the username, and the password.

    By default, the username should be “root” and there should be no password.

    Now that our database is set, we can start working on the actual project. In this project, we’ll be making use of Laravel’s Eloquent and Facades classes. In Lumen, these classes come disabled, so we have to enable them ourselves. To do this, navigate to boostrap/app.php and uncomment the lines below:

    //$app->withFacades();

    //$app->withEloquent();

    Now, your bootstrap/app.php file should look like this:https://omojolasamsonade.medium.com/media/68dd19d605319f97a4cb061e715cd5b4

    We’ll be making use of Eloquent and Facades in our routes and controller files.

    Now that we have that set up, let’s create our users table in the database we just created. Run the following command in your CLI:

    php artisan make:migration create_users_table

    Navigate to the migrations folder and open the newly created users migration file. This is where we decide what columns the users table should have.

    Each user should have a first name, a last name, and an email address. So let’s go ahead and create columns for them.

    $table->string(‘first_name’);

    $table->text(‘last_name’);

    $table->integer(‘email_address’);

    Now, your users migration file should look like this:https://omojolasamsonade.medium.com/media/0caf4f7320a9f21e3159fbc2f5741ebf

    To create the table, run the following command in your CLI:

    php artisan migrate

    Now that we’ve successfully created our users table, the next step is to create our User model. In Lumen, there’s no CLI command for creating models, so navigate to your app/Models folder, create a file and name it User.php. If you find a User.php file already created in that folder, just use that instead. Now, let’s map it to our database:

    protected $fillable =[‘first_name’, ‘last_name’, ‘email_address’,];

    It should look like this now:https://omojolasamsonade.medium.com/media/05657cd2cae8ab19b8e53a881583d282

    Now we need to create the appropriate routes for our microservice. The code that will process API calls will be in a controller file named UserController. UserController will contain different methods for handling all the different HTTP requests, and each method will need a route pointing to it. The routes will serve as triggers for these methods. Every time they are called, the methods will be executed. We’ll be giving all the routes a common prefix “api/v1” (think of it as them all belonging to the same family).

    Navigate to routes/web.php and add the needed routes:

    $router->group([‘prefix’ => ‘api/v1’], function () use ($router) {

    $router->post(‘users/add’, ‘UserController@createUser’);

    $router->get(‘users/view/{id}’, ‘UserController@viewUser’);

    $router->put(‘users/edit/{id}’, ‘UserController@updateUser’);

    $router->delete(‘users/delete/{id}’, ‘UserController@deleteUser’);

    $router->get(‘users/index’, ‘UserController@index’);

    });

    Your web.php should look like this:https://omojolasamsonade.medium.com/media/8ae6347853eb6a9604c797d0068e5403

    (The comment above each route explains what the route does).

    Now that our routes are set, we need to actually create that controller file with the methods we are referencing above. These methods will be in charge of handling our API calls and processing our requests.

    Go to app/Http/Controllers and create a file named UserController.php

    These are the methods we need:

    Create New User

    public function createUser(Request $request){

    $user = User::create($request->all());

    return response()->json($user);

    }

    update user details

    public function updateUser(Request $request, $id){

    $user = User::find($id);

    $user->first_name = $request->input(‘first_name’);

    $user->last_name = $request->input(‘last_name’);

    $user->email_address = $request->input(‘email_address’);

    $user->save();

    return response()->json($user);

    }

    view user

    public function viewUser($id){

    $user = User::find($id);

    return response()->json($user);

    }

    delete user

    public function deleteUser($id){

    $user = User::find($id);

    $user->delete();

    return response()->json(‘Removed successfully’);

    }

    list users

    public function index(){

    $user =User::all();

    return response()->json($user);

    }

    Your User Controller should look like this:https://omojolasamsonade.medium.com/media/2d970a97395fe287e49e3d980da9c2e3

    The first method createUser() allows you to create a new user.

    The second method updateUser() allows you to update the details of an already existing user.

    The third method viewUser() allows you to view the details of a user you created.

    The fourth method deleteUser() allows you to delete a user from your database.

    The fifth method index() allows you to list all the users you created.

    Now, if a call is made to any of the routes in web.php, the corresponding method in UserController is triggered.

    You can use Postman to make the http request. To do that, make sure your lumen server is running. Use this command to get it started: php -S localhost:8000 -t public

    Next, fire up postman.

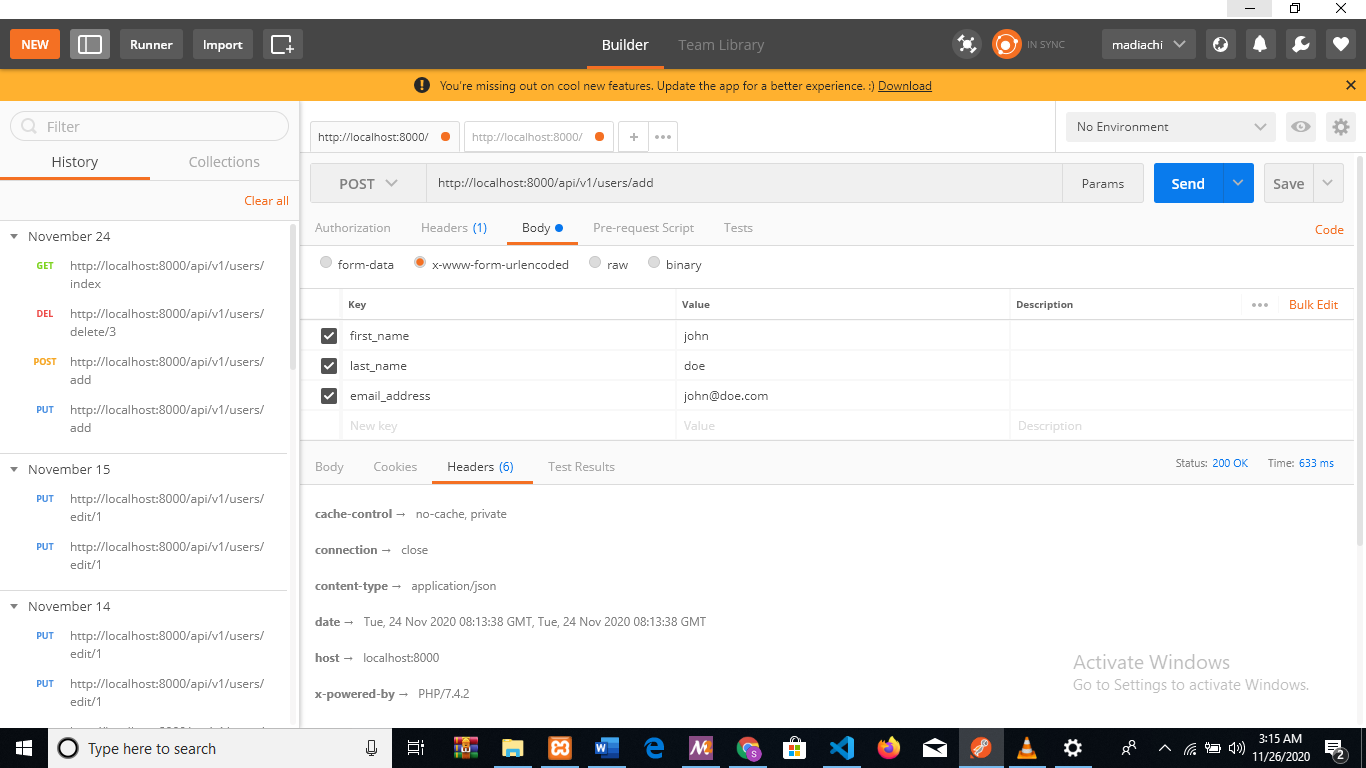
    Let’s test createUser() first. Send this HTTP request via Postman: http://localhost:8000/api/v1/users/add

    Image for post

    Create the required fields and supply them with values.

    (Use the POST option)

    You should get the details of the user you just created as a JSON response.

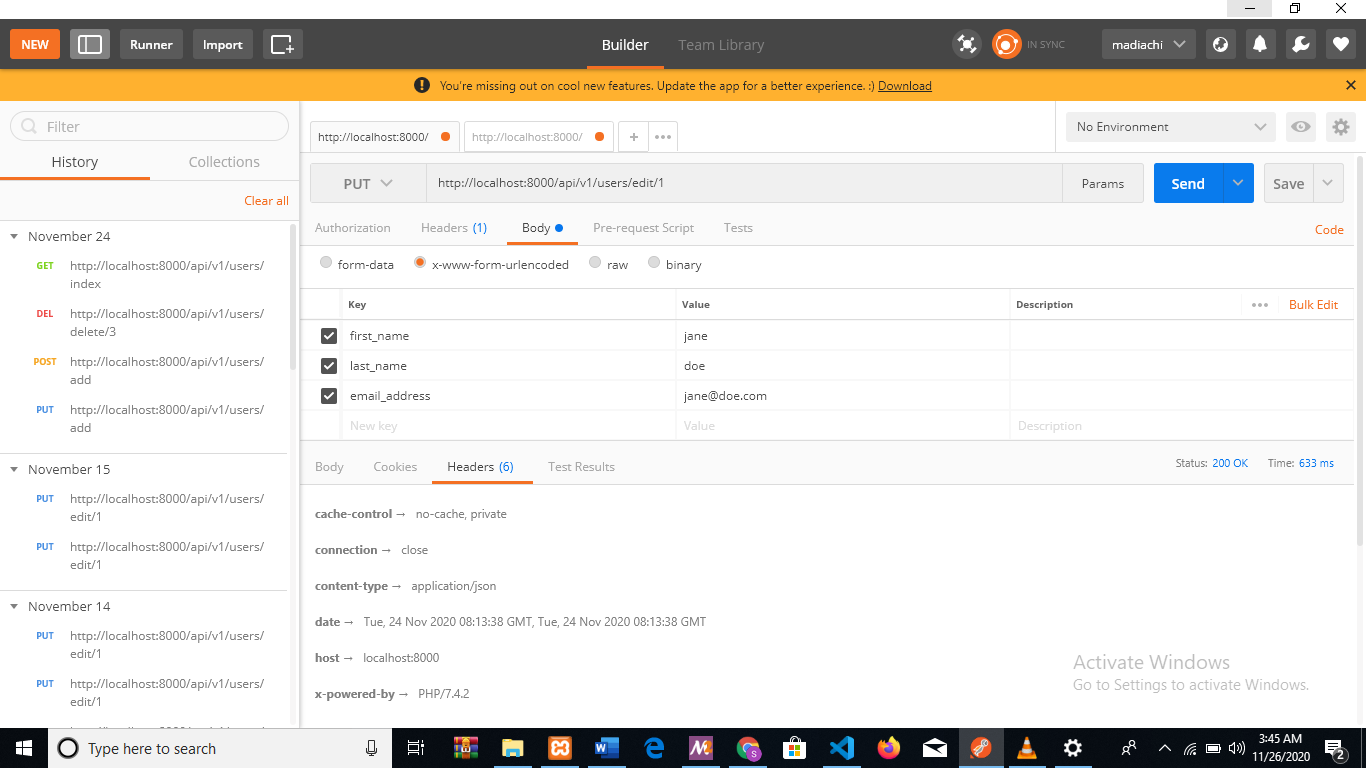
    Next, let’s test updateUser(). We can edit the details of the user we just created. Send this HTTP request via Postman: http://localhost:8000/api/v1/users/edit/1

    Image for post

    Supply the previously created fields with new values.

    (Use the PUT option)

    You should get the details you just entered back as a JSON response.

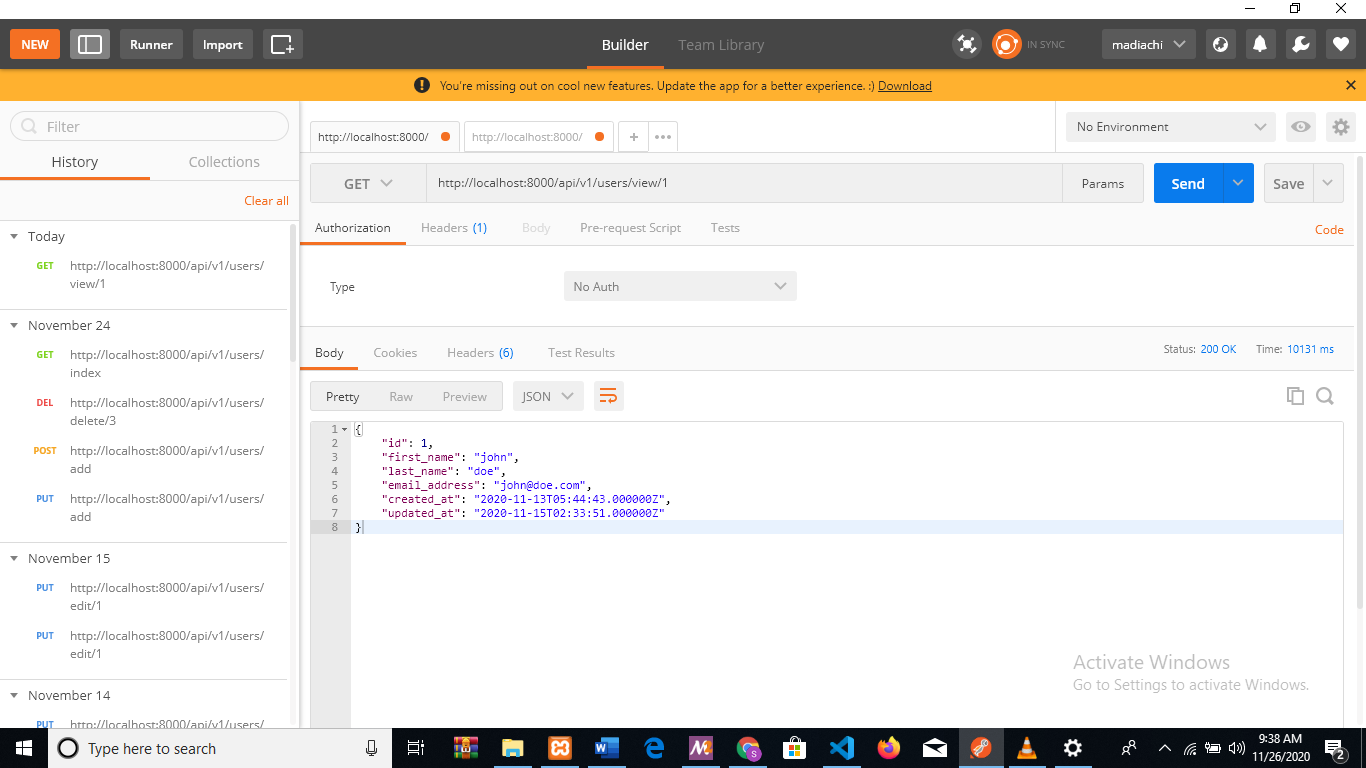
    Next, let’s test viewUser(). We can view the details of the user we just created. Send this HTTP request via Postman: http://localhost:8000/api/v1/users/view/1

    Image for post

    (Use the GET option)

    You should get the details of the user you created back as a JSON response.

    Next, let’s test deleteUser(). We can delete the user we just created. Send this HTTP request via Postman: http://localhost:8000/api/v1/users/delete/1

    (Use the DELETE option)

    You should get a success message back.

    Lastly, let’s test index(). This will list out all the users we have in our database. Send this HTTP request via Postman: http://localhost:8000/api/v1/users/index

    (Use the GET option)

    BUILDING A CLIENT APPLICATION TO CONSUME THE API

    Let’s create a very simple frontend application to consume the API we just created. A simple PHP application will suffice. Navigate to xampp/htdocs and create a folder for your frontend app. I’ll name mine “userfrontend”. Next, create a file in the folder and name it “index.php”.

    Make sure your lumen microservice and your XAMPP are running.

    We can use php’s curl function to make the API request, like this:

    $url = ‘http://localhost:8000/api/v1/users/index’;

    curl_setopt($curl, CURLOPT_URL, $url);

    $data = curl_exec($curl);

    Next, you convert the data to JSON format:

    $decodeUsers = json_decode($data, true);

    And lastly, loop through the data with a foreach loop and display each user’s data.

    Now, if you go to your browser and run http://localhost/userfrontend, you should see the details of the users in your database.

    Here’s a link to the GitHub repo of this project: Repo

    More from Samson Omojola