Category: Programming

  • Strategy In PHP 8 — (Design Patterns)

    Strategy In PHP 8 — (Design Patterns)

    The design pattern strategy is one of my favorites, and in this article, I will show you how to implement it in real-life examples using PHP 8. You will learn more about the patterns, their pros, and cons.

    About this series of articles

    This article’s main goal is to teach you about this subject that I am passionate about. After writing two books about design patterns (In Brazil), I started this series of articles to share with them and help you become a more professional developer. I hope you enjoy it.

    Keep it in mind: The most difficult part about learning design patterns is “when I should apply them.” My advice is to focus on the examples and try to think in different situations that you have a similar problem; it doesn’t matter the industry or type of project you work with. Design patterns are not related to a specific business. They are intended to solve programming problems related to algorithms’ behavior, the structure of your code, or even creating the objects on your application.

    GitHub Repository: https://github.com/gabrielanhaia/php-design-patterns

    Name: Strategy (also known as Policy)

    Type: Behavioral (It changes your code at a behavior level).

    Origin: from the book “Design Patterns: Elements of Reusable Object-Oriented Software.

    The Problem

    I want to introduce you to an example of a widespread problem that We developers use to face. Let’s imagine that you work in an e-commerce platform focused on the food industry.

    In this hypothetical situation, each product sold online has a tax of 30%. Let’s assume that you sell the types of the product above:

    +-------------+-----+
    |  Category   | Tax |
    +-------------+-----+
    | Foods       | 30% |
    | Electronics | 30% |
    | Books       | 30% |
    +-------------+-----+

    However, there was a change, and your country’s government started collecting taxes depending on what kind of product it is. Now the taxes look like this:

    +-------------+-----+
    |  Category   | Tax |
    +-------------+-----+
    | Foods       | 20% |
    | Electronics | 40% |
    | Books       |  0% |
    +-------------+-----+

    If you think in terms of algorithm, your solution could look like something like this:

    switch ($product->getCategory()) {
        case 'foods':
            // All the logic related to the calculation with 20% rate.
            break;
        case 'electronics':
            // All the logic related to the calculation with 40% rate.
            break;
        case 'foods':
            // All the logic related to the calculation with 0% rate.
            break;
    }

    It looks like a good solution, but if you look closer and start thinking about the future, it can be a big headache. We are not making use of object orientation, our software is not modular, and if we need to use the logic of tax calculation in another place, we probably will have to duplicate code. This is a simple example, and in real life, things are much more complex. Those Tax calculations would have much more complex logic and too many lines each one. If we put all different logics in the same class (It doesn’t matter if we are breaking them into methods), it will not be a reusable solution, it will be tough to test, and probably when it grows, and we have more categories (As you can imagine, it is a very probable situation) we will have problems changing the code.

    We should see behind this problem that we have a group of algorithms with the same purpose (tax calculator); however, each has its own behavior and implementation.

    The Strategy Pattern

    The Strategy’s main goal is to define a family of algorithms that perform a similar operation, each with a different implementation. It splits each of the Algorithms (called strategies) in its own class, so we can use them through our whole application, test them easier, and even change the algorithms at run time.

    The Strategy pattern is composed of two main elements:

    1. A Strategy Interface: This interface guarantees that all the strategies implemented will follow the same rules (with the same contract), and they will be interchangeable on our code.
    2. The concrete strategy classes: Those are the concrete implementations of our Strategies. We have one class with one/x method(s) defined in our interface. We can have as many strategies as necessary.
    3. Context class: This is the class that knows only the Strategy interface, it owns an instance of a concrete Strategy, and it is responsible for running the Algorithm.

    Solving the Ecommerce problem with Strategy

    After knowing the Strategy pattern and the problem it solves, we can assume that it fits very well in solving our e-commerce problem. We have different algorithms (each one responsible for calculating a product’s fees differently). Furthermore, we don’t know the exact number of categories we can have in the future and grow.

    I will start creating an object that represents our products, and it’s just a DTO with getters and setters:

    <?php
    
    class Product
    {
        private string $name;
        private string $category;
        private float $price;
        private float $taxes;
    
        public function getCategory(): string
        {
            return $this->category;
        }
    
        public function setCategory(string $category): Product
        {
            $this->category = $category;
            return $this;
        }
    
        public function getName(): string
        {
            return $this->name;
        }
    
        public function setName(string $name): Product
        {
            $this->name = $name;
            return $this;
        }
    
        public function getPrice(): float
        {
            return $this->price;
        }
    
        public function setPrice(float $price): Product
        {
            $this->price = $price;
            return $this;
        }
    
        public function getTaxes(): float
        {
            return $this->taxes;
        }
    
        public function setTaxes(float $taxes): Product
        {
            $this->taxes = $taxes;
            return $this;
        }
    }

    The idea is to look into the category and use it to calculate and return its tax.

    Let’s design the first element of our pattern, the Strategy interface:

    interface TaxCalculatorStrategy
    {
        public function calculate(Product $product): float;
    }

    If you look at the interface above, you will see that it defines a method responsible for calculating the Tax of a product passed as a param to this method.

    Now we need to implement our concrete strategies, and the first one is for the foods category:

    class FoodTaxStrategy implements TaxCalculatorStrategy
    {
        const TAX_RATE = 30.0;
    
        public function calculate(Product $product): float
        {
            return $product->getPrice() * (self::TAX_RATE / 100);
        }
    }

    Now we will implement the electronics category:

    class ElectronicTaxStrategy implements TaxCalculatorStrategy
    {
        const TAX_RATE = 40.0;
    
        public function calculate(Product $product): float
        {
            return $product->getPrice() * (self::TAX_RATE / 100);
        }
    }

    and last but not least, the strategy used by the books category:

    class TaxFreeStrategy implements TaxCalculatorStrategy
    {
        public function calculate(Product $product): float
        {
            return 0;
        }
    }

    Note: I create this TaxFreeStrategy to be more generic and not attached to a specific category, so maybe I can use it in different categories that require it in the future.

    Now let’s implement the last part of our pattern, the Context class (this class can be named what makes more sense into your project):

    class Context
    {
        private TaxCalculatorStrategy $taxCalculatorStrategy;
    
        public function __construct(TaxCalculatorStrategy $taxCalculatorStrategy)
        {
            $this->taxCalculatorStrategy = $taxCalculatorStrategy;
        }
    
        public function calculateProduct(Product $product): void
        {
            $taxes = $this->taxCalculatorStrategy->calculate($product);
    
            $product->setTaxes($taxes);
        }
    }

    If you take a closer look at this class, you will see that it encapsulates a strategy, it receives the interface, making it possible to use any Concrete Strategy. We need to define which class will be used and call the calculation method.

    Outside of all those classes above is your project that can be a simple PHP script, a Laravel framework, Symfony (Controller, Model, Repository, Service layer), it doesn’t matter what it is, I will show the simple example above using those classes:

    $product = new Product;
    $product->setName('Product Test')
        ->setCategory('electronic')
        ->setPrice(100);
    
    switch ($product->getCategory()) {
        case 'electronics':
            $strategy = new ElectronicTaxStrategy;
            break;
        case 'food':
            $strategy = new FoodTaxStrategy;
            break;
        case 'books':
            $strategy = new TaxFreeStrategy;
            break;
        default:
            throw new \Exception('Strategy not found for this category.');
    }
    
    $context = new Context($strategy);
    $context->calculateProduct($product);
    
    echo $product->getTaxes();

    If you are asking yourself why we still have this conditional block, and the answer is that we will not get rid of it by just applying the Strategy pattern, however, we have different approaches to do so. The most important is that we could split the algorithms responsible for the calculation into smaller blocks of code, and they are standardized and easy to change, and in use them depending on different conditions. We took the code’s spiral inside our unlimited number of if conditions and turned it into a much more modular code using object orientation.

    I hope you liked this articles; let me know if you have any questions about it, and don’t forget to check the GitHub repository here https://github.com/gabrielanhaia/php-design-patterns

    Don’t forget to add me on LinkedIn and follow me on GitHub for more updates!

    Source: https://medium.com/mestredev/strategy-in-php-8-design-patterns-2044e5ef54ed

  • How to implement Laravel’s Must Verify Email feature in the API registration

    Laravel provides us with an amazing feature called Must Verify Email which makes email verification a breeze by just writing 2–3 lines of code really. But unfortunately there is no provision for applying the same feature in API, especially if you are using same auth user table to register in API . This threw me off for a while and there wasn’t many resource online , when i finally got around it , turned out to be very simple. So here i am going to share with you how to apply the same feature in your API registration as one stop solution. We will basically recreate the must verify email feature for API. Follow along ….

    Let’s install a fresh installation of Laravel, in my case I named my project as “email”, runn the following command to install laravel

    composer create-project --prefer-dist laravel/laravel email

    Laravel comes ship with users table migration which looks like this

    class CreateUsersTable extends Migration
    {
       /**
        * Run the migrations.
        *
        * @return void
        */
        public function up()
        {
            Schema::create('users', function (Blueprint $table) {
                $table->increments('id');
                $table->string('name');
                $table->string('email')->unique();
                $table->timestamp('email_verified_at')->nullable();
                $table->string('password');
                $table->rememberToken();
                $table->timestamps();
            });
        }
    }
    

    As you can see that laravel includes ‘email_verified_at’ in it’s schema which when we use Must Verify Email changes from null to the current timestamp , you can check the docs for more info.

    Before we implement the email verification feature we need to run the artisan command to make the authorisation scaffoldings type in the following command to enable auth:

    php artisan make:auth
    

    Once the auth is generated you can simply include the following in your User Model as mentionad in the docs

    <?php
    
    namespace App;
    
    use Illuminate\Notifications\Notifiable;
    use Illuminate\Contracts\Auth\MustVerifyEmail;
    use Illuminate\Foundation\Auth\User as Authenticatable;
    
    class User extends Authenticatable implements MustVerifyEmail
    {
        use Notifiable;
        // ...
    }
    

    And you can simply include the following in your web route

    Auth::routes(['verify' => true]);

    Add the middleware in the route to protect it like so

    Route::get('profile', function () {
    // Only verified users may enter...
    })->middleware('verified');

    So far we have only talked about how we can implement the email verification in the web route now coming to the topic i will guide you how we can replicate the same for API

    Let’s start with recreating the VerificationController that you can find under app/http/controllers/auth/VerificationController only for an API let’s name it “VerificationApiController” run the following command to make the controller

    php artisan make:controller VerificationApiController

    And just add the follwoing code inside the controller

    <?php
    
    namespace App\Http\Controllers;
    
    use App\User;
    use Illuminate\Foundation\Auth\VerifiesEmails;
    use Illuminate\Http\Request;
    use Illuminate\Auth\Events\Verified;
    
    class VerificationApiController extends Controller
    {
        use VerifiesEmails;
    
        /**
        * Show the email verification notice.
        *
        */
        public function show()
        {
            //
        }
    
        /**
        * Mark the authenticated user’s email address as verified.
        *
        * @param \Illuminate\Http\Request $request
        * @return \Illuminate\Http\Response
        */
        public function verify(Request $request)
        {
            $userID = $request[‘id’];
            $user = User::findOrFail($userID);
            $date = date(“Y-m-d g:i:s”);
            $user->email_verified_at = $date; // to enable the “email_verified_at field of that user be a current time stamp by mimicing the must verify email feature
            $user->save();
            return response()->json(‘Email verified!’);
        }
    
        /**
        * Resend the email verification notification.
        *
        * @param \Illuminate\Http\Request $request
        * @return \Illuminate\Http\Response
        */
        public function resend(Request $request)
        {
            if ($request->user()->hasVerifiedEmail()) {
            return response()->json(‘User already have verified email!’, 422);
            // return redirect($this->redirectPath());
        }
    
        $request->user()->sendEmailVerificationNotification();
        return response()->json(‘The notification has been resubmitted’);
        // return back()->with(‘resent’, true);
        }
    }

    Now let’s create our own notification which will mimic the Must Verify Email notification , just create a folder under the app folder called “Notifications” and create a file named “VerifyApiEmail.php” and paste in the following code:

    <?php
    
    namespace App\Notifications;
    
    use Illuminate\Support\Carbon;
    use Illuminate\Support\Facades\URL;
    use Illuminate\Auth\Notifications\VerifyEmail as VerifyEmailBase;
    
    class VerifyApiEmail extends VerifyEmailBase
    {
        /**
        * Get the verification URL for the given notifiable.
        *
        * @param mixed $notifiable
        * @return string
        */
        protected function verificationUrl($notifiable)
        {
            return URL::temporarySignedRoute(
            ‘verificationapi.verify’, Carbon::now()->addMinutes(60), [‘id’ => $notifiable->getKey()]
            ); // this will basically mimic the email endpoint with get request
        }
    }

    Now all you have to do for it to work is bring in the notification that you created into your User Model like so use App\Notifications\VerifyApiEmail;
    and add the following method inside your user Model

    public function sendApiEmailVerificationNotification()
    {
        $this->notify(new VerifyApiEmail); // my notification
    }
    

    You are almost done now all you have to do is specify the route “‘verificationapi.verify” in your api route , it’s important to note that you need to add the following routes inside your api route for it to work

    Route::get(‘email/verify/{id}’, ‘VerificationApiController@verify’)->name(‘verificationapi.verify’);
    Route::get(‘email/resend’, ‘VerificationApiController@resend’)->name(‘verificationapi.resend’);

    The above code will take care of email verification and getting the proper response as “Email Verified”. But we still need to be able to send the email notification to the email of the user trying to register via api , for that let’s make a controller to handle the api registration request by the user. Let’s call it UsersApiController , run the following command to make the controller

    php artisan make:controller UsersApiController

    and paste in the following code in it

    <?php
    
    namespace App\Http\Controllers;
    
    use Illuminate\Http\Request;
    use App\User;
    use Illuminate\Support\Facades\Hash;
    use Auth;
    use Validator;
    use Illuminate\Foundation\Auth\VerifiesEmails;
    use Illuminate\Auth\Events\Verified;
    
    class UsersApiController extends Controller
    {
        use VerifiesEmails;
    
        public $successStatus = 200;
    
        /**
        * login api
        *
        * @return \Illuminate\Http\Response
        */
        public function login()
        {
            if (Auth::attempt([‘email’ => request(‘email’), ‘password’ => request(‘password’)])) {
                $user = Auth::user();
                    if ($user->email_verified_at !== NULL) {
                        $success[‘message’] = “Login successfull”;
                        return response()->json([‘success’ => $success], $this-> successStatus);
                    } else {
                        return response()->json([‘error’=>’Please Verify Email’], 401);
                    }
                } else {
                return response()->json([‘error’=>’Unauthorised’], 401);
            }
        }
    
        /**
        * Register api
        *
        * @return \Illuminate\Http\Response
        */
        public function register(Request $request)
        {
            $validator = Validator::make($request->all(), [
                ‘name’ => ‘required’,
                ‘email’ => ‘required|email’,
                ‘password’ => ‘required’,
                ‘c_password’ => ‘required|same:password’,
            ]);
    
            if ($validator->fails()) {
                return response()->json([‘error’=>$validator->errors()], 401);
            }
    
            $input = $request->all();
            $input[‘password’] = Hash::make($input[‘password’]);
            $user = User::create($input);
            $user->sendApiEmailVerificationNotification();
            $success[‘message’] = ‘Please confirm yourself by clicking on verify user button sent to you on your email’;
            return response()->json([‘success’=>$success], $this-> successStatus);
        }
    
        /**
        * details api
        *
        * @return \Illuminate\Http\Response
        */
        public function details()
        {
            $user = Auth::user();
            return response()->json([‘success’ => $user], $this-> successStatus);
        }
    }

    Now all we need to do is add the routes to tie up with the methods in our controller as following , again make sure to add this in your api routes

    Route::post(‘login’, ‘UsersApiController@login’);
    
    Route::post(‘register’, ‘UsersApiController@register’);
    
    Route::group([‘middleware’ => ‘auth:api’], function() {
        Route::post(‘details’, ‘UsersApiController@details’)->middleware(‘verified’);
    }); // will work only when user has verified the email

    Congratulations now you can recieve the email via Api registration , you can test the result in Postman by simply sending a POST Request to
    yourUrl/api/register — to register and you should get an email and you can simply click on the link at the email that you have recieved you will get a response as “Email verified” and user is now verified.

    Hope this article helps you in solving your API email verification in laravel . Please feel free to reach me out for any queries or doubt.

  • Laravel: Adding those missing helpers you always wanted

    One of the things I like from any PHP project is having global helpers. You know, those functions you can call anywhere and remove or save you many lines or verbosity into one, maybe two, while allocating in one place any logic.

    $expected = from($this)->do('foo');

    The problem with Laravel itself is that sometimes is not enough with the helpers it includes. The ones included are mostly quick access to Services (like cache()) or Factories (like response()), and some that help you having an expected result (like data_get).

    For example, let’s say we want a function be called multiple times but sleep between executions, like we would need to avoid rate limiting for an external API. Without a helper, we will have to resort to create a Class and put the logic inside a public static method, and hopefully remember where it is located.

    class Logics
    {
    public static function logic_sleep($times, $sleep, $callback)
    {
    // Run and sleep between calls.
    }
    }Logics::sleep(4, 10, function() {
    // ...
    });

    Using this technique makes your global not so globally. Since this is one of many thing I need in my projects, I decided to create a package with more global helpers:

    Larahelp

    Those helpers you always wanted

    The main idea of a global helper, at least to me, is to have a piece of code that offers simplicityreadability and flexibility. Think about them as small swiss knives that you may put in your pocket.

    For example, the above can become its own global function, and we can call it literally anywhere.

    public function handle()
    {
    logic_sleep(10, 5, function () {
    $this->uploadRecords();
    });
    }

    The helper is very simple to operate, but we won’t know what the hell it does behind the scenes unless we dig into the source code, which is fair. In any case, having a global function of one or two words makes the whole code more readable. And since it’s our own helper, we can call it anything we want.

    How to add your own helpers

    But that’s is only one of the many helpers I decided to create for things I use a lot.

    To add global helpers to your project, you can simply add a PHP file with the global functions you want anywhere in your project (preferably inside your PSR-4 root folder) and tell Composer to load it.

    You are free to add how many files you want. I decided to separate them into categories like I did for my package to avoid having a wall of text full of functions.

    "autoload": {
    "psr-4": {
    "App\\": "app"
    },
    "files": [
    "app/Helpers/datetime.php",
    "app/Helpers/filesystem.php",
    "app/Helpers/http.php",
    "app/Helpers/objects.php",
    "app/Helpers/services.php"
    ]
    },

    I’m opened to suggestions too, so give it a go if you think it may be useful for you:

    DarkGhostHunter/Larahelp

    Supercharge your Laravel projects with more than 35 useful global helpers.

    github.com

  • Laravel localization and multi-language functionality in web

    Laravel localization and multi-language functionality in web

    MAKE USE OF LARAVEL FEATURES AND BEST PACKAGES FOR LOCALIZATION

    Laravel localization and multi-language functionality in web

    A step by step guide to implement multi-language functionality in your web projects

    Laravel made it so easy to implement a multi-language website. You can implement it with Laravel localization and just some tricks. Also, there is plenty of Laravel translation packages which you can use in your project. In this post, I will explain how to implement multi-language functionality.

    Creating a multi-language website requires two steps. Firstly, you need to detect user local language setting and change it bu user choice. Secondly, you need to translate messages and strings into user local language, in which we use Laravel localization.

    DETECTING AND SETTING USER LOCALE

    In order to detect user language setting, we need to create a language middleware. this middleware checks for locale setting in the user session. If there was no locale setting, the middleware sets a default locale setting. Then, it sets system locale by the user session setting.

    if (is_null(session('locale'))) {
        session(['locale'=> "en"]);
    }
    app()->setLocale(session('locale'));

    Setting locale is enough for Laravel localization to work. After that, we need a simple function To change the system language. This function gets a locale string and sets the user locale session.

    public function change_lang($lang) {
        if (in_array($lang,['en','tr','fa'])) {
            session(['locale'=> $lang]);
        }
        return back();
    }

    In order to make sure the given string is a locale string, we check the language string against an array of locales.

    Any route to that function, like a drop down to select language will work perfectly and will show your website multi-language functionality for users. So they can easily choose their languages.

    Using Laravel localization to translate strings

    Every string that needed to be translated must be in Laravel lang directive or __ function. For example, you can manage all message strings with inside messages.

    @lang('messages.successful_login')

    In addition, you can find more useful information about localization like how to put variables inside translation strings in Laravel documentation.

    Laravel Langman package is one of the useful packages for translation. In order to translate strings, every time you updated views with new strings, you just need to run Langman sync command:
    php artisan langman:sync

    Laravel Langman has a lot more commands that would help you in your Laravel project localization. Reading through its documentation will add a lot.

    Although this method is easy and enough, I realized that for SEO purposes and to share localized links to your website, you better consider concatenating user locale in your projects routes. Then, you can check user locale from the query string and the rest is just as same as I explained in this post.

    Keep in touch and share your ideas about Laravel localization and how you implement multi-language functionality in your web projects. What other methods and Laravel packages do you use in your multi-language projects?

    Also, you can read my other post about Laravel authorization and user’s permission management in Laravel.

    If you find this multi-language functionality method useful in Laravel and you may want to implement this on your Laravel projects, share your ideas with me. Follow me on Twitter, Let’s connect on LinkedIn and give me a visit to amiryousefi.com

  • Laravel authorization and roles permission management

    EASY AND FLEXIBLE USERS PERMISSIONS MANAGEMENT

    Laravel authorization and roles permission management

    a simple guide for a flexible authentication and authorization

    Inmany web projects, we have different user roles interacting with the system. Each role has its own permission. Every feature of the system can be enabled or disabled for these roles. We can define users permissions in our codes and check if they are authorized to do the requested action or not. A better way, mostly in more flexible systems, is to create a role and authorization management system. I’ll explain how to implement a Laravel authorization system and define users permission based on their roles.

    In this post, firstly we manage users in groups we called roles. Every role has different permissions. In order to avoid permissions conflict, we assume each user has only one role. Secondly, Laravel authorization implemented by middleware. This middleware checks for the user’s role permission and authorizes user requests.

    CREATING ROLES AND PERMISSIONS

    In order to implement Laravel authorization, we will create roles and permissions table. To assign a role for users, we create a roles table. The migration for roles table is as simple as this:

    Schema::create(‘roles’, function (Blueprint $table) {
        $table->increments(‘id’);
        $table->string(‘name’);
        $table->string(‘description’)->nullable();
        $table->timestamps();
    });

    We have an ID and name for roles. All users will be managed in these roles. There is also a description field, because you may need a short note on roles to describe each role for yourself.

    After that, we add a foreign key, role_id, in the user table. Adding this field to the default user model helps us for Laravel authorization.

    $table->unsignedInteger(‘role_id’)->index();
    $table->foreign(‘role_id’)->references(‘id’)->on(‘roles’);

    Now let’s talk about the permissions table. Every request leads to a method of a controller. So we store a list of all methods and their controller’s name in the permissions table. Later, we explain how we gather this list and how we check users authorization in Laravel by this permissions table.

    Schema::create(‘permissions’, function (Blueprint $table) {
        $table->increments(‘id’);
        $table->string(‘name’)->nullable();
        $table->string(‘key’)->nullable();
        $table->string(‘controller’);
        $table->string(‘method’);
        $table->timestamps();
    });

    Finally, a relationship created between roles and permission.

    Schema::create(‘permission_role’, function (Blueprint $table) {
        $table->unsignedInteger(‘permission_id’);
        $table->unsignedInteger(‘role_id’);$table->foreign(‘permission_id’)
            ->references(‘id’)
            ->on(‘permissions’)
            ->onDelete(‘cascade’);$table->foreign(‘role_id’)
            ->references(‘id’)
            ->on(‘roles’)
            ->onDelete(‘cascade’);$table->primary([‘permission_id’, ‘role_id’]);
    });

    We created a complete users->roles->permissions architecture. After that, an access list will be stored in these tables. So, we can easily implement Laravel authorization by checking requests against this list.

    Read Laravel migration documentation for further information about creating tables.

    CREATING AN ACCESS LIST FOR USER PERMISSIONS

    The whole purpose of this post is about being dynamic. Especially, in systems with a different type of roles. We need to create a list of permissions in the system. Also, this list must be updated as the system developed. List of controllers and methods is a good representation of all permissions in the system. Every route is leading to a method of a controller. So, it’s a good idea to make a list of permissions using the routes list.

    In order to do that, I used a Laravel database seeder. Firstly, let’s write a role seeder. It creates basic roles we need and stores them in the roles table. Running this artisan command will create RolesSeeder for you:

    php artisan make:seeder RolesTableSeeder

    Inside this RolesTableSeeder, we create our basic roles:

    DB::table(‘roles’)->insert([
        [‘name’ => ‘admin’],
        [‘name’ => ‘operator’],
        [‘name’ => ‘customer’],
    ]);

    You can add as many roles as you need. Also, you can create new roles from your website whenever you need a new one.

    The second step is to create an authorization list for each role. we create another Laravel seeder in which populate permissions table:

    php artisan make:seeder PermissionTableSeeder

    Firstly, we get all routes list. Then, We check up with the database if the permission already stored. After that, if this permission is not in the table already, we insert new permissions in the permissions table. After all, we attach all permissions to the admin role.

    $permission_ids = []; // an empty array of stored permission IDs
    // iterate though all routes
    foreach (Route::getRoutes()->getRoutes() as $key => $route) {
        // get route action
        $action = $route->getActionname(); // separating controller and method
        $_action = explode(‘@’, $action);
    
        $controller = $_action[0];
        $method = end($_action);
    
        // check if this permission is already exists
        $permission_check = Permission::where(
            [‘controller’ => $controller, ’method’ => $method]
        )->first();
        if (!$permission_check) {
            $permission = new Permission;
            $permission->controller = $controller;
            $permission->method = $method;
            $permission->save();
    
            // add stored permission id in array
            $permission_ids[] = $permission->id;
        }
    } // find admin role.
    $admin_role = Role::where(‘name’, ’admin’)->first(); // atache all permissions to admin role
    $admin_role->permissions()->attach($permission_ids);

    LARAVEL AUTHORIZATION USING MIDDLEWARE

    Every request in Laravel goes through middleware. Knowing that creating RolesAuth middleware will do Laravel authorization. You can create the middleware manually or by an artisan command:

    php artisan make:middleware RolesAuth

    Inside this middleware, we get all permissions for logged in user. Then, we check if the requested action is in the permissions list. If requested action can’t be found in permissions list, a 403 error response returns.

    // get user role permissions
    $role = Role::findOrFail(auth()->user()->role_id);
    $permissions = $role->permissions; // get requested action
    $actionName = class_basename($request->route()->getActionname()); // check if requested action is in permissions list
    foreach ($permissions as $permission) {
        $_namespaces_chunks = explode(‘\’, $permission->controller);
        $controller = end($_namespaces_chunks);
        if ($actionName == $controller . ‘@’ . $permission->method) {
            // authorized request
            return $next($request);
        }
    } // none authorized request
    return response(‘Unauthorized Action’, 403);

    Finally, you can register this middleware in Laravel and use it according to your requirements.

    I started publishing my experience about Laravel development, here you can see my post about Laravel localization. Comment your questions about this post or any other Laravel development questions in this area.

    Update 2020:
    Now you can use my Laravel permission package build based this article. It just got better, cleaner, and easier to understand.
    https://github.com/amiryousefi/laravel-permission

  • Create an Admin middleware for Laravel with spatie/laravel-permission

    Although there are many articles about this topic, I decided to document this in a post for my future self and to share with all of you the approach I usually use to separate an application depending on specific roles.

    Middleware provide a convenient mechanism for filtering HTTP requests entering your application. For example, Laravel includes a middleware that verifies the user of your application is authenticated. If the user is not authenticated, the middleware will redirect the user to the login screen. However, if the user is authenticated, the middleware will allow the request to proceed further into the application.

    Additional middleware can be written to perform a variety of tasks besides authentication. A CORS middleware might be responsible for adding the proper headers to all responses leaving your application. A logging middleware might log all incoming requests to your application.

    There are several middleware included in the Laravel framework, including middleware for authentication and CSRF protection. All of these middleware are located in the app/Http/Middleware directory.


    Creating a custom Admin middleware in Laravel

    Spatie/laravel-permission is great package developed by Spatie team that allows you to manage user permissions and roles in a database.

    For this example we are going to install the package and create a custom middleware to group our administration routes into a new single route file under the same access control logic for all admin routes.

    I will simplify the example in this post to use only two roles: Admin and User (without assigning specific permissions).

    Setup of spatie/laravel-permission package

    First of all, you must fill your .env file with a new database configuration.

    This package can be used in Laravel 5.4 or higher. If you are using an older version of Laravel, take a look at the v1 branch of this package.

    You can install the package via composer:

    composer require spatie/laravel-permission

    The service provider will automatically get registered. Or you may manually add the service provider in your config/app.php file:

    'providers' => [
        // ...
        Spatie\Permission\PermissionServiceProvider::class,
    ];

    You can publish the migration with:

    php artisan vendor:publish --provider="Spatie\Permission\PermissionServiceProvider" --tag="migrations"

    After the migration has been published you can create the role- and permission-tables by running the migrations:

    php artisan migrate

    Optionally you can publish the config file with:

    php artisan vendor:publish --provider="Spatie\Permission\PermissionServiceProvider" --tag="config"

    add the Spatie\Permission\Traits\HasRoles trait to your User model(s):

    use Illuminate\Foundation\Auth\User as Authenticatable;
    use Spatie\Permission\Traits\HasRoles;

    Using Laravel Authentication system

    Make sure of the Laravel authentication feature is present, if not, you can setup this with the artisan command:

    php artisan make:auth

    Creating some Users

    Now add some users to your application, optionally you can use a Seeder to achieve this. For example, create a new RolesAndPermissionsSeeder by running:

    php artisan make:seeder RolesAndPermissionsSeeder

    Now paste the following code into the new seeder

    public function run()
    {
        // Reset cached roles and permissions
        app()['cache']->forget('spatie.permission.cache');
    
    
        Role::create(['name' => 'user']);

    Don’t forget to import the Role class with use Spatie\Permission\Models\Role. Now we have two different users with different roles.

    Note: How we have relied on the UserFactory class, the default password for both is password (in Laravel 5.8, for earlier versions the default password is secret)

    You can now seed your database with this command

    php artisan db:seed --class=RolesAndPermissionsSeeder

    Creating the new middleware with the custom route file

    We are ready to create a new middleware to separate admin routes of user routes. It should be noted that an administrator can access the routes of a normal user, but not in an inverse way.

    Step 0: Add a test

    To achieve this quickly, I will rely on the use of automated tests using the integrated phpunit on Laravel:

    php artisan make:test RolesAccessTest

    And add the following tests:

    <?php
    
    namespace Tests\Feature;
    
    use App\User;
    use Tests\TestCase;
    
    class RolesAccessTest extends TestCase
    {
        /** @test */
        public function user_must_login_to_access_to_admin_dashboard()
        {
            $this->get(route('admin.dashboard'))
                 ->assertRedirect('login');
        }
    
        /** @test */
        public function admin_can_access_to_admin_dashboard()
        {
            //Having
            $adminUser = factory(User::class)->create();
    
            $adminUser->assignRole('admin');
    
            $this->actingAs($adminUser);
    
            //When
            $response = $this->get(route('admin.dashboard'));
    
            //Then
            $response->assertOk();
        }
    
        /** @test */
        public function users_cannot_access_to_admin_dashboard()
        {
            //Having
            $user = factory(User::class)->create();
    
            $user->assignRole('user');
    
            $this->actingAs($user);
    
            //When
            $response = $this->get(route('admin.dashboard'));
    
            //Then
            $response->assertForbidden();
        }
    
        /** @test */
        public function user_can_access_to_home()
        {
            //Having
            $user = factory(User::class)->create();
    
            $user->assignRole('user');
    
            $this->actingAs($user);
    
            //When
            $response = $this->get(route('home'));
    
            //Then
            $response->assertOk();
        }
    
        /** @test */
        public function admin_can_access_to_home()
        {
            //Having
            $adminUser = factory(User::class)->create();
    
            $adminUser->assignRole('admin');
    
            $this->actingAs($adminUser);
    
            //When
            $response = $this->get(route('home'));
    
            //Then
            $response->assertOk();
        }
    }

    Obviously these assertions could be improved by adding others to check views and / or content that should be shown in those sections, but for the purposes of this post, these tests are sufficient.

    If you run this test now, you will get the following errors:

    ./vendor/bin/phpunit --filter RolesAccessTest
    PHPUnit 7.4.3 by Sebastian Bergmann and contributors.

    Let’s start writing the code so that this test passes:

    Create a new temporary route into the routes/web.php file, your file will look like this:

    Route::get('/', function () {
        return view('welcome');
    });
    
    Auth::routes();
    
    Route::get('/home', 'HomeController@index')->name('home');
    
    Route::get('/admin/dashboard', function(){
        return 'Wellcome Admin!';
    })->name('admin.dashboard');

    Now, re-run the test:

    ./vendor/bin/phpunit --filter RolesAccessTest
    PHPUnit 7.4.3 by Sebastian Bergmann and contributors.

    At this point, we have 2 failures only, the admin route is a public route and is not restricted to the Admin role only, let’s fix it in a few steps.

    Step 1: Create a map for the new Admin routes

    Go to the app\Providers\RouteServiceProvider. In the map method add a new function for map the Admin routes:

    public function map()
    {
        $this->mapApiRoutes();
    
        $this->mapWebRoutes();
    
        $this->mapAdminRoutes();
    
        //
    }

    and now implement the new mapAdminRoutes method inside the provider:

    protected function mapAdminRoutes()
    {
        Route::middleware('admin')
             ->namespace($this->namespace)
             ->group(base_path('routes/admin.php'));
    }

    Note: optionally, I recommend separating also the namespace of the controllers that will be used by the admin routesand that in addition the users must have the admin role

    ->namespace($this->namespace . '\\Admin')

    Step 2: Create new admin.php file into routes folder

    Add a new file into routes filder called admin.php and move the route for admins inside of this new file:

    <?php

    Step 3: Create the Admin middleware

    Open the app\Http\Kernel class and find the $routeMiddleware attribute and add two new middleware that belong to spatie/laravel-permission package :

    protected $routeMiddleware = [
        ...
        'role' => \Spatie\Permission\Middlewares\RoleMiddleware::class,
        'permission' => \Spatie\Permission\Middlewares\PermissionMiddleware::class,
    ];

    And in the $middlewareGroups attribute add this new admin middleware group:

    protected $middlewareGroups = [
        'web' => [
            ....
        ],
    
        'admin' => [
            'web',
            'auth',
            'role:admin'
        ],
    
        'api' => [
            ...
        ],
    ];

    This group specifies that the middleware will make use of the web and auth middlewares, and that in addition the users must have the admin role. This middleware group was indicated into mapAdminRoutesmethod into our RouteServiceProvider.

    Final Step:

    Now you can re-run the tests and check the results

    ./vendor/bin/phpunit — filter RolesAccessTest
    PHPUnit 7.4.3 by Sebastian Bergmann and contributors.

    Now we have the new middleware working correctly to restrict access to administration routes only to the corresponding users. You can also perform a manual check with the created users in the Seeder

    Admin user successfully logged in into the admin routes

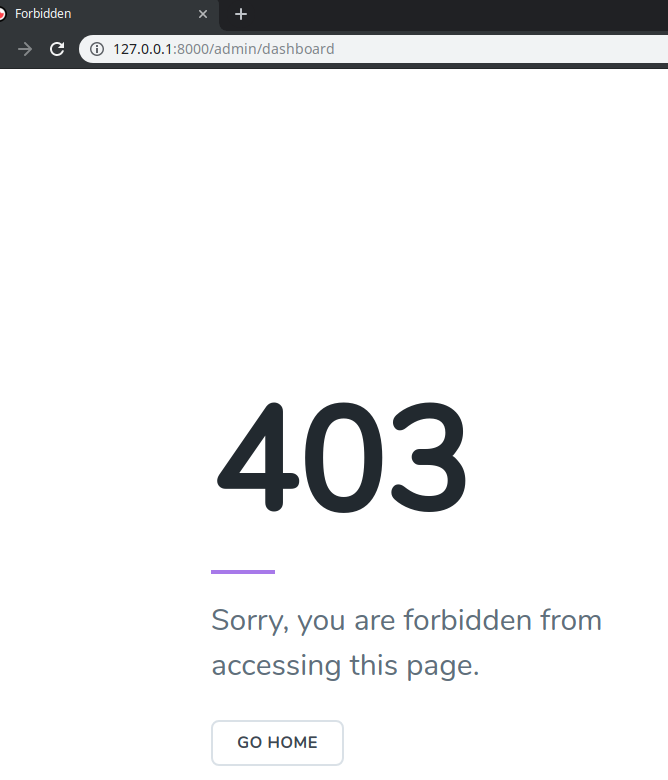
    And if you try to enter in the admin routes with the normal user you will get an Forbidden response:

    Normal user cannot enter to admin routes

    In Closing

    With this approach you will get a clear separation for the Admin routes and the normal User routes. We only needed to:

    • Install and configure spatie/laravel-permission
    • Create and assign desired Roles to Users
    • Create a new admin middleware group in the app\Http\Kernel class
    • Create a new mapAdminRoutes into the RouteServiceProvider to map a new routes/admin.php file and assign it to the new admin middleware group

    And some advantages of this approach are the separations of concerns for different app components:

    • Separated routes files
    • Separated Controllers with a custom namespace

    And also you can use this approach to separate resources files as assets or layouts and view files.

    As we have guided our development by the use of automated tests (TDD), we have not needed to manually test with each user of our application during the development, which is also another great advantage.

    Informatics Engineer | Musician

  • Testing Laravel Password Resets

    Testing is an important yet often overlooked aspect of building successful Laravel applications. This article will provide an introduction to testing applications written using the Laravel Framework.

    For our purposes we’ll be writing feature tests that make HTTP requests to our application and then make assertions about the responses and the state of the application’s database after the request is complete. We will make minimal changes to the authentication scaffolding provided by Laravel and focus on testing the Password Reset feature.

    Getting Started

    Assuming you are familiar with setting up a new Laravel project, use your terminal and the Laravel installer to create a new project.

    If you aren’t familiar with setting up a development environment for a new Laravel application I encourage you to check out the documentation on installation and the Vagrant box Homestead.

    Create a new Laravel application in the directory password-reset-testing.

    $ laravel new password-reset-testing

    Once composer has finished installing everything, change your working directory to that of the new project.

    $ cd password-reset-testing/

    Next use Artisan to generate the authentication scaffolding for our application.

    $ php artisan make:auth

    Again using Artisan, run the database migrations to create the users and password_resets tables.

    $ php artisan migrate

    Naming Each Route

    As a best practice, each of our application’s routes should have a name. By using route names and the route helper function instead of hard-coding routes, the URI of a route can be easily changed in the future.

    Open up routes/web.php and change the contents to match below.

    <?php

    // Welcome Route
    Route::get('/', function () {
    return view('welcome');
    })->name('welcome');

    // Authentication Routes
    Route::get('login', 'Auth\LoginController@showLoginForm')
    ->name('login');

    Route::post('login', 'Auth\LoginController@login')
    ->name('login.submit');

    Route::post('logout', 'Auth\LoginController@logout')
    ->name('logout');

    // Registration Routes
    Route::get('register',
    'Auth\RegisterController@showRegistrationForm')
    ->name('register');

    Route::post('register',
    'Auth\RegisterController@register')
    ->name('register.submit');

    // Password Reset Routes
    Route::get('password/reset',
    'Auth\ForgotPasswordController@showLinkRequestForm')
    ->name('password.request');

    Route::post('password/email',
    'Auth\ForgotPasswordController@sendResetLinkEmail')
    ->name('password.email');

    Route::get('password/reset/{token}',
    'Auth\ResetPasswordController@showResetForm')
    ->name('password.reset');

    Route::post('password/reset',
    'Auth\ResetPasswordController@reset')
    ->name('password.reset.submit');

    // Home Route
    Route::get('/home', 'HomeController@index')
    ->name('home');

    Note that we didn’t change any of the routes provided by the original Auth::routes() statement, we simply rewrote them to include names for every route.

    Editing the Base Test Case

    Before we write our tests, let’s quickly edit the base test case. Open up the file at tests/TestCase.php and edit the contents to match below.

    <?php

    namespace
    Tests;

    use Illuminate\Foundation\Testing\DatabaseTransactions;
    use Notification;
    use Illuminate\Foundation\Testing\TestCase as BaseTestCase;

    abstract class TestCase extends BaseTestCase
    {
    use CreatesApplication;
    use DatabaseTransactions;

    /**
    * Set up the test case.
    */
    protected function setUp()
    {
    parent::setUp();

    Notification::fake();
    }
    }

    First we import the Illuminate\Foundation\Testing\DatabaseTransactions trait and the Notification facade.

    The statement use DatabaseTransactions at the top of the class tells Laravel to create a database transaction before each test and roll back the transaction after each test. This will keep our tests from affecting the state of our database; the database will be in the same starting state for each test.

    We override the setUp method which is called before running each test. In this method we first call the parent setUp method then call fake on the Notification facade. This will fake all notifications sent out during any of our tests. Within each test we can then use another method on the Notification facade to assert a notification would have been sent to the correct destination.

    Creating the Test Class

    Use artisan to generate a new feature test called PasswordResetTest.

    $ php artisan make:test PasswordResetTest

    Open the new file at tests/Feature/PasswordResetTest.php and edit the contents to match below.

    <?php

    namespace
    Tests\Feature;

    use App\User;
    use Hash;
    use Illuminate\Auth\Notifications\ResetPassword;
    use Illuminate\Foundation\Testing\WithFaker;
    use Notification;
    use Password;
    use Tests\TestCase;

    class PasswordResetTest extends TestCase
    {
    use WithFaker;

    const ROUTE_PASSWORD_EMAIL = 'password.email';
    const ROUTE_PASSWORD_REQUEST = 'password.request';
    const ROUTE_PASSWORD_RESET = 'password.reset';
    const ROUTE_PASSWORD_RESET_SUBMIT = 'password.reset.submit';

    const USER_ORIGINAL_PASSWORD = 'secret';
    }

    Here we’ve added import statements for the model App\User, the facades HashNotification, and Password, and the notification Illuminate\Auth\Notifications\ResetPassword. We’ve also added an import statement for the trait Illuminate\Foundation\Testing\WithFaker which conveniently instantiates a Faker factory for us for use within our tests. We simply specify our class is using the WithFaker trait and each test case will have an instance of a Faker factory at $this->faker.

    Within our class we replaced the example test case with a statement specifying we’re using the WithFaker trait, constants for each route name we’ll be using, and a constant for the password test users will have.

    Writing Test Cases

    We will write tests for the following cases:

    • Showing the password reset request page
    • Submitting the password reset request page with an invalid email address
    • Submitting the password reset request page with an email address not in use
    • Submitting the password reset request page with a valid email address in use
    • Showing the reset password page
    • Submitting the reset password page with an invalid email address
    • Submitting the reset password page with an email address not in use
    • Submitting the reset password page with a valid email address in use and a password that does not match the password confirmation
    • Submitting the reset password page with a valid email address in use and a password that isn’t long enough
    • Submitting the reset password page with a valid email address in use and a valid password matching the password confirmation

    After each new test, feel free to run PHPUnit using your terminal.

    $ ./vendor/bin/phpunit

    Testing Showing the Password Reset Request Page

    Now it’s time to write our first test! Edit the PasswordResetTest class by adding the method below. By convention each test case method starts with test which is then recognized by PHPUnit.

    /**
    * Testing showing the password reset request page.
    */
    public function testShowPasswordResetRequestPage()
    {
    $this
    ->get(route(self::ROUTE_PASSWORD_REQUEST))
    ->assertSuccessful()
    ->assertSee('Reset Password')
    ->assertSee('E-Mail Address')
    ->assertSee('Send Password Reset Link');
    }

    In this test case we use the method get to make a GET request to the specified URI. We generate the URI using the route helper method and the name of our route, which is stored in a constant. The assertSuccessful method asserts the response has a 200 level status code. Next we use the assertSee method to check for the presence of the text Reset PasswordE-Mail Address, and Send Password Reset Link.

    Testing Submitting the Password Reset Request Page

    Our next few tests will be testing submitting the password reset request page with various inputs.

    Add the next test shown below which tests submitting a password reset request with an invalid email address.

    /**
    * Testing submitting the password reset request with an invalid
    * email address.
    */
    public function testSubmitPasswordResetRequestInvalidEmail()
    {
    $this
    ->followingRedirects()
    ->from(route(self::ROUTE_PASSWORD_REQUEST))
    ->post(route(self::ROUTE_PASSWORD_EMAIL), [
    'email' => str_random(),
    ])
    ->assertSuccessful()
    ->assertSee(__('validation.email', [
    'attribute' => 'email',
    ]));
    }

    When a request fails validation, Laravel will return a redirect to the location the request came from with validation error messages flashed to the session. To make assertions on the response the user will see, therefore, we need to follow redirects with the followingRedirects method. We also specify a location we’re making the request from using the from method.

    Next we use the post method to issue a POST request to the password.email route (again using the route helper and a previously defined constant) with data specifying the email key as a random string (using the str_random helper method).

    We assert the response is successful and check for the presence of a validation message. The __ helper method is used to format the validation message using localization filesvalidation.email specifies the file resources/lang/{locale}/validation.php and the email array key, where {locale} is the application’s configured locale. The :attribute parameter in the string The :attribute must be a valid email address. will be replaced by the string email as specified by the associative array passed as the second argument to the __ method.


    Next we’ll be testing submitting the password reset request page with a valid email address that is not in use by any user of the application.

    Add the test shown below.

    /**
    * Testing submitting the password reset request with an email
    * address not in the database.
    */
    public function testSubmitPasswordResetRequestEmailNotFound()
    {
    $this
    ->followingRedirects()
    ->from(route(self::ROUTE_PASSWORD_REQUEST))
    ->post(route(self::ROUTE_PASSWORD_EMAIL), [
    'email' => $this->faker->unique()->safeEmail,
    ])
    ->assertSuccessful()
    ->assertSee(e(__('passwords.user')));
    }

    Again we follow redirects and set the location where our request should originate from, but this time we use Faker to generate an email address that is not in use by anyone in the world (as the domains are example.comexample.net, and example.org). We use the unique method to ensure the email address returned has not been previously returned by Faker.

    We assert the response is successful and check for the presence of the validation error message specified by the user key in the associative array in the file resources/lang/{locale}/passwords.php. This time the validation message contains a reserved HTML character, ', so we must use the e helper method to replace the character with it’s corresponding character entity.


    Finally it’s time to test successfully submitting the password reset request page with a valid email address present in our application’s database.

    Add the test shown below.

    /**
    * Testing submitting a password reset request.
    */
    public function testSubmitPasswordResetRequest()
    {
    $user = factory(User::class)->create();

    $this
    ->followingRedirects()
    ->from(route(self::ROUTE_PASSWORD_REQUEST))
    ->post(route(self::ROUTE_PASSWORD_EMAIL), [
    'email' => $user->email,
    ])
    ->assertSuccessful()
    ->assertSee(__('passwords.sent'));

    Notification::assertSentTo($user, ResetPassword::class);
    }

    In this test we use the factory helper method to create a new user in our database. Then we follow redirects for the response to our POST request to the password.email route. Our request specifies the created user’s email address in the email key of the payload. We assert the response is successful and check for the presence of the string We have e-mailed your password reset link!, specified with the argument passwords.sent passed to the __ helper method.

    Using the Notification facade’s method assertSentTo we assert the ResetPassword notification was sent to the $user. We can pass the model stored in the variable $user directly into the assertSentTo method because our User model, by default, uses the Illuminate\Notifications\Notifiable trait. When routing emails for any model using the Notifiable trait, the email property on the model will be used by default.

    Testing Showing the Password Reset Page

    Next, to test showing the password reset page, add the test shown below.

    /**
    * Testing showing the reset password page.
    */
    public function testShowPasswordResetPage()
    {
    $user = factory(User::class)->create();

    $token = Password::broker()->createToken($user);

    $this
    ->get(route(self::ROUTE_PASSWORD_RESET, [
    'token' => $token,
    ]))
    ->assertSuccessful()
    ->assertSee('Reset Password')
    ->assertSee('E-Mail Address')
    ->assertSee('Password')
    ->assertSee('Confirm Password');
    }

    We again create a user using the factory helper method. Next we create a valid password reset token using the Password facade.

    The value of $token is used to replace the token parameter in the password.reset route. We send a GET request to this route, assert the response is successful, and check for the presence of the text for page elements.

    Testing Submitting the Password Rest Page

    Next we’ll test submitting the password reset page, starting with using an invalid email address.

    Continue our testing by adding the test shown below.

    /**
    * Testing submitting the password reset page with an invalid
    * email address.
    */
    public function testSubmitPasswordResetInvalidEmail()
    {
    $user = factory(User::class)->create([
    'password' => bcrypt(self::USER_ORIGINAL_PASSWORD),
    ]);

    $token = Password::broker()->createToken($user);

    $password = str_random();

    $this
    ->followingRedirects()
    ->from(route(self::ROUTE_PASSWORD_RESET, [
    'token' => $token,
    ]))
    ->post(route(self::ROUTE_PASSWORD_RESET_SUBMIT), [
    'token' => $token,
    'email' => str_random(),
    'password' => $password,
    'password_confirmation' => $password,
    ])
    ->assertSuccessful()
    ->assertSee(__('validation.email', [
    'attribute' => 'email',
    ]));

    $user->refresh();

    $this->assertFalse(Hash::check($password, $user->password));

    $this->assertTrue(Hash::check(self::USER_ORIGINAL_PASSWORD,
    $user->password));
    }

    In this test we’re again using the factory helper method to create at test user but this time we explicitly set the user’s password. To do this we use the bcrypt helper method to hash the value of our constant.

    We create another password reset token and generate a random string to use as the new password for our request’s payload. Again following redirects we POST to the password.reset.submit route with a request originating from the password.reset route. A random string is used for the email address in the request payload.

    After asserting the response was successful and checking for the validation.email validation message we refresh the user model and use the check method on the Hash facade to assert the user’s password has not changed.


    Next we’ll test submitting the password reset page with an email address not in use by our application’s database.

    Add the test shown below.

    /**
    * Testing submitting the password reset page with an email
    * address not in the database.
    */
    public function testSubmitPasswordResetEmailNotFound()
    {
    $user = factory(User::class)->create([
    'password' => bcrypt(self::USER_ORIGINAL_PASSWORD),
    ]);

    $token = Password::broker()->createToken($user);

    $password = str_random();

    $this
    ->followingRedirects()
    ->from(route(self::ROUTE_PASSWORD_RESET, [
    'token' => $token,
    ]))
    ->post(route(self::ROUTE_PASSWORD_RESET_SUBMIT), [
    'token' => $token,
    'email' => $this->faker->unique()->safeEmail,
    'password' => $password,
    'password_confirmation' => $password,
    ])
    ->assertSuccessful()
    ->assertSee(e(__('passwords.user')));

    $user->refresh();

    $this->assertFalse(Hash::check($password, $user->password));

    $this->assertTrue(Hash::check(self::USER_ORIGINAL_PASSWORD,
    $user->password));
    }

    Nothing new on this test. We create a user, password reset token, and new password. Then the follow redirects, POST to the password.reset.submit route from the password.reset route using the token, a random and unique safe email, and the new password. We assert the response is successful, check for the presence of the passwords.user translated string (after swapping any html character entities in the string), refresh the user, and assert the user’s password hasn’t changed.


    The next test will be testing submitting the password reset page with a password that doesn’t match the password confirmation.

    Add the test shown below.

    /**
    * Testing submitting the password reset page with a password
    * that doesn't match the password confirmation.
    */
    public function testSubmitPasswordResetPasswordMismatch()
    {
    $user = factory(User::class)->create([
    'password' => bcrypt(self::USER_ORIGINAL_PASSWORD),
    ]);

    $token = Password::broker()->createToken($user);

    $password = str_random();
    $password_confirmation = str_random();

    $this
    ->followingRedirects()
    ->from(route(self::ROUTE_PASSWORD_RESET, [
    'token' => $token,
    ]))
    ->post(route(self::ROUTE_PASSWORD_RESET_SUBMIT), [
    'token' => $token,
    'email' => $user->email,
    'password' => $password,
    'password_confirmation' => $password_confirmation,
    ])
    ->assertSuccessful()
    ->assertSee(__('validation.confirmed', [
    'attribute' => 'password',
    ]));

    $user->refresh();

    $this->assertFalse(Hash::check($password, $user->password));

    $this->assertTrue(Hash::check(self::USER_ORIGINAL_PASSWORD,
    $user->password));
    }

    Again nothing new on this test except we’re checking for a different validation message.


    Our last invalid submission case to test for submitting the password reset page is using a new password that’s too short.

    Add the test shown below.

    /**
    * Testing submitting the password reset page with a password
    * that is not long enough.
    */
    public function testSubmitPasswordResetPasswordTooShort()
    {
    $user = factory(User::class)->create([
    'password' => bcrypt(self::USER_ORIGINAL_PASSWORD),
    ]);

    $token = Password::broker()->createToken($user);

    $password = str_random(5);

    $this
    ->followingRedirects()
    ->from(route(self::ROUTE_PASSWORD_RESET, [
    'token' => $token,
    ]))
    ->post(route(self::ROUTE_PASSWORD_RESET_SUBMIT), [
    'token' => $token,
    'email' => $user->email,
    'password' => $password,
    'password_confirmation' => $password,
    ])
    ->assertSuccessful()
    ->assertSee(__('validation.min.string', [
    'attribute' => 'password',
    'min' => 6,
    ]));

    $user->refresh();

    $this->assertFalse(Hash::check($password, $user->password));

    $this->assertTrue(Hash::check(self::USER_ORIGINAL_PASSWORD,
    $user->password));
    }

    This time we pass an argument 5 to the str_random helper function to specify the length of the random returned string (as opposed to the default length of 16). Another difference in this test is we’re checking for the presence of a validation message, validation.min.string, with two parameters, attribute and min.

    Notice how we can use dot notation to specify a translation string in a nested array. To learn more about these validation messages and translation strings, check out the file at resources/lang/{locale}/validation.php.


    Finally, it’s time to test the happy path: submitting the password reset page with a valid email address belonging to a user with a valid password reset token and a password matching the confirmation password (that isn’t too short).

    Add the final test shown below.

    /**
    * Testing submitting the password reset page.
    */
    public function testSubmitPasswordReset()
    {
    $user = factory(User::class)->create([
    'password' => bcrypt(self::USER_ORIGINAL_PASSWORD),
    ]);

    $token = Password::broker()->createToken($user);

    $password = str_random();

    $this
    ->followingRedirects()
    ->from(route(self::ROUTE_PASSWORD_RESET, [
    'token' => $token,
    ]))
    ->post(route(self::ROUTE_PASSWORD_RESET_SUBMIT), [
    'token' => $token,
    'email' => $user->email,
    'password' => $password,
    'password_confirmation' => $password,
    ])
    ->assertSuccessful()
    ->assertSee(__('passwords.reset'));

    $user->refresh();

    $this->assertFalse(Hash::check(self::USER_ORIGINAL_PASSWORD,
    $user->password));

    $this->assertTrue(Hash::check($password, $user->password));
    }

    In this test we use the Hash facade to assert the user’s password has changed to the given password, thus successfully completing the password reset.

    Conclusion

    This concludes our testing for Laravel’s password resets. In ten short tests we were able to do things like create test users and valid password reset tokens, make HTTP requests to our application, assert the response contains desired content, and check if the user’s password has changed as a result of the request.

    Laravel has provided ample testing capabilities and I strongly recommend reading the documentation for a deeper look at the possibilities.

    You can view the source code for this project on GitHub.

  • Getting Started with Geospatial Data in Laravel

    Today we’ll be learning about working with geospatial data, or data relating to geographical locations, in Laravel 5.6. As an exercise for working with this kind of data we’ll be building a simple USA Neighborhood Finder application.

    screenshot of a successful result in our application

    There are three main learning objectives for this article:

    1. How to use Google’s Geocoding API to geocode an address into corresponding coordinates consisting of a longitude and latitude.
    2. How to import geospatial data in Well-Known Text (WKT) format into a spatial column in MySQL.
    3. How to determine if a point (in this case a longitude and latitude) is contained by a geometry (in this case a neighborhood boundary).

    Overview

    The flow of our application is as follows:

    1. A user enters an address and clicks “Submit”.
    2. The name of the neighborhood which contains the address is displayed to the user (or an error message stating no location or neighborhood could be found).

    For the purposes of this article we won’t be tracking down the neighborhood boundaries of every neighborhood in the USA; instead we’ll be using three example data sets but set things up so more data sources can easily be added in the future.

    You can take a look at the data sources using these links:

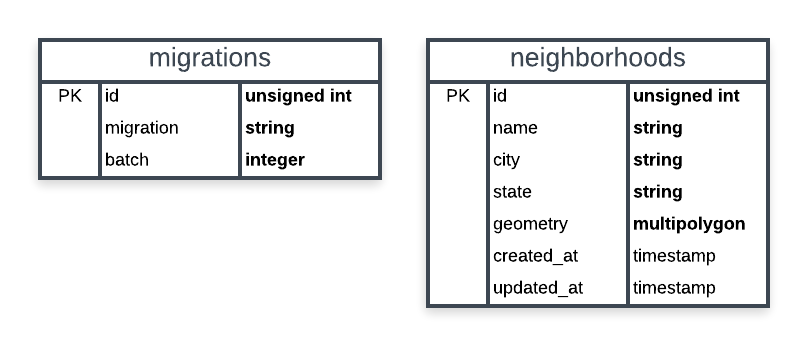
    A basic schema of our application’s database is shown below. We only need two tables: Laravel’s table for migrations and a table for storing neighborhoods. Our spatial column will be named geometry and be of the multipolygon type. Think of a multipolygon as a collection of polygons. We’re using a multipolygon because a neighborhood may have more than one polygon to define its boundary. If a neighborhood uses a polygon to define its boundary we can always create multipolygon containing a single polygon (which we’ll be doing later).

    schema of our application’s database

    In addition to the Laravel Framework, we’ll be using two more packages to build our application:

    We will also be using Bootstrap 4 for basic styling.

    Creating Our Application

    For this article it’s assumed you’re comfortable using a development environment for Laravel (such as Homestead).

    Generating the Project

    First, let’s create a new Laravel project using the terminal.

    $ laravel new neighborhood-finder

    Wait for the installation to finish and change directories to the root of the project.

    $ cd neighborhood-finder/

    Next let’s clean up some of the things Laravel comes with that we won’t be using for our application. This includes authentication controllers, the User model/migration/factory, and the password_resets table.

    • delete the app/Http/Controllers/Auth directory
    • delete app/User.php
    • delete database/factories/UserFactory.php
    • delete database/migrations/*_create_users_table.php
    • delete database/migrations/*_create_password_resets_table.php

    Now we’re ready to create the model and migration for a Neighborhood. Note how we’re creating the model in the App\Models namespace.

    $ php artisan make:model Models\\Neighborhood --migration

    For our application each Neighborhood will have an (auto-incrementing) id, a name, a city, a state(abbreviation), and a geometry representing the neighborhood’s boundary as a multipolygon.

    Open up the generated database/migrations/*_create_neighborhoods_table.php migration and edit the up method as shown below.

    /**
    * Run the migrations.
    *
    *
    @return void
    */
    public function up()
    {
    Schema::create('neighborhoods', function (Blueprint $table) {
    $table->increments('id');
    $table->string('name');
    $table->string('city');
    $table->string('state', 2);
    $table->multiPolygon('geometry');
    $table->timestamps();
    });
    }

    Installing the First Package

    Now let’s install our first package using composer: grimzy/laravel-mysql-spatial. This package will allow us to easily work with spatial data types.

    $ composer require "grimzy/laravel-mysql-spatial"

    Let composer install the package dependencies and regenerate autoload files.

    The Neighborhood Model

    Our Neighborhood model will be using the SpatialTrait found in the grimzy/laravel-mysql-spatial package. The package looks for any attributes defined in the $spatialFields array on a model using this trait.

    Edit app/Models/Neighborhood.php to match below. Notice how a spatial field is still eligible to be fillable through mass assignment.

    <?php

    namespace
    App\Models;

    use Grimzy\LaravelMysqlSpatial\Eloquent\SpatialTrait;
    use Illuminate\Database\Eloquent\Model;

    class Neighborhood extends Model
    {
    use SpatialTrait;

    /**
    * The attributes that are mass-assignable.
    *
    *
    @var array
    */
    protected $fillable = [
    'name',
    'geometry',
    ];

    /**
    * The attributes that are spatial fields.
    *
    *
    @var array
    */
    protected $spatialFields = [
    'geometry'
    ];
    }

    Gathering Test Data

    Many cities have data portals open to the public. To seed our database with neighborhoods including geospatial data for boundaries, our application will use Comma-separated values (CSV) files exported from three of these data portals.

    Create a directory at database/seeds/flat-files for a place to store the flat files.

    We want to ensure none of these flat files are checked into source control, so create a .gitignore file at database/seeds/flat-files/.gitignore containing the following:

    *
    !.gitignore

    The * entry is a wildcard telling git to ignore all files in the directory. The !.gitignore entry excludes the .gitignore file from the wildcard so it is still checked into source control.

    Download the following CSV files to each location specified below.

    • this CSV to database/seeds/flat-files/chicago-illinois.csv
    • this CSV to database/seeds/flat-files/baltimore-maryland.csv
    • this CSV to database/seeds/flat-files/east-baton-rouge-parish-louisiana.csv

    Let’s take a quick peek at what this data looks like. Open up database/seeds/flat-files/chicago-illinois.csv and notice the file contains a header row specifying the columns. The two columns we want are PRI_NEIGH (primary neighborhood) and the_geom (the geometry data).

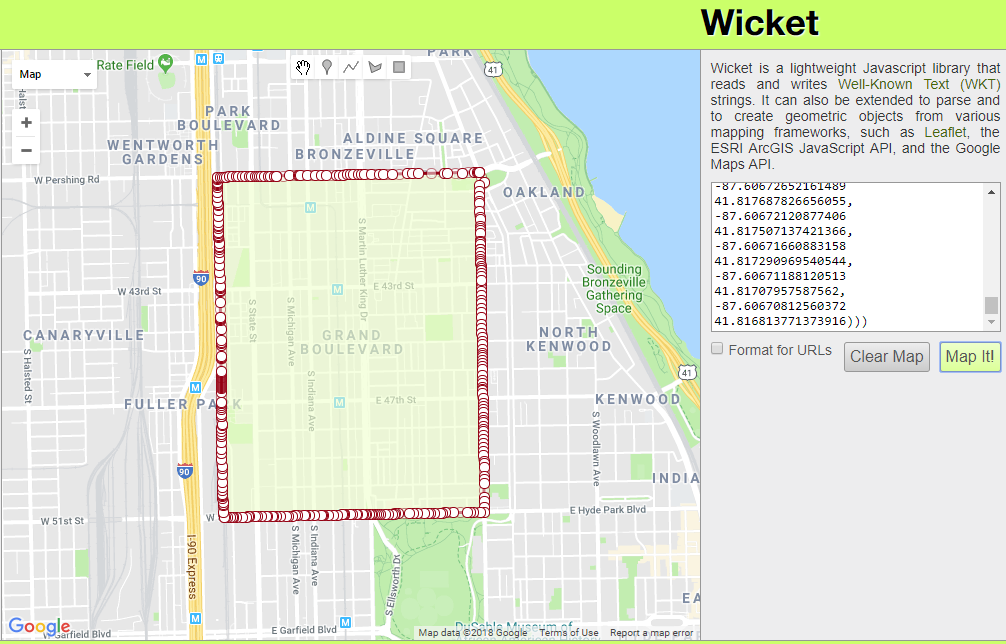
    From the first row of data in the file, copy the MULTIPOLYGON(((...))) part. This is the WKT representation of the neighborhood’s boundary.

    To visualize WKT data one of my favorite tools is Wicket by Arthur Endsley. Open up Wicket, paste the WKT data from your clipboard into the text box, and click “Map It!”. You’ll see the mapped multipolygon for Chicago’s neighborhood Grand Boulevard.

    Creating Seeders

    Now that we have our flat files and an understanding of what the data looks like let’s create some seeders.

    For this exercise we’ll keep things simple with one seeder per file, each of which will extend a base class. The base class will hold logic for reading a CSV and creating a Neighborhood record. It will also contain an abstract method for transforming a geometry record into a Multipolygon. Each seeder extending the base class will implement this abstract method with logic specific to the file being processed. These seeders will also contain the run() method to be called by Laravel.

    While this pattern works well for our purposes as we only have a few flat files to process, for a larger application with possibly hundreds of files I’d suggest a variation of this pattern and not defining one seeder per file.

    First, let’s create our BaseNeighborhoodSeeder using artisan.

    $ php artisan make:seeder BaseNeighborhoodSeeder

    Update the created file at database/seeds/BaseNeighborhoodSeeder.php to match below.

    <?php

    use
    App\Models\Neighborhood;
    use Grimzy\LaravelMysqlSpatial\Types\MultiPolygon;
    use Illuminate\Database\Seeder;

    abstract class BaseNeighborhoodSeeder extends Seeder
    {
    /**
    * Mode for opening a file as read-only.
    */
    const FILE_MODE_READ = 'r';

    /**
    * Parses the given geometry value into a Multipolygon.
    *
    *
    @param mixed $geometry the geometry to parse
    *
    @return \Grimzy\LaravelMysqlSpatial\Types\MultiPolygon
    */
    protected abstract function parseGeometryToMultiPolygon($geometry): MultiPolygon;

    /**
    * Reads all records in a flat file, parses the geometry into a multipolygon,
    * and saves a Neighborhood in the database for each record.
    *
    *
    @param string $file_path path to the file to read data from
    *
    @param int $name_index the index of the column containing the neighborhood name
    *
    @param int $geometry_index the index of the column containing the neighborhood geometry
    *
    @param string $city the name of the neighborhoods' city
    *
    @param string $state the name of the neighborhoods' state
    *
    @param bool $skip_first_row if the first row of the file should be skipped (if there's a header row)
    *
    @param bool $use_title_case if the neighborhood names should be converted to Title Case
    *
    @throws \Throwable
    */
    protected function seedFromFlatFile(string $file_path,
    int $name_index,
    int $geometry_index,
    string $city,
    string $state,
    bool $skip_first_row,
    bool $use_title_case) {

    // throw an exception unless a file exists at the given location
    throw_unless(file_exists($file_path), new Exception("No file found at path '$file_path'"));

    try {
    // open the specified file at the given location
    $file = fopen($file_path, self::FILE_MODE_READ);

    // if the first row should be skipped, read the first row of the file
    if ($skip_first_row) {
    fgetcsv($file);
    }

    // while there's a row to be read in the file, read the next row
    while ($row = fgetcsv($file)) {
    // get the neighborhood name from the specified index
    $name = $row[$name_index];

    // if the name should be converted to Title Case, convert it
    if ($use_title_case) {
    $name = title_case($name);
    }

    // parse the geometry at the specified index into a multipolygon
    $multipolygon = $this->parseGeometryToMultiPolygon($row[$geometry_index]);

    // make the new neighborhood model by filling the name, city, state, and geometry
    $neighborhood = new Neighborhood([
    'name' => $name,
    'city' => $city,
    'state' => $state,
    'geometry' => $multipolygon,
    ]);

    // throw an exception unless the neighborhood could be saved
    throw_unless($neighborhood->save(), new Exception("Failed to save neighborhood '$name'"));
    }
    } finally {
    // if the file has been opened, close it
    if (! empty($file)) {
    fclose($file);
    }
    }
    }
    }

    Here we’re defining an abstract class which cannot be instantiated; this class must be extended to be used. At the top of the class we have a constant for the file mode we’ll be using to open CSV files.

    We define the abstract method parseGeometryToMulipolygon($geometry) and declare it returns a Multipolygon. This method must be implemented by any class extending BaseNeighborhoodSeeder and will contain the logic necessary for converting the geometry data in each CSV record to a Multipolygon. For our purposes this will always be parsing WKT but it could easily be parsing another format such as GeoJSON.

    The seedFromFlatFile method contains parameters for the path to the file to read data from, the index of the neighborhood name column, the index of the neighborhood boundary geometry column, the name of the city for the neighborhoods, the name of the state for the neighborhoods, whether or not to skip the first row of the file (in case there is a header row), and whether or not the neighborhood name should be converted to Title Case before being saved.

    In this method we first check if a file exists at $file_path using PHP’s file_exists function. If a file does not exist at the specified path we throw an exception.

    Next, inside a try block, we open the file for reading using fopen with the file mode 'r'. If the $skip_first_row flag is true, we read the first row of the file using PHP’s function fgetcsv. Looping through each row, while there’s still a row left to read in the file, we use fgetcsv to parse the CSV row into an array of data.

    Using the given $name_index we get the neighborhood name from the array and if $use_title_case is true we use Laravel’s helper method title_case to convert the string to Title Case. The neighborhood’s geometry is parsed into a MultiPolygon by passing the data of the geometry column into the parseGeometryToMultiPolygon method, which will be implemented by child classes.

    Finally we create the new neighborhood record by passing an array of attributes to the Neighborhood model’s constructor. If the model could not be saved, an exception is thrown.

    In the finally block we check if the $file variable has a value and if it does, we use fclose to close the file. Putting this logic inside the finally block ensures we close the file even if an exception is thrown.


    With our base seeder class in place, we’re ready to create a seeder for each flat file. Start by creating ChicagoIllinoisNeighborhoodSeeder using artisan.

    $ php artisan make:seeder ChicagoIllinoisNeighborhoodSeeder

    Update the file database/seeds/ChicagoIllinoisDatabaseSeeder.php with the content below.

    <?php

    use
    Grimzy\LaravelMysqlSpatial\Types\MultiPolygon;

    class ChicagoIllinoisNeighborhoodSeeder extends BaseNeighborhoodSeeder
    {
    /**
    * Index of the name column.
    */
    const COLUMN_INDEX_NAME = 0;

    /**
    * Index of the geometry column.
    */
    const COLUMN_INDEX_GEOMETRY = 1;

    /**
    * Name of the neighborhoods' city.
    */
    const CITY = 'Chicago';

    /**
    * Name of the neighborhoods' state.
    */
    const STATE = 'IL';

    /**
    * Path of the seed file relative to the `database` directory.
    */
    const DATABASE_FILE_PATH = 'seeds/flat-files/chicago-illinois.csv';

    /**
    * If the file has a header row.
    */
    const HAS_HEADER_ROW = true;

    /**
    * If the neighborhood names should be converted to Title Case.
    */
    const USE_TITLE_CASE = false;

    /**
    * Run the database seeds.
    *
    *
    @throws \Throwable
    */
    public function run()
    {
    // resolve the path of the seed file
    $file_path = database_path(self::DATABASE_FILE_PATH);

    // seed the neighborhoods from the flat file
    $this->seedFromFlatFile($file_path,
    self::COLUMN_INDEX_NAME,
    self::COLUMN_INDEX_GEOMETRY,
    self::CITY,
    self::STATE,
    self::HAS_HEADER_ROW,
    self::USE_TITLE_CASE);
    }

    /**
    * Parses the geometry to a multipolygon from well-known text.
    *
    *
    @param mixed $geometry
    *
    @return \Grimzy\LaravelMysqlSpatial\Types\MultiPolygon
    */
    protected function parseGeometryToMultiPolygon($geometry): MultiPolygon
    {
    return MultiPolygon::fromWKT($geometry);
    }
    }

    At the top of the file we have constants for the column indexes of the name and geometry data as well as constants for the neighborhood city, the neighborhood state, the file path relative to the database directory, whether or not the file has a header row, and whether or not the neighborhood names should be converted to Title Case.

    Next we have the run method which is called by Laravel when executing the seeder. In this method we first resolve the path of the flat file using Laravel’s helper method database_path. Then we call the parent class’s method seedFromFlatFile using the file path and our constants as arguments.

    Finally, we implement the parseGeometryToMultiPolygon method by using the fromWKT static method of Grimzy\LaravelMysqlSpatial\Types\Multipolygon to instantiate a new MultiPolygon and return it. Remember this method will be called by the base class during the execution of the seedFromFlatFile method.


    Continuing with our seeders, use artisan to create BaltimoreMarylandSeeder.

    $ php artisan make:seeder BaltimoreMarylandSeeder

    Edit the file database/seeds/BaltimoreMarylandSeeder.php to match the contents below.

    <?php

    use
    Grimzy\LaravelMysqlSpatial\Types\MultiPolygon;

    class BaltimoreMarylandSeeder extends BaseNeighborhoodSeeder
    {
    /**
    * Index of the name column.
    */
    const COLUMN_INDEX_NAME = 3;

    /**
    * Index of the geometry column.
    */
    const COLUMN_INDEX_GEOMETRY = 1;

    /**
    * Name of the neighborhoods' city.
    */
    const CITY = 'Baltimore';

    /**
    * Name of the neighborhoods' state.
    */
    const STATE = 'MD';

    /**
    * Path of the seed file relative to the `database` directory.
    */
    const DATABASE_FILE_PATH = 'seeds/flat-files/baltimore-maryland.csv';

    /**
    * If the file has a header row.
    */
    const HAS_HEADER_ROW = true;

    /**
    * If the neighborhood names should be converted to Title Case.
    */
    const USE_TITLE_CASE = false;

    /**
    * Run the database seeds.
    *
    *
    @throws \Throwable
    */
    public function run()
    {
    // resolve the path of the seed file
    $file_path = database_path(self::DATABASE_FILE_PATH);

    // seed the neighborhoods from the flat file
    $this->seedFromFlatFile($file_path,
    self::COLUMN_INDEX_NAME,
    self::COLUMN_INDEX_GEOMETRY,
    self::CITY,
    self::STATE,
    self::HAS_HEADER_ROW,
    self::USE_TITLE_CASE);
    }

    /**
    * Parses the geometry to a multipolygon from well-known text.
    *
    *
    @param mixed $geometry
    *
    @return \Grimzy\LaravelMysqlSpatial\Types\MultiPolygon
    */
    protected function parseGeometryToMultiPolygon($geometry): MultiPolygon
    {
    return MultiPolygon::fromWKT($geometry);
    }
    }

    Notice how simple it was to implement a new flat file seeder because we abstracted away the logic into our base class.


    Again using artisan, create our last seeder EastBatonRougeParishSeeder.

    $ php artisan make:seeder EastBatonRougeParishSeeder

    Open up the file database/seeds/EastBatonRougeParishSeeder.php and edit the contents to match below.

    <?php

    use
    Grimzy\LaravelMysqlSpatial\Types\MultiPolygon;
    use Grimzy\LaravelMysqlSpatial\Types\Polygon;

    class EastBatonRougeParishSeeder extends BaseNeighborhoodSeeder
    {
    /**
    * Index of the name column.
    */
    const COLUMN_INDEX_NAME = 2;

    /**
    * Index of the geometry column.
    */
    const COLUMN_INDEX_GEOMETRY = 1;

    /**
    * Name of the neighborhoods' city.
    */
    const CITY = 'Baton Rouge';

    /**
    * Name of the neighborhoods' state.
    */
    const STATE = 'LA';

    /**
    * Path of the seed file relative to the `database` directory.
    */
    const DATABASE_FILE_PATH = 'seeds/flat-files/east-baton-rouge-parish-louisiana.csv';

    /**
    * If the file has a header row.
    */
    const HAS_HEADER_ROW = true;

    /**
    * If the neighborhood names should be converted to Title Case.
    */
    const USE_TITLE_CASE = true;

    /**
    * Run the database seeds.
    *
    *
    @throws \Throwable
    */
    public function run()
    {
    // resolve the path of the seed file
    $file_path = database_path(self::DATABASE_FILE_PATH);

    // seed the neighborhoods from the flat file
    $this->seedFromFlatFile($file_path,
    self::COLUMN_INDEX_NAME,
    self::COLUMN_INDEX_GEOMETRY,
    self::CITY,
    self::STATE,
    self::HAS_HEADER_ROW,
    self::USE_TITLE_CASE);
    }

    /**
    * Parses the geometry to a multipolygon from well-known text.
    *
    *
    @param mixed $geometry
    *
    @return \Grimzy\LaravelMysqlSpatial\Types\MultiPolygon
    */
    protected function parseGeometryToMultiPolygon($geometry): MultiPolygon
    {
    // parse the well-known text into a polygon
    $polygon = Polygon::fromWKT($geometry);

    // return a multipolygon containing the polygon
    return new MultiPolygon([$polygon]);
    }
    }

    This time the implementation of the parseGeometryToMultiPolygon method is different. If you check the east-baton-rouge-parish-louisiana.csv file you’ll notice the WKT contains polygons instead of multipolygons, but the method calls for a MultiPolygon to be returned. Therefore we first parse the Polygon from WKT and then create and return a new MutliPolygon using an array containing the Polygon passed to the constructor.

    Next we need to edit database/seeds/DatabaseSeeder.php to call each of our seeders. Update the file to match the contents below.

    <?php

    use
    Illuminate\Database\Seeder;

    class DatabaseSeeder extends Seeder
    {
    /**
    * Seed the application's database.
    *
    *
    @return void
    */
    public function run()
    {
    $this->call([
    ChicagoIllinoisNeighborhoodSeeder::class,
    BaltimoreMarylandSeeder::class,
    EastBatonRougeParishSeeder::class,
    ]);
    }
    }

    Let’s quickly regenerate our autoload files using composer.

    $ composer dump-autoload

    Finally, let’s migrate and seed our database using an artisan command. This will create our neighborhoods table as well as seed all the neighborhoods from our flat files.

    $ php artisan migrate --seed

    Installing the Second Package

    Use composer to require the toin0u/geocoder-laravel package we’ll be using to geocode addresses.

    $ composer require "toin0u/geocoder-laravel"

    While composer is running, this is a great time to get a Google API key for our project. We’ll be using Google’s Geocoding API.

    1. Go to the Google Cloud Console and log in using a Google account.
    2. Create a new project.
    3. Under the APIs & Services dashboard, click ENABLE APIS AND SERVICES.
    4. Enable the Geocoding API by searching for Geocoding API, clicking on the result, and then clicking the button labeled ENABLE.
    5. Under APIs & Services go to Credentials.
    6. Click Create and select API Key.
    7. Copy the generated API key to your clipboard.

    Now we’re going to add the necessary configuration for the geocoding package we just installed.

    Edit the .env environment file at the root of our project, adding the key GOOGLE_MAPS_API_KEY and pasting in the value of your API key.

    GOOGLE_MAPS_API_KEY=***************************************

    For posterity’s sake let’s also add an entry in .env.example for the same key. Remember, don’t add your API key here; this file is only a template and is checked into source control.

    GOOGLE_MAPS_API_KEY=

    The Home Controller

    Now let’s define our routes by editing routes/web.php, deleting the existing welcome route, and replacing it with the routes below.

    Route::get('/', 'HomeController@show')->name('home.show');
    Route::post('/', 'HomeController@submit')->name('home.submit');

    The first route, named home.show, is for displaying the home page. The second route, named home.submit, will handle the submission of addresses and return a response containing the result of the search.

    Next, create a HomeController using artisan.

    $ php artisan make:controller HomeController

    Edit app/Http/Controllers/HomeController.php to match the contents below.

    <?php

    namespace
    App\Http\Controllers;

    use App\Models\Neighborhood;
    use Grimzy\LaravelMysqlSpatial\Types\Point;
    use Illuminate\Http\Request;

    class HomeController extends Controller
    {
    /**
    * The session key for storing the success message.
    */
    const SESSION_KEY_SUCCESS = 'success';

    /**
    * The session key for storing the error message.
    */
    const SESSION_KEY_ERROR = 'error';

    /**
    * The result message for an address that could not be geocoded.
    */
    const RESULT_BAD_ADDRESS = 'Failed to find a location for that address!';

    /**
    * The result message for an address that does not fall in any exiting Neighborhood's geometry.
    */
    const RESULT_NO_RESULTS = 'No results for that address!';

    /**
    * The result message prefix for a found Neighborhood.
    */
    const RESULT_NEIGHBORHOOD_PREFIX = 'That address is in ';

    /**
    * The route name for showing the home page.
    */
    const ROUTE_NAME_SHOW_HOME = 'home.show';

    /**
    * Shows the home page.
    *
    *
    @return \Illuminate\View\View
    */
    public function show()
    {
    return view('home');
    }

    /**
    * Handles submission of an address and returns a redirect to the home page with success or error message.
    *
    *
    @param \Illuminate\Http\Request $request
    *
    @return \Illuminate\Http\RedirectResponse
    */
    public function submit(Request $request)
    {
    // validate the request
    $this->validate($request, [
    'address' => 'required',
    ]);

    // get the given address from the request
    $address = $request->input('address');

    // make the geocoder
    $geocoder = app('geocoder');

    // geocode the address and get the first result
    $result = $geocoder->geocode($address)->get()->first();

    // if a result couldn't be found, redirect to the home page with a result message flashed to the session
    if (! $result) {
    return redirect(route(self::ROUTE_NAME_SHOW_HOME))->with(self::SESSION_KEY_ERROR, self::RESULT_BAD_ADDRESS);
    }

    // get the coordinates of the geocoding result
    $coordinates = $result->getCoordinates();

    // get the latitude of the coordinates
    $lat = $coordinates->getLatitude();

    // get the longitude of the coordinates
    $lng = $coordinates->getLongitude();

    // create a new point using the coordinates
    $point = new Point($lat, $lng);

    // get the first Neighborhood that has geometry containing the point
    $neighborhood = Neighborhood::contains('geometry', $point)->first();

    // if a Neighborhood couldn't be found, redirect to the home page with a result message flashed to the session
    if (! $neighborhood) {
    return redirect(route(self::ROUTE_NAME_SHOW_HOME))->with(self::SESSION_KEY_ERROR, self::RESULT_NO_RESULTS);
    }

    // format the result message for the found Neighborhood
    $message = $this->formatNeighborhoodResult($neighborhood);

    // redirect to the home page with the result message flashed to the session
    return redirect(route(self::ROUTE_NAME_SHOW_HOME))->with(self::SESSION_KEY_SUCCESS, $message);
    }

    /**
    * Format the result message for a found neighborhood.
    *
    *
    @param \App\Models\Neighborhood $neighborhood
    *
    @return string
    */
    private function formatNeighborhoodResult(Neighborhood $neighborhood) {
    return self::RESULT_NEIGHBORHOOD_PREFIX . $neighborhood->name . ', ' . $neighborhood->city . ', ' . $neighborhood->state . '.';
    }
    }

    In this file we first define constants for the session key storing success messages, the session key storing error messages, the text for result messages, and the home.show route name.

    In the show method we simply return the view named home using the Laravel helper method view.

    The submit method accepts an argument of type Illuminate\Http\Request called $request. Laravel will automatically inject this variable containing the current request data.

    First we validate the request by specifying a rule for address making the field required. The validated address is then retrieved using the input method on the $request variable. We use Laravel’s app helper method which uses the service container to resolve an instance of the geocoder. Using method chaining we geocode the given address and get the first result. If a result couldn’t be found for the given address we redirect the user to the home page with an error message flashed to the session.

    Next we get the longitude and latitude coordinates from the result and create a new Grimzy\LaravelMysqlSpatial\Types\Point instance by passing the coordinates into the constructor.

    The eloquent query scope contains provided by the grimzy/laravel-mysql-spaital package is then used to scope the query by records with a geometry containing the point. We use the first method to get the first result. This will generate a query along the lines of:

    SELECT * FROM `neighborhoods` WHERE ST_Contains(`geometry`, ST_GeomFromText('POINT(0 0)')) LIMIT 1

    In this case 'POINT(0 0)' is the WKT representation of our longitude and latitude (which won’t actually be 0, 0 unless our user lives in the middle of the ocean).

    Notice that we are using MySQL to calculate if the the geometry contains the point. This is much faster than if we had chunked through all the records and had done the calculation in PHP.

    Finally, if a resulting neighborhood containing the point couldn’t be found we return a redirect to the home page with an error message flashed to the session. Otherwise, we format the neighborhood name, city, and state into a success result message (using the formatNeighborhoodResult method) and return a redirect to the home page with the message flashed to the session.

    The Home View

    Rename the blade template at resources/views/welcome.blade.php to resources/views/home.blade.php and open the file.

    Under the <!-- Styles --> comment, add a link to Bootstrap’s style sheet.

    <link rel="stylesheet" href="https://maxcdn.bootstrapcdn.com/bootstrap/4.0.0-alpha.6/css/bootstrap.min.css" integrity="sha384-rwoIResjU2yc3z8GV/NPeZWAv56rSmLldC3R/AZzGRnGxQQKnKkoFVhFQhNUwEyJ" crossorigin="anonymous">

    Next, in the .title class definition, change the font size to something smaller.

    .title {
    font-size: 64px;
    }

    Just before the closing </body> tag, add script tags for Bootstrap’s dependencies jQueryPopper.js, and Bootstrap’s minified JavaScript file.

    <script src="https://code.jquery.com/jquery-3.1.1.slim.min.js" integrity="sha384-A7FZj7v+d/sdmMqp/nOQwliLvUsJfDHW+k9Omg/a/EheAdgtzNs3hpfag6Ed950n" crossorigin="anonymous"></script>
    <script src="https://cdnjs.cloudflare.com/ajax/libs/tether/1.4.0/js/tether.min.js" integrity="sha384-DztdAPBWPRXSA/3eYEEUWrWCy7G5KFbe8fFjk5JAIxUYHKkDx6Qin1DkWx51bBrb" crossorigin="anonymous"></script>
    <script src="https://maxcdn.bootstrapcdn.com/bootstrap/4.0.0-alpha.6/js/bootstrap.min.js" integrity="sha384-vBWWzlZJ8ea9aCX4pEW3rVHjgjt7zpkNpZk+02D9phzyeVkE+jo0ieGizqPLForn" crossorigin="anonymous"></script>

    Because our application has no authentication, remove the entire @if (Route::has(‘login’)) directive including the contents and closing directive.

    Finally, edit the contents of the <div class="content"> div to match below.

    <div class="content">
    <div class="title m-b-md">
    Neighborhood Finder
    </div>
    @if (session('success'))
    <div class="alert alert-success">
    {{ session('success') }}
    </div>
    @elseif (session('error'))
    <div class="alert alert-danger">
    {{ session('error') }}
    </div>
    @endif
    <div class="col-12 text-left">
    <form class="form-horizontal" method="POST" action="{{ route('home.submit') }}">
    @csrf
    <div class="form-group{{ $errors->has('address') ? ' has-error' : '' }}">
    <label for="address" class="control-label">Enter an address</label>

    <input id="address" name="address" type="text" class="form-control" required autofocus>

    @if ($errors->has('address'))
    <span class="help-block">
    <strong>{{ $errors->first('address') }}</strong>
    </span>
    @endif
    </div>
    <div class="form-group text-right">
    <button type="submit" class="btn btn-primary">
    Submit
    </button>
    </div>
    </form>
    </div>
    </div>

    Here we use the blade directive @if to check if there’s a message in the success key of the current session. If there is one, we display an alert to the user containing the message. If there isn’t one, we use the blade directive @elseif to check if there’s a message in the error key of the current session, again displaying it to the user if it exists.

    Next we define a form with an action specifying our submission route using the route helper method. The @crsf blade directive is used to generate a Cross-Site Request Forgery field and token. If the $errors message bag contains an entry for address we add the has-error class to the form group div and display the error in a help block.

    Conclusion

    That’s it! Open the project in your browser and try out some different addresses! The address will be geocoded and a neighborhood will be returned if any neighborhoods in the database have a boundary containing the address’s coordinates. If no address coordinates or neighborhood could be found, an error message stating such will be returned.

    Try some of these addresses:

    1558 N Damen Ave, Chicago, IL 606221001 E Fayette St, Baltimore, MD 21202201 Community College Dr, Baton Rouge, LA 70806123 Fake St, NowhereYour Address

    Additional Resources

    For additional data sources I encourage you to check out this Forbes article as well as Open Data Inception.

    You can view the source code for this project on GitHub.

  • Handling Time Zone in JavaScript

    Recently, I worked on a task of adding a time zone feature to the TOAST UI Calendar, the JavaScript calendar library managed by my team. I pretty well knew that the time zone support in JavaScript is quite poor, but hoped that abstracting existing data objects would easily resolve many problems.

    However, my hope was false, and I found it really hard to handle time zone in JavaScript as I progressed more. Implementing time zone features beyond simple formatting of time and calculating time data with complex operations (e.g. calendar) was a truly daunting task. For this reason, I had a valuable and thrilling experience of solving a problem leading to cause more problems.

    The purpose of this article is to discuss the issues and solutions related to the implementation of time zone features using JavaScript. As I was writing this rather lengthy article, I suddenly realized that the root of my problem lied in my poor understanding of the time zone domain. In this light, I will first discuss the definition and standards related to time zone in detail, and then talk about JavaScript.

    What is Time zone?

    A time zone is a region that follows a uniform local time which is legally stated by the country. It’s common for many countries to have its unique time zone, and some large countries, such as the USA or Canada, even have multiple time zones. Interestingly, even though China is large enough to have multi time zones, she uses only one time zone. This sometimes results in such an awkward situation where the sun rises around 10:00 AM in the western part of China

    GMT, UTC, and Offset

    GMT

    The Korean local time is normally GMT +09:00. GMT is an abbreviation for Greenwich Mean Time, which is the clock time at the Royal Observatory in Greenwich, U.K. located at longitude 0. The GMT system began spreading in Feb. 5, 1925 and became the world time standard until Jan. 1, 1972.

    UTC

    Many consider GMT and UTC the same thing, and the two are used interchangeably in many cases, but they are actually different. UTC was established in 1972 to compensate for the slowing problem of the Earth’s rotation. This time system is based on International Atomic Time, which uses the cesium atomic frequency to set the time standard. In other words, UTC is the more accurate replacement system of GMT. Although the actual time difference between the two is tiny, UTC is whatsoever the more accurate choice for software developers.

    When the system was still in development, anglophones wanted to name the system CUT (Coordinated Universal Time) and francophones wanted to name it TUC (Temps Universal Coordonn). However, none of the either side won the fight, so they came to an agreement of using UTC instead, as it contained all the essential letters (C, T, and U).

    Offset

    +09:00 in UTC+09:00 means the local time is 9 hours ahead than the UTC standard time. This means that it’s 09:00 PM in Korea when it’s 12:00 PM in a UTC region. The difference of time between UTC standard time and the local time is called “offset”, which is expressed in this way: +09:00-03:00, etc.

    It’s common that countries name their time zone using their own unique names. For example, the time zone of Korea is called KST (Korea Standard Time), and has a certain offset value which is expressed as KST = UTC+09:00. However, the +09:00 offset is also used by not only Korea but also Japan, Indonesia, and many others, which means the relation between offsets and time zone names are not 1:1 but 1:N. The list of countries in the +09:00 offset can be found in UTC+09:00.

    Some offsets are not strictly on hourly basis. For example, North Korea uses +08:30 as their standard time while Australia uses +08:45 or +09:30 depending on the region.

    The entire list of UTC offsets and their names can be found in List of UTC Time offsets.

    Time zone !== offset?

    As I mentioned earlier, we use the names of time zones (KST, JST) interchangeably with offset without distinguishing them. But it’s not right to treat the time and offset of a certain region the same for the following reasons:

    Summer Time (DST)

    Although this term might be unfamiliar to some countries, a lot of countries in the world adopted summer time. “Summer time” is a term mostly used in the U.K. and other European countries. Internationally, it is normally called Daylight Saving Time (DST). It means advancing clocks to one hour ahead of standard time during summer time.

    For example, California in the USA uses PST (Pacific Standard Time) during winter time and use PDT (Pacific Daylight Time, UTC-07:00) during summer time. The regions that uses the two time zones are collectively called Pacific Time (PT), and this name is adopted by many regions of the USA and Canada.

    Then the next question is exactly when the summer begins and ends. In fact, the start and end dates of DST are all different, varying country by country. For example, in the U.S.A and Canada, DST used to be from the first Sunday of April at 02:00 AM to the last Sunday of October at 12:00 AM until 2006, but since 2007, DST has begun on the second Sunday of March at 02:00 AM till the first Sunday of November at 02:00 AM. In Europe, summer time is uniformly applied across the countries, while DST is applied progressively to each time zone in the states.

    Does Time Zone Changes?

    As I briefly mentioned earlier, each country has its own right to determine which time zone to use, which means its time zone can be changed due to any political and/or economic reasons. For example, in the states, the period of DST was changed in 2007 because President George Bush signed the energy policy in 2005. Egypt and Russia used to use DST, but they ceased to use it since 2011.

    In some cases, a country can change not only its DST but also its standard time. For example, Samoa used to use the UTC-10:00 offset, but later changed to the UTC+14:00 offset to reduce the losses in trading caused by the time difference between Samoa and Australia & New Zealand. This decision caused the country to miss the whole day of Dec. 30, 2011 and it made to newspapers all over the world.

    Netherlands used to use +0:19:32.13 offset, which is unnecessarily accurate since 1909, but changed it to +00:20 offset in 1937, and then changed again to +01:00 offset in 1940, sticking to it so far.

    Time Zone 1 : Offset N

    To summarize, a time zone can have one or more offsets. Which offset a country will use as its standard time at a certain moment can vary due to political and/or economic reasons.

    This is not a big issue in everyday life, but it is when trying to systematize it based on rules. Let’s imagine that you want to set a standard time for your smartphone using an offset. If you live in a DST-applied region, your smartphone time should be adjusted whenever DST starts and ends. In this case, you would need a concept that brings standard time and DST together into one time zone (e.g. Pacific Time).

    But this cannot be implemented with just a couple of simple rules. For example, as the states changed the dates DST starts and ends in 2007, May 31, 2006 should use PDT (-07:00) as the standard time while Mar 31, 2007 should use PST (-08:00) as the standard time. This means that to refer to a specific time zone, you must know all historical data of the standard time zones or the point in time when DST rules were changed.

    You can’t simply say, “New York’s time zone is PST (-08:00).” You must be more specific by saying, for instance, “New York’s current time zone is PST.” However, we need a more accurate expression for the sake of the system implementation. Forget the word “time zone”. You need to say, “New York is currently using PST as its standard time”.

    Then what should we use other than offset to designate the time zone of a specific region? The answer is the name of the region. To be more specific, you should group regions where the changes in DST or standard time zone has been uniformly applied into one time zone and refer to it as appropriate. You might be able to use names like PT (Pacific Time), but such term only combines the current standard time and its DST, not necessarily all the historical changes. Furthermore, since PT is currently used only in the USA and Canada, you need more well established standards from trusted organizations in order to use software universally.

    IANA Time Zone Database

    To tell you the truth, time zones are more of a database rather than a collection of rules because they must contain all relevant historical changes. There are several standard database designed to handle the time zone issues, and the most frequently used one is IANA Time Zone Database. Usually called tz database (or tzdata), IANA Timezone Database contains the historical data of local standard time around the globe and DST changes. This database is organized to contain all historical data currently verifiable to ensure the accuracy of time since the Unix time (1970.01/01 00:00:00). Although it also has data before 1970, the accuracy is not guaranteed.

    The naming convention follows the Area/Location rule. Area usually refers to the name of a continent or an ocean (Asia, America, Pacific) while Location the name of major cities such as Seoul and New York rather than the name of countries (This is because the lifespan of a country is far shorter than that of a city). For example, the time zone of Korea is Asia/Seoul and that of Japan is Asia/Tokyo. Although the two countries share the same UTC+09:00, both countries have different histories regarding time zone. That is why the two countries are handled using separate time zones.

    IANA Time Zone Database is managed by numerous communities of developers and historians. Newly found historical facts and governmental policies are updated right away to the database, making it the most reliable source. Furthermore, many UNIX-based OSs, including Linux and macOS, and popular programming languages, including Java and PHP, internally use this database.

    Note that Windows is not in the above support list. It’s because Windows uses its own database called Microsoft Time Zone Database. However, this database does not accurately reflect historical changes and managed only by Microsoft. Therefore, it is less accurate and reliable than IANA.

    JavaScript and IANA Time Zone Database

    As I briefly mentioned earlier, the time zone feature of JavaScript is quite poor. Since it follows the time zone of the region by default (to be more specific, the time zone selected at the time of the OS installation), there is no way to change it to a new time zone. Also, its specifications for database standard are not even clear, which you will notice if you take a close look at the specification for ES2015. Only a couple of vague declarations are stated regarding local time zone and DST availability. For instance, DST is defined as follows: ECMAScript 2015 — Daylight Saving Time Adjustment

    An implementation dependent algorithm using best available information on time zones to determine the local daylight saving time adjustment DaylightSavingTA(t), measured in milliseconds. An implementation of ECMAScript is expected to make its best effort to determine the local daylight saving time adjustment.

    It looks like it is simply saying, “Hey, guys, give it a try and do your best to make it work.” This leaves a compatibility problem across browser vendors as well. You might think “That’s sloppy!”, but then you will notice another line right below:

    NOTE : It is recommended that implementations use the time zone information of the IANA Time Zone Database http://www.iana.org/time-zones/.

    Yes. The ECMA specifications toss the ball to you with this simple recommendation for IANA Time Zone Database, and JavaScript has no specific standard database prepared for you. As a result, different browsers use their own time zone operations for time zone calculation, and they are often not compatible with one another. ECMA specifications later added an option to use IANA time zone in ECMA-402 Intl.DateTimeFormat for international API. However, this option is still far less reliable than that for other programming languages.

    Time Zone in Server-Client Environment

    We will assume a simple scenario in which time zone must be considered. Let’s say we’re going to develop a simple calendar app that will handle time information. When a user enters date and time in the field on the register page in the client environment, the data is transferred to the server and stored in the DB. Then the client receives the registered schedule data from the server to displays it on screen.

    There is something to consider here though. What if some of the clients accessing the server are in different time zones? A schedule registered for Mar 11, 2017 11:30 AM in Seoul must be displayed as Mar 10, 2017 09:30 PM when the schedule is looked up in New York. For the server to support clients from various time zones, the schedule stored in the server must have absolute values that are not affected by time zones. Each server has a different way to store absolute values, and that is out of the scope of this article since it is all different depending on the server or database environment. However for this to work, the date and time transferred from the client to the server must be values based on the same offset (usually UTC) or values that also include the time zone data of the client environment.

    It’s a common practice that this kind of data is transferred in the form of Unix time based on UTC or ISO-8601 containing the offset information. In the example above, if 11:30 AM on Mar 11, 2017 in Seoul is to be converted into Unix time, it will be an integer type of which value is 1489199400. Under ISO-8601, it will be a string type of which value is 2017–03–11T11:30:00+09:00.

    If you’re working with this using JavaScript in a browser environment, you must convert the entered value as described above and then convert it back to fit the user’s time zone. The both of these two tasks have to be considered. In the sense of programming language, the former is called “parsing” and the latter “formatting”. Now let’s find out how these are handled in JavaScript.

    Even when you’re working with JavaScript in a server environment using Node.js, you might have to parse the data retrieved from the client depending on the case. However since servers normally have their time zone synced to the database and the task of formatting is usually left to clients, you have fewer factors to consider than in a browser environment. In this article, my explanation will be based on the browser environment.

    Date Object in JavaScript

    In JavaScript, tasks involving date or time are handled using a Date object. It is a native object defined in ECMAScript, like Array or Function. which is mostly implemented in native code such as C++. Its API is well described in MDN Documents. It is greatly influenced by Java’s java.util.Date class. As a result, it inherits some undesirable traits, such as the characteristics of mutable data and month beginning with 0.

    JavaScript’s Date object internally manages time data using absolute values, such as Unix time. However, constructors and methods such as parse() function, getHour()setHour(), etc. are affected by the client’s local time zone (the time zone of the OS running the browser, to be exact). Therefore, if you create a Date object directly using user input data, the data will directly reflect the client’s local time zone.

    As I mentioned earlier, JavaScript does not provide any arbitrary way to change time zone. Therefore, I will assume a situation here where the time zone setting of the browser can be directly used.

    Creating Date Object with User Input

    Let’s go back to the first example. Assume that a user entered 11:30 AM, Mar 11, 2017 in a device which follows the time zone of Seoul. This data is stored in 5 integers of 2017, 2, 11, 11, and 30 — each representing the year, month, day, hour, and minute, respectively. (Since the month begins with 0, the value must be 3–1=2.) With a constructor, you can easily create a Date object using the numeric values.

    const d1 = new Date(2017, 2, 11, 11, 30);
    d1.toString(); // Sat Mar 11 2017 11:30:00 GMT+0900 (KST)

    If you look at the value returned by d1.toString(), then you will know that the created object’s absolute value is 11:30 AM, Mar 11, 2017 based on the offset +09:00 (KST).

    You can also use the constructor together with string data. If you use a string value to the Date object, it internally calls Date.parse() and calculate the proper value. This function supports the RFC2888 specifications and the ISO-8601 specifications. However, as described in the MDN’s Date.parse() Document, the return value of this method varies from browser to browser, and the format of the string type can affect the prediction of exact value. Thus, it is recommended not to use this method.

    For example, a string like 2015–10–12 12:00:00 returns NaN on Safari and Internet Explorer while the same string returns the local time zone on Chrome and Firefox. In some cases, it returns the value based on the UTC standard.

    Creating Date Object Using Server Data

    Let’s now assume that you are going to receive data from the server. If the data is of the numerical Unix time value, you can simply use the constructor to create a Date object. Although I skipped the explanation earlier, when a Date constructor receives a single value as the only parameter, it is recognized as a Unix time value in millisecond. (Caution: JavaScript handles Unix time in milliseconds. This means that the second value must be multiplied by 1,000.) If you see the example below, the resultant value is the same as that of the previous example.

    const d1 = new Date(1489199400000);
    d1.toString(); // Sat Mar 11 2017 11:30:00 GMT+0900 (KST)

    Then what if a string type such as ISO-8601 is used instead of the Unix time? As I explained in the previous paragraph, the Date.parse() method is unreliable and better not be used. However since ECMAScript 5 or later versions specify the support of ISO-8601, you can use strings in the format specified by ISO-8601 for the Date constructor on Internet Explorer 9.0 or higher that supports ECMAScript 5 if carefully used.
    If you’re using a browser of not the latest version, make sure to keep the Z letter at the end. Without it, your old browser sometimes interprets it based on your local time instead of UTC. Below is an example of running it on Internet Explorer 10.

    const d1 = new Date('2017-03-11T11:30:00');
    const d2 = new Date('2017-03-11T11:30:00Z');
    d1.toString(); // "Sat Mar 11 11:30:00 UTC+0900 2017"
    d2.toString(); // "Sat Mar 11 20:30:00 UTC+0900 2017"

    According to the specifications, the resultant values of both cases should be the same. However, as you can see, the resultant values are different as d1.toString() and d2.toString(). On the latest browser, these two values will be the same. To prevent this kind of version problem, you should always add Z at the end of a string if there is no time zone data.

    Creating Data to be Transferred to Server

    Now use the Date object created earlier, and you can freely add or subtract time based on local time zones. But don’t forget to convert your data back to the previous format at the end of the processing before transferring it back to the server.

    If it’s Unix time, you can simply use the getTime() method to perform this. (Note the use of millisecond.)

    const d1 = new Date(2017, 2, 11, 11, 30);
    d1.getTime(); // 1489199400000

    What about strings of the ISO-8601 format? As explained earlier, Internet Explorer 9.0 or higher that supports ECMAScript 5 or higher supports the ISO-8601 format. You can create strings of the ISO-8601 format using the toISOString() or toJSON() method. (toJSON() can be used for recursive calls with JSON.stringify() or others.) The two methods yield the same results, except for the case in which it handles invalid data.

    const d1 = new Date(2017, 2, 11, 11, 30);
    d1.toISOString(); // "2017-03-11T02:30:00.000Z"
    d1.toJSON(); // "2017-03-11T02:30:00.000Z"

    const d2 = new Date('Hello');
    d2.toISOString(); // Error: Invalid Date
    d2.toJSON(); // null

    You can also use the toGMTString() or toUTCString() method to create strings in UTC. As they return a string that satisfies the RFC-1123 standard, you can leverage this as needed.

    Date objects include toString()toLocaleString(), and their extension methods. However, since these are mainly used to return a string based on local time zone, and they return varying values depending on your browser and OS used, they are not really useful.

    Changing Local Time Zone

    You can see now that JavaScript provides a bit of support for time zone. What if you want to change the local time zone setting within your application without following the time zone setting of your OS? Or what if you need to display a variety of time zones at the same time in a single application? Like I said several times, JavaScript does not allow manual change of local time zone. The only solution to this is adding or removing the value of the offset from the date provided that you already know the value of the time zone’s offset. Don’t get frustrated yet though. Let’s see if there is any solution to circumvent this.

    Let’s continue with the earlier example, assuming that the browser’s time zone is set to Seoul. The user enters 11:30 AM, Mar 11, 2017 based on the Seoul time and wants to see it in New York’s local time. The server transfers the Unix time data in milliseconds and notifies that New York’s offset value is -05:00. Then you can convert the data if you only know the offset of the local time zone.

    In this scenario, you can use the getTimeZoneOffset() method. This method is the only API in JavaScript that can be used to get the local time zone information. It returns the offset value of the current time zone in minutes.

    const seoul = new Date(1489199400000);
    seoul.getTimeZoneOffset(); // -540

    The return value of -540 means that the time zone is 540 minutes ahead of the target. Be warned that the minus sign in front of the value is opposite to Seoul’s plus sign (+09:00). I don’t know why, but this is how it is displayed. If we calculate the offset of New York using this method, we will get 60 * 5 = 300. Convert the difference of 840 into milliseconds and create a new Date object. Then you can use that object’s getXX methods to convert the value into a format of your choice. Let’s create a simple formatter function to compare the results.

    function formatDate(date) {
    return date.getFullYear() + '/' +
    (date.getMonth() + 1) + '/' +
    date.getDate() + ' ' +
    date.getHours() + ':' +
    date.getMinutes();
    }

    const seoul = new Date(1489199400000);
    const ny = new Date(1489199400000 - (840 * 60 * 1000));

    formatDate(seoul); // 2017/3/11 11:30
    formatDate(ny); // 2017/3/10 21:30

    formatDate() shows the correct date and time according to the time zone difference between Seoul and New York. It looks like we found a simple solution. Then can we convert it to the local time zone if we know the region’s offset? Unfortunately, the answer is “No.” Remember what I said earlier? That time zone data is a kind of database containing the history of all offset changes? To get the correct time zone value, you must know the value of the offset at the time of the date (not of the current date).

    Problem of Converting Local Time Zone

    If you keep working with the example above a little more, you will soon face with a problem. The user wants to check the time in New York local time and then change the date from 10th to 15th. If you use the setDate() method of Date object, you can change the date while leaving other values unchanged.

    ny.setDate(15);
    formatDate(ny); // 2017/3/15 21:30

    It looks simple enough, but there is a hidden trap here. What would you do if you have to transfer this data back to the server? Since the data has been changed, you can’t use methods such as getTime() or getISOString(). Therefore, you must revert the conversion before sending it back to the server.

    const time = ny.getTime() + (840 * 60 * 1000);  // 1489631400000

    Some of you may wonder why I added using the converted data when I have to convert it back anyway before returning. It looks like I can just process it without conversion and temporarily create a converted Date object only when I’m formatting. However, it is not what it seems. If you change the date of a Date object based on Seoul time from 11th to 15th, 4 days are added (24 * 4 * 60 * 60 * 1000). However, in New York local time, as the date has been changed from 10th to 15th, resultantly 5 days have been added (24* 5 * 60 * 60 * 1000). This means that you must calculate dates based on the local offset to get the precise result.

    The problem doesn’t stop here. There is another problem waiting where you won’t get wanted value by simply adding or subtracting offsets. Since Mar 12 is the starting date of DST in New York’s local time, the offset of Mar 15, 2017 should be -04:00 not -05:00. So when you revert the conversion, you should add 780 minutes, which is 60 minutes less than before.

    const time = ny.getTime() + (780 * 60 * 1000);  // 1489627800000

    On the contrary, if the user’s local time zone is New York and wants to know the time in Seoul, DST is applied unnecessarily, causing another problem.

    Simply put, you can’t use the obtained offset alone to perform the precise operations based on the time zone of your choice. If you recollect what we have discussed in the earlier part of this document, you would easily know that there is still a hole in this conversion if you know the summer time rules. To get the exact value, you need a database that contains the entire history of offset changes, such as IANA timezone Database.

    To solve this problem, one must store the entire time zone database and whenever date or time data is retrieved from the Date object, find the date and the corresponding offset, and then convert the value using the process above. In theory, this is possible. But in reality, this takes too much effort and testing the converted data’s integrity will also be tough. But don’t get disappointed yet. Until now, we discussed some problems of JavaScript and how to solve them. Now we’re ready to use a well built library.

    Moment Timezone

    Moment is a well established JavaScript library that is almost the standard for processing date. Providing a variety of date and formatting APIs, it is recognized by so many users recently as stable and reliable. And there is Moment Timezone, an extension module, that solves all the problems discussed above. This extension module contains the data of IANA Time Zone Database to accurately calculate offsets, and provides a variety of APIs that can be used to change and format time zone.

    In this article, I won’t discuss how to use library or the structure of library in details. I will just show you how simple it is to solve the problems I’ve discussed earlier. If anyone is interested, see Moment Timezone’s Document.

    Let’s solve the problem shown in the picture by using Moment Timezone.

    const seoul = moment(1489199400000).tz('Asia/Seoul');
    const ny = moment(1489199400000).tz('America/New_York');

    seoul.format(); // 2017-03-11T11:30:00+09:00
    ny.format(); // 2017-03-10T21:30:00-05:00

    seoul.date(15).format(); // 2017-03-15T11:30:00+09:00
    ny.date(15).format(); // 2017-03-15T21:30:00-04:00

    If you see the result, the offset of seoul stays the same while the offset of ny has been changed from -05:00 to -04:00. And if you use the format() function, you can get a string in the ISO-8601 format that accurately applied the offset. You will see how simple it is compared to what I explained earlier.

    Conclusion

    So far, we’ve discussed the time zone APIs supported by JavaScript and their issues. If you don’t need to manually change your local time zone, you can implement the necessary features even with basic APIs provided that you’re using Internet Explorer 9 or higher. However, if you need to manually change the local time zone, things get very complicated. In a region where there is no summer time and time zone policy hardly changes, you can partially implement it using getTimezoneOffset() to convert the data. But if you want full time zone support, do not implement it from scratch. Rather use a library like Moment Timezone.

    I tried to implement time zone myself, but I failed, which is not so surprising. The conclusion here after multiple failures is that it is better to “use a library.” When I first began writing this article, I didn’t know what conclusion I was going to write about, but here we go. As a conclusion, I would say that it’s not a recommended approach to blindly use external libraries without knowing what features they support in JavaScript and what kind of issues they have. As always, it’s important to choose the right tool for your own situation. I hope this article helped you in determining the right decision of your own.

    References
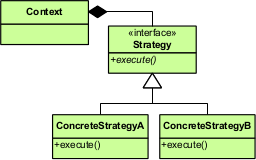
  • Better Python dependency while packaging your project

    I have been cooking this blog topic idea for a long time. I did a lot of searching, reading and trying while working on different projects. But even today after publishing it I don’t think I’m 100% satisfied with the provided solution how to manage python project dependencies efficiently.

    What is package and dependency management?

    Software released in bundled packages this way it’s easier to manage installed programs.

    The package manager is a collection of libraries that are packaged together, which makes it easier to download entire package rather than each library.

    Almost every library in the package has a dependency managed by the dependency manager.

    Dependency management helps manage all the libraries required to make an application work. It’s incredibly beneficial when you’re dealing with complex projects and in a multi-environment. Dependency management also helps to keep track, update libraries faster and easier, as well as solve the problem then one package will depend on another package.

    Every programming language has its flavor of dependency manager.

    To summarize all above :

    • The library is a collection of already pre-written code.
    • The package is a collection of libraries that are built on each other or using each other one way or another.

    Typical way of managing project dependency today

    Today the most used Python package manager is pip, used to install and manage python software packages, found in the Python Package Index. Pip helps us, python developers, effortlessly “manually” control installation and lifecycle of publicly available Python packages from their online repositories.

    Pip also can upgrade, show, uninstall project dependencies, etc.

    To install the package, you can just run pip install <somepackage> that will build an extra Python library in your home directory.

    Running pip freeze,can help to check installed packages and packages versions listed in case-insensitive sorted order.

    Project setup

    After building your application, you will need to perform some set of actions(steps) to make application dependencies available in the different environments.

    Actions will be similar to the one below:

    • Create a virtual environment $ python3 -m venv /path/to/new/virtual/env
    • Install packages using $pip install <package> command
    • Save all the packages in the file with $pip freeze > requirements.txt. Keep in mind that in this case, requirements.txt file will list all packages that have been installed in virtual environment, regardless of where they came from
    • Pin all the package versions. You should be pinning your dependencies, meaning every package should have a fixed version.
    • Add requirements.txt to the root directory of the project. Done.

    Install project dependencies

    When if you’re going to share the project with the rest of the world you will need to install dependencies by running $pip install -r requirements.txt

    To find more information about individual packages from the requiements.txt you can use $pip show <packagename>. But how informative the output is?

    Example pip show command

    How can project dependencies be easily maintained?

    Personally, I think above setup is not easy to maintain, for the variety of reasons:

    1. Sometime requirements.txt files contain more than thousands of lines. When maintain and update package version is hard, it will be even more hard to automate it (for example: delete development dependencies, etc.).
    2. If versions are not pinned in requirements.txt the result executing a fresh $ pip install -r requirements.txt will result in different packages being installed every time then new, different versions of sub-dependencies will be released.
    3. Pip doesn’t have dependency resolution.
    4. Sometimes you may want to create requirements.txt as an empty file without modules (this will not work with pip freeze command. )

    Are there any better alternatives?

    Option 1 : multiple requirements.txt files ?

    There are many examples of projects with multiple requirements.txt files. Developers having different versions of requirements.txt file for example for different environments (e.g., test or local ) or files for different users (e.g., machines vs. people).

    Multiple requirements.txt is a good solution for managing project dependencies? I disagree…managing manually various requirements.txt files not a good solution, and it will be not easy if they grow more than even ~50lines.

    Option 2: can Pipreqs and Pipdeptre make it better?

    I recently tried pipreqsutility, which generates requirements.txt file based on project imports. It’s simple to use.

    To generate a requirements.txt file you can run pipreqs /your_project/path

    Example pipreqs command

    Pipdeptree

    I thought of combining it with pipdeptree another cool and “handy” command line utility which will help to display the installed python packages in the form of a dependency tree.

    After executing pipdeptree command in your terminal window in the virtualenv directory of the project, all the installed python packages of a dependency tree will be displayed:

    Example pipdeptree command

    Cool bonus thatpipdeptree will warns you when you have multiple dependencies where versions don’t exactly match.

    I found it’s handy in some cases, like:

    • if you want to create a requirements.txt for a git repository and you only want to list the packages required to run that script; packages that the script imports without any “extras”
    • support option like clean command
    • can be used with pipdeptree to verify project dependencies

    There are some downsides too,Pipreq will not include the plugins required for specific projects, and you will end up adding plugins information manually in a requirement.txt. It’s not yet a very mature utility.

    Option 3: have you tried pip-compile?

    pip-compilemodule provides two commands: pip-compile and pip-sync.

    pip-compile command will generate requirements.inor requirements.txt of top-level summary of the packages and all (underlying dependencies) pinned. And you can store .in and .txt files in version control.How useful, right?

    This means that we can get the same versions whenever we run pip install, no matter what the new version is.

    -generate-hashes flag helps to generate-hashes. In this case pip-compile consults the PyPI index for each top level package required, looking up the package versions available.

    To update all packages, periodically re-run pip-compile --upgrade.

    To update a specific package to the latest or a particular version use the --upgrade-package or -P flag.

    pip-sync command used to update your virtual environment to reflect exactly what’s in there. Command will install/upgrade/uninstall everything necessary to match the requirements.txt contents.

    Software dependencies are often the largest attack surface

    To know what dependencies your project hasT is very useful to find out after the fact what packages were installed and what dependencies your project has.

    Organizations usually assume most risks come from public-facing web applications. That has changed. With dozens of small components in every application, threats can come from anywhere in the codebase.

    Currently using pip freeze will only show the final package list of dependencies.

    I would recommend using pipdeptreemodule which helps to find possible dependency conflicts and displaying an actual dependency in the project.

    pipdeptree --reverse leaf package installed first

    Another good advice is start building applications using Docker. Every tool we run in Docker is one less tool we have to install locally, so get up-and-running phase will be much faster. But that is a different topic.

    Happy Packaging .

    Interesting reading: