Category: IT Pros

  • The Difference Between Active Directory and LDAP

    The Difference Between Active Directory and LDAP

    Any hacker knows the keys to the network are in Active Directory (AD). Once a hacker has access to one of your user accounts, it’s a race against you and your data security protections to see if you can stop them before they can start a data breach.

    It’s important to know Active Directory backwards and forwards in order to protect your network from unauthorized access – and that includes understanding LDAP.

    What is LDAP?

    LDAP (Lightweight Directory Access Protocol) is an open and cross platform protocol used for directory services authentication.

    LDAP provides the communication language that applications use to communicate with other directory services servers. Directory services store the users, passwords, and computer accounts, and share that information with other entities on the network.

    What is Active Directory?

    Active Directory is a directory services implementation that provides all sorts of functionality like authentication, group and user management, policy administration and more.

    Active Directory (AD) supports both Kerberos and LDAP – Microsoft AD is by far the most common directory services system in use today. AD provides Single-SignOn (SSO) and works well in the office and over VPN. AD and Kerberos are not cross platform, which is one of the reasons companies are implementing access management software to manage logins from many different devices and platforms in a single place. AD does support LDAP, which means it can still be part of your overall access management scheme.

    Active Directory is just one example of a directory service that supports LDAP. There are other flavors, too: Red Hat Directory Service, OpenLDAP, Apache Directory Server, and more.

    LDAP vs. Active Directory

    LDAP is a way of speaking to Active Directory.

    LDAP is a protocol that many different directory services and access management solutions can understand.

    The relationship between AD and LDAP is much like the relationship between Apache and HTTP:

    • HTTP is a web protocol.
    • Apache is a web server that uses the HTTP protocol.
    • LDAP is a directory services protocol.
    • Active Directory is a directory server that uses the LDAP protocol.

    Occasionally you’ll hear someone say, “We don’t have Active Directory, but we have LDAP.” What they probably mean is that they have another product, such as OpenLDAP, which is an LDAP server.
    It’s kind of like someone saying “We have HTTP” when they really meant “We have an Apache web server.”

    What is LDAP Authentication?

    There are two options for LDAP authentication in LDAP v3 – simple and SASL (Simple Authentication and Security Layer).

    Simple authentication allows for three possible authentication mechanisms:

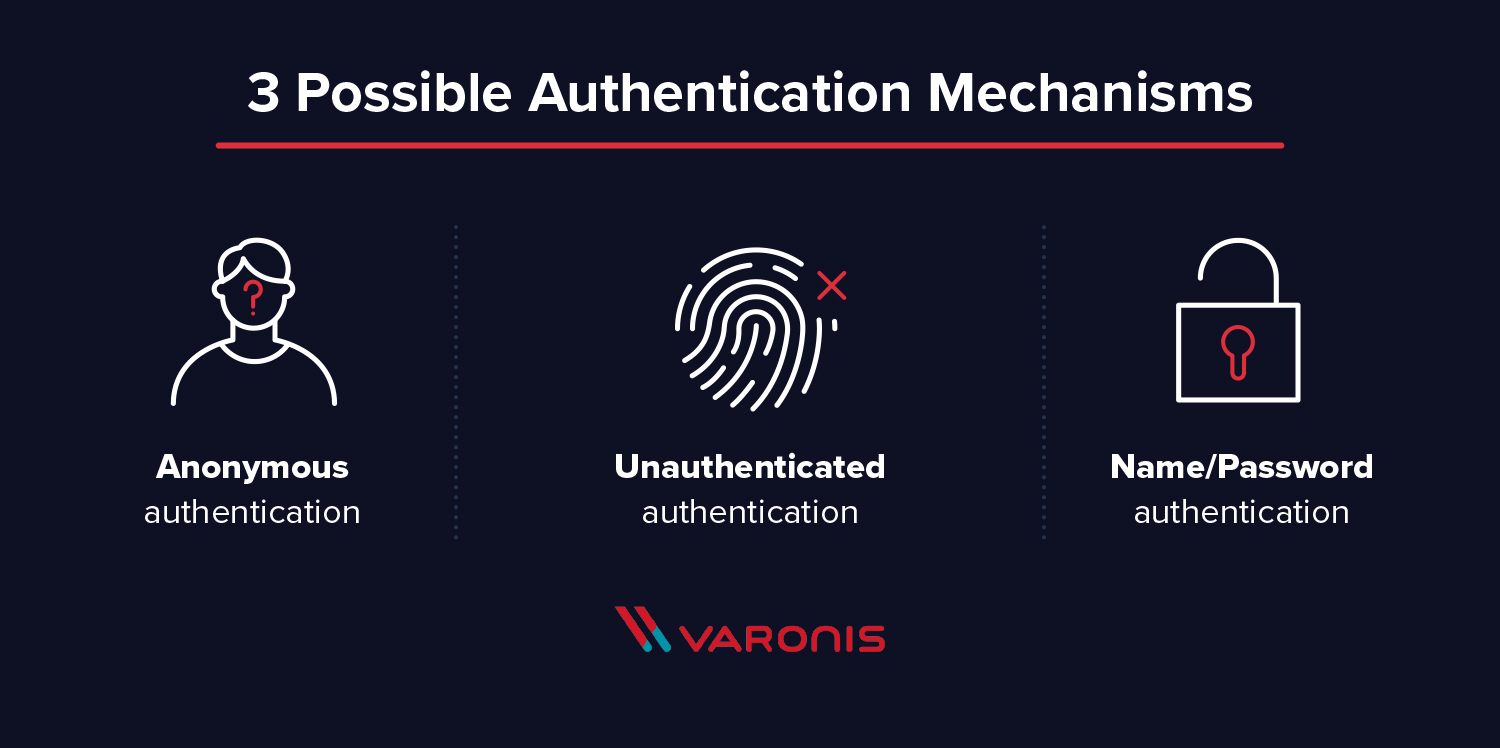
    • Anonymous authentication: Grants client anonymous status to LDAP.
    • Unauthenticated authentication: For logging purposes only, should not grant access to a client.
    • Name/Password authentication: Grants access to the server based on the credentials supplied – simple user/pass authentication is not secure and is not suitable for authentication without confidentiality protection.

    SASL authentication binds the LDAP server to another authentication mechanism, like Kerberos. The LDAP server uses the LDAP protocol to send an LDAP message to the other authorization service. That initiates a series of challenge response messages that result in either a successful authentication or a failure to authenticate.

    It’s important to note that LDAP passes all of those messages in clear text by default, so anyone with a network sniffer can read the packets. You need to add TLS encryption or similar to keep your usernames and passwords safe.

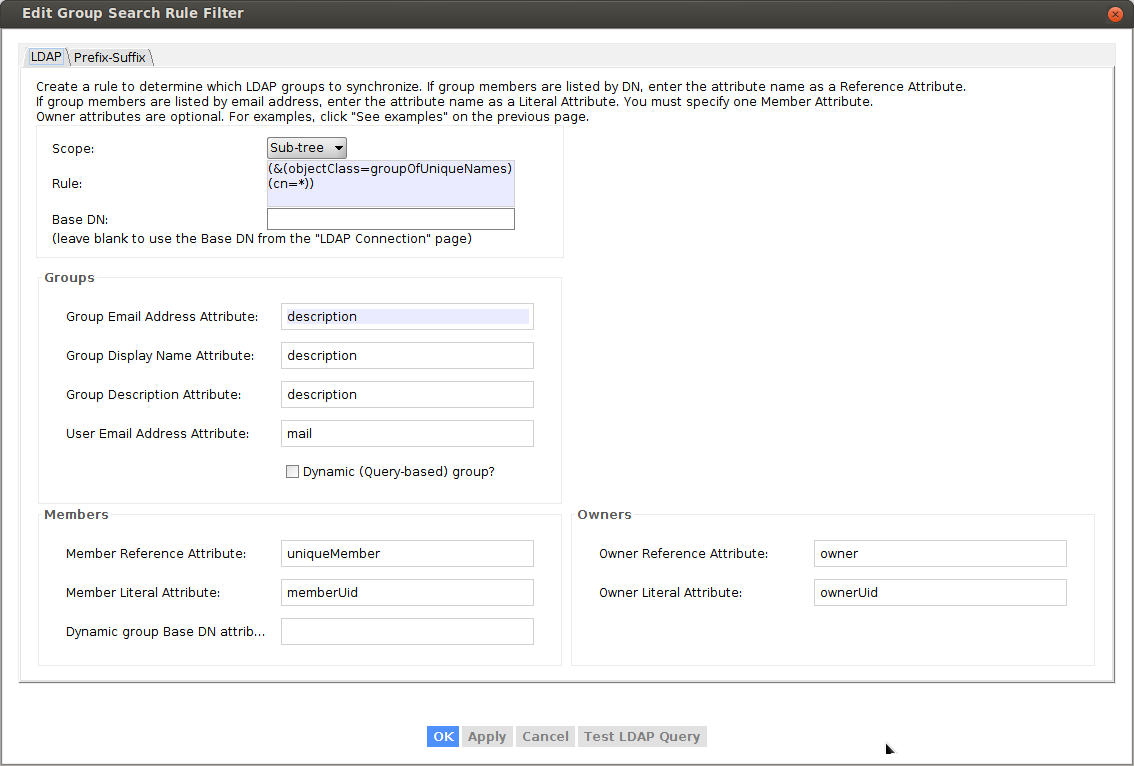
    What is an LDAP Query?

    An LDAP query is a command that asks a directory service for some information. For instance, if you’d like to see which groups a particular user is a part of, you’d submit a query that looks like this:

    (&(objectClass=user)(sAMAccountName=yourUserName)
    (memberof=CN=YourGroup,OU=Users,DC=YourDomain,DC=com))

    Beautiful syntax, huh? Not quite as simple as typing a web address into your browser. Feels like LISP.

    Luckily, in most cases, you won’t need to write LDAP queries. To maintain your sanity, you’ll perform all your directory services tasks through a point-and-click management interface like Varonis DatAdvantage or perhaps using a command line shell like PowerShell that abstracts away the details of the raw LDAP protocol.

    TL;DR: LDAP is a protocol, and Active Directory is a server. LDAP authenticates Active Directory – it’s a set of guidelines to send and receive information (like usernames and passwords) to Active Directory. Want to learn more? Get a 1:1 AD demo and learn how Varonis helps protect your Active Directory environment.

  • Setting up Google Directory Sync with OpenLDAP

    I’ll be adding updates to my new blog here: https://blog.salrashid.me/

    Introduction

    Tutorial on how to provision users and groups from a local LDAP server (OpenLDAP) into your G-suites domain. Any users and groups present in your local LDAP server will get created in G-suites. Once your users are present in your G-suites domain, you can authorize these users and groups access to Google Cloud Resources and other G-suites features.

    This article is simply a tutorial on the simplified steps you would take for your on-prem directory server (ActiveDirectory, OpenLDAP). The Directory Sync utility overwrites any existing G-suites users and groups in favor of your local LDAP. As this is just a tutorial, only execute the ‘dry-run/simulate’ capabilities unless you are absolutely sure. You will need Domain Admin user privileges to your G-suites domain.

    This sample will only sync the basic Users and Groups objects from your LDAP to G-suites.

    Some references on the Directory Sync tool:

    If you are a Google Cloud Platform user, consider migrating your organization after you have setup Directory Sync

    This article is a copy of my github page.

    OpenLDAP configuration

    This tutorial run a Docker container with a configurable OpenLDAP server that you can setup and load sample data reflecting your LDAP hierarchy. The the sample LDIF file is very basic and enables the domain dc=example, dc=com with users under ou=users and groups under ou=groups

    You can edit the slapd.conf file and import.ldif file to map to your users and directory structure. You will need to initialize and load the LDIF files once the container starts up as shown below

    ** NOTE: I’ve made some specific modifications to the objectclass mappings for a users groups display name for simplicity **

    Download the sample Dockerfile and LDAP configuration

    Start the LDAP server

    The first step is to setup the local LDAP server. You will need to clone the gitrepo to acquire the sample Dockerfile and ldap configurations.

    Build the container

    docker build -t myldap .

    Start the container

    docker run -p 1389:389 -p 1636:636 myldap slapd  -h "ldap://0.0.0.0:389  ldaps://0.0.0.0:636" -d 3 -f /ldap/slapd.conf

    Install LDAP utilities on the host

    Either: Install some LDAP utilities you will need on the docker host

    apt-get install ldap-utils

    Alternatively, you can install an LDAP UI like Apache Directory Studio.

    Initialize your LDAP server

    Load the sample data

    ldapadd -v -x -D "cn=admin,dc=example,dc=com" -w mypassword  -H ldap://localhost:1389 -f import.ldif

    If you used Apache Directory Studio, you can load and execute the .ldif file directly (“LDAP →New LDIF FIle”) after you establish a connection:

    Verify via query

    ldapsearch -v -x -D "cn=admin,dc=example,dc=com" -w mypassword -b "ou=people,dc=example,dc=com" -H ldap://localhost:1389

    If you use Directory Studio, you can browse the imported LDAP structure in the console directly.

    Setup dry-run Google Directory Sync

    Once the LDAP server is running, we need to run the Directory Sync utility.

    Again only run the Directory Sync in dry-run mode!!

    Download and Start the Directory Sync utility Download: https://support.google.com/a/answer/6120989 Launch:

    $ GoogleCloudDirSync/config-manager

    Setup the Google Domain Configuration

    You need to be domain super user to syn and run this utility:

    Connect to the LDAP server

    Connect as cn=admin,dc=example,dc=com. The default password is mypassword

    If you are using ldaps://, you need to add in the certificate chain first:

    cd GoogleCloudDirSync/jre
    $ keytool -keystore lib/security/cacerts -storepass changeit -import -file path_to_your/ldap_crt.pem -alias mydc
    $ keytool -keystore lib/security/cacerts -storepass changeit -import -file path_to_your/CA_crt.pem -alias myca

    Select Users and Groups to sync

    User Configuration

    I’ve made some specific maps for LDAP attributes to G-suites attributes:

    • cn -> Unique identifer attribute
    • mail -> email address to use
    • givenName -> Users Firstname
    • sn -> Users Lastname
    • userPassword -> SHA1 format for the users local LDAP password

    The users in LDAP are found under ou=People,dc=example,dc=com and the primary identifier is cn

    The SHA format for the password can be derived using sample utilities bundled with openldap:

    slappasswd -h  {SHA} -s mypassword
    {SHA}kd/Z3bQZiv/FwZTNjObTOP3kcOI=

    Groups Configuration

    I did not want to override the default openldap schema so I ended up using the description attribute of objectclass: groupofuniquenames as the attribute the utility will use to infer the Group Email Address:

    • Group Email Address Attribute: description

    Meaning the LDAP’s description field for a groupofuniquenames denotes the email address to provision in G-suites.

    You can search for the groups by looking in the subtree for:

    (&(objectClass=groupOfUniqueNames)(cn=*))

    For example:

    dn: cn=engineering, ou=groups, dc=example,dc=com
    cn: engineering
    objectclass: groupofuniquenames
    description: engineering@example.com
    uniqueMember: cn=user1,ou=people, dc=example,dc=com
    uniqueMember: cn=user2,ou=people, dc=example,dc=com

    To verify, select “Test Query” button:

    Execute Dry-Run Sync

    Now that you are all setup, click the ‘Simulate sync’ button to see what would happen.

    REMEMBER TO SELECT “SIMULATE SYNC”

    If had existing users already in my apps domain and I tried to import new ones, the reconciliation favored the local LDAP (meaning it would add local ldap and delete existing accounts~)

    Execute Sync

    Only execute a full sync if you are absolutely sure this is what you want to do!!

    If you are confident on the sync setup, you can initiate the full synchronization. Once the users and groups are committed, you can see them in the Google Apps domain console.

    Note, the setup does not sync or overwrite the domain admin users.

    You can also backup/export your existing users list first to a .csv file prior to running the full sync.

    The following changes were applied on the Google domain:-
    *****************************************************************************Change Status Report, Generated 10:09:17 AM Dec 28, 2016
    Successful user changes:
    Deleted: 0
    Modified: 0
    Created: 2Failures:
    Delete: 0
    Modify: 0
    Create: 0Created 2 new users
    User: "user1@example.com"
    Local key "dXNlcjE"
    Given name "user1"
    Family name "user1"
    Set SHA-1 password hashUser: "user2@example.com"
    Local key "dXNlcjI"
    Given name "user2"
    Family name "user2"
    Set SHA-1 password hash
    Successful group changes:
    Deleted: 0
    Modified: 2
    Created: 2Failures:
    Delete: 0
    Modify: 0
    Create: 0Successfully modified 2 groups
    Group: "finance@example.com"
    Added user user1@example.comGroup: "engineering@example.com"
    Added user user1@example.com
    Added user user2@example.com
    Created 2 new groups
    Group: "engineering@example.com"
    Group: "finance@example.com"The following changes were proposed:-
    *****************************************************************************Proposed Change Report, Generated 10:09:16 AM Dec 28, 2016Analyzed users:
    2 local
    1 remoteProposed changes:
    Delete: 0
    Modify: 0
    Create: 2Create - 2 total
    New user 1: "user1@example.com"
    Non-address primary key "dXNlcjE"
    Given name "user1"
    Family name "user1"
    SHA1 password
    0 aliasesNew user 2: "user2@example.com"
    Non-address primary key "dXNlcjI"
    Given name "user2"
    Family name "user2"
    SHA1 password
    0 aliasesAnalyzed groups:
    2 local
    0 remoteProposed changes:
    Delete: 0
    Modify: 2
    Create: 2
    Create Group(s) - 2 total
    "engineering@example.com"
    "finance@example.com"
    Modify (all proposed changes) - 2 total groups affected
    Modify group 1: "engineering@example.com"
    Add address "user1@example.com"
    Add address "user2@example.com"Modify group 2: "finance@example.com"
    Add address "user1@example.com"

    Directory Sync via Admin API

    You can also script the provisioning and management of users and groups via the G-suites APIs such as Directory API

    #!/usr/bin/pythonfrom apiclient.discovery import build
    import httplib2
    from oauth2client.service_account import ServiceAccountCredentials
    from oauth2client.client import GoogleCredentials
    import logging
    import json
    import sys
    from apiclient import discovery
    import oauth2client
    from oauth2client import client
    from oauth2client import toolsscope = 'https://www.googleapis.com/auth/admin.directory.user'
    credentials = ServiceAccountCredentials.from_p12_keyfile('adminapi@fabled-ray-104117.iam.gserviceaccount.com',
    'project1-5fc7d442817b.p12',
    scopes=scope)
    credentials = credentials.create_delegated('admin@example.com')
    http = httplib2.Http()
    http = credentials.authorize(http)
    service = discovery.build('admin', 'directory_v1', http=http)
    results = service.users().list(customer='C023zw2x7', domain='example.com').execute()
    users = results.get('users', [])
    print json.dumps(users, sort_keys=True, indent=4)
    for u in users:
    print json.dumps(u['primaryEmail'], sort_keys=True, indent=4)
  • Goodbye OpenSSL, and Hello To Google Tink

    Prof Bill Buchanan OBEAug 30, 2018 · 5 min read

    Which program has never reached Version 1.2, but is used as a core of security on the Internet? OpenSSL.

    OpenSSL has caused so many problems in the industry including the most severe with Heartbleed. The problem with it is that it has been cobbled together and maintained on a shoe-string budget. Google, though, have been driving cryptography standards, and especially for the adoption of HTTPs.

    And so Google have released Tink which is a multi-language, cross-platform cryptographic library. With OpenSSL we have complex bindings and which were often focused on specific systems, such as for DLLs in Windows systems. Tink is open-source and focuses on creating simple APIs and which should make the infrastructure more portable.

    To overcome the problems caused by OpenSSL, Amazon too created their own stack: s2n (signal to noise), with a core focus on improving TLS (Transport Layer Security) and using a lighter weight approach. This follows Google’s release of BoringSSL and OpenBSD’s LibreSSL (and which were forks from OpenSSL). Each have defined smaller and more stripped down versions that implement the basic functionality of SSL/TLS. Overall s2n uses only 6,000 lines of code, but, of course, this is likely to increase with new versions, as it is only a basic implementation.

    s2n is open source and hosted in GitHub allowing others to view and review the code, along with it being difficult to actually delete a project which is hosted there. Along with this, GitHub allows for a forking of the project, to support new features which the core version does not want to support.

    What is interesting too, is that Amazon have generally taken security seriously, and has respond well to bugs found by the community. This includes working with researchers and academics on new addressing bugs.

    Problems, too, have been discovered in the random generator for the key generation (one for public and one for the private key), and s2n uses two separate random number generators, which many would struggle to see the advantage of this, but perhaps time will tell.

    Meet Tink

    Ref: https://en.wikipedia.org/wiki/Authenticated_encryption

    For Tink — based on BoringSSL and now at Version 1.2.0 — the adoption has been good and is already integrated into AdMob, Google Pay, Google Assistant, and Firebase. It also integrates AEAD (Authenticated encryption AE and authenticated encryption with associated data) methods and which integrates encryption keys, a hash function, and a message authentication code (MAC). Google, too, have analysed many cryptography weaknesses and have created code which addresses many of these problems.

    The minimal standards for AEAD include [RFC5116]:

    • The plaintext and associated data can have any length (from 0 to 2³² bytes).
    • Supports 80-bit authentication.
    • CCA2 security (adaptive chosen-ciphertext attack).

    Sample code

    A basic cryptography operation is to use symmetric key encryption, and where Bob and Alice use the same key to encrypt and also to decrypt. Either Bob creates the key, and then passes it securely to Alice, or they use a key exchange method to generate a shared key:

    Tink aims to simplify encryption processing and use the best methods possible for encryption. In the following we encrypt a string (“napier”) with a key of “qwerty123”:

    package com.helloworld;import com.google.crypto.tink.aead.AeadConfig;
    import java.security.GeneralSecurityException;import com.google.crypto.tink.Aead;
    import com.google.crypto.tink.KeysetHandle;
    import com.google.crypto.tink.aead.AeadFactory;
    import com.google.crypto.tink.aead.AeadKeyTemplates;public final class HelloWorld {
    public static void main(String[] args) throws Exception {AeadConfig.register();try {KeysetHandle keysetHandle = KeysetHandle.generateNew(AeadKeyTemplates.AES128_GCM);Aead aead = AeadFactory.getPrimitive(keysetHandle);String plaintext="napier";String aad="qwerty123";System.out.println("Text:"+plaintext);
    byte[] ciphertext = aead.encrypt(plaintext.getBytes(), aad.getBytes());
    System.out.println("Cipher:"+ciphertext.toString());byte[] decrypted = aead.decrypt(ciphertext, aad.getBytes());
    String s = new String(decrypted);
    System.out.println("Text:"+s);} catch (GeneralSecurityException e) {
    System.out.println(e);
    System.exit(1);
    }}
    }

    A sample run proves the process:

    Text:  hello123
    Password: qwerty
    Type: 1
    Enc type: 128-bit AES GCMCipher: AQbLoE0ino8ofgrvuSSLOKTaYjdPc/ovwWznuMeYfjP+TO1fc6cn7DE=Cipher: 4151624C6F4530696E6F386F666772767553534C4F4B5461596A6450632F6F7677577A6E754D6559666A502B544F31666336636E3744453DDecrypted: hello123

    In this case we use 128-bit AES with GCM (Galois/counter mode). Our AEAD object is created with:

    KeysetHandle keysetHandle = KeysetHandle.generateNew(AeadKeyTemplates.AES128_GCM);Aead aead = AeadFactory.getPrimitive(keysetHandle);

    and then the encrypt() and decrypt() methods are used to create the cipher stream and then decipher it.

    A demo of these methods is here.

    Google aims to focus the industry on strong encryption methods using AEAD and with integrated authentication: AES-EAX (encrypt-then-authenticate-then-translate), AES-GCM, AES-CTR-HMAC (Counter reset), KMS Envelope. For streaming encryption these methods are converted into: AES-GCM-HKDF-STREAMING, and AES-CTR-HMAC-STREAMING .

    This AeadKeyTemplates object has the following properties:

    • AES128_CTR_HMAC_SHA25. 16 byte AES key size. IV size: 16 bytes. HMAC key size: 32 bytes.HMAC tag size: 16 bytes. HMAC hash function: SHA256
    • AES128_EAX. Key size: 16 bytes. IV size: 16 bytes.
    • AES128_GCM Key size: 16 bytes.
    • AES256_CTR_HMAC_SHA25. AES key size: 32 bytes. AES IV size: 16 bytes . HMAC key size: 32 bytes. HMAC tag size: 32 bytes. HMAC hash function: SHA256
    • AES256_EAX. Key size: 32 bytes. IV size: 16 bytes
    • AES256_GCM. Key size: 32 bytes.
    • CHACHA20_POLY1305.

    Here is an example of creating a stream cipher from AES:Which Encryption Process Encrypts on Either Side?Making stream ciphers from AES: CFB Modemedium.com

    Conclusions

    Google is changing the world of encryption for the better, and forcing developers to use a good standard (AEAD), and where there is embedded authentication of the cryptography used.

    Here is an example of using MAC tags with Tink:Proving Messages and That Bob Is Still Sending Them: MAC With Google TinkGoogle Tink is an open source repository for the integration of cryptography methods. It uses best practice in order to…medium.com

    and for digital signing:Proving Bob is “Bob”: Using Digital Signatures With Google TinkGoogle Tink is an open source repository for the integration of cryptography methods. It uses best practice in order to…medium.com

    WRITTEN BY

    Prof Bill Buchanan OBE

    Professor of Cryptography. Serial innovator. Believer in fairness, justice & freedom. EU Citizen. Auld Reekie native. Old World Breaker. New World Creator.

    Follow

    ASecuritySite: When Bob Met Alice

    ASecuritySite: When Bob Met Alice

    This publication brings together interesting articles related to cyber security.

    FollowSee responses (8)AboutHelpLegal

  • OPEN MY HOME KUBERNETES CLUSTER TO INTERNET AND SECURE IT WITH LET’S ENCRYPT TLS CERTIFICATE

    After struggling for a few weeks, finally, on my mobile, I could launch my page, that running on my home Kubernetes cluster and hosting on my public domain, with the Chrome browser. I even don’t have to tolerate that dazzling “not secure” icon and that little red text remind me that my site is not trusted, because I protected with a TLS certificate issued by Let’s Encrypt. The whole setup was free, besides the monthly bill from my ISP and the cost for turning on my 10-years old PC, and I will tell you how to do it.

    Open your home Kubernetes cluster to the internet could be significant. Imagine that you are a freelancer and want to run a demo site for your client for a few days. It can be hosted on your PC, at least they won’t complain that your page has a bug because they saw a little red warning text next to the address bar. It also could be your last frontier in freezone before you move them to cloud, until now I still hide my credit card no from Google, AWS and Azure.

    Anyway, if you plan to do what I done, you will need to run you own Kubernetes cluster locally. You can find my previous post for how to configure your home Kubernetes cluster with the Rancher server.

    The header pic illustrated my home network setup, and how the incoming requests from internet forward into my Kubernetes cluster, you can jump to next section about the TLS certificate setup if you found that pic was instructive enough.

    • Like an ordinary home network, I has a wireless router connecting to my ISP, behind it is my first-tier private LAN using network address 192.168.1.0/24. My wireless router is also a DHCP server, that assigned an IP address 192.168.1.128/24 to my desktop PC.
    • My desktop PC running on Windows 10, it installed with VMWare as the hypervisor. The NAT network managed by the VMWare is my second-tier private LAN using different network address 192.168.24.0/24. The Ubuntu virtual machines were spun up in the second-tier network formed my local Kubernetes cluster, one of the worker nodes was assigned with an IP address 192.168.24.149/24.
    • To open my Kubernetes cluster to the internet (explicitly is to open the Nginx ingress controller running on worker nodes), I configured the port forwarding rules on both wireless router and VMWare hypvisor, it allows incoming requests from internet forwarding to the Nginx ingress controller.
    • Another critical setting to make the requests through is to add inbound rule into my Windows 10 firewall. The default rule set blocked incoming requests to both Http (80) and Https (443) ports, therefore an allowed-rule is necessary for establishing the connection.
    • Meanwhile, I registered for a free public domain “hung-from-konghong.asuscomm.com” with the DDNS service come with my ASUS wireless router. I believe those well-known DDNS providers such as Google domain, DynDNS or no-IP are supported by most of the wireless routers in the market.
    • Finally, to verify the above settings, I tested the Nginx ingress controller by making request from internet. I tested with my mobile, even no ingress rules had been defined, Nginx can return a 404 page. I also used the canyouseeme.org, the utility page can capture my public IP address and checked whether my both Http and Https ports were opened or not.

    Let’s Encrypt, DNS-01 and HTTP-01 challenge

    Congratulations! If you followed to this point, your Kubernetes cluster should also be accessible from internet too. Now I had my public domain, I can request an TLS certificate for it from Let’s Encrypt.

    • Let’s Encrypt is a CA (Certificate Authority) who offers a free TLS certificate, it verifies certificate and delivers certificate using the ACME protocol.
    • First, it requires to deploy an agent on my Kubernetes cluster. The agent responds to raise certificate request to the Let’s Encrypt service, completes either the DNS-01 or the HTTP-01 challenge, and installs the certificate delivered by CA. The challenge is part of the ACME protocol, it lets the CA validates whether the public domain in the cert request is managed by the requester.
    • With the DNS-01 challenge, the agent will be asked to update the text (TXT) record (a type of DNS record) of their domain. Since I relied on ASUS’s DDNS service to register my public domain, and it does not provide the feature to update my text record, therefore I could only take the HTTP-01 challenge option.
    • With the HTTP-01 challenge, the agent has to publish a given token into a pre-agreed URL, after Let’s Encrypt servers verified that content, it will deliver a new SSL certificate to the agent.

    Cert-Manager and Helm

    I found Cert-Manager as the ACME agent implmentation for Kubernetes environment, if you search both “Kubernetes” and “Let’s Encrypt” in Google, it should be listed within top 10. The tool integrates with Nginx ingress controller to do the HTTP-01 challenge automatically.

    Install Helm and Tiller

    • Cert-Manager is available in Helm chart package, so I has to install Helm first. Helm is a packaging system for Kubernetes resources.
    • Helm comes with a backend service, the Tiller which to deploy different Kubernetes resources in a Helm chart package. To run Tiller on a Kubernetes cluster which has Role Base Access Control (RBAC) enabled (cluster created by Rancher is RBAC enabled by default). Tiller needs to run with a service account granted with the cluster-admin role. I captured the script to install Helm as below:
    # Install Helm with snap
    sudo snap install helm --classic# Create a service account for triller with following manifest
    cat <<EOF | kubectl apply -f -
    apiVersion
    : v1
    kind: ServiceAccount
    metadata:
    name: tiller
    namespace: kube-system
    ---
    apiVersion: rbac.authorization.k8s.io/v1
    kind: ClusterRoleBinding
    metadata:
    name: tiller
    roleRef:
    apiGroup: rbac.authorization.k8s.io
    kind: ClusterRole
    name: cluster-admin
    subjects:
    - kind: ServiceAccount
    name: tiller
    namespace: kube-system
    EOF# Install Tiller - the backend service for Helm
    helm init --service-account tiller# Verify Helm client and Tiller server installation
    helm version

    Install Cert-Manager

    • Cert-Manager’s document recommands to install it into a separated namespace and I captured only thenecessary steps to install Cert-Manager.
    # Install the CustomResourceDefinition resources separately
    kubectl apply --validate=false -f https://raw.githubusercontent.com/jetstack/cert-manager/release-0.11/deploy/manifests/00-crds.yaml

    # Create the namespace for cert-manager
    kubectl create namespace cert-manager

    # Add the Jetstack Helm repository
    helm repo add jetstack https://charts.jetstack.io

    # Update your local Helm chart repository cache
    helm repo update

    # Install the cert-manager Helm chart
    helm install \
    --name cert-manager \
    --namespace cert-manager \
    --version v0.11.0 \
    jetstack/cert-manager# Verify the cert-manager installation
    kubectl get pods --namespace cert-manager

    Create Issuer for Let’s Encrypt production service

    • Now I came to the ACME agent part, Issuer and Cluster Issuer are types of Kubernete resource comes with Cert-Manager, Issuer can only work with resources in its namespace, and Cluster Issuer do not has such restiction.
    • An issuer responses to deal with differnt types of CA and issuing TLS certificate for ingress rules. Following manifest defined a Cluster Issuer that works as agent for Let’s Encrypt production service, the spec.acme.solvers property defined to use HTTP-01 challenge for verification and integrated for Nginx ingress controller.
    • Other than production service, Let’s Encrypt also provides the staging service, to switch to it, you just need to change the spec.acme.server property to a proper URL.
    # Create the cluster issuer with following manifest
    cat <<EOF | kubectl apply -f -
    apiVersion
    : cert-manager.io/v1alpha2
    kind: ClusterIssuer
    metadata:
    name: letsencrypt-prod
    spec:
    acme:
    # The URL for Let's Encrypt production service
    server: https://acme-v02.api.letsencrypt.org/directory
    # My Email address used for ACME registration
    email: kwonghung.yip@gmail.com
    # Name of a secret used to store the ACME account private key
    privateKeySecretRef:
    name: letsencrypt-prod
    # Enable the HTTP-01 challenge provider
    solvers:
    - http01:
    ingress:
    class: nginx
    EOF# Verify the resource
    kubectl describe clusterissuer letsencrypt-prod

    Request a TLS certificate and save it into Secert

    • Next step is to request a TLS certificate. The Certificate resource introduced by Cert-Manager actually is for making certificate request (a little bit confuse, Ha!), the received TLS certificate eventally is stored as a Kubernetes Secret object.
    • That is what you can find in Kubernete offical reference, the spec.tls.secretName property for Ingress rule defines which Secret contains the TLS key pair, it means you can apply TLS certificate without using the Cert-Manager, but it does give a convenience way to handling the certificate.
    • Following manifest defined a Certificate Resource that refer to the Cluster Issuer created before, the TLS certificate was stored into Secret named tls-public-domain.
    #Create certificate resource to request certifiate from Cluster Issuer
    cat <<EOF | kubectl apply -f -
    apiVersion: cert-manager.io/v1alpha2
    kind: Certificate
    metadata:
    name: tls-public-domain
    namespace: default
    spec:
    dnsNames:
    - hung-from-hongkong.asuscomm.com
    issuerRef:
    group: cert-manager.io
    kind: ClusterIssuer
    name: letsencrypt-prod
    secretName: tls-public-domain
    EOF

    Deploy the Tomcat service for testing

    • After the TLS certificate Secret has been created, I deployed a Tomcat service for verification, a sample service was necessary because it needed a Ingress rule that get used the TLS certificate Secret. I used Tomcat because I am a Java developer and it does provide a default welcome page for verification.
    • I packed the Tomcat service as a Helm chart package and hosting it on GitHub Page, you can refer to my other post for details. Following script show how to deploy the Tomcat with Helm, and the Ingress rule came with the package.
    # Add my Helm repository running on GitHub Page
    helm repo add hung-repo https://kwonghung-yip.github.io/helm-charts-repo/# Update local Helm charts repository cac
    helm repo update# Install the tomcat service
    helm install hung-repo/tomcat-prod --name tomcat# Verify the ingress rule manifest after installed the tomcat, sample output as below:
    helm get manifest tomcat
    ...
    ...
    ---
    # Source: tomcat-prod/templates/ingress.yaml
    apiVersion: extensions/v1beta1
    kind: Ingress
    metadata:
    name: tomcat-tomcat-prod
    labels:
    app.kubernetes.io/name: tomcat-prod
    helm.sh/chart: tomcat-prod-0.1.0
    app.kubernetes.io/instance: tomcat
    app.kubernetes.io/version: "9.0.27"
    app.kubernetes.io/managed-by: Tiller
    spec:
    tls:
    - hosts:
    - hung-from-hongkong.asuscomm.com
    secretName: tomcat-acme-prod
    rules:
    - host: hung-from-hongkong.asuscomm.com
    http:
    paths:
    - backend:
    serviceName: tomcat-tomcat-prod
    servicePort: 8080
    • After going through all the steps, the welcome page was exposed and secured.

    Conclusion and further work

    In this post, I shared my findings and the steps that how I opened my home Kubernetes cluster to the Internet and secrued it with the Let’s Encrypt TLS certificate.

    Other than ACME agent, Cert- Manager Issuer also supports self-signed certificate as the Certificate Authority, it allows to issue a certificate to a wildcard domain within your private LAN, with a wildcard domain, different services can have their customized domain and they all under a single self signed root certificate.

    Other further works can be:

    • To bridge Github or other public repo and your home Kubernetes cluster with webhook to automate the deployment process for your home Kubernetes cluster.
    • Instead of forwarding request to only one of my worker nodes, the requests should be forward to a HA proxy that will be a load balancer of all worker nodes.

    In the next post, I will look into service mesh, Istio and their implementations.

    Below sections supplement the technical details for your reference, please feel free to leave comment or messaging me, my contact info can be found at the end of this post.


    DDNS settings in my ASUS wireless router

    Port fowarding settings in my ASUS router

    Port forwarding setting for VMWare Hypervisor

    Windows 10 firewall inbound rule settings

    References and resources

    [Wireless][WAN] How to set up Virtual Server/ Port Forwarding on ASUS Router? | Official Support |…Edit descriptionwww.asus.com[WAN] How to set up DDNS ? | Official Support | ASUS USAEdit descriptionwww.asus.comChange NAT SettingsYou can change the gateway IP address, configure port forwarding, and configure advanced networking settings for NAT…docs.vmware.comAutomatically creating Certificates for Ingress resources – cert-manager documentationEdit descriptiondocs.cert-manager.io

    email: kwonghung.yip@gmail.com

    linkedin: linkedin.com/in/yipkwonghung

    Twitter: @YipKwongHung

    github https://github.com/kwonghung-YIP

    Kwong Hung Yip

    WRITTEN BY

    Kwong Hung Yip

    Developer from Hong Kong