I’ve built a Laravel 7 client management application to manage complex billing for another much larger product. The application creates an invoice and dynamic line items (based on active features, licence overages, crazy pricing tiers, custom discounts and ad-hoc unique items) locally and then exports it to Xero via their API.
Using a daily scheduled job, the payment for these invoices are processed days later using Stripe (credit card or BECS) based on the respective client’s payment terms. A successful payment will then be applied to the invoice in Xero.
But what if a client pays their invoice before the payment due date, or if our in-house finance team make a change to the invoice once it’s in Xero? My application needs to know to ensure the client is not paying twice or paying the wrong amount when it’s picked up by the scheduled job.
Xero Webhooks to the rescue!
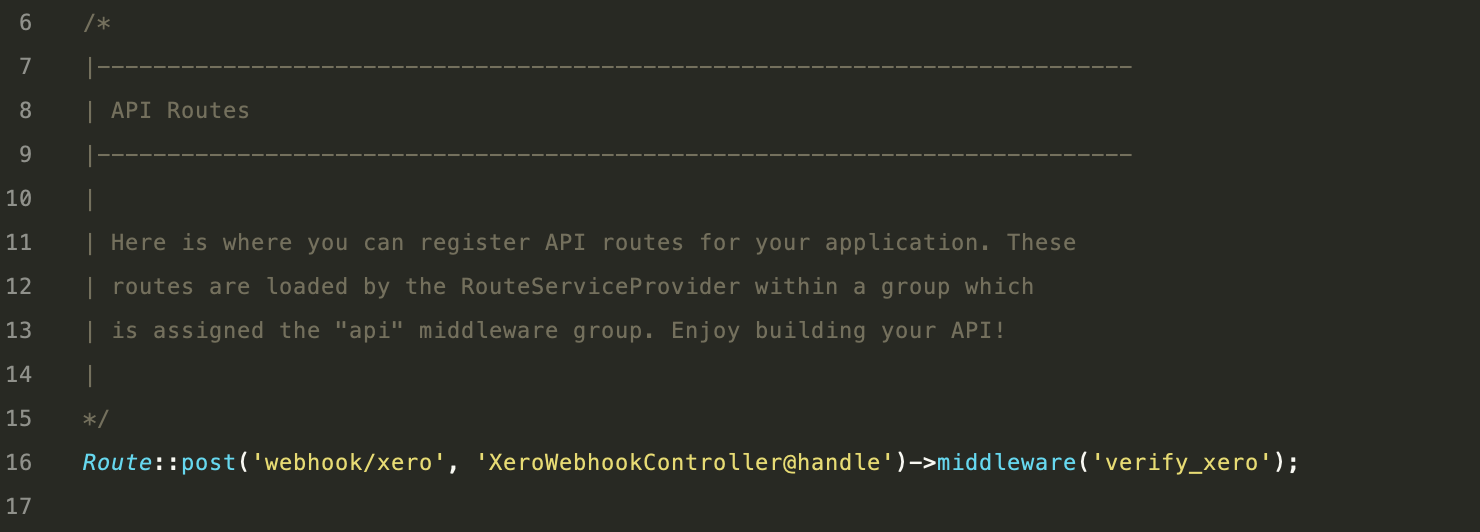
In Xero Developer you can set your app to subscribe to webhooks for both Invoices and Contacts. I have subscribed to invoice events only (update and create)… not that I care about create events.
There are a few things you need to configure in your application to satisfy Xero and safely accept payloads. This process is part of the Intent to Receive, which is essentially Xero checking you’re ready to accept payloads and that you’re verifying that the payloads are cryptographically correct.
Xero doesn’t want to be firing webhooks to something that’s not listening, so they will also rate limit based on how your application responds. Xero is expecting timely and accurate response codes (200 or 401).
“If we don’t receive an acceptable response when sending events we will continue retrying the request, with decreasing frequency for up to 24 hours. After 24 hours the webhook will be disabled and needs to be re-enabled.”
There are a few parts to this process, so follow this article and the instructions in order and you should have a relatively pain-free time configuring your application.
Add the webhook key to your .env file
Grab your Xero App’s Webhook key.
You will likely already have your Xero Client ID and Client Secret in your .env file, so create a new environment variable for XERO_WEBHOOK_KEY.
Add a new key-value pair to your config file for Xero.
‘signing_key’ => env(‘XERO_WEBHOOK_KEY’),
Use middleware to verify the payload
Abstract the request signature verification process to route middleware to ensure the payload is correctly signed.
In Terminal, use Artisan to create a new middleware:
php artisan make:middleware VerifyXeroToken
Add a new key-value pair to your route middleware array in Kernal.php.
Create a public URL using Ngrok for testing configurations
You will need to have a public URL to receive webhooks from Xero. This is made extremely easy with Laravel using a service called Ngrok via Valet (if you’re a Mac user). Ngrok will create a public URL and tunnel traffic to your localhost.
In Terminal, run the following command (Mac users):
valet share
You’ll be presented with this beauty. Don’t be concerned if you see some other connection success/failure information here. Those will clear out once you start receiving HTTP requests.
The generated ‘Forwarding’ URL is your new public URL. Copy the https version of the URL and add it to the ‘Send notifications to’ section of your Xero App’s Webhook settings.
Press ‘Save’, but hold off on sending the ‘Intent to receive’ until your middleware and Controller are both configured.
Configure your middleware
In the handle method, we’re going to create a key using the payload contents and our application’s assigned signature key. We’ll then compare that to the signature key provided by Xero in the request header. If they don’t match, we need to return a 401, otherwise, the request can pass through to the next step.
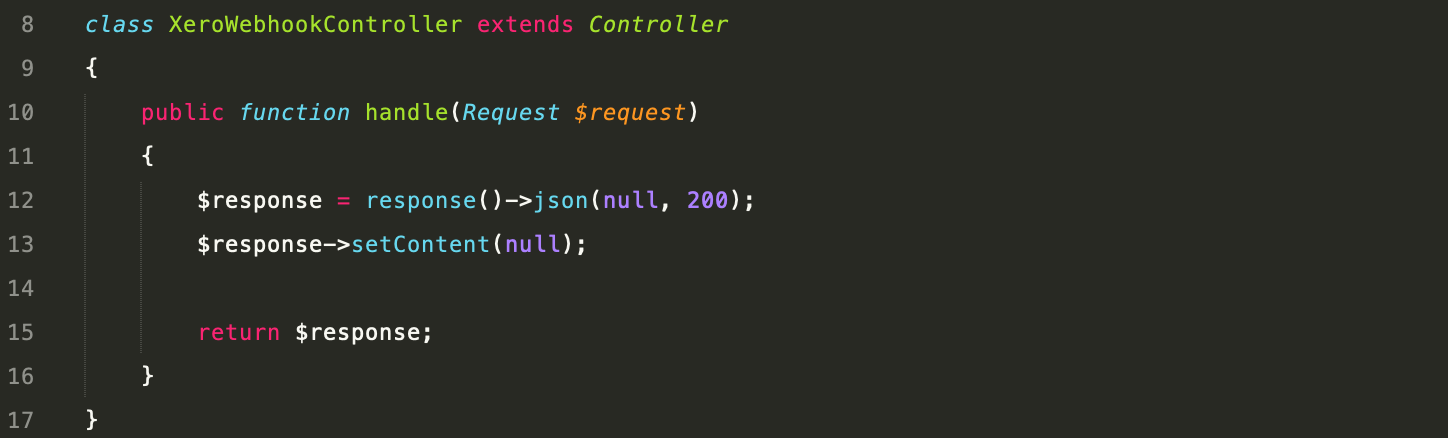
After successfully passing through the middleware, the request will be routed to your controller. For testing purposes, simply return a 200 response to Xero without evaluating the payload any further.
Once you have successfully passed the ‘Intent to receive’ process, you can build out this Controller to handle the payload.
Send the Intent to Receive
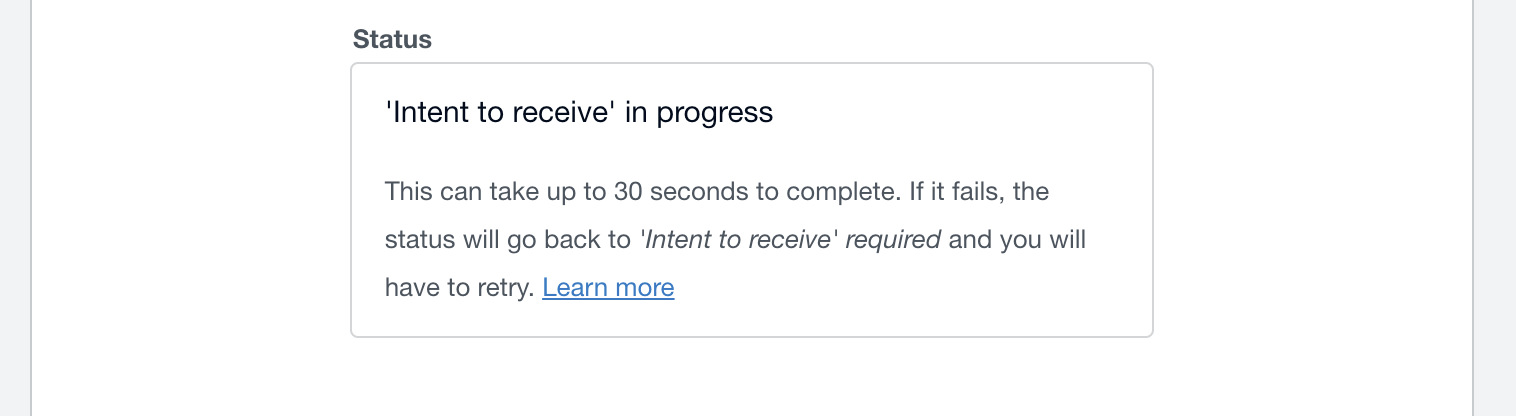
You’re now ready to send the intent to receive. Press ‘Send Intent to receive’.
Xero will send multiple webhook events to your endpoint to verify your configuration.
In my Terminal screenshot above, you can that I received 4 events and only 1 of them was a correctly signed payload.
Xero is now satisfied, so you’re ready to build your Controller.
Process the request
You’re now through the hardest part and can process the payload events as you wish!
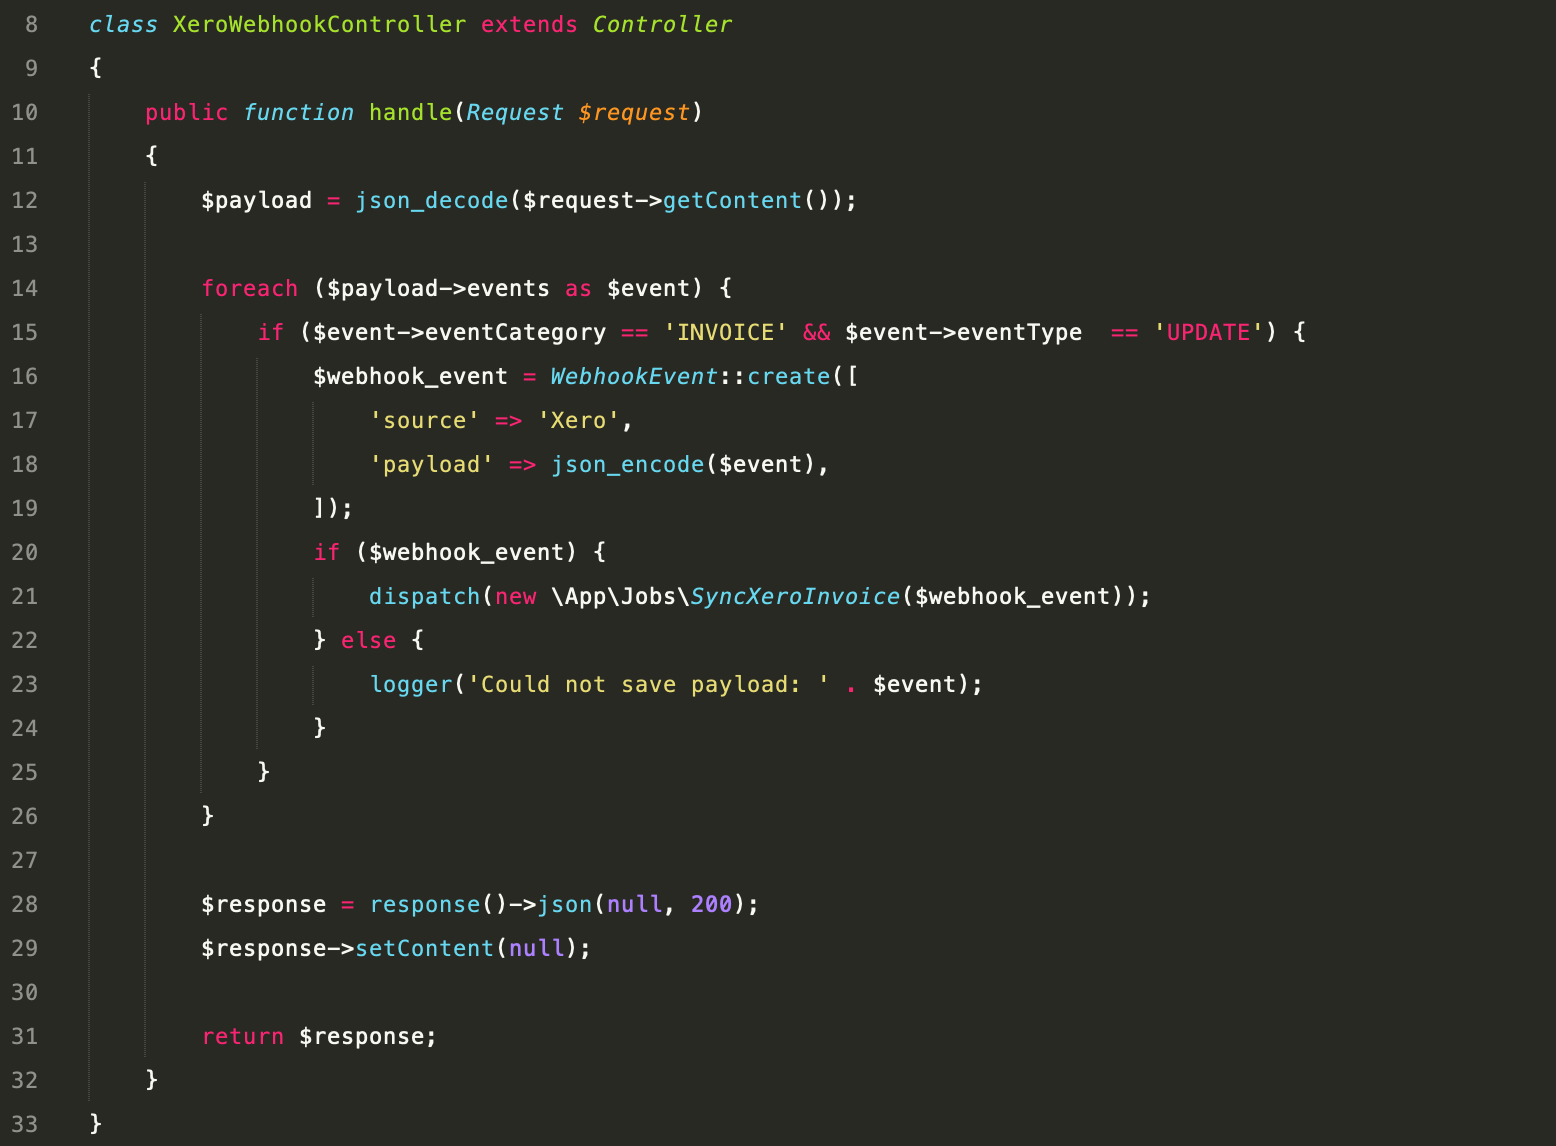
In the Controller handle method, I’m iterating over the payload events and actioning only the invoice update events. For each event, I save the payload to the database for future reference.
Because Xero expects a response within 5 seconds and the payload contains very little information, I need to make a call back to Xero to get the current invoice version. These calls could take some time and I can’t keep Xero waiting, so I dispatch the processing to a queue using a job I’ve called SyncXeroInvoice.
After iterating through the events, I return a successful 200 response with an empty body as per Xero’s requirements.
By now the SyncXeroInvoice job is processing in the background. My local invoice will be updated with the latest line items and payments information from Xero.
When it comes time to process a payment for this invoice, my application will now have the correct information.
Hopefully, this article helps you implement webhooks in your application. Let me know if you have any comments or feedback. Happy coding!
Tip: Use Postman during testing
If your application doesn’t respond correctly to Xero (with a 401 or 200), Xero will rate-limit the sending of webhook events.
While you’re building out your Controller, I recommend replicating a successful request payload into a tool like ‘Postman’.
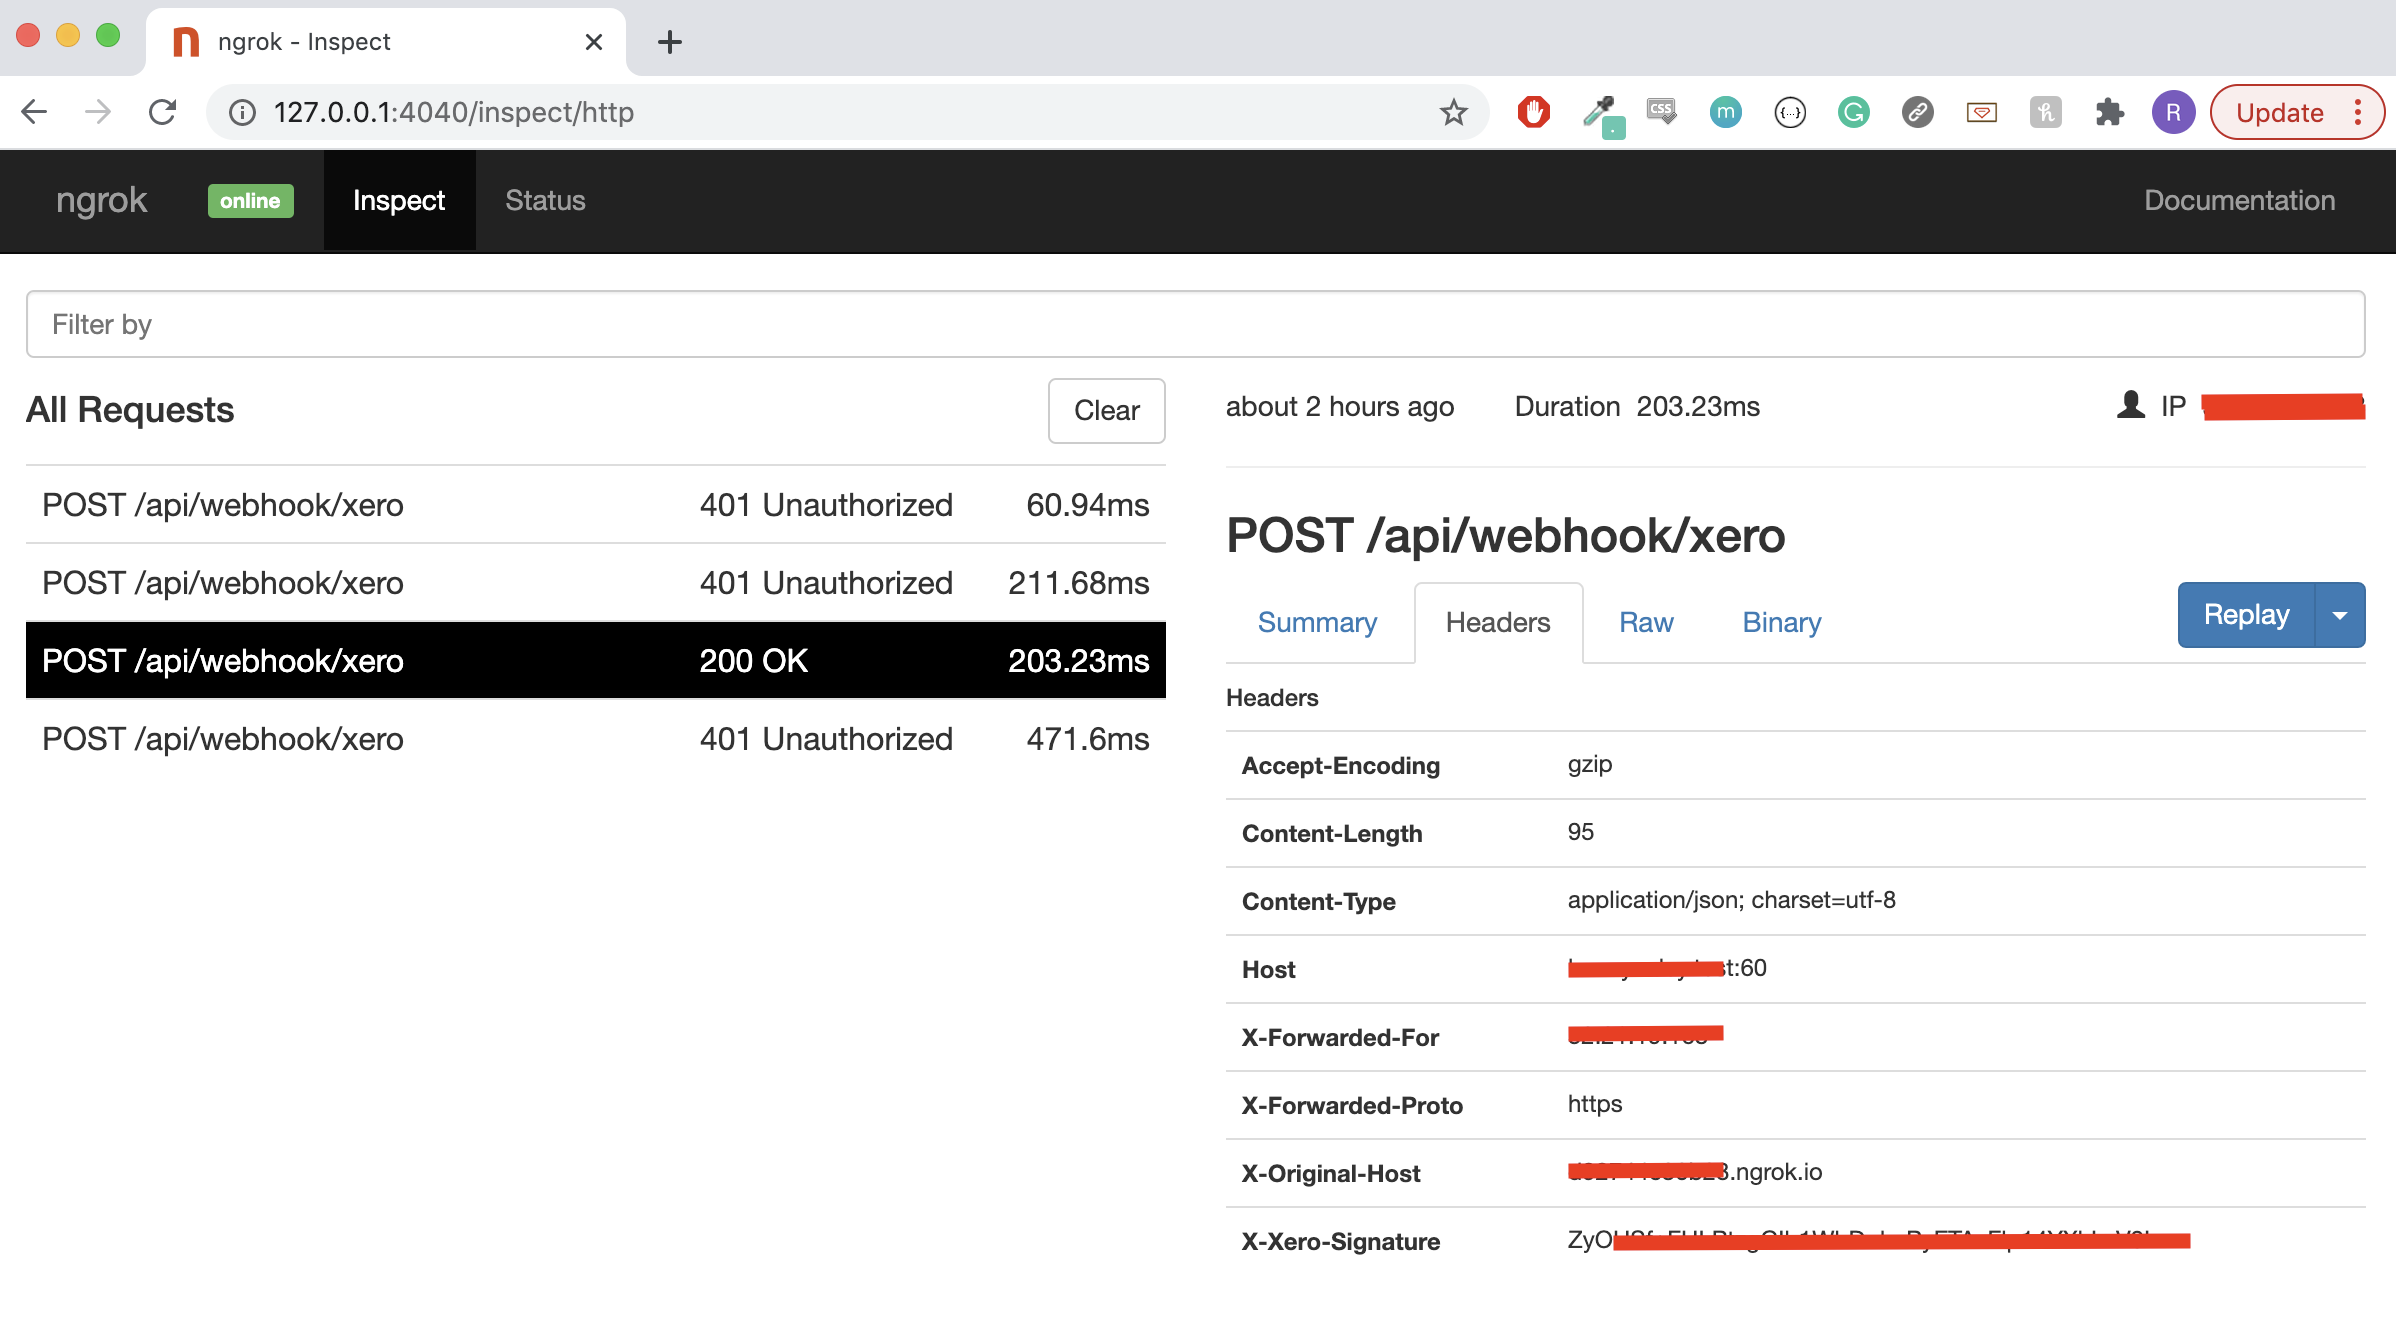
In the Terminal screenshot above, you will notice there’s a web interface for Ngrok (mine is http://127.0.0.1:4040).
From the Ngrok menu, select ‘Inspect’. Here you will find each request, related JSON payload and the x-xero-signature header.
Grab the payload, the header and build the request in Postman. Send the same payload to your application as many times as you need!
Sign up for Top 10 Stories
By The Startup
Get smarter at building your thing. Subscribe to receive The Startup’s top 10 most read stories — delivered straight into your inbox, once a week. Take a look.Get this newsletter
By signing up, you will create a Medium account if you don’t already have one. Review our Privacy Policy for more information about our privacy practices.
Dalam rangka memenuhi tugas besar EL3014 Sistem Mikroprosesor dan modul 5 EL3214 Praktikum Sistem Mikroprosesor, dirancang sebuah robot omni-directional 3 roda dengan sensor warna dan LCD. Sistem yang dirancang akan mampu menerima input dari keypad dan menggerakkan robot sesuai dengan input yang diberikan. Roda digerakkan menggunakan motor DC yang didrive oleh LM2903. Sistem juga mampu mempercepat dan memperlambat gerak robot dengan memanfaatkan mode PWM pada timer AVR. Selain itu, sistem juga akan membaca warna jalan yang dilalui oleh robot dan menampilkan warnanya pada LCD.
1. Spesifikasi
1.1. Komponen yang Digunakan
Atmega 32
2 x Driver Motor L293D
3 x Motor DC
4x Baterai AA 1.5V
Kotak 4 Baterai
LCD 16×2
LDR
LED merah, LED kuning, LED Hijau
Port ISP
Gearbox
Keypad 3×4
Supplai Batrai Lipo 3 cell
Header 2×5
Header 1×8
Body mekanik menggunakan akrilik
1.2. Spesifikasi Sistem
Tegangan motor 12 volt
Tegangan sistem 5 volt
Keypad memberikan 8 perintah. Key “1” menggerakkan motor pivot ke kiri, key “2” menggerakkan motor pivot ke kanan, key “7” menggerakkan motor ke kiri, key ”8” menggerakkan motor ke depan, key “9” menggerakkan motor ke kanan, key “” memperlambat gerak motor, key”0” menggerakkan motor ke belakang, dan key “#” mempercepat gerak motor. Tombol reset mengembalikan kecepatan motor menjadi kecepatan awal. LCD menampilkan contrast jalan dan warna jalan yang dilalui. LCD menampilkan pwm ketika tombol “” dan “#” ditekan.
Sensor warna memancarkan cahaya dari 3 LED yang berbeda pada permukaan jalan dan memberikan masukkan ke ADC serta menentukan warna jalan dengan benar.
2. Desain Rangkaian
2.1. Skema Rangkaian
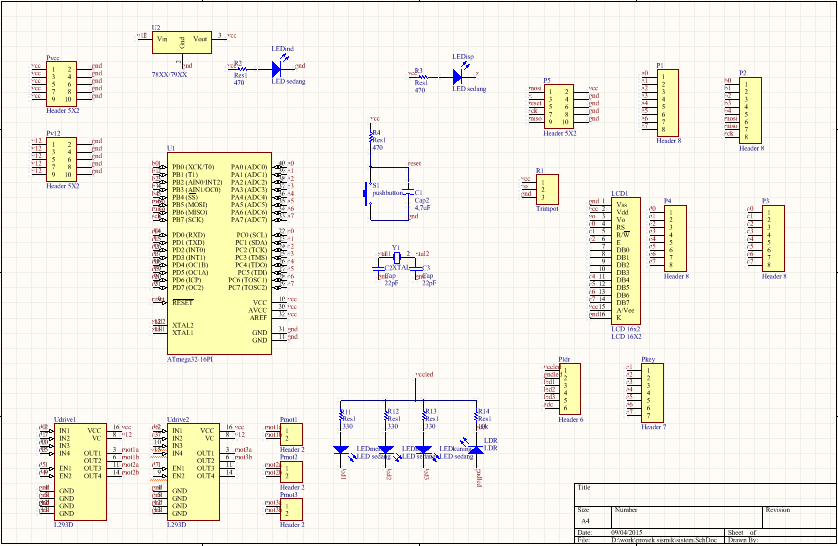
Rangkaian yang dirancang terdiri dari 2 bagian. Bagian pertama adalah sistem minimum yang terdiri dari beberapa bagian penting, yaitu mikrokontroler ATMEGA32, header LCD, header keypad, driver motor, header sumber 12V dan 5V. Bagian kedua adalah modul sensor warna yang terdiri dari beberapa bagian penting, yaitu LED merah, hijau, kuning, dan LDR. Berikut adalah skematik rangkaian yang diimplementasikan pada PCB dengan altium designer release 13.
Gambar 2.1.1: Desain Skematik Rangkaian
2.2 Cara Kerja Rangkaian
Berikut beberapa pointer mengenai cara kerja rangkaian :
PORT ISP: Hubungan downloader antara port ISP dan port USB laptop akan memberikan supply tegangan 5 V, sehingga seluruh antarmuka dan komponen yang memiliki spesifikasi kerja 5 V akan berjalan. Namun, driver motor yang membutuhkan tegangan 12 V masih tidak dapat dijalankan. Port ISP ini berfungsi untuk jalur komunikasi antara laptop (tempat memrogram) dan Atmega32 (mikrokontroler sismin).
ATMega32: Chip mikrokontroler yang akan diprogram menggunakan laptop dan berfungsi untuk mengatur kerja sistem yang dirancang.
Keypad: Output keypad dihubungkan pada port A1-A4 dan input keypad dihubungkan pada port A5-A8. Selanjutnya, port-port ini akan diatur dan diprogram untuk melakukan scanning keypad pada bagian implementasi software.
Pushbutton: Ketika pushbutton ditekan, pin reset pada ATMega32 yang bersifat active low akan digroundkan sehingga sistem akan menjalankan perintah dari awal kembali (reset).
Sumber 5V: Sumber ini dihubungkan pada mikrokontroler ATMega32, LCD, LED indikator, dan modul sensor warna untuk membuat sistem bekerja.
Sumber 12V: Sumber ini dihubungkan pada sumber daya motor agar motor yang bekerja pada tegangan 12V dapat dijalankan.
Pin D4, D5, dan D7 yang merupakan pin OCR1A, OCR1B, dan OCR2 dihubungkan pada pin EN driver motor untuk mengatur kecepatan motor menggunakan mode PWM.
Modul Sensor Warna: Modul ini memiliki keluaran yang dihubungkan pada pin A0 sebagai ADC yang akan mengkonversikan data analog menjadi digital. LED merah, kuning dan hijau dihubungkan pada pin B0-B2 dan dikontrol agar menyala secara bergantian pada bagian implementasi software.
3. Implementasi Rangkaian
3.1. Layout PCB
Berikut adalah desain sistem minimum dan modul sensor warna yang diimplementasikan pada PCB dengan altium de-signer release 13.
Gambar 3.1.1: Layout PCB (Kiri: Sistem Minimum, Kanan: Modul Sensor Warna)
Dalam perancangan PCB, pengaturan yang digunakan adalah :
Preferred Width : 10 mil
Min Width : 10 mil
Max Width : 10 mil
Single Layer
Pengaturan tersebut dilakukan agar pada desain PCB tidak terjadi short serta sesuai rule minimal tempat kami mencetak PCB. Kemudian, penggunaan single layer dipilih untuk meminimalkan cost yang diperlukan dalam implementasi rangkaian.
3.2. Desain dan Teknik Implementasi Arah Gerakan Robot
Robot yang dirancang merupakan robot omni-directional 3 roda. Artinya, sudut antara setiap sumbu roda memiliki besar 120o. Agar visualisasi model robot lebih mudah, sumbu-sumbu roda robot dapat diamati pada gambar 3.2.2. Robot kami desain sedemikian rupa, sehingga untuk menggerakkan robot ke arah tertentu, arah gerak roda-roda dapat direpresentasikan dengan persamaan berikut :
Catatan: Sumbu x positif menunjukkan arah kanan, sumbu y positif menunjukkan arah depan, V menunjukkan kecepatan gerak roda.
Arah Depan
Roda 1
: v=-Vcos60°x+Vsin60°y
Roda 2
: v=Vcos60°x+Vsin60°y
Roda 3
: v=0
Resultan
: v=2Vsin60°y
Arah Depan
Belok Kiri
Roda 1
: v=-0.5Vcos60°x+0.5Vsin60°y
Roda 2
: v=-0.5Vcos60°x-0.5Vsin60°y
Roda 3
: v=-Vx
Resultan
: v=-2Vx
Belok Kiri
Belok Kanan Roda 1 : v=0.5Vcos60°x-0.5Vsin60°y
Roda 1
: v=0.5Vcos60°x-0.5Vsin60°y
Roda 2
: v=0.5Vcos60°x+0.5Vsin60°y
Roda 3
: v=Vx
Resultan
: v=2Vx
Belok Kanan
Roda 2 : v=0.5Vcos60°x+0.5Vsin60°y
Roda 3 : v=Vx
Resultan : v=2Vx
Arah Belakang Roda 1 : v=Vcos60°x-Vsin60°y
Roda 2 : v=-Vcos60°x-Vsin60°y
Roda 3 : v=0
Resultan : v=-2Vsin60°y
Pivot Kiri Roda 1 : v=-Vcos60°x+Vsin60°y
Roda 2 : v=-Vcos60°x-Vsin60°y
Roda 3 : v=Vx
Resultan :0 (Robot tidak bergerak, hanya berputar di tempat ke arah kiri).
Pivot Kanan Roda 1 : v=Vcos60°x-Vsin60°y
Roda 2 : v=Vcos60°x+Vsin60°y
Roda 3 : v=-Vx
Resultan :0 (Robot tidak bergerak, hanya berputar di tempat ke arah kanan).
sumbuGambar 3-2-2 Sumbu Roda Robot
Implementasi Software 4.1 Diagram Blok
Diagram blok dari sistem dapat diamati pada gambar berikut :
Diagram Blok-1Gambar 4-1-1 Diagram Blok
4.2 Scanning Keypad
Pada sistem ini, keypad berfungsi untuk memberikan masukkan yang kemudian digunakan untuk mengontrol gerak dan kecepatan robot. Cara kerja scanning keypad dilakukan dengan memeriksa tombol yang ditekan secara per-baris. Karena scanning dilakukan secara per-baris dan keypad merupakan keypad 3 kolom 4 baris, maka 4 pin dari keypad diatur sebagai output dan 3 pin dari keypad diatur sebagai input. Sebelum mengimplementasikan teknik scanning keypad, pull-up resistor perlu diaktifkan dengan menginisialisasi PUD pada SFIOR. Kemudian, pada fungsi scanning keypad itu sendiri, setiap pin output diset ‘LOW’ satu persatu. Setelah pin output diset ‘LOW’, akan dilakukan pengecekan pada pin-pin input keypad dan dilihat mana yang memiliki logika ‘LOW’. Pasangan pin output dan input yang berlogika ‘LOW’ menunjukkan tombol keypad yang ditekan. Setelah tombol yang ditekan telah diketahui, fungsi akan mengembalikan karakter yang dari tombol tersebut. Pada sistem ini, tombol keypad yang digunakan hanya tombol ‘1’, ‘3’, ‘7’, ‘8’, ‘9’, ‘*’, ‘0’, dan ‘#’. Oleh sebab itu, pengecekkan baris kedua pada keypad tidak diperlukan. Flowchart dari fungsi scanning keypad dapat diamati pada gambar berikut :
KeypadGambar 4-2-1 Flowchart Fungsi Scanning Keypad
4.3 Prosedur LED
LED merah, hijau, dan kuning merupakan bagian dari modul sensor warna yang berfungsi untuk memancarkan sinar ke permukaan jalan. LED merah, hijau, dan kuning diatur agar menyala secara bergantian masing-masing selama 10ms. Waktu 10ms ini dipilih agar waktu yang termakan untuk menjalankan fungsi ini tidak terlalu besar dan tidak mengganggu proses lainnya seperti scanning keypad dan penggerakkan motor. LED merah, hijau, dan kuning dihubungkan pada PORT B0-B2, sehingga sebelum memanggil prosedur ini, PORT B0-B2 perlu diinisialisasi pada fungsi utama sebagai output. Pemberian delay 10ms dilakukan dengan menggunakan delay avr yang librarynya telah dimasukkan. Pada implementasi rangkaian, LED diatur agar bersifat active low. Oleh sebab itu, prosedur LED akan mengeset PORT B0-B2 “LOW” secara bergantian untuk menyalakan ketiga LED secara bergantian. Flowchart dari fungsi LED dapat diamati pada gambar berikut :
LEDGambar 4-3-1 Flowchart Prosedur LED
4.4 Fungsi Read ADC
Keluaran dari modul sensor warna merupakan tegangan analog dari LDR. Oleh sebab itu, diperlukan ADC untuk mengkonversi tegangan analog tersebut menjadi data digital. Fungsi ini akan membaca keluaran ADC dan mengembalikan nilainya ke fungsi utama. Flowchart dari fungsi ini dapat diamati pada gambar berikut :
ADC
Gambar 4-4-1 Flowchart Fungsi Read ADC
4.5 Program Utama
Pada program utama, akan dilakukan beberapa hal diantaranya :
Inisialisasi Pada bagian inisialisasi, program utama akan menginisialisasi register timer, I/O, dan LCD. Motor yang dikendalikan berjumlah 3 buah, oleh sebab itu cukup digunakan 2 buah timer, yaitu timer 1 (memiliki 2 buah register compare) dan timer 2. Register-register timer ini akan diinisialisasi sehingga bekerja pada mode PWM dan interupt untuk compare match aktif. Interupt pada compare match perlu diaktifkan karena pin-pin enable dari motor dihubungkan pada pin-pin compare timer ATMega32. I/O perlu diinisialisasi untuk mengatur port mana yang bekerja sebagai input dan port mana yang bekerja sebagai ouput. DDR port-port yang terhubung pada LED, LCD, compare timer, dan output keypad diset “HIGH”. DDR port-port input seperti input keypad diset “LOW”. Selain itu, dilakukan juga inisialisasi ADC untuk mengaktifkan pin ADC. Hal lain yang perlu dilakukan adalah mengeset PUD pada SFIOR “LOW” untuk mengaktifkan pull-up resistor dan mengaktifkan global interrupt.
Looping while(1) Pada bagian ini, dilakukan beberapa hal, yaitu :
Pemanggilan fungsi-fungsi Program utama akan memanggil fungsi led, fungsi keypad, dan read adc secara berulang-ulang untuk pengolahan lebih lanjut.
Menampilkan warna jalan Setelah menjalankan fungsi read adc, program utama akan menentukan lokasi tampilan contrast pada baris kedua LCD menggunakan perintah lcd gotoxy yang telah tersedia pada library alcd.h. Kemudian, program mencetak nilai contrast menggunakan perintah sprintf yang telah tersedia pada library stdio.h. Berdasarkan nilai contrast yang dibaca, program akan menentukan warna jalan sesuai database warna yang telah dibuat.
Menggerakkan dan mengatur kecepatan robot Program utama akan terus mengupdate kecepatan motor 3 dengan mendefinisikan nilai OCR2. Motor 1 dan 2 tidak langsung diupdate kecepatannya karena arah gerak robot menentukan kecepatan motor 1 dan motor 2. Motor 1 dan motor 2 memiliki kecepatan yang berbeda untuk gerak belok, gerak pivot dan maju-mundur, oleh sebab itu update kecepatan motor 1 dan motor 2 dilakukan dalam perintah conditional if jika tombol yang menggerakkan motor ditekan. Setelah menjalankan fungsi keypad, program utama akan mengeksekusi perintah sesuai dengan masukkan keypad yang diberikan. Ketika tombol-tombol penggerak motor, yaitu tombol ‘1’, ‘3’, ‘7’, ‘8’, ‘9’, dan ‘0’ ditekan, pin-pin arah motor akan diset sehingga menghasilkan arah gerak sebagai berikut : (Keterangan : sumbu x positif merepresentasikan arah kanan, dan sumbu y positif merepresentasikan arah depan).
Arah Depan (Tombol 8)
Motor 1 :-x+y
Motor 2 :x+y
Motor 3 : Diam
Belok Kiri (Tombol 7)
Motor 1 :-x+y
Motor 2 :-x–y
Motor 3 😡
Pivot Kiri (Tombol 1)
Motor 1 :-x+y
Motor 2 :-x–y
Motor 3 😡
Belok Kanan (Tombol 9)
Motor 1 :x–y
Motor 2 :x+y
Motor 3 😡
Pivot Kanan (Tombol 3)
Motor 1 :x–y
Motor 2 :x+y
Motor 3 😡
Arah Belakang (Tombol 0)
Motor 1 :x–y
Motor 2 :-x–y
Motor 3 : Diam
Selain penentuan arah, dilakukan juga update kecepatan motor 1 dan motor 2 sebelum motor digerakkan. Kecepatan motor 1 dan motor 2 saat bergerak ke depan, ke belakang, pivot kiri, dan kanan sama dengan kecepatan motor 3. Sedangkan, ketika belok ke kiri atau ke kanan, motor 1 dan motor 2 memiliki kecepatan 2x lebih lambat daripada motor 3. Jika tombol-tombol pengatur kecepatan motor ditekan, variabel yang menyimpan nilai OCR akan di-increment dan di-decrement bergantung tombol mana yang ditekan. Bila tombol ‘*’ ditekan, variabel akan di-increment sehingga kecepatan motor berkurang. Bila tombol ‘#’ ditekan, variabel akan di-decrement sehingga kecepatan motor bertambah.Variabel ini kemudian akan diupdate sebagai nilai register compare OCR timer 1 dan timer 2 yang mengatur kecepatan motor. Semakin kecil nilai OCR, semakin cepat register TCNT timer mencapai nilai OCR. Nilai pada register Counter TCNT akan terus menerus naik sampai nilai maximum, lalu kembali ke 0. begitu seterusnya selama sinyal clock diberikan kepada timer. Nilai OCR diset untuk mengatur pembentukan PWM.
saat nilai TCNT > nilai OCR maka pin OC mengeluarkan sinyal HIGH , saat nilai TCNT < nilai OCR maka pin OC mengeluarkan sinyal LOW. Ingat bahwa pin-pin OC dihubungkan pada pin-pin enable motor. Sehingga, semakin kecil nilai variabel penyimpan nilai OCR, pulsa PWM semakin lebar dan semakin cepat motor bergerak (begitu juga sebaliknya).. Ketika tombol ini ditekan, program juga akan membersihkan tampilan LCD, kemudian mencetak nilai variabel tersebut pada layar LCD selama 0.3 detik.
Flowchart dari program utama dapat diamati pada gambar berikut :
main
Gambar 4-5-1 Flowchart Program Utama
4.6 Software yang Digunakan
Dalam perancangan dan implementasi sistem, digunakan beberapa software, yaitu CVAVR, progisp, Altium Designer, dan SolidWorks. CVAVR digunakan untuk memprogram mikrokontroler. Kemudian, progisp digunakan untuk mendownload program yang telah dibuat ke dalam mikrokontroler. Perancangan desain skematik dan layout PCB dilakukan menggunakan Altium Designer. Perancangan desain mekanik robot diakukan menggunakan software SolidWorks.
Pengujian dan Analisa 5.1 Pengujian yang Dilakukan
Pengujian yang kami lakukan adalah :
Pengujian Power Supply Mengukur tegangan pada pin-pin sumber tegangan secara langsung menggunakan multimeter. Pengecekkan dilakukan dengan menghubungkan baterai 12 V pada pin sumber tegangan 12 V, kemudian mengukur tegangan pada pin-pin daya motor yang disuplai oleh sumber tegangan 12 V ini. Kemudian, dilakukan juga pengecekkan tegangan pada pin-pin sumber tegangan 5 V yang merupakan keluaran dari LM7805. Hasil pengukuran tegangan yang diperoleh pada pin sumber 12 V adalah 12V dan pengukuran tegangan yang diperoleh pada pin sumber 5V adalah 5 V. Sehingga, pengujian menunjukkan bahwa suplai tegangan pada sistem telah sesuai.
Pengujian ATMega32 dan Port ISP Pengujian dilakukan dengan menghubungkan ATMega32 dan PORT ISP menggunakan USBasp. Setelah dihubungkan, software progisp dibuka dan digunakan untuk membaca chip ATMega32. Apabila pembacaan id chip berhasil dan tidak keluar notice “chip programming error”, maka hubungan ATMega32 dan Port ISP sudah benar. Kemudian, chip diprogram dengna test program untuk mengecek apabila program berhasil didownload ke dalam chip. Pengujian menunjukkan bahwa ATMega32 dan PORT ISP bekerja dengan baik.
Pengujian Reset Button Pengujian reset button dilakukan dengan merubah kecepatan motor menggunakan keypad. Kemudian, nilai kecepatan motor dicek melalui LCD. Ketika reset button ditekan, tampilan nilai kecepatan motor kembali ke nilai semula. Oleh sebab itu, pengujian menunjukkan bahwa reset button bekerja dengan benar.
Pengujian Keypad dan LCD Pengujian keypad dan LCD dilakukan dengan program sederhana yang melakukan scanning keypad per-baris dan menampilkan hasil scanning pada LCD. Tampilan LCD untuk setiap penekanan tombol dapat diamati pada tabel berikut :
Tabel 5.1.1 Hasil Uji Keypad dan LCD
Tombol Keypad
Display LCD 1
1
2
2
3
3
4
4
5
5
6
6
7
7
8
8
9
9
*
*
0
0
#
#
Hasil pengujian keypad dan LCD telah menunjukkan hasil yang sesuai harapan, maka keypad dan LCD telah bekerja dengan baik.
Pengujian Motor dan Timer Pengujian robot dilakukan menggunakan bantuan keypad yang telah diuji sebelumnya. Sistem akan diprogram sehingga menggerakkan robot sesuai masukkan keypad. Gerakan robot untuk setiap penekanan tombol dapat diamati pada tabel berikut :
Tabel 5.1.2 Hasil Uji Motor dan Timer
Tombol Keypad
Gerakan Motor
1
Pivot Kiri
3
Pivot Kanan
7
Belok Kiri
8
Maju
9
Belok Kanan
*
Semakin Lambat
0
Mundur
#
Semakin Cepat
Hasil pengujian motor dan timer telah menunjukkan hasil yang sesuai harapan, maka motor dan timer telah berfungsi dengan baik.
Pengujian Modul Sensor Warna Modul sensor warna diuji dengan meletakkan robot pada lintasan yang terbuat dari karton yang terdiri dari beberapa warna, yaitu merah, hijau, biru, dan kuning. Sistem akan dijalankan dan hasil display warna pada LCD akan diamati apabila sesuai dengan warna karton. Display LCD terhadap warna lintasan robot dapat diamati pada tabel berikut :
Tabel 5.1.3 Hasil Uji Modul Sensor Warna
Warna Karton Display LCD Merah Merah Hijau Hijau Biru Biru Kuning Kuning Hasil pengujian modul sensor warna telah menunjukkan hasil yang sesuai harapan, maka modul sensor warna telah berfungsi dengan baik.
Pengujian Sistem secara Keseluruhan Pengujian sistem secara keseluruhan dilakukan dengan menggerakkan robot pada lintasan berwarna. Arah gerak robot terhadap input keypad telah sesuai dengan tabel 5.1.2 dan display warna pada LCD telah sesuai dengan tabel 5.1.3. Maka, sistem yang dirancang secara keseluruhan telah berfungsi dengan benar.
5.2 Masalah yang Dihadapi
Dalam merancang dan mengerjakan sistem minimum, ada beberapa masalah yang ditemukan sehingga perlu dilakukan debugging dan troubleshooting. Masalah-masalah yang ditemukan adalah :
Board Pertama Gagal PCB sistem minimum yang pertama kami cetak gagal karena tempat percetakkan PCB tidak melubangi seluruh pin yang digunakan. Sehingga, dilakukan pencetakkan ulang.
VCC dan Ground Short Setelah seluruh komponen disolder dan ditempatkan pada PCB, terdapat hubungan short antara VCC dan ground. Permasalahan kemudian dapat diselesaikan dengan merapikan solderan.
Terdapat VCC 5V yang Terhubung VCC dari PORT ISP tidak terhubung dengan pin-pin sumber 5V lainnya. Sehingga, ketika board dihubungkan dengan PC, sistem tidak tersuplai oleh sumber tegangan 5V. Permasalahan ini dapat diselesaikan dengan memberikan jumper untuk menghubungi VCC PORT ISP dengan salah satu pin sumber 5V.
Manajemen Power Penggunaan 3 buah motor DC membuat arus yang mengalir pada sistem kurang dan menyebabkan terjadinya brown out. Hal ini menyebabkan sistem langsung reset. Masalah dapat diselesaikan dengan menambahkan sumber tegangan lain dari 4 buah batre 1.5V untuk menyuplai sistem, sehingga sumber 12V tidak terlalu terbebani.
Pengaruh Cahaya Luar terhadap Pembacaan LDR Intensitas cahaya dari luar mempengaruhi pembacaan LDR, sehingga modul sensor warna tidak dapat dikalibrasi dengan tepat. Hal ini dapat diatasi dengan memasang penutup untuk mengisolasi cahaya pantulan dari LED dan mencegah interferensi dari cahaya luar.
Nilai Kontras Pembacaan Sensor Warna Hampir Sama untuk Beberapa Warna Karena sensor warna dibuat secara manual, hasil pembacaannya tidak terlalu akurat. Sebagai contoh, warna kuning dan putih menghasilkan hasil pembacaan nilai contrast yang hampir sama. Sehingga, dapat terjadi kesalahan pembacaan warna pada lintasan kuning dan putih.
5.3 Foto Alat
closed up sistemGambar 5-3-1 Close Up Sistem
closed up modul
Gambar 5-3-2 Close Up Modul Sensor Warna
robot pada lintasan
Gambar 5-3-3 Robot pada Lintasan Warna
Kesimpulan Kesimpulan yang diperoleh dari proses perancangan dan implementasi sistem adalah :
Alat telah mampu untuk menyuplai tegangan 12 V pada motor dan driver. Alat telah mampu untuk menyuplai tegangan 5 V pada sistem. Proses scanning keypad telah berhasil dilakukan dengan benar dan gerakan motor telah sesuai dengan input yang diberikan pada keypad. Tombol reset dapat berfungsi dengan baik. LCD telah berhasil menampilkan contrast jalan dan warna jalan yang dilalui. LCD telah berhasil menampilkan pwm ketika tombol “*” dan “#” ditekan. Sensor warna telah berhasil memancarkan cahaya dari 3 LED yang berbeda pada permukaan jalan dan memberikan masukkan ke ADC serta menentukan warna jalan dengan benar. Seluruh spesifikasi sistem telah berhasil dicapai.
Install Unifi Video Controller versi 3.10.13 baik dari download atau dengan menggunakan script dari https://glennr.nl/s/unifi-video gagal tanpa menghasilkan log sama sekali. Hanya saat dilihat pada status memunculkan hasil sbb:
Feb 10 11:59:19 szlin1 systemd[1]: Starting LSB: Ubiquiti unifi-video...
Feb 10 11:59:19 szlin1 unifi-video[1917]:  * Starting Ubiquiti UniFi Video unifi-video
Feb 10 11:59:20 szlin1 unifi-video[1996]: (unifi-video) Hardware type:Unknown
Feb 10 11:59:20 szlin1 unifi-video[1996]: (unifi-video) checking for system.properties and truststore files...
Feb 10 11:59:21 szlin1 unifi-video[1917]:    ...fail!
Feb 10 11:59:21 szlin1 systemd[1]: Started LSB: Ubiquiti unifi-video.
Sebagai root (sudo su) lakukan langkah-langkah berikut:
mkdir -p /usr/local/java
cd /usr/local/java
tar zxvf jre-8u271-linux-x64.tar.gz
rm jre-8u271-linux-x64.tar.gz
update-alternatives --install "/usr/bin/java" "java" "/usr/local/java/jre1.8.0_271/bin/java" 1
update-alternatives --config java (pilih nomor yang baru saja dipasang, contoh):
* 1      /usr/local/java/jre1.8.0_271/bin/java      1     manual mode
echo "JAVA_HOME=/usr/local/java/jre1.8.0_271" | tee -a /etc/default/unifi
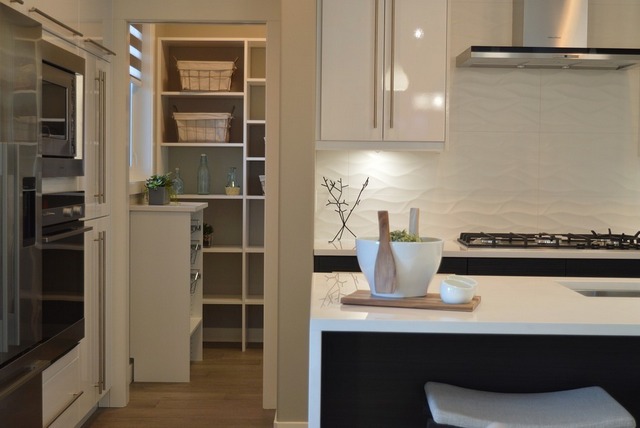
Pantry adalah dapur bersih. Pantry sebenarnya merupakan bagian dari ruang dapur yang digunakan untuk menyimpan makanan ringan, minuman, dan peratalan dapur modern.
Untuk itu, desain pantry dibuat semodern mungkin agar terlihat rapi dan selalu bersih. Desain ruang pantry dilengkapi dengan kabinet dan lemari untuk menyimpan barang dan makanan serta minuman.
Konsep pantry berawal dari Eropa dan Amerika. Istilah Pantry sendiri berasal dari Bahasa Inggris, yaitu ruangan yang difungsikan untuk menyimpan barang pecah belah atau makanan dan minuman.
Di Eropa, fungsi utama pantry adalah untuk menyimpan stok minuman anggur. Itu sebabnya, di ruang pantry tersedia banyak lemari dan dilengkapi dengan meja minum atau bar.
Dan sekarang ini keberadaan pantry dilengkapi juga dengan alat untuk memasak makanan tapi yang berkerja secara elektronik, seperti misalnya microwave. Pantry dengan konsep seperti ini biasanya diaplikasikan pada bangunan rumah yang berukuran cukup besar guna untuk melayani tamu langsung “on the spot”.
Di Indonesia sendiri kebiasaan memasak tentunya berbeda dengan orang Eropa atau barat. Cara memasak yang lebih rumit membuat orang Indonesia memilih untuk membangun dapur dibandingkan pantry.
Tapi tidak jarang, ada saja yang sudah memiliki dapur, juga masih berkeinginan untuk membuat pantry. Hanya saja semua ini memang tergantung pada keinginan serta selera pemilik rumah yang memang punya kuasa terhadap segala isinya.
Perbedaan Konsep Pantry dan Dapur
Kebanyakan dari kita masih belum memahami benar bagaimana perbedaan konsep pantry dan dapur itu dibuat. Mungkin, untuk sebagian yang bekerja di perkantoran sudah cukup paham perbedaan keduanya. Karena biasanya di kantor juga tersedia ruang pantry.
Berikut ini penjelasan mengenai perbedaan keduanya:
Pantry atau dapur bersih, yaitu ruangan yang biasanya disatukan dengan ruang keluarga atau ruang makan, yang dilengkapi dengan lemari atau cabinet untuk menyimpan makanan.
Dapur, yaitu sudut ruangan dari sebuah bangunan rumah yang biasanya digunakan untuk memasak. Dapur ini difungsikan untuk menyiapkan hidangan termasuk kegiatan memasak, menghangatkan makanan sebelum disajikan, ataupun digunakan untuk aktivitas membersihkan peralatan dapur.
Dari segi penampilannya dapur didesain tidak sebagus dari pantry, namun perlengkapan rumah tangganya bisa jadi lebih lengkap meskipun secara kualitas dan harga dibawah appliance pantry.
Oleh karenanya dapur digunakan untuk memasak masakan yang prosesnya rumit dan memakan waktu yang lama. Sementara itu pantry untuk membuat masakan simple dan gampang, tanpa memerlukan perabot dapur yang lengkap.
Mengatur Desain Pantry yang Ciamik
Ketika sudah memutuskan untuk membuat ruang pantry di rumah, maka harus pintar-pintar mengatur desainnya. Berikut ini adalah cara membuat desain pantry ciamik sehingga enak dipandang:
Pertama perlu diketahui jika pantry pada umumnya dibuat dengan konsep desain yang modern. Pilihlah meja dan kursi yang desainnya sederhana dengan bahan yang ringan sehingga tidak muncul kesan yang berat atau penuh pada ruang tersebut.
Tambahkan perabot seperti elektronik seperti kulkas dua pintu, microwave, hods (penghisap asap), hobs (kompor), dan sebagainya.
Letakkan kursi secukupnya, jangan terlalu banyak. Tiga atau empat sudah cukup. Pilih desain kursi yang mampu menampilkan kesan santai dan tidak terlalu formal. Bisa menggunakan kursi yang tidak memiliki sandaran, atau kursi yang terbuat dari bahan rotan, baik rotan alami ataupun rotan sintetis. Selain furniture berbahan rotan, kamu juga bisa memilih furniture yang berbahan aklirik.
Pilih perabot atau furniture pelangkap lainnya yang desainnya praktis, ringkas serta effisien. Gunakan meja yang bisa dilipat atau didorong. Atau dapat juga memesannya kepada pengrajin untuk dibuat custom yang disatukan dengan cabinet. Sehingga saat sedang tidak ditempati, ruang pantry lebih terlihat luas dan lapang. Kamu bisa melihat konsep ruangan di apartemen yang umumnya dibuat praktis, minimalis dan efisien.
Gunakan penyekat yang sifatnyab tidak permanen antara ruang dapur dan pantry.
Akses antara dapur dan pantry didesain mudah untuk lalu lalang para penghuni ataupun tamu.
Itulah ulasan mengenai apa itu pantry, perbedaannya dengan dapur, dan desain pantry agar terlihat indah. Jika kamu ingin menciptakan suasana yang berbeda, ruang pantry juga bisa dijadikan sekaligus sebagai ruang makan lho. Oleh karenanya, kamu bisa menjamu tamu di ruang pantry ini.
Pembangunan rumah minimalis harus banyak memperhitungkan kebutuhan dan ukuran struktur yang akan dibuat. Mulai dari ukuran ruang tamu hingga ukuran luas dapur. Luas dapur umumnya sebesar 10% dari luas rumah. Luas dapur rumah minimalis sekitar 4 – 5 m² sudah cukup bermanfaat untuk dapat dipakai aktifitas.
Agar luas dapur bisa lebih efektif dan efisien, salah satu yang wajib diperhitungkan adalah ukuran kitchen set dan model layout-nya. Dengan kitchen set yang berukuran ideal, maka aktifitas yang kamu lakukan akan lebih nyaman, namun jika kamu salah memperhitungkan ukuran dari kitchen set, maka kegiatan di dapur akan mudah terhambat. Sedangkan untuk pemilihan model layout kitchen set akan memberikan efek pada tampilan dapur kamu, apakah elegan atau tidak, nyaman atau tidak, dan praktis atau tidak.
Ukuran dan Pilihan Model Kitchen Set : souce image via faizahalfaza94.files.wordpress.com
Ukuran Standar Kitchen Set
Kitchen set dapat dikatakan sebagai perlengkapan dapur yang multifungsi karena memiliki fasilitas penyimpanan, fasilitas pencucian hingga fasilitas untuk kerja. Fasilitas penyimpanan diwakili oleh lemari cabinet, fasilitas pencucian sudah tentu diwakili oleh bak cuci piring dan fasilitas kerja diakomodir oleh kompor, microwave atau oven serta top table.
Berikut ini ukuran bagian-bagian dari kitchen set yang perlu diperhatikan:
Area Kerja
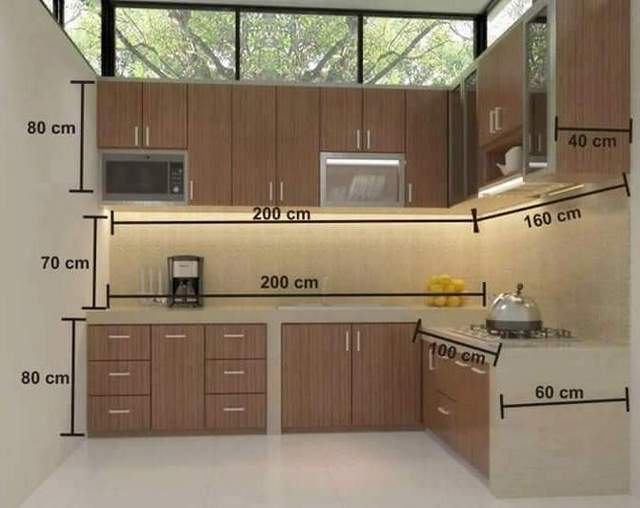
Area kerja yang dimaksud di sini adalah adanya ruang bebas yang dipersiapkan antara counter (meja) satu dengan counter lainnya yang letaknya berhadapan. Atau area kerja di sini juga bisa diartikan area yang digunakan berjalan bolak-balik di dapur. Jarak yang perlu kamu persiapkan di sini kurang lebih adalah 80 – 115 cm (seperti gambar di atas pada bagian gambar yang kanan) untuk memudahkan kamu mengambil barang yang berada di bawah atau menaruh rak piring di lantai bawah yang mengharuskan kamu untuk membungkuk.
Sedangkan untuk ukuran jarak antara meja satu dengan yang lainnya yang harus kamu persiapkan adalah kurang lebih 120 cm.
Ketinggian
Ketinggian yang dimaksud di sini adalah ketinggian yang akan kamu pergunakan untuk melakukan kegiatan-kegiatan seperti mencuci piring, meracik, dan memasak yang umumnya dilakukan pada meja dapur yang dilengkapi dengan kabinet bawah. Ada baik nya ketinggian yang harus kamu atur adalah ketinggian yang membuat kamu nyaman dalam melakukan kegiatan-kegiatan tersebut. Seperti yang terlihat pada gambar di atas, ketinggian ideal sebuah sekitar area pinggul kamu kurang lebih sekitar 85 cm dari lantai.
Jarak Ideal
Untuk menjalankan aktivitas di dapur, kamu harus memastikan jarak ideal kitchen set. Sesuai gambar di atas, jarak yang ideal antara meja dapur dan kabinet atas adalah sekitar 50-70 cm. Dengan jarak tersebut akan mempermudah kamu untuk menggapai barang yang ada di kabinet atas.
Lebar Meja dengan Struktur Kabinet Bawah
Salah satu hal terpenting adalah lebar meja dapur atau kabinet bawah. Kabinet bawah ini berguna sebagai meja untuk area kamu meracik, memasak dan mencuci. Lebar meja dapur yang ideal adalah kurang lebih sekitar 50-70 cm, dengan ukuran panjang 60–150 cm (untuk kabinet bawah dengan dua pintu) dan tinggi 70-85 cm.
Kabinet bawah ini dapat diisi dengan keranjang yang dapat ditarik sehingga sangat membantu karena perabot atau bahan makanan yang disimpan menjadi mudah dijangkau.
Lebar Kabinet Atas
Kabinet atas tergantung setinggi mata manusia atau 150 cm di atas permukaan lantai. Untuk kabinet atas sebaiknya memiliki lebar kurang lebih sekitar 35 cm agar saat kamu melakukan kegiatan masak memasak tidak mengenai kepala. Berikut ini ukuran ideal kabinet atas:
Ukuran lemari cabinet atas satu pintu menggunakan ukuran panjang 40 – 60 cm, lebar maksimal 35 cm dan tinggi kabinet 36/66/100 cm.
Ukuran Lemari cabinet atas dua pintu menggunakan ukuran panjang 70 – 150 cm, lebar 35 cm, dan tinggi 50/66/100 cm.
Kabinet atas gantung sangat efisien untuk menyimpan barang peranti makan porselen dan menyimpan makanan kaleng.
Rak Terbuka
Rak terbuka ini bisa didesain pada lemari atas, bawah maupun lemari dinding. Rak ini memiliki fungsi untuk menyimpan panci dan teko yang sering digunakan ketika memasak. Ukuran rak terbuka ini bervariasi tergantung dengan ukuran lemari kabinet atas.
Lemari Kabinet Laci
Lemari ini biasanya terletak di lemari bawah. Meskipun fungsi utamanya adalah untuk menyimpan benda-benda kecil seperti sendok dan garpu, kini ukuran lemari laci dibuat besar dan dalam sehingga dapat digunakan untuk menyimpan panci dan wajan. Ukuran laci yang dipakai mengikuti bentuk lemari cabinet dengan panjang sekitar 45-60cm dan lebar 60 cm.
Lekukan Bawah Kabinet
Untuk lekukan bawah kabinet sekitar 10-15 cm, agar kamu dapat dengan nyaman berdiri tegak menghadap meja dapur. Lekukan ini juga akan memudahkan kamu saat melakukan pembersihan area dapur seperti misal nya menyapu dan mengepel.
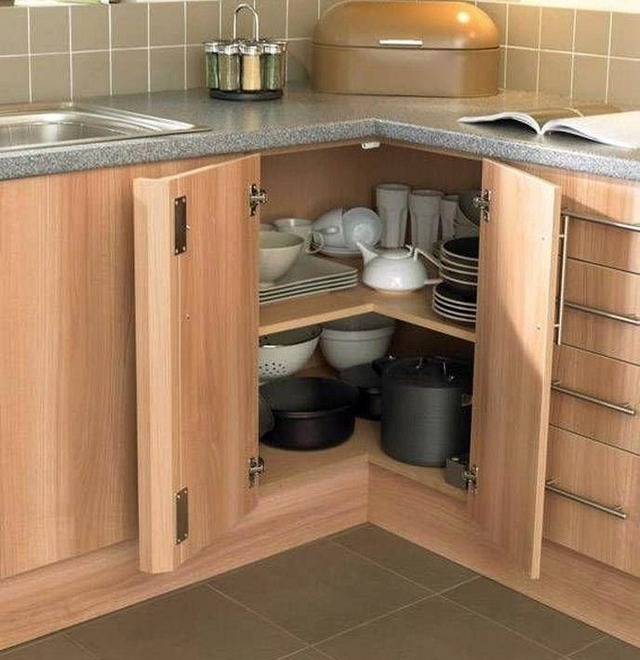
Lemari sudut
Contoh Lemari Sudut
Untuk memanfaatkan sudut dapur yang biasanya menjadi tempat yang terbuang karena bagian ini sulit dijangkau adalah dengan membuat lemari sudut. Lemari ini dibuat dengan dua pintu lemari yang kedua pegangannya berada disudut lemari atau dengan pintu berengsel dobel sehingga ketika kedua pintu dibuka, lemari dapat tebuka lebar–lebar dan seluruh isi lemari dapat terbuka.
Untuk ukuran lemari cabinet sudut menggunakan ukuran panjang 65 – 100 cm, lebar sisi yang panjang 85 – 100 cm, lebar sisi yang pendek 60 cm dan tinggi 85 cm.
Pilihan Model Layout Kitchen Set
Selain ukuran kitchen set, kamu juga harus mengetahui beberapa model layout kitchen set yang dapat kamu pilih. Untuk mewujudkan dapur yang layak pakai dan dapat memenuhi kebutuhan dari penghuni, berikut ini adalah beberapa model kitchean set untuk rumah sederhana dengan luas dapur 4 – 5 m².
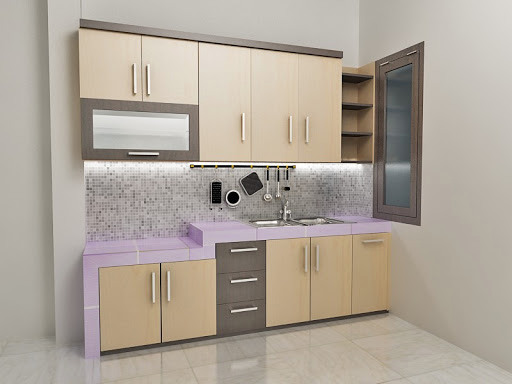
A. Single Line Layout
Kitchen Set Single Line
Single line layout adalah salah satu model layout dapur yang bisa dibilang paling simpel dengan bentuk dasar garis lurus. Dibandingkan dengan model layout kitchen set lainnya, barang-barang yang ada di dapur seperti kulkas dapat diletakkan searah dan sejajar.
Tipe kitchen set ini biasa diletakkan menempel pada dinding ruangan. Semua peralatan memasak sejajar dalam satu garis. Kitchen set model ini memiliki ukuran sekitar 200-220 cm dengan ukuran tinggi kabinet bawah kurang lebih sekitar 85-100 cm.
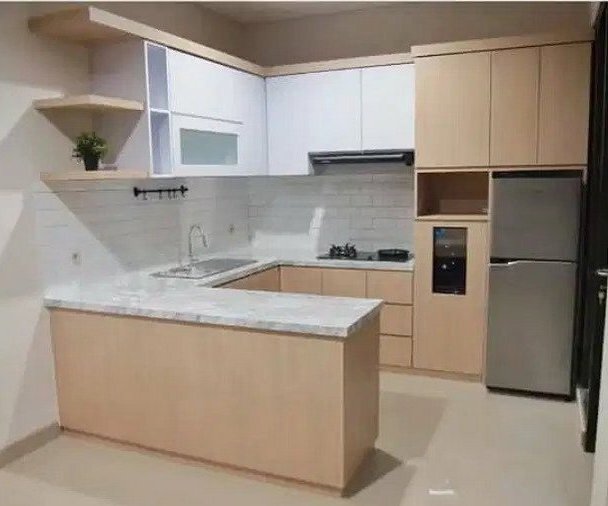
B. Layout L
Kitchen Set Layout Model Huruf L
Model layout ini sangat cocok dipergunakan pada sudut ruangan. Model kitchen set huruf L ini dapat didesain dengan menyatu pada ruang makan.
Ukuran dari model layout ini memiliki lebar kurang lebih 60 cm, tinggi sekitar 85 cm, dan panjang sekitar 300 cm. Ukuran stkamur yang dipergunakan adalah sebagai berikut;
Kabinet bawah berukuran sekitar 200 cm x 70 cm x 60 cm
Kabinet atas berukuran sekitar 300 cm x 30 cm x 100 cm.
Penempatan kitchen set menempel pada dinding ruangan dan membentuk konfigurasi seperti huruf L. Walapun berbentuk huruf L. kitchen set model ini tidak harus diletakkan pada sudut ruangan. Adapun bahan yang biasa digunakan adalah bahan multiplek.
Dengan menggunakan model layout ini maka ruangan akan terlihat lebih luas.
C. Layout U
Via Pixabay.com
Kitchen set berbentuk huruf U ini biasa digunakan di dapur yang berbentuk persegi dengan luas dapur yang cukup besar. Seperti pada gambar di atas, posisi sing atau tempat cuci piring berseberangan dengan kulkas atau diapit oleh meja dan tempat untuk memasak.
Berikut ini beberapa keuntungan yang didapat dengan kitchen yang ber-layout U:
Setiap space pada kitchen set model huruf U ini membuat penghuni serasa menjadi peserta kompetisi memasak di televisi.
Model dapur ber-layout U memberikan kemudahan bagi penghuni saat menata dan menempatkan peralatan dapur.
Kondisinya yang tidak terlalu besar dan berbentuk U yang mengelilingi penghuni saat memasak, membuat perabotan dapur mudah dijangkau.
Dapat memaksimalkan storage dapur dengan penempataan kabinet atau lemari gantung yang ditempatkan hampir di setiap sisi dinding.
Ruangan dapur berbentuk U membuat kegiatan dapur yang semakin leluasa dan menyenangkan. Ruang dapur pun terasa sangat rapi juga nyaman.
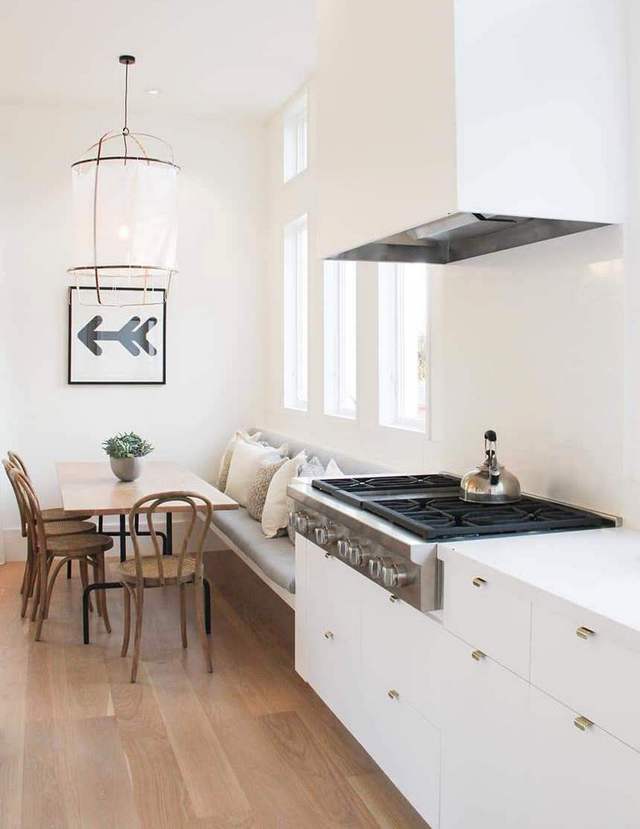
D. Layout Breakfast Nook
Via trendir.com
Bagi kamu yang menginginkan model dapur sederhana namun suasananya unik, kamu bisa memilih model layout dapur bertipe breakfast nook ini. Model dapur sederhana ini dilengkapi dengan sofa atau kursi yang empuk dan meja kecil untuk menempatkan menu sarapan.
Model layout breakfast nook ini bisa dipergunakan di area dapur apartemen atau rumah minimalis dengan ruang dapur yang sangat terbatas.
Kesimpulan
Dalam memilih ukuran kitchen set dan model layout dapur ini kamu harus memperhitungkan pencahayaan yang masuk ke dalam dapur. Lantai yang berada di dapur kamu juga perlu diperhatikan agar dapur yang super mungil ini dapat dengan nyaman kamu pergunakan untuk kegiatan masak memasak.
Hal terpenting berikutnya adalah pemilihan material yang akan dipergunakan untuk membuat kitchen set kamu. Kualitas super tinggi dan ketahanan material tersebut akan memengaruhi kenyamanan kamu saat berada di area dapur. Dan untuk menambah kenyamanan sebaik nya kamu memilih cat untuk dapur kamu dengan warna-warna yang lebih soft agar kenyamanan di dapur lebih terasa lagi.
Dan itulah penjelasan dari kami mengenai ukuran kitchen set sesuai standar yang umum dipakai oleh perumahan di Indonesia. Semoga dapar mempermudah bagi kamu yang sedang merencanakan model ktchen set untuk rumah idamanmu.
This article takes us through installation and configuration of LDAP and Laravel Passport on a Laravel project. This will enable API authentication with access and refresh tokens using existing Active Directory accounts.
Laravel comes with a fluent auth out of the box. For those wanting to use it as an API that manages its own API authentication, Passport does a fantastic job in that regard. Going further, some enterprise systems will require you to use their existing Active Directory accounts so everyone is saved from having to save gazillion passwords. And yes, Laravel LDAP does that well too.
Wait, it looks like there is no case where this article can come in after all. Maybe not just yet. What if you are required to develop an API for a mobile app but to be used by an enterprise? They require their Active Directory. They memorize one password. And you, on the other hand, require Laravel Passport to manage the app’s authentication with those tokens. Let’s crack this one up!
First, let’s set up the laravel application with
laravel new ldap-passport
Then install the two composer packages
cd ldap-passport
composer require adldap2/adldap2-laravel
composer require laravel/passport
You can find the config details of adaldap installation on their docs
Since traditionally you cannot use LDAP and Passport together out of the box, we will draw their lines in our auth config file and in LoginController so that LDAP handles the authentication with Active Directory, and pass on to Passport to issue tokens to the client.
To achieve this, first we change the api guard to passport and users provider to ldap as in the code snippet below.
Then we fetch the passport client to use with the request. We assume (of course we require) the consumers of the API to pass their client’s API key in the request header.
The complete login controller should like the one below
<?php

namespace App\Http\Controllers\Auth;

use App\Http\Controllers\Controller;
use App\Models\Passport\Authenticator as PassportAuthenticator;
use App\Models\Passport\PassportClient;
use App\User;
use Illuminate\Foundation\Auth\AuthenticatesUsers;
use Illuminate\Http\JsonResponse;
use Psr\Http\Message\ServerRequestInterface;

class LoginController extends Controller
{

    use AuthenticatesUsers;

    protected $redirectTo = '/home';

    public function __construct()
    {
        $this->middleware('guest')->except('logout');
    }

    public function username()
    {
        return 'username';
    }

    /**
     * @param ServerRequestInterface $request
     * @param LoginInterface $login
     * @return JsonResponse
     */
    public function login(ServerRequestInterface $request, LoginInterface $login): JsonResponse
    {
        // Attempt logging in with ldap auth provider
        if (!Auth::attempt(['username' => $username, 'password' => $password], true))
            return response()->json(["error" => "The credentials provided do not match our records"], 401);

        if (!request()->header("apiKey"))
          return response()->json(["error" => "Your client is not allowed on this app"], 401);

        // get the passport client using the API key passed in the request header
        $client = PassportClient::findClientBySecret(request()->header("apiKey"));

        // generate passport tokens
        $passport = (new PassportAuthenticator($request))
            ->authenticate($client, request('username'), request('password'));

        // return the tokens to the client
        return respose()->json([
            "access_token" => $passport->access_token,
            "expires_in" => $passport->expires_in,
            "refresh_token" => $passport->refresh_token,
        ], 200);
    }
}
That sorts us out, right? Not just yet. At this stage, when subsequent requests are made, the API will try to authenticate with auth:api guard and that won’t work. So we will modify the Kernel to pass our custom middleware (which will refer to Passport Middleware anyway). Here is how…
The very last thing, as you might have noticed, we did some abstraction in the Login Controller. There is a little more happening in PassportClient and PassportAuthenticator classes. That was necessary to keep our code concise and focus on the main objective of the tutorial. You can see what’s happening behind the scenes in the snippets below:
<?php

namespace App\Models\Passport;

use Laravel\Passport\Client;

class PassportClient extends Client
{
    public static function findClientBySecret($clientSecret): PassportClient
    {
        return static::where('secret', $clientSecret)->get()->first();
    }
}
<?php

// Credits to @ceekays

namespace App\Models\Passport;


use Laravel\Passport\Http\Controllers\HandlesOAuthErrors;
use Laravel\Passport\TokenRepository;
use Lcobucci\JWT\Parser as JwtParser;
use League\OAuth2\Server\AuthorizationServer;
use Psr\Http\Message\ServerRequestInterface;
use Zend\Diactoros\Response as Psr7Response;

class Authenticator
{
    use HandlesOAuthErrors;

    private $tokens;
    private $server;
    private $jwt;
    private $request = null;

    public function __construct(ServerRequestInterface $request)
    {
        $this->jwt = resolve(JwtParser::class);
        $this->server = resolve(AuthorizationServer::class);
        $this->tokens = resolve(TokenRepository::class);
        $this->request = $request;
    }

    public function authenticate(PassportClient $client, $username, $password)
    {
        $request = $this->request->withParsedBody([
            "username" => $username,
            "password" => $password,
            "client_id" => $client->id,
            "client_secret" => $client->secret,
            "grant_type" => "password"
        ]);

        $response = $this->withErrorHandling(function () use ($request) {
            return $this->convertResponse($this->server->respondToAccessTokenRequest($request, new Psr7Response));
        })->content();

        return json_decode($response);
    }

}
The design pattern strategy is one of my favorites, and in this article, I will show you how to implement it in real-life examples using PHP 8. You will learn more about the patterns, their pros, and cons.
About this series of articles
This article’s main goal is to teach you about this subject that I am passionate about. After writing two books about design patterns (In Brazil), I started this series of articles to share with them and help you become a more professional developer. I hope you enjoy it.
Keep it in mind: The most difficult part about learning design patterns is “when I should apply them.” My advice is to focus on the examples and try to think in different situations that you have a similar problem; it doesn’t matter the industry or type of project you work with. Design patterns are not related to a specific business. They are intended to solve programming problems related to algorithms’ behavior, the structure of your code, or even creating the objects on your application.
Type: Behavioral (It changes your code at a behavior level).
Origin: from the book “Design Patterns: Elements of Reusable Object-Oriented Software.”
The Problem
I want to introduce you to an example of a widespread problem that We developers use to face. Let’s imagine that you work in an e-commerce platform focused on the food industry.
In this hypothetical situation, each product sold online has a tax of 30%. Let’s assume that you sell the types of the product above:
However, there was a change, and your country’s government started collecting taxes depending on what kind of product it is. Now the taxes look like this:
If you think in terms of algorithm, your solution could look like something like this:
switch ($product->getCategory()) {
    case 'foods':
        // All the logic related to the calculation with 20% rate.
        break;
    case 'electronics':
        // All the logic related to the calculation with 40% rate.
        break;
    case 'foods':
        // All the logic related to the calculation with 0% rate.
        break;
}
It looks like a good solution, but if you look closer and start thinking about the future, it can be a big headache. We are not making use of object orientation, our software is not modular, and if we need to use the logic of tax calculation in another place, we probably will have to duplicate code. This is a simple example, and in real life, things are much more complex. Those Tax calculations would have much more complex logic and too many lines each one. If we put all different logics in the same class (It doesn’t matter if we are breaking them into methods), it will not be a reusable solution, it will be tough to test, and probably when it grows, and we have more categories (As you can imagine, it is a very probable situation) we will have problems changing the code.
We should see behind this problem that we have a group of algorithms with the same purpose (tax calculator); however, each has its own behavior and implementation.
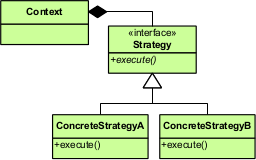
The Strategy Pattern
The Strategy’s main goal is to define a family of algorithms that perform a similar operation, each with a different implementation. It splits each of the Algorithms (called strategies) in its own class, so we can use them through our whole application, test them easier, and even change the algorithms at run time.
The Strategy pattern is composed of two main elements:
A Strategy Interface: This interface guarantees that all the strategies implemented will follow the same rules (with the same contract), and they will be interchangeable on our code.
The concrete strategy classes: Those are the concrete implementations of our Strategies. We have one class with one/x method(s) defined in our interface. We can have as many strategies as necessary.
Context class: This is the class that knows only the Strategy interface, it owns an instance of a concrete Strategy, and it is responsible for running the Algorithm.
Solving the Ecommerce problem with Strategy
After knowing the Strategy pattern and the problem it solves, we can assume that it fits very well in solving our e-commerce problem. We have different algorithms (each one responsible for calculating a product’s fees differently). Furthermore, we don’t know the exact number of categories we can have in the future and grow.
I will start creating an object that represents our products, and it’s just a DTO with getters and setters:
<?php

class Product
{
    private string $name;
    private string $category;
    private float $price;
    private float $taxes;

    public function getCategory(): string
    {
        return $this->category;
    }

    public function setCategory(string $category): Product
    {
        $this->category = $category;
        return $this;
    }

    public function getName(): string
    {
        return $this->name;
    }

    public function setName(string $name): Product
    {
        $this->name = $name;
        return $this;
    }

    public function getPrice(): float
    {
        return $this->price;
    }

    public function setPrice(float $price): Product
    {
        $this->price = $price;
        return $this;
    }

    public function getTaxes(): float
    {
        return $this->taxes;
    }

    public function setTaxes(float $taxes): Product
    {
        $this->taxes = $taxes;
        return $this;
    }
}
The idea is to look into the category and use it to calculate and return its tax.
Let’s design the first element of our pattern, the Strategy interface:
interface TaxCalculatorStrategy
{
    public function calculate(Product $product): float;
}
If you look at the interface above, you will see that it defines a method responsible for calculating the Tax of a product passed as a param to this method.
Now we need to implement our concrete strategies, and the first one is for the foods category:
class FoodTaxStrategy implements TaxCalculatorStrategy
{
    const TAX_RATE = 30.0;

    public function calculate(Product $product): float
    {
        return $product->getPrice() * (self::TAX_RATE / 100);
    }
}
Now we will implement the electronics category:
class ElectronicTaxStrategy implements TaxCalculatorStrategy
{
    const TAX_RATE = 40.0;

    public function calculate(Product $product): float
    {
        return $product->getPrice() * (self::TAX_RATE / 100);
    }
}
and last but not least, the strategy used by the books category:
class TaxFreeStrategy implements TaxCalculatorStrategy
{
    public function calculate(Product $product): float
    {
        return 0;
    }
}
Note: I create this TaxFreeStrategy to be more generic and not attached to a specific category, so maybe I can use it in different categories that require it in the future.
Now let’s implement the last part of our pattern, the Context class (this class can be named what makes more sense into your project):
class Context
{
    private TaxCalculatorStrategy $taxCalculatorStrategy;

    public function __construct(TaxCalculatorStrategy $taxCalculatorStrategy)
    {
        $this->taxCalculatorStrategy = $taxCalculatorStrategy;
    }

    public function calculateProduct(Product $product): void
    {
        $taxes = $this->taxCalculatorStrategy->calculate($product);

        $product->setTaxes($taxes);
    }
}
If you take a closer look at this class, you will see that it encapsulates a strategy, it receives the interface, making it possible to use any Concrete Strategy. We need to define which class will be used and call the calculation method.
Outside of all those classes above is your project that can be a simple PHP script, a Laravel framework, Symfony (Controller, Model, Repository, Service layer), it doesn’t matter what it is, I will show the simple example above using those classes:
$product = new Product;
$product->setName('Product Test')
    ->setCategory('electronic')
    ->setPrice(100);

switch ($product->getCategory()) {
    case 'electronics':
        $strategy = new ElectronicTaxStrategy;
        break;
    case 'food':
        $strategy = new FoodTaxStrategy;
        break;
    case 'books':
        $strategy = new TaxFreeStrategy;
        break;
    default:
        throw new \Exception('Strategy not found for this category.');
}

$context = new Context($strategy);
$context->calculateProduct($product);

echo $product->getTaxes();
If you are asking yourself why we still have this conditional block, and the answer is that we will not get rid of it by just applying the Strategy pattern, however, we have different approaches to do so. The most important is that we could split the algorithms responsible for the calculation into smaller blocks of code, and they are standardized and easy to change, and in use them depending on different conditions. We took the code’s spiral inside our unlimited number of if conditions and turned it into a much more modular code using object orientation.
No matter if you’re brand new to Laravel or have been using it for years, there’s always something new to learn. The framework and its ecosystem are constantly evolving and growing to improve the overall developer experience. So, it can be quite important to keep up to date with the latest changes so that you don’t fall behind.
It’s also likely that you’ve run into a coding problem once or twice and needed to reach out to people online for a bit of advice and help. Let’s be honest, as developers we spend quite a lot of time searching online on a daily basis looking things up. Whether it be to jog our memory on a certain algorithm or to look at possible ways of tackling new pieces of code.
The list below shows you 8 different places you can go online to give help you learn Laravel, keep up to date with it and also ask community members questions:
Laracasts (Free and Paid)
Laracasts is an online platform that has over 1700 lessons that you can use to learn about Laravel and other web programming related topics. The great thing about Laracasts is that it doesn’t focus solely on Laravel; it also has lessons based around tooling, testing and different programming languages. For example, there is a series of lessons based around getting your IDE (integrated development environment) or text editor, such as PHPStorm or Visual Studio Code, set up to make your development experience more productive.
At the time of writing this article, some of the lessons on Laracasts are free and you can view them without having to spend any money at all! However, I would strongly recommend signing up for a paid account, which is $15/month, so that you can get full access to all of the tutorials.
Another great thing about the Laracasts are it’s forums and the helpful community. If you ever have any questions or an issue that you can’t figure out, you can post it on to the forum. A large majority of the time, someone will reply to you with an answer that helps you solve your problem.
Laravel News (Free)
Laravel News is the official Laravel news source. They post new articles, tutorials and tips on a daily-basis as well as provide a newsletter that is sent out regularly. These articles always have useful information about different topics or new Laravel packages that you can use within your code.
Although Laravel News doesn’t have a forum like Laracasts, the newsletter and podcast that they provide are extremely beneficial at keeping you up to date with the latest goings-on in the Laravel space.
As a side note, I’ve actually had two of my Laravel packages that I’ve built in the past (Laravel Exchange Rates and Laravel Executor) featured on the Laravel News website. If you’d like to check them out, the articles were: Laravel Exchange Rates API Package and Simplify Installing and Updating your App With Laravel Executor.
Laravel Documentation (Free)
One of the most useful resources for helping you learn how to use Laravel is the official Laravel documentation. The documentation is really detailed and covers a large amount of the framework that you would touch when working on projects.
Typically, huge amounts of documentation can feel overwhelming and can feel like being bombarded with too much information at once. However, I personally feel like the Laravel documentation does a really good job of splitting things out and making it easy to understand. Even after working with Laravel for years, I still always have the documentation open in a tab in my web browser just in case I need to quickly brush up on a topic.
Top tip: For any of you that use DuckDuckGo as your search engine, you can search for “!laravel” and it will take you straight to the Laravel documentation.
Udemy (Paid)
Udemy is a video platform that’s similar to Laracasts. It sells online video courses that you can use to learn about a range of topics. However, they have a section that is dedicated to Laravel and learning how to use it; ranging from beginner to advanced courses.
I’ve never personally used Udemy myself, but I know other developers that I work with that swear by it and find it extremely useful.
Stack Overflow (Free)
If you’ve ever done any type of software or web development, chances are you, you probably visit Stack Overflow on a daily basis. But if you’re just starting out as a developer, you might not have heard of it yet.
Stack Overflow is an online question-and-answer site for developers. As an example, say if you have a question about something or have a bug in your code, you could post your question on Stack Overflow and someone would try and answer it for you. However, the chances are that if you’ve got a problem, someone else has already had it, posted the question and got an answer that solved their issue. So, Stack Overflow can be a great resource that contains almost instant answers for any problems that you might run into.
If you need to ask a question though because it doesn’t already exist there, the community is usually really quick at answering.
GitHub (Free)
This resource is slightly different to some of the others above and might be a little more suitable for more experienced developers rather than any novices. There are countless Laravel projects and packages that you can find on public GitHub repositories. So, this means that there are a lot of places that you can look at to get ideas for development.
As an example, when I first started writing Laravel packages, I wasn’t too sure on where to start. So, after reading through the Laravel documentation, I also checked out how other packages had been written. I looked at some of the official Laravel packages, such as Telescope, and also looked at how some of the Spatie packages were written. Being able to look at real-life examples of code can sometimes be more valuable than just looking at documentation that explains something. It gives you an insight and context into how things are actually done in practice.
As a small side note as well, once you feel that you have enough experience with Laravel, you could maybe start contributing to open-source projects. This can be a little bit daunting at first but can feel extremely rewarding when your first pull request is accepted. When you make your pull request, the maintainers of the project will review your changes and additions to check that they’re okay to pull in. It’s usually during this stage that you get feedback on any changes you might need to make to get the pull request approved and merged. This feedback can really help you grow as a developer.
Reddit (Free)
Reddit is one of my personal favorite resources for keeping up to date with the latest Laravel and PHP topics. The r/laravel and r/php subreddits are made up of large communities of developers who can answer questions that you might have.
I have asked questions on Reddit many times in the past for suggestions on how to tackle issues and have always been able to find an answer. The r/laravel subreddit also has a weekly “No Stupid Questions” thread that you can use to comment on and ask questions. Just remember though, if you’re asking any questions in any of the subreddits that you follow their rules; otherwise your post will get deleted.
If you don’t want to post anything or ask any questions, the two subreddits can also be really helpful for keeping up to date with the latest news on the ecosystem.
Other Laravel Developers (Free and Paid)
One resource for learning Laravel that developers often overlook is possibly one of the most valuable… other developers. Sometimes, it can be really easy to sit and stare at a problem for a few hours without getting anywhere with it. Usually when this happens, it can be best to get an opinion from someone else who is looking at the problem from a different perspective. For this reason, it can be really useful to have other developers as friends or as someone you can contact.
If you only have a quick question, quite a lot of developers will probably be happy to help you out and lend a helping hand (I know I would!). But, obviously, you have to remember that other people also have things they need to do and won’t want to be spending too much time helping you out for free. So, if you do contact a developer for help, try not to do it too often as it might discourage them from wanting to help you.
Sometimes, you might also want to pay a more experienced developer to have a chat for an hour or two to go over some topics. Like I mentioned earlier, looking at documentation can give you an idea of how something is done, but speaking to someone can help you understand the “why”. Speaking to senior developers can be extremely helpful because it’s likely that if you run into a problem that they’ve already experienced something similar themselves and know any pitfalls that you should to try to avoid.
If you have any questions about anything Laravel related or need any Laravel web development doing, you can always feel free to contact me and have a chat.
Originally published at https://ashallendesign.co.uk.
Laravel is an open-source PHP framework and it keeps adopting new versions to perform on various projects. After Laravel 7.27.0, Laravel 8 projects are going to float over the internet. Here is a brand new Scaffolding package for Laravel 8 projects that are named ‘Laravel Jetstream’ for every Laravel development company to use. Laravel Jetstream is an open-source package derived by the Laravel team. This free package goes beyond Authentication Scaffolding.
Now, Laravel Installer includes support for Jetstream. The latest Laravel version 8 is coming into existence with a new feature Laravel Jetstream to set it with better improvements. This enhances the Laravel development services by performing in the changed package of Laravel/UI. With the latest version, Laravel is moving ahead from the jQuery and Bootstrap based scaffolding. Laravel was stuck to these scaffolding and the change was indeed needed. Laravel Jetstream is the one that not only brings the change but also gives a more intuitive way of development to Laravel developers.
The Change Cum Revolution with Laravel
Laravel Mix helps to compile SASS files to plain CSS. The ‘package.json’ of Laravel includes the ‘bootstrap’ package after installing the ‘laravel/ui’ composer package. It further generates the frontend scaffolding. Now, on the other hand, Laravel Jetstream has changed the things from Laravel/UI package. Tailwind has taken the place for CSS. Tailwind CSS is a low-level CSS framework, which is highly customizable too.
Developers use ‘Presets’ to handle frontend. They allow developers for adding additional methods to the ‘UiCommand’ class at runtime. Presets are ‘macroable’ that needs to be declared in a service provider. Laravel Jetstream includes ‘Inertia.js’ or ‘Livewire’ to replace presets in Laravel/UI.
Tailwind
Tailwind is a highly customizable and utility-first CSS framework. It helps to build rapid custom designs. Tailwind serves the developers with bespoke designs where they need not to worry much about those annoying opinionated styles.
Most CSS frameworks perform too much with all sorts of predesigned components. They often create a mess with cards, buttons, and alerts, etc. When a business looks to hire Laravel developer, it needs to make sure whether the team can perform with customer design or not. But Tailwind is so different and easy to optimize. It provides low-level utility classes and replaces the opinionated pre-designed components.
Tailwind drives custom designs without ever leaving HTML. This is completely your thing if you are just fed up with battling specificity wars, overriding unwanted styles, etc. Listing a few features of Tailwind that are contributing to making it different –
Livewire
Livewire is a full-stack framework that helps the developer for building dynamic interfaces. Every business looks for modern app development. This development becomes much hard with tools like Reach and Vue. Though these tools and extremely powerful, the complexity causes fatigue.
Livewire comes with the comfort of Laravel. If you will into its codes, you can find out the difference and uniqueness of performance. It keeps improving with the real-time search component that the user sees after typing into the search input.
It works swiftly and the performance is here –
SEO friendly performance with the page
AJAX request to the server at an interaction
Mutates DOM as the things changed
Inertia.js
Developers can build single-page apps with Inertia.js. There is no such requirement of building an API as Interia.js lets you build modern single-page apps with React, Vue, and Svelte. A Laravel development company uses classic server-side routing and controllers to perform the required task.
First of all, Inertia.js is not a framework. This is completely a new approach, also known as a modern monolith. It neither has client-side routing nor requires an API. Inertia performs by leveraging existing server-side frameworks. Developers can simply build controllers and page views.
There are three official client-side adapters where the developers actually perform. These are Vue.js, React, and Svelte. Additionally, two server-side adapters are also here Laravel and Rails. Inertia is designated to work with existing client-side and server-side frameworks. Inertia comes with Vue.js as a default adapter.
Availability of Laravel Jetstream
Laravel keeps evolving with its various versions. These versions are coming with some revolutionary changes, every time. Laravel team brings major changes with its every version. They keep a 6-month interval between their two Laravel versions’ releases. Laravel 8 Non-LTS is a general version that provides six-months bug fixes and one-year security-fixes. WebOccult keeps itself informed and equipped with every technological development in the relevant realm.
Since the latest version of Laravel is Laravel 8, the expectations for Laravel Jetstream also revolve around that date. 8th September 2020 is the date when Laravel 8 is coming out with some supreme features. Laravel Jetstream can also follow it after the arrival or one/two weak later. Thus, it is just nothing to hire a Laravel developer. A business must ensure that the developer (or development team) is well-aware of every latest technology and versions before hiring them.
Features of Laravel Jetstream
Laravel Jetstream offers amazing scaffolding for Laravel applications. It is a new Laravel ecosystem. This open-source platform is completely free for developers. Laravel Jetstream includes much cool and development-friendly stuff. A few of its useful features are mentioned below –
User Profile Management
User Profile Management is, somehow, the key feature of Laravel Jetstream that sets it different from others. Here, the user can update various relevant information, easily. It includes information like –
Users can update a profile picture.
Users can update their name, along with email and password.
Users can view the Browser Sessions and log out from there.
Users can delete their account, completely.
Developers enjoy full control as all functionality and its code is available to them.
Two Factor Authentications is available with Recovery codes and QR code.
Team Management
Though it has been very usual that developers do use the ‘teams’ feature in every SAAS application, Laravel Jetstream has clubbed it in a very unique as well as a better way. It adds ‘teams’ entry in the ‘jetstream.php’ config file with to enable you to –
API Tokens
This is an ultimate feature of Laravel jetstream where it uses Laravel Sanctum to generate API tokens, under-the-hood. A Laravel developer can perform by adding a single line of code in the ‘jetstream.php’ config file to enable the user form generating their own tokens. Even if it is not required, if your Laravel app exposes an API, the developer should give this flexibility to its users.
With the suggested configuration, a new page will be added automatically, namely, user/api-tokens. Additionally, the user can also manage token permissions on this page, which are defined in ‘JetstreamServiceProvider’.
Final words
Laravel 8 is going to give a kick to Laravel development. Laravel Jetstream is like a non-billing part of Laravel Spark that is offered by the Laravel team. Since the intuitive and futuristic approach of the team is unquestionable, Laravel Jetstream can add much more to the Laravel development. We, at WebOccult Technologies, provide unerring Laravel development services to the clients where we keep adopting every new trend of the technology.
All we can say is that Laravel Jetstream will work effectively. It looks quite appealing and promising in the first look, let’s see how far it walks with us!
Originally published at https://www.weboccult.com.
Redis which stands for Remote Dictionary Server is an open-source (BSD licensed), in-memory data structure store, used as a database, cache, and message broker.
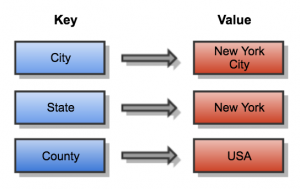
In basic words, Redis is a Key-Value Store that stores data in Key-Value pairs.
For Example:
How data is stored in Redis
Redis is a No-SQL database.
Basically, this means it does not have tables, rows, columns, functions, procedures, etc like in MySQL, Oracle DBs
It also does not use SELECT, INSERT, UPDATE, DELETE.
Instead, it uses data structures to store data.
Like,
String
Lists
Sorted Sets
Hashes
Sets
And,
Bitmaps (also called bit arrays, bit vectors, etc.)
Hyperloglogs ( It’s is a probabilistic data structure used to count unique values — or as it’s referred to in mathematics: calculating the cardinality of a set)
Geospatial Indexes (The geospatial index supports containment and intersection queries for various geometric 2D shapes.)
Interaction with data in Redis is command based.
One of the key differences between Redis and other key-value databases is Redis’s ability to store and manipulate high-level data types.
Redis is a popular choice for caching, session management, gaming, leader boards, real-time analytics, geospatial, ride-hailing, chat/messaging, media streaming, and pub/sub-apps.
To learn more about Redis you can visit their website, redis.io.
Getting Started
For this post, I’ll be working with Ubuntu 18.04 but any Linux Distro works.
The Redis configuration for your application can be found in config/database.php. In this file, you’ll find a Redis array containing the Redis servers utilized by your application.
The default configuration uses phpredis as it’s client, so you’ll have to change this to predis if you’ll be using the laravel predis package.
Interacting with Redis
You can interact with Redis by calling various methods on the Redis facade.
Redis facade supports dynamic methods, basically, this means that you could call any command on the facade and the command will be passed directly to Redis.
Here’s an example,
namespace App\Http\Controllers;

use App\Http\Controllers\Controller;
use Illuminate\Support\Facades\Redis;

class UserController extends Controller
{
    /**
     * Show the profile for the given user.
     *
     * @param int $id
     * @return Response
     */
    public function showProfile($id)
    {
        Redis::set('name', 'Taylor');
        $values = Redis::lrange('names', 5, 10);
        $name = Redis::get(‘name’.$id);
        // $values = Redis::command('lrange', ['name', 5, 10]);
        $user = [
            'name' => $name,
            'values' => $values
        ];

        return view(‘user.profile’, [‘user’ => $user]);
    }
}
For more commands like this, you can check out the laravel documentation on Redis here