For people running Homebrew (brew), and getting ‘Illegal Instruction: 4’ with certain software, but specifically wget. They recently switched brew to compile with ‘Nehalem’ instructions. The oldest architecture still officially supported by Mojave.
You can switch back to ‘core2’ instructions by editing /usr/local/Homebrew/Library/Homebrew/extend/os/mac/hardware.rb. Replace the elsif version and else branch result with “:core2” like this: Code:
# frozen_string_literal: true

module Hardware
  def self.oldest_cpu(version = MacOS.version)
    if CPU.arch == :arm64
      :arm_vortex_tempest
    elsif version >= :mojave
      :core2
    else
      :core2
    end
  end
end
Add this to /etc/hosts to break access to the pre-built packages: Code:
0.0.0.0 homebrew.bintray.com
You can then reinstall wget from source: Code:
brew reinstall openssl wget --build-from-source
A “roll your own brew upgrade”; This oneliner will stuff all the upgradable packages on a single brew reinstall line. Maybe that will work but it may fail with some bash error like a ‘commandline too long’. I had a pretty long list so you’ll probably be fine. Code:
Definitely picked up Turbo Console Log, and had a few of the others already! Great list overall.I would recommend adding indent-rainbow, it colorizes the indentations of lines to make your code more readable.
TCL is Amazing, thank you for that.Some remarks:Project manager seems to be a LOT more used than Projects. Whould you explain why you chose the later?VSCode now ships with Sync Settings. I used to use Settings sync extension but the VSCode one is…...
Read More1 reply
5 min read
VS Code is one of the most popular and widely used code editor. It comes packed with lots of features that are free in comparison to other editors. You can download extensions on VS code, which add another dimension of incredible features.
I have listed some of my favorite VS code extensions, without which I cannot live.
Please note that there is no ranking involved. Each extension is impressive in itself. The last one and the first are equal.
I am sure you will leave with a new extension that will make your work easier.
1. Turbo Console Log
Turbo console log is a killer extension when coming to the debugging part. This extension makes debugging easier by automating the process of writing meaningful log messages.
You insert meaningful log message automatically with two steps:
Selecting the variable which is the subject of the debugging
Pressing ctrl + alt + L
2. Import cost
Speed is essential for your website. If your page or app can’t load quickly, it is the same as no page.
This extension displays your import’s size. This way, you get to know how much you will be downloading and figure out why your application is sluggish.
With this extension, you can decide if you should write a function or import the whole bundle.
3. Prettier
This extension is for everyone, be it If you code in python, JavaScript, or any other language.
It makes your code, as the name suggests, prettier.
I am terrible at giving equal lines and spacing and tab. As a result, my code looks just like some noodle pasta.
With prettier, as soon as you press command+S, you will experience the magic. All your code will get correctly and equally spaced, and proper line spaces. Your code will look beautiful.
No-One will ever identify how messy you are 😐.
4. Bracket pair colorizer
How many times it happens that when editing JavaScript code, you have trouble finding the closing brackets. It is painful to use the finger to trace the opening and closing brackets. Stop wasting your time and use this extension.
Your opening and closing brackets are colored the same; it is easier this way.
This extension is a must-have for those who have spent time with python because python doesn’t require brackets; this will help the transition.
5. Live share
Live share is a fantastic extension. With it, I can code with my friends, colleagues.
Whenever I am stuck with a problem, I can pull over my friend to help me.
What this extension does is that it gives remote control of your VS code editor, the opened files. With that, another person can change my code and save it—no need to struggle over the phone anymore or wait to meet your friend to get help.
One of the features you get with this is that — You get to code in real-time. You get to know who is typing and what it is that they are entering. It makes coding just like messaging, which we all love. Thanks to VS code and live share. Besides, it also gives access to localhost, your terminal.
Live share is one of the best features of VS code, in my opinion, and the reason I recommend it to everyone. I haven’t seen anything as good as it and free to use. Mind-blowing!
Bonus: You can download the live share audio extension, which adds audio calling capabilities to Live Share. I love this and especially in the pandemic when everything has gone remote.
6. Projects
If you are working on several projects at a time, then switching between folders is hard. You have to navigate to the required folder. And if you switch between quite often, then it is hell.
One use I find with this extension is that it can work as your favorite tab. E.g. Someone may store custom CSS and bootstrap in a folder and use this extension to navigate in between quickly.
7. Settings Sync
As the name suggests, setting sync extension stores all your setting backup in GitHub. This way, you can have the same settings for your multiple devices or new devices. Any changes made can be seamlessly synchronized.
It allows you to sync pretty much everything you customize on VS Code to Github, from settings to keyboard shortcuts to other VS Code extensions.
8. JavaScript (ES6) Code Snippets
VS Code comes with built-in JS IntelliSense, but JS Code Snippetsenhances that experience further by adding premade JavaScript snippets, which contain the most commonly used snippets. No more repeating of code endlessly.
The extension supports JS, TypeScript, JS React, TS React, HTML, and Vue.
I hope you enjoyed reading and I provided value to you. If you find extensions that I have missed and you find it amazing, mention it in response.
The admin dashboard needs to be secure. Laravel comes with Laravel Jetstream which provides login, registration, email verification, two-factor authentication, session management, API support via Laravel Sanctum, and optional team management. Jetstream is designed using Tailwind CSS and offers your choice of Livewire or Inertia scaffolding.
We have already used Laravel Sanctum to secure RESTful API in the previous tutorial.
If you like Vue.js as a templating language then choose the Inertia.js stack provided by Jetstream.
I am sticking to Blade as the templating language so I will use Livewire provided by Jetstream.
Laravel Livewire is a library that makes it simple to build modern, reactive, dynamic interfaces. When using Livewire, you may pick and choose which portions of your application will be a Livewire component, while the remainder of your application can be rendered as the traditional Blade templates you are used to.
Now let’s dive into code. There is make:livewire command which creates two files, one in app\Http\Livewire directory and another in resources\views\livewire directory.
Different versions of this command are as follows:
php artisan make:livewire foo --inline # Creates only Foo.php
Before we start with our planned application, let us make few required edits in registration and profile update files provided by Laravel as there are first_name and last_name in our users table instead of the default name.
If you have not changed the default migration for users table then you may skip this step.
At this point, we are ready to go with Laravel’s default registration and profile update functionality.
Now move on to create pages to manage Categories, Tags, and Posts of our News Application.
Our Category page will look like the following and have the functionality to list all categories, edit a category, show all posts of a category, delete a category, and create a new category.
To create this page follow the below-mentioned steps:
php artisan make:livewire Categories\\categories
It will create Component and View files as discussed before.
Open app\Http\Livewire\Categories\Categories.php and write the following code
<?php
namespace App\Http\Livewire\Categories;use App\Models\Category;
use Livewire\Component;class Categories extends Component
{
public $categories, $title, $color, $category_id;
public $isOpen = 0;public function render()
{
$this->categories = Category::all();
return view('livewire.categories.categories');
}public function store()
{
$this->validate([
'title' => 'required',
'color' => 'required',
]);Category::updateOrCreate(['id' => $this->category_id], [
'title' => $this->title,
'color' => $this->color
]);session()->flash('message', $this->category_id ? 'Category Updated Successfully.' : 'Category Created Successfully.');$this->closeModal();$this->resetInputFields();
}public function delete($id)
{
Category::find($id)->delete();
session()->flash('message', 'Category Deleted Successfully.');
}public function edit($id)
{
$category = Category::findOrFail($id);
$this->category_id = $id;
$this->title = $category->title;
$this->color = $category->color;
$this->openModal();
}public function create()
{
$this->resetInputFields();
$this->openModal();
}public function openModal()
{
$this->isOpen = true;
}public function closeModal()
{
$this->isOpen = false;
}private function resetInputFields()
{
$this->title = '';
$this->color = '';
$this->category_id = '';
}
}
In the above code all the public properties are available to the view returned by render() method. List of all categories are passed to categories view by $categories variable.
To create or update a category the store() method is wired in the view. In this method after validation a category is added or updated in the database and accordingly message is flushed.
To delete a category delete() method is wired to delete button of view. The id of category to be deleted is passed to delete method from view and the same is deleted and message is flushed.
The edit() method is wired to edit button of the view. It passes id of the category. Then the category data is fetched by this id and all the public variables are populted with that data which will now be available to model form.
Then open resources\views\livewire\categories\categories.blade.php and write the following code
To show all the posts belonging to a category create app\Http\Livewire\Categories\Categoryposts.php file and write the following code
<?php
namespace App\Http\Livewire\Categories;use App\Models\Category;
use App\Models\Post;
use App\Models\Tag;
use Illuminate\Support\Facades\Auth;
use Illuminate\Support\Facades\DB;
use Livewire\Component;
use Livewire\WithPagination;class Categoryposts extends Component
{
use WithPagination;
public $title, $content, $category, $post_id;
public $tagids = array();
public $isOpen = 0;
public $cid;public function mount($id)
{
$this->cid = $id;
}public function render()
{
return view('livewire.posts.posts', [
'posts' => Post::where('category_id', $this->cid)->orderBy('id', 'desc')->paginate(),
'categories' => Category::all(),
'tags' => Tag::all(),
]);
}public function store()
{
$this->validate([
'title' => 'required',
'content' => 'required',
'category' => 'required',
]);$post = Post::updateOrCreate(['id' => $this->post_id], [
'title' => $this->title,
'content' => $this->content,
'category_id' => intVal($this->category),
'author_id' => Auth::user()->id,
]);if (count($this->tagids) > 0) {
DB::table('post_tag')->where('post_id', $post->id)->delete();
foreach ($this->tagids as $tagid) {
DB::table('post_tag')->insert([
'post_id' => $post->id,
'tag_id' => intVal($tagid),
'created_at' => now(),
'updated_at' => now(),
]);
}
}
session()->flash('message', $this->post_id ? 'Post Updated Successfully.' : 'Post Created Successfully.');$this->closeModal();$this->resetInputFields();
}public function delete($id)
{
Post::find($id)->delete();
session()->flash('message', 'Post Deleted Successfully.');
}public function edit($id)
{
$post = Post::with('tags')->findOrFail($id);
$this->post_id = $id;
$this->title = $post->title;
$this->content = $post->content;
$this->category = $post->category_id;
$this->tagids = $post->tags->pluck('id');
$this->openModal();
}public function create()
{
$this->resetInputFields();
$this->openModal();
}public function openModal()
{
$this->isOpen = true;
}public function closeModal()
{
$this->isOpen = false;
}private function resetInputFields()
{
$this->title = '';
$this->content = '';
$this->category = null;
$this->tagids = null;
$this->post_id = '';
}
}
In the above code we are doing pagination as there might be many posts belonging to a category. To do so use Livewire\WithPagination then use paginate() method to get paginated records.
In the above code block we have used mount() method, we use mount() method to intercept parameters. To get the id of category from URL we will use this method.
This time we are passing posts, categories, and tags to view so we will pass these as an array in the second parameter while returning view.
Rest of the code is mostly repetative. So I am ignoring for now.
Now lets work on Posts. Posts page will look like this:
Once again run make:livewire as follows:
php artisan make:livewire Posts\\posts
Open app\Http\Livewire\Posts\Posts.php file and paste the following code:
<?php
namespace App\Http\Livewire\Posts;
use App\Models\Category;
use App\Models\Image;
use App\Models\Post;
use App\Models\Tag;
use Illuminate\Support\Facades\Auth;
use Illuminate\Support\Facades\DB;
use Illuminate\Support\Str;
use Livewire\Component;
use Livewire\WithFileUploads;
use Livewire\WithPagination;class Posts extends Component
{
use WithPagination;
use WithFileUploads;
public $title, $content, $category, $post_id;
public $tagids = array();
public $photos = [];
public $isOpen = 0;public function render()
{
return view('livewire.posts.posts', [
'posts' => Post::orderBy('id', 'desc')->paginate(),
'categories' => Category::all(),
'tags' => Tag::all(),
]);
}public function store()
{
$this->validate([
'title' => 'required',
'content' => 'required',
'category' => 'required',
'photos.*' => 'image|max:1024',
]);// Update or Insert Post
$post = Post::updateOrCreate(['id' => $this->post_id], [
'title' => $this->title,
'content' => $this->content,
'category_id' => intVal($this->category),
'author_id' => Auth::user()->id,
]);// Image upload and store name in db
if (count($this->photos) > 0) {
Image::where('post_id', $post->id)->delete();
$counter = 0;
foreach ($this->photos as $photo) {
$storedImage = $photo->store('public/photos');
$featured = false;
if($counter == 0 ){
$featured = true;
}Image::create([
'url' => url('storage'. Str::substr($storedImage, 6)),
'title' => '-',
'post_id' => $post->id,
'featured' => $featured
]);
$counter++;
}
}// Post Tag mapping
if (count($this->tagids) > 0) {
DB::table('post_tag')->where('post_id', $post->id)->delete();
foreach ($this->tagids as $tagid) {
DB::table('post_tag')->insert([
'post_id' => $post->id,
'tag_id' => intVal($tagid),
'created_at' => now(),
'updated_at' => now(),
]);
}
}session()->flash('message', $this->post_id ? 'Post Updated Successfully.' : 'Post Created Successfully.');$this->closeModal();$this->resetInputFields();
}public function delete($id)
{
Post::find($id)->delete();
DB::table('post_tag')->where('post_id', $id)->delete();session()->flash('message', 'Post Deleted Successfully.');
}public function edit($id)
{
$post = Post::with('tags')->findOrFail($id);
$this->post_id = $id;
$this->title = $post->title;
$this->content = $post->content;
$this->category = $post->category_id;
$this->tagids = $post->tags->pluck('id');
$this->openModal();
}public function create()
{
$this->resetInputFields();
$this->openModal();
}public function openModal()
{
$this->isOpen = true;
}public function closeModal()
{
$this->isOpen = false;
}private function resetInputFields()
{
$this->title = null;
$this->content = null;
$this->category = null;
$this->tagids = null;
$this->photos = null;
$this->post_id = null;
}
}
The above code follows the same pattern as previous codes. Here I am uploading multiple files. To upload file use Livewire\WithFileUploads. Read more here about Livewire file upload.
Open resources\views\livewire\posts\posts.blade.php and paste the following code:
To show single post create file app\Http\Livewire\Posts\Post.php and paste the following code:
<?php
namespace App\Http\Livewire\Posts;
use App\Models\Post as PostModel;
use Livewire\Component;class Post extends Component
{
public $post;
public function mount($id)
{
$this->post = PostModel::with(['author', 'comments', 'category', 'images', 'videos', 'tags'])->find($id);
}public function render()
{
return view('livewire.posts.post');
}
}
Now create view for the single post resources\views\livewire\posts\post.blade.php and paste the following code:
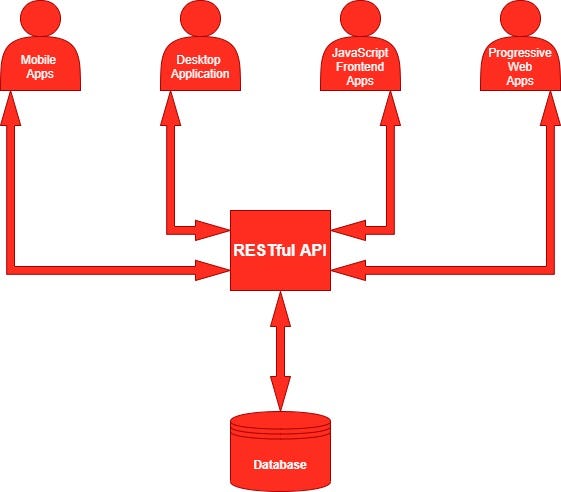
An API — Application Programming Interface, is a computing interface that defines interactions between multiple software intermediaries. It is a way to programmatically interact with a separate software component or resource.
What is REST?
REST is an acronym for REpresentational State Transfer. This term was coined by Roy Fielding in 2000. It is an architecture style for designing loosely coupled applications over HTTP, that is often used in the development of web services.
REST defines 6 architectural constraints that make any web service a true RESTful API.
Client-server — By separating the user interface from the data storage, we improve the portability of the user interface across multiple platforms and improve scalability by simplifying the server components.
Stateless — Each request from the client to the server must contain all of the information necessary to understand the request, and cannot take advantage of any stored context on the server. Session state is therefore kept entirely on the client.
Cacheable — Cache constraints require that the data within a response to a request be implicitly or explicitly labeled as cacheable or non-cacheable. If a response is cacheable, then a client cache is given the right to reuse that response data for later, equivalent requests.
Uniform interface — By applying the principle of generality to the component interface, the overall system architecture is simplified and the visibility of interactions is improved.
Layered system — The layered system style allows an architecture to be composed of hierarchical layers by constraining component behavior such that each component cannot “see” beyond the immediate layer with which they are interacting.
Code on demand (optional) — REST allows client functionality to be extended by downloading and executing code in the form of applets or scripts. This simplifies clients by reducing the number of features required to be pre-implemented.
Now let’s jump into creating and consuming RESTful API in Laravel. I would recommend to read and implement Migration and data seeding & Creating Relationships before you dive into this tutorial.
Consumers of our API will be able to perform a few limited tasks. There would be the following endpoints:
API endpoints for the unauthenticated route
Related to category:
Get all categories GET/categories
Get all posts of a category GET/categories/{id}/posts
Related to the post:
Get all posts GET/posts
Get a post by ID GET/posts/{id}
Get all comments on a post GET/posts/{id}/comments
Related to the author:
Get details of an author GET/authors/{id}
Get all posts by an author GET/authors/posts
Get all comments by an author GET/authors/{id}/comments
Step 1: Let’s first create API Resources. To do so follow the below-mentioned steps (don’t forget to implement the Migration and Relationship part):
When building an API, you may need a transformation layer that sits between your Eloquent models and the JSON responses that are actually returned to your application’s users. Laravel’s resource classes allow you to expressively and easily transform your models and model collections into JSON.
Run the command php artisan make:resource CategoryResource. It will create CategoryResource in app\Http\Resources directory.
Open this file and return the desired data, eg. category_id in place of id. You can do a lot more than just masking the field names or number of fields to be returned like- we can return additional information with API, etc.
public function toArray($request)
{
 return [
  'category_id' => $this->id,
  'category_title' => $this->title,
  'category_color' => $this->color,
 ];
}// (Optional) Additional code is attached to the response
public function with($request){
 return [
  'version' => "1.0.0",
  'author_url' => "https://mditech.net"
 ];
}
The same way you have to create other required resources — CommentResource, PostResource, TagResource, UserResource, ImageResource, and VideoResource. Create these resources or check them out from the repository.
Step 2: The next activity is to create the required controllers. To do so follow the below steps:
Run the command php artisan make:controller Api\\CategoryApiController. It will create CategoryApiController in theapp\Http\Controllers\Api directory. Open that file and write the methods to perform actions.
public function index()
{
 $categories = Category::all();
 return CategoryResource::collection($categories);
}public function posts($id)
{
 $posts = Post::where('category_id', $id)->orderBy('id', 'desc')->paginate();
 return PostResource::collection($posts);
}
Here you created two methods index and posts inside CategoryApiController.
The index method will return all the categories wrapped inside CategoryResource.
The posts method will return all the posts belonging to a specific category wrapped inside PostResource.
The same way create the desired methods in CommentApiController, PostApiController, TagApiController, and UserApiController or checkout repository.
Step 3: The last step is to create routes for the API. Proceed to the routes directory and open the api.php file and create the API endpoints that will reference the methods created in CategoryApiController, CommentApiController, PostApiController, TagApiController, and UserApiController.
<?php
use App\Http\Controllers\Api\CategoryApiController;
use App\Http\Controllers\Api\CommentApiController;
use App\Http\Controllers\Api\PostApiController;
use App\Http\Controllers\Api\TagApiController;
use App\Http\Controllers\Api\UserApiController;
use Illuminate\Support\Facades\Route;Route::get('authors/{id}', [UserApiController::class, 'show']);
Route::get('authors/{id}/posts', [UserApiController::class, 'posts']);
Route::get('authors/{id}/comments', [UserApiController::class, 'comments']);
Route::get('categories', [CategoryApiController::class, 'index']);
Route::get('categories/{id}/posts', [CategoryApiController::class, 'posts']);
Route::get('posts', [PostApiController::class, 'index']);
Route::get('posts/{id}', [PostApiController::class, 'show']);
Route::get('posts/{id}/comments', [PostApiController::class, 'comments']);
Route::get('tags/{id}/posts', [TagApiController::class, 'posts']);
Route::middleware('auth:sanctum')->group(function () {
Route::post('comments/posts', [CommentApiController::class, 'store']);
});
Testing the API endpoints
Start the database and run php artisan serve command. Laravel development server will start on http://127.0.0.1:8000
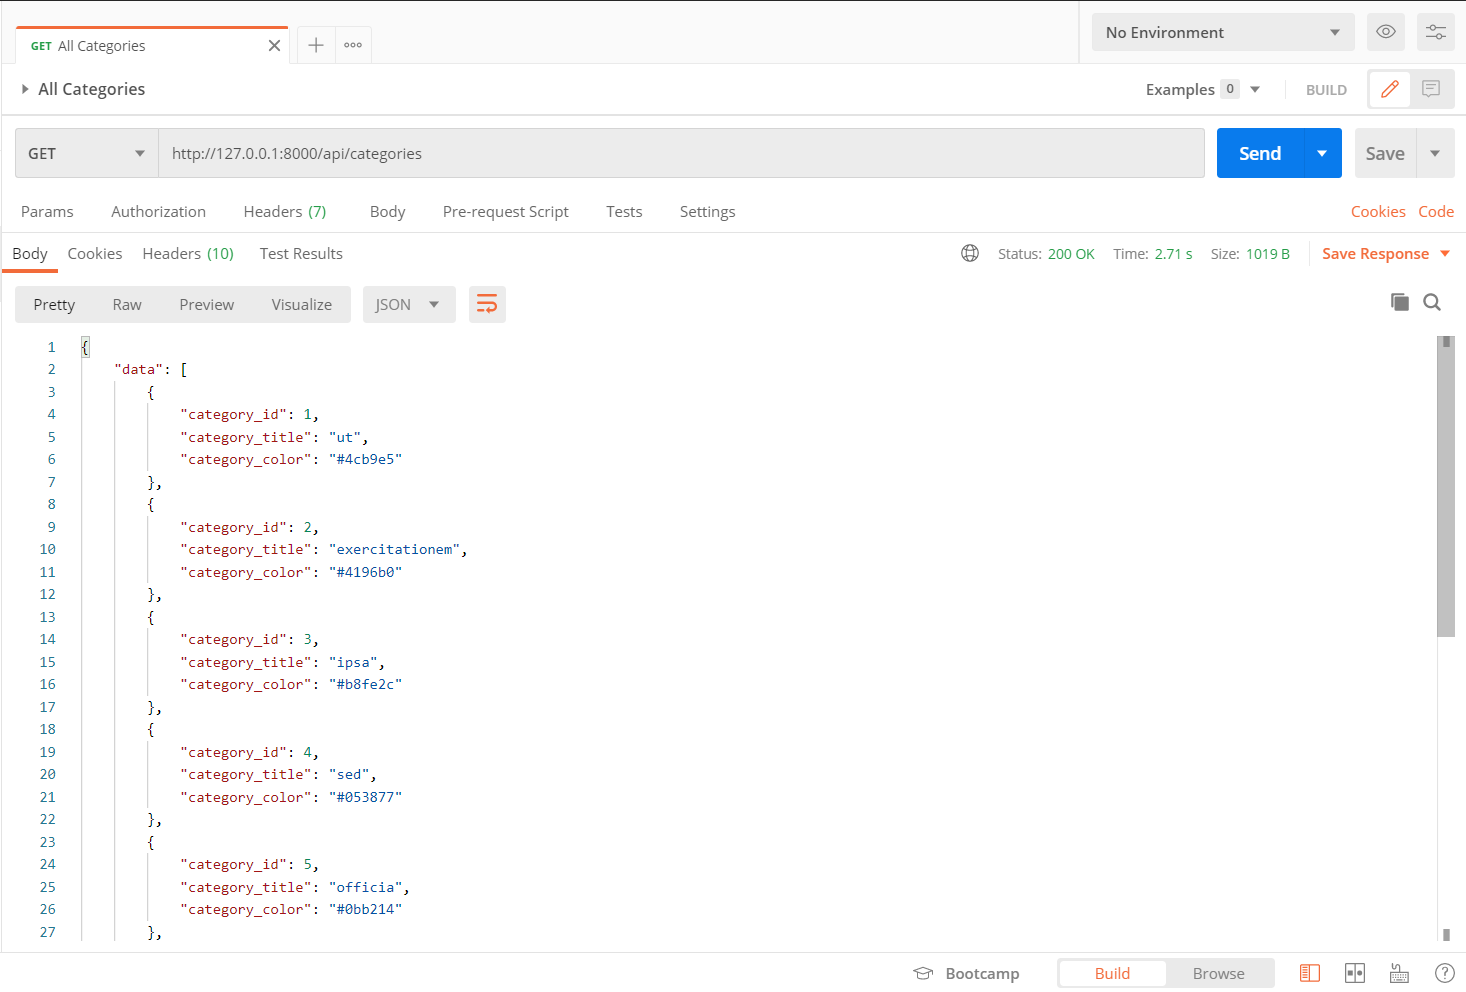
Open Postman and test all routes defined in api.php, but make sure to append your route with /api/
To get all categories you should send a GET request to http://127.0.0.1:8000/api/categories
RESTful API Returning Response
Now lets test authenticated route as well. There is only one authenticated route for storing comment of logged in user on a post.
We are using Laravel Sanctum for authentication and authorization. We will issue an API token and use that in Postman to authenticate the request.
Laravel Sanctum provides a featherweight authentication system for SPAs (single page applications), mobile applications, and simple, token based APIs. Sanctum allows each user of your application to generate multiple API tokens for their account. These tokens may be granted abilities / scopes which specify which actions the tokens are allowed to perform.
It will now allow us to interact with the Laravel application from the command line. Here you need to create an API token for a user using createToken() method.
Copy plainTextToken, to be used in Postman.
Now open Postman and do the following:
New POST request to http://127.0.0.1:8000/api/comments/posts
In Authorization tab select Type as Bearer Token and paste the plainTextToken in Token text box.
Then in Headers tab Key as Accept and Value as application/json.
Then in Body tab select form-data radio button and in Key, Value write id — 159, comment — Testing some comment on post 159
Now hit the send button and you will get back the newly created comment.
In this article, we have been able to build and consume (Consumer was Postman)RESTful API using Laravel. We covered the API Resource creation, API Controller creation, and tested Authenticated and Non-Authenticated API Routes.
The source code is available at Github for you to refer to.
In this tutorial, you’ll learn how to use Laravel Lumen (version 8) to create REST APIs.
We’ll be creating a Lumen microservice that implements all the types of HTTP requests. Our microservice will help us manage users. So, from any frontend application we connect to our microservice, we should be able to:
– Create a new user (POST Request)
– Edit the details of a user (PUT Request)
– Request for the details of users (GET Request)
– Delete a user (DELETE Request)
Here’s a link to the GitHub repo of this project: Repo
Tools Required:
· You need to have PHP installed. The minimum PHP version that is compatible with Lumen 8 is PHP 7.3. If you have the latest XAMPP, WAMP, or LAMP installed, you should be good to go.
· You also need to have Composer installed. If you don’t have it, click here to get it.
Knowledge Required:
Basic knowledge of Laravel will help you follow along.
Let’s Get Started!
Install lumen on your system by running the command below via a CLI:
composer global require “laravel/lumen-installer”
Next, in your CLI, navigate to the directory that you want your project to be located in and create a lumen project using the command:
NB: Replace “projectName” with whatever you want to name your project.
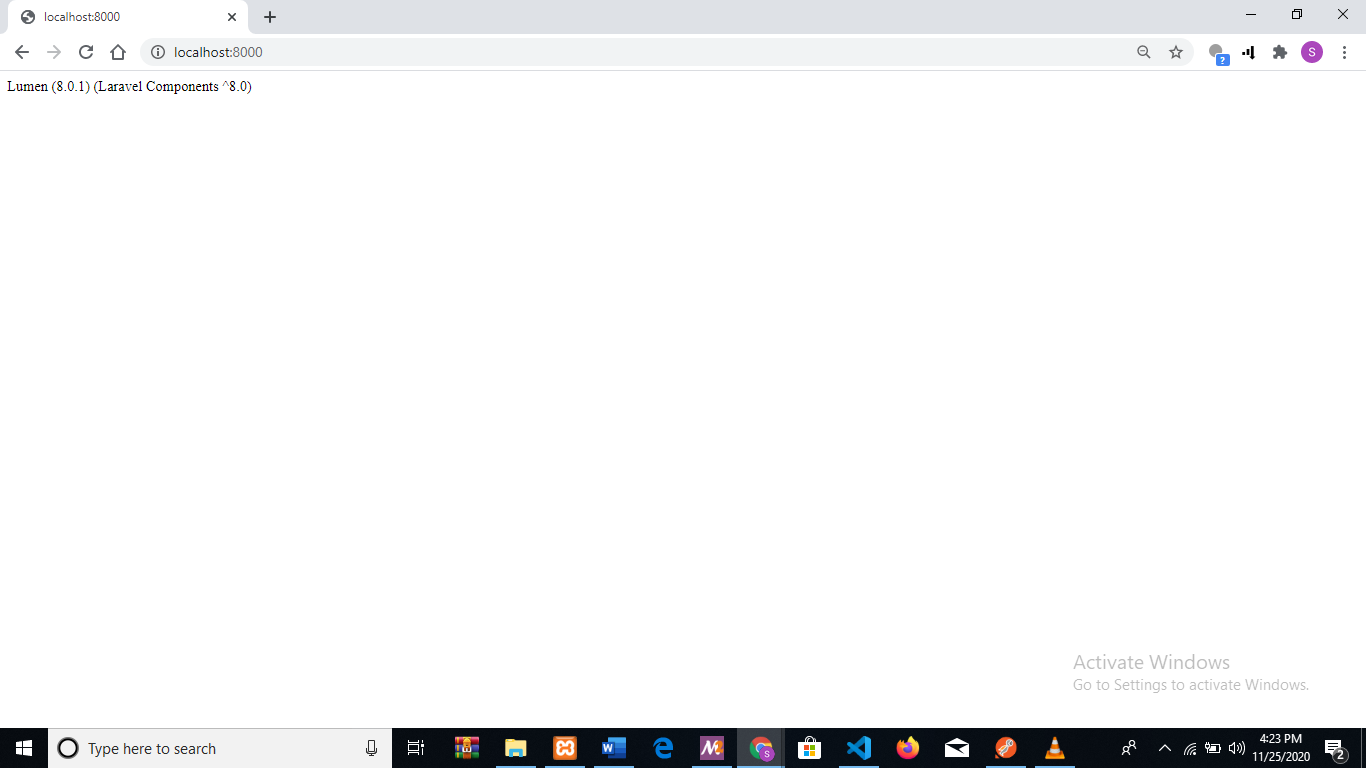
Lumen comes with some boilerplate code; a simple template that we can build upon. If you want to take a quick look at it, run php -S localhost:8000 -t public via your CLI and run localhost:8000 in your browser. You should see something like this:
Now, let’s continue with creating our microservice.
The next thing we want to do is create a database for our microservice. This is where all the details of our users will be stored. There are a number of ways to do this. I’m going to stick with MySQL, and I’ll make use of PHPmyAdmin. Feel free to use whatever option you deem best.
Make sure your server is running(XAMPP, WAMP, or LAMP). Go to your browser and enter localhost/phpmyadmin. Create a new database and take note of the name you used.
Next, let’s add our database details to our lumen project, so as to connect both together.
Open the newly created lumen project with any code editor of your choice, navigate to the .env file, and update the name of the database, the username, and the password.
By default, the username should be “root” and there should be no password.
Now that our database is set, we can start working on the actual project. In this project, we’ll be making use of Laravel’s Eloquent and Facades classes. In Lumen, these classes come disabled, so we have to enable them ourselves. To do this, navigate to boostrap/app.php and uncomment the lines below:
//$app->withFacades();
//$app->withEloquent();
Now, your bootstrap/app.php file should look like this:https://omojolasamsonade.medium.com/media/68dd19d605319f97a4cb061e715cd5b4
We’ll be making use of Eloquent and Facades in our routes and controller files.
Now that we have that set up, let’s create our users table in the database we just created. Run the following command in your CLI:
php artisan make:migration create_users_table
Navigate to the migrations folder and open the newly created users migration file. This is where we decide what columns the users table should have.
Each user should have a first name, a last name, and an email address. So let’s go ahead and create columns for them.
$table->string(‘first_name’);
$table->text(‘last_name’);
$table->integer(‘email_address’);
Now, your users migration file should look like this:https://omojolasamsonade.medium.com/media/0caf4f7320a9f21e3159fbc2f5741ebf
To create the table, run the following command in your CLI:
php artisan migrate
Now that we’ve successfully created our users table, the next step is to create our User model. In Lumen, there’s no CLI command for creating models, so navigate to your app/Models folder, create a file and name it User.php. If you find a User.php file already created in that folder, just use that instead. Now, let’s map it to our database:
It should look like this now:https://omojolasamsonade.medium.com/media/05657cd2cae8ab19b8e53a881583d282
Now we need to create the appropriate routes for our microservice. The code that will process API calls will be in a controller file named UserController. UserController will contain different methods for handling all the different HTTP requests, and each method will need a route pointing to it. The routes will serve as triggers for these methods. Every time they are called, the methods will be executed. We’ll be giving all the routes a common prefix “api/v1” (think of it as them all belonging to the same family).
Navigate to routes/web.php and add the needed routes:
$router->group([‘prefix’ => ‘api/v1’], function () use ($router) {
Your web.php should look like this:https://omojolasamsonade.medium.com/media/8ae6347853eb6a9604c797d0068e5403
(The comment above each route explains what the route does).
Now that our routes are set, we need to actually create that controller file with the methods we are referencing above. These methods will be in charge of handling our API calls and processing our requests.
Go to app/Http/Controllers and create a file named UserController.php
These are the methods we need:
Create New User
public function createUser(Request $request){
$user = User::create($request->all());
return response()->json($user);
}
update user details
public function updateUser(Request $request, $id){
Your User Controller should look like this:https://omojolasamsonade.medium.com/media/2d970a97395fe287e49e3d980da9c2e3
The first method createUser() allows you to create a new user.
The second method updateUser() allows you to update the details of an already existing user.
The third method viewUser() allows you to view the details of a user you created.
The fourth method deleteUser() allows you to delete a user from your database.
The fifth method index() allows you to list all the users you created.
Now, if a call is made to any of the routes in web.php, the corresponding method in UserController is triggered.
You can use Postman to make the http request. To do that, make sure your lumen server is running. Use this command to get it started: php -S localhost:8000 -t public
Create the required fields and supply them with values.
(Use the POST option)
You should get the details of the user you just created as a JSON response.
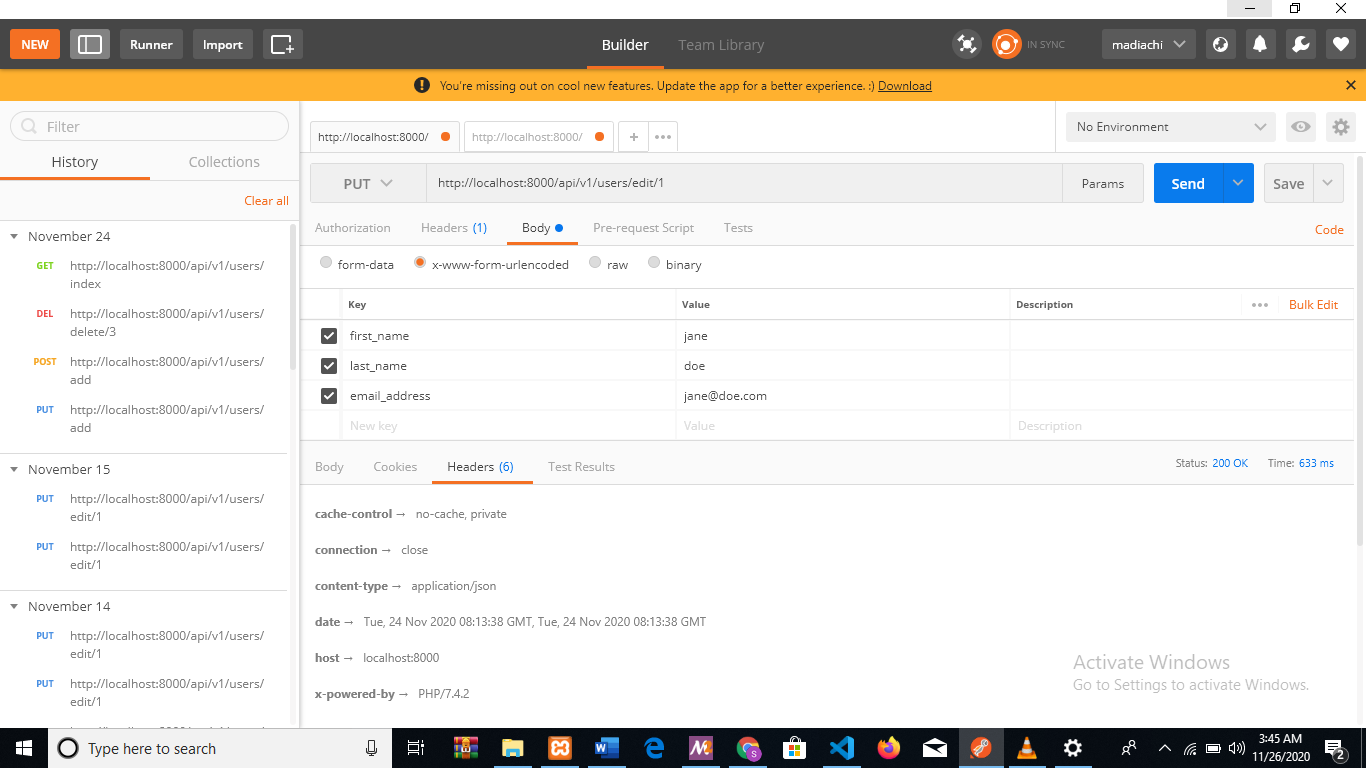
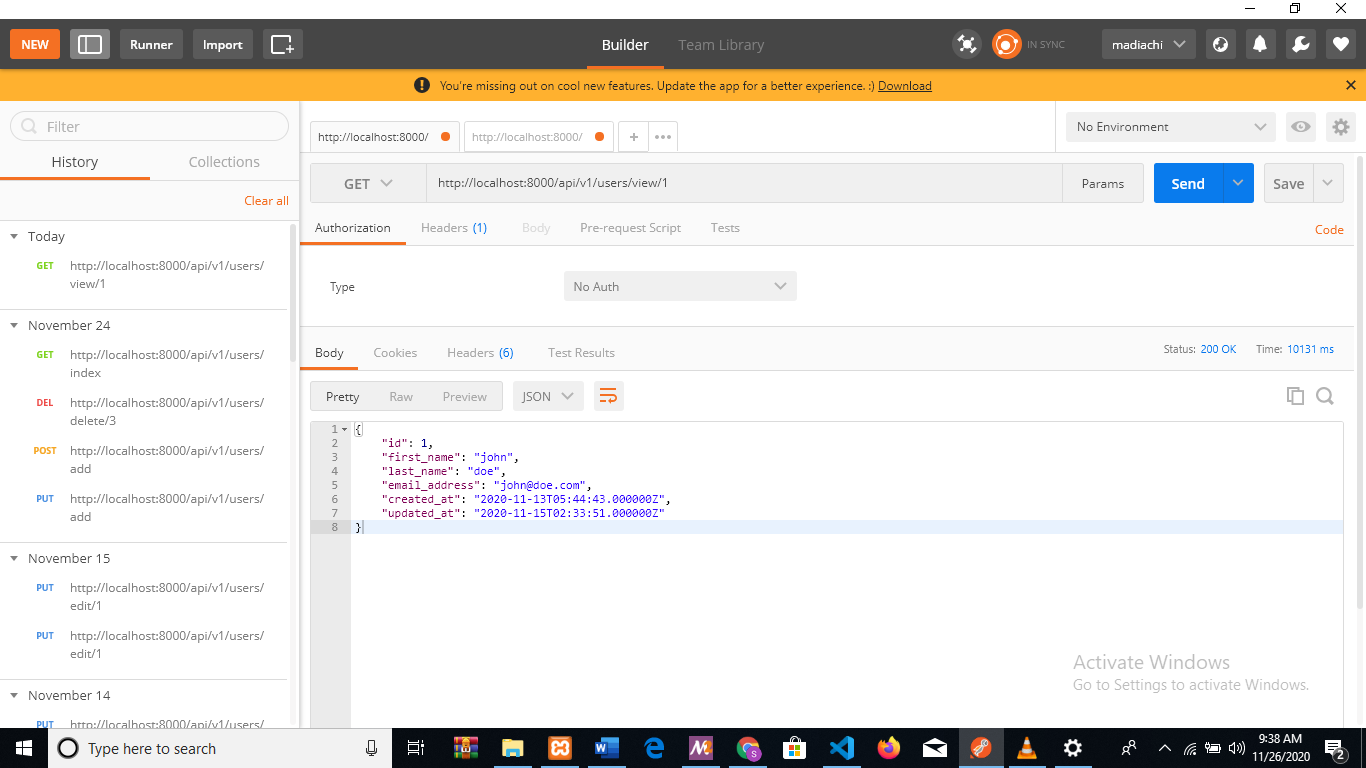
Next, let’s test updateUser(). We can edit the details of the user we just created. Send this HTTP request via Postman: http://localhost:8000/api/v1/users/edit/1
Supply the previously created fields with new values.
(Use the PUT option)
You should get the details you just entered back as a JSON response.
Next, let’s test viewUser(). We can view the details of the user we just created. Send this HTTP request via Postman: http://localhost:8000/api/v1/users/view/1
(Use the GET option)
You should get the details of the user you created back as a JSON response.
Next, let’s test deleteUser(). We can delete the user we just created. Send this HTTP request via Postman: http://localhost:8000/api/v1/users/delete/1
(Use the DELETE option)
You should get a success message back.
Lastly, let’s test index(). This will list out all the users we have in our database. Send this HTTP request via Postman: http://localhost:8000/api/v1/users/index
(Use the GET option)
BUILDING A CLIENT APPLICATION TO CONSUME THE API
Let’s create a very simple frontend application to consume the API we just created. A simple PHP application will suffice. Navigate to xampp/htdocs and create a folder for your frontend app. I’ll name mine “userfrontend”. Next, create a file in the folder and name it “index.php”.
Make sure your lumen microservice and your XAMPP are running.
We can use php’s curl function to make the API request, like this:
Although there are many articles about this topic, I decided to document this in a post for my future self and to share with all of you the approach I usually use to separate an application depending on specific roles.
Middleware provide a convenient mechanism for filtering HTTP requests entering your application. For example, Laravel includes a middleware that verifies the user of your application is authenticated. If the user is not authenticated, the middleware will redirect the user to the login screen. However, if the user is authenticated, the middleware will allow the request to proceed further into the application.
Additional middleware can be written to perform a variety of tasks besides authentication. A CORS middleware might be responsible for adding the proper headers to all responses leaving your application. A logging middleware might log all incoming requests to your application.
There are several middleware included in the Laravel framework, including middleware for authentication and CSRF protection. All of these middleware are located in the app/Http/Middleware directory.
For this example we are going to install the package and create a custom middleware to group our administration routes into a new single route file under the same access control logic for all admin routes.
I will simplify the example in this post to use only two roles: Admin and User (without assigning specific permissions).
Setup of spatie/laravel-permission package
First of all, you must fill your .env file with a new database configuration.
This package can be used in Laravel 5.4 or higher. If you are using an older version of Laravel, take a look at the v1 branch of this package.
You can install the package via composer:
composer require spatie/laravel-permission
The service provider will automatically get registered. Or you may manually add the service provider in your config/app.php file:
add the Spatie\Permission\Traits\HasRoles trait to your User model(s):
use Illuminate\Foundation\Auth\User as Authenticatable;
use Spatie\Permission\Traits\HasRoles;class User extends Authenticatable
{
    use HasRoles;    // ...
}
Using Laravel Authentication system
Make sure of the Laravel authentication feature is present, if not, you can setup this with the artisan command:
php artisan make:auth
Creating some Users
Now add some users to your application, optionally you can use a Seeder to achieve this. For example, create a new RolesAndPermissionsSeeder by running:
Don’t forget to import the Role class with use Spatie\Permission\Models\Role. Now we have two different users with different roles.
Note: How we have relied on the UserFactory class, the default password for both is password (in Laravel 5.8, for earlier versions the default password is secret)
Creating the new middleware with the custom route file
We are ready to create a new middleware to separate admin routes of user routes. It should be noted that an administrator can access the routes of a normal user, but not in an inverse way.
Step 0: Add a test
To achieve this quickly, I will rely on the use of automated tests using the integrated phpunit on Laravel:
php artisan make:test RolesAccessTest
And add the following tests:
<?php

namespace Tests\Feature;

use App\User;
use Tests\TestCase;

class RolesAccessTest extends TestCase
{
    /** @test */
    public function user_must_login_to_access_to_admin_dashboard()
    {
        $this->get(route('admin.dashboard'))
             ->assertRedirect('login');
    }

    /** @test */
    public function admin_can_access_to_admin_dashboard()
    {
        //Having
        $adminUser = factory(User::class)->create();

        $adminUser->assignRole('admin');

        $this->actingAs($adminUser);

        //When
        $response = $this->get(route('admin.dashboard'));

        //Then
        $response->assertOk();
    }

    /** @test */
    public function users_cannot_access_to_admin_dashboard()
    {
        //Having
        $user = factory(User::class)->create();

        $user->assignRole('user');

        $this->actingAs($user);

        //When
        $response = $this->get(route('admin.dashboard'));

        //Then
        $response->assertForbidden();
    }

    /** @test */
    public function user_can_access_to_home()
    {
        //Having
        $user = factory(User::class)->create();

        $user->assignRole('user');

        $this->actingAs($user);

        //When
        $response = $this->get(route('home'));

        //Then
        $response->assertOk();
    }

    /** @test */
    public function admin_can_access_to_home()
    {
        //Having
        $adminUser = factory(User::class)->create();

        $adminUser->assignRole('admin');

        $this->actingAs($adminUser);

        //When
        $response = $this->get(route('home'));

        //Then
        $response->assertOk();
    }
}
Obviously these assertions could be improved by adding others to check views and / or content that should be shown in those sections, but for the purposes of this post, these tests are sufficient.
If you run this test now, you will get the following errors:
./vendor/bin/phpunit --filter RolesAccessTest
PHPUnit 7.4.3 by Sebastian Bergmann and contributors.EEE.. 5 / 5 (100%)Time: 219 ms, Memory: 18.00MBThere were 3 errors:1) Tests\Feature\RolesAccessTest::user_must_login_to_access_to_admin_dashboard
InvalidArgumentException: Route [admin.dashboard] not defined....ERRORS!
Tests: 5, Assertions: 2, Errors: 3.
Let’s start writing the code so that this test passes:
Create a new temporary route into the routes/web.php file, your file will look like this:
./vendor/bin/phpunit --filter RolesAccessTest
PHPUnit 7.4.3 by Sebastian Bergmann and contributors.F.F.. 5 / 5 (100%)Time: 228 ms, Memory: 18.00MBThere were 2 failures:1) Tests\Feature\RolesAccessTest::user_must_login_to_access_to_admin_dashboard
Response status code [200] is not a redirect status code.
Failed asserting that false is true....2) Tests\Feature\RolesAccessTest::users_cannot_access_to_admin_dashboard
Response status code [200] is not a forbidden status code.
Failed asserting that false is true....FAILURES!
Tests: 5, Assertions: 5, Failures: 2.
At this point, we have 2 failures only, the admin route is a public route and is not restricted to the Admin role only, let’s fix it in a few steps.
Step 1: Create a map for the new Admin routes
Go to the app\Providers\RouteServiceProvider. In the map method add a new function for map the Admin routes:
public function map()
{
    $this->mapApiRoutes();

    $this->mapWebRoutes();

    $this->mapAdminRoutes();

    //
}
and now implement the new mapAdminRoutes method inside the provider:
protected function mapAdminRoutes()
{
    Route::middleware('admin')
         ->namespace($this->namespace)
         ->group(base_path('routes/admin.php'));
}
Note: optionally, I recommend separating also the namespace of the controllers that will be used by the admin routesand that in addition the users must have the admin role
->namespace($this->namespace . '\\Admin')
Step 2: Create new admin.php file into routes folder
Add a new file into routes filder called admin.php and move the route for admins inside of this new file:
This group specifies that the middleware will make use of the web and auth middlewares, and that in addition the users must have the admin role. This middleware group was indicated into mapAdminRoutesmethod into our RouteServiceProvider.
Final Step:
Now you can re-run the tests and check the results
./vendor/bin/phpunit — filter RolesAccessTest
PHPUnit 7.4.3 by Sebastian Bergmann and contributors.….. 5 / 5 (100%)Time: 215 ms, Memory: 18.00MBOK (5 tests, 6 assertions)
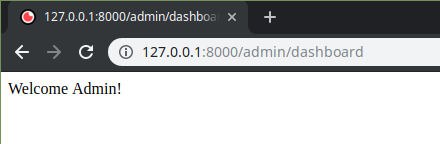
Now we have the new middleware working correctly to restrict access to administration routes only to the corresponding users. You can also perform a manual check with the created users in the Seeder
Admin user successfully logged in into the admin routes
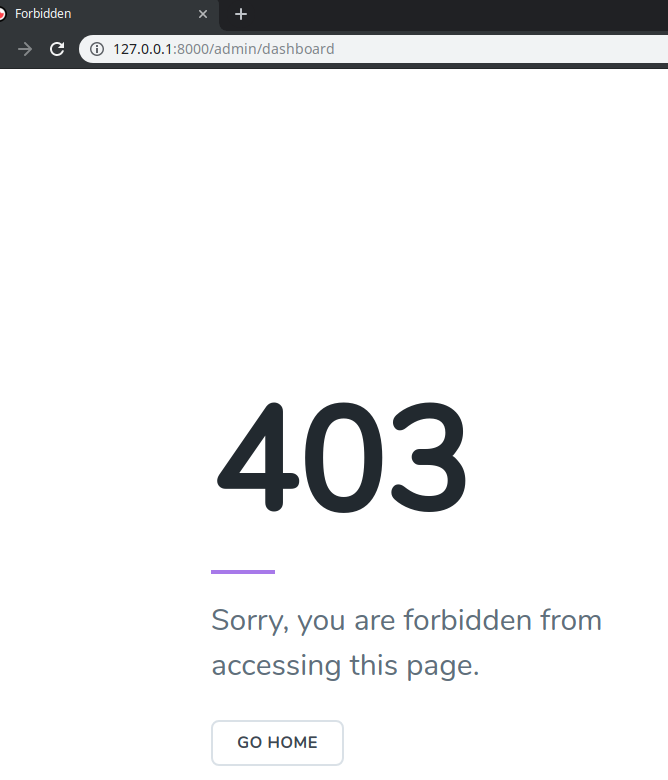
And if you try to enter in the admin routes with the normal user you will get an Forbidden response:
Normal user cannot enter to admin routes
In Closing
With this approach you will get a clear separation for the Admin routes and the normal User routes. We only needed to:
Install and configure spatie/laravel-permission
Create and assign desired Roles to Users
Create a new admin middleware group in the app\Http\Kernel class
Create a new mapAdminRoutes into the RouteServiceProvider to map a new routes/admin.php file and assign it to the new admin middleware group
And some advantages of this approach are the separations of concerns for different app components:
Separated routes files
Separated Controllers with a custom namespace
And also you can use this approach to separate resources files as assets or layouts and view files.
As we have guided our development by the use of automated tests (TDD), we have not needed to manually test with each user of our application during the development, which is also another great advantage.
Any hacker knows the keys to the network are in Active Directory (AD). Once a hacker has access to one of your user accounts, it’s a race against you and your data security protections to see if you can stop them before they can start a data breach.
It’s important to know Active Directory backwards and forwards in order to protect your network from unauthorized access – and that includes understanding LDAP.
What is LDAP?
LDAP (Lightweight Directory Access Protocol) is an open and cross platform protocol used for directory services authentication.
LDAP provides the communication language that applications use to communicate with other directory services servers. Directory services store the users, passwords, and computer accounts, and share that information with other entities on the network.
What is Active Directory?
Active Directory is a directory services implementation that provides all sorts of functionality like authentication, group and user management, policy administration and more.
Active Directory (AD) supports both Kerberos and LDAP – Microsoft AD is by far the most common directory services system in use today. AD provides Single-SignOn (SSO) and works well in the office and over VPN. AD and Kerberos are not cross platform, which is one of the reasons companies are implementing access management software to manage logins from many different devices and platforms in a single place. AD does support LDAP, which means it can still be part of your overall access management scheme.
Active Directory is just one example of a directory service that supports LDAP. There are other flavors, too: Red Hat Directory Service, OpenLDAP, Apache Directory Server, and more.
LDAP vs. Active Directory
LDAP is a way of speaking to Active Directory.
LDAP is a protocol that many different directory services and access management solutions can understand.
The relationship between AD and LDAP is much like the relationship between Apache and HTTP:
HTTP is a web protocol.
Apache is a web server that uses the HTTP protocol.
LDAP is a directory services protocol.
Active Directory is a directory server that uses the LDAP protocol.
Occasionally you’ll hear someone say, “We don’t have Active Directory, but we have LDAP.” What they probably mean is that they have another product, such as OpenLDAP, which is an LDAP server. It’s kind of like someone saying “We have HTTP” when they really meant “We have an Apache web server.”
What is LDAP Authentication?
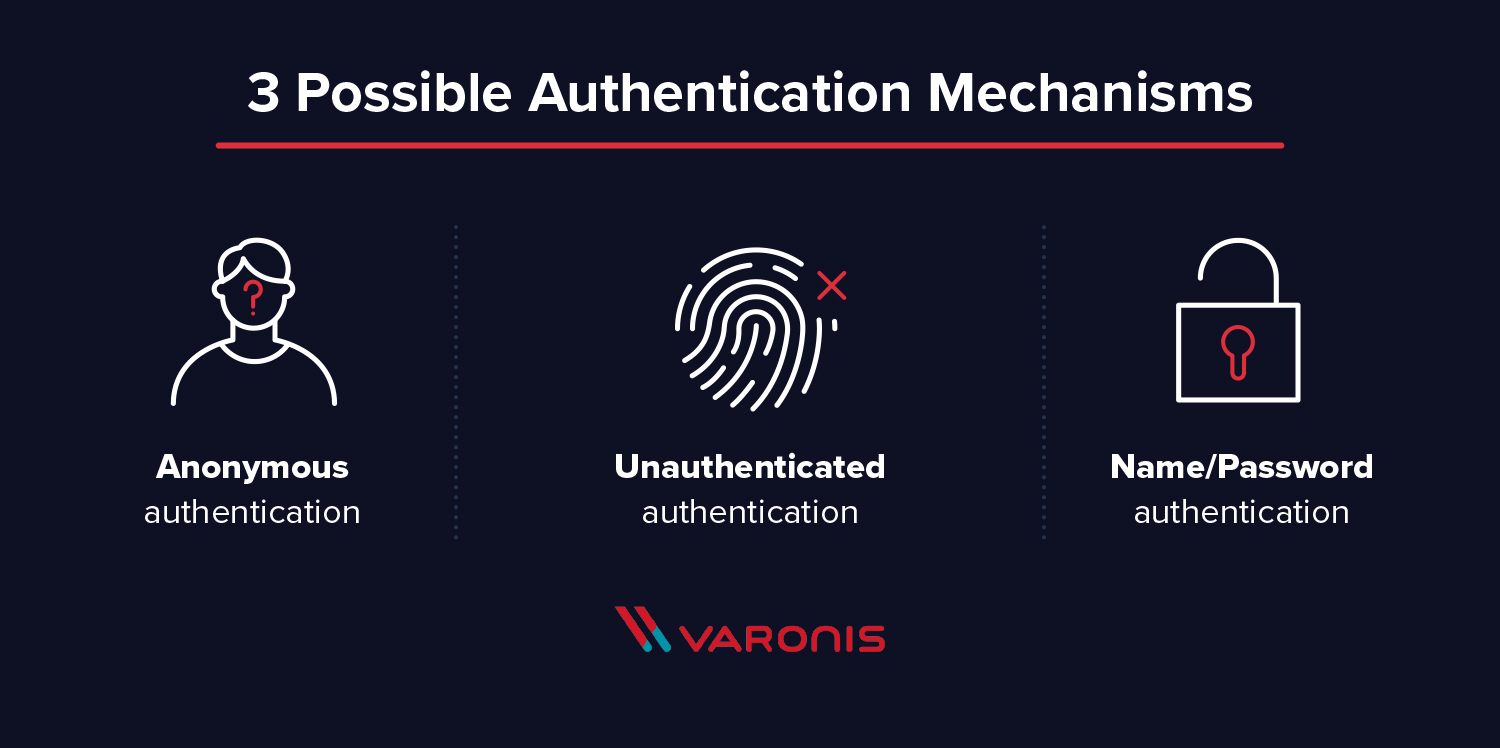
There are two options for LDAP authentication in LDAP v3 – simple and SASL (Simple Authentication and Security Layer).
Simple authentication allows for three possible authentication mechanisms:
Anonymous authentication: Grants client anonymous status to LDAP.
Unauthenticated authentication: For logging purposes only, should not grant access to a client.
Name/Password authentication: Grants access to the server based on the credentials supplied – simple user/pass authentication is not secure and is not suitable for authentication without confidentiality protection.
SASL authentication binds the LDAP server to another authentication mechanism, like Kerberos. The LDAP server uses the LDAP protocol to send an LDAP message to the other authorization service. That initiates a series of challenge response messages that result in either a successful authentication or a failure to authenticate.
It’s important to note that LDAP passes all of those messages in clear text by default, so anyone with a network sniffer can read the packets. You need to add TLS encryption or similar to keep your usernames and passwords safe.
What is an LDAP Query?
An LDAP query is a command that asks a directory service for some information. For instance, if you’d like to see which groups a particular user is a part of, you’d submit a query that looks like this:
Beautiful syntax, huh? Not quite as simple as typing a web address into your browser. Feels like LISP.
Luckily, in most cases, you won’t need to write LDAP queries. To maintain your sanity, you’ll perform all your directory services tasks through a point-and-click management interface like Varonis DatAdvantage or perhaps using a command line shell like PowerShell that abstracts away the details of the raw LDAP protocol.
TL;DR: LDAP is a protocol, and Active Directory is a server. LDAP authenticates Active Directory – it’s a set of guidelines to send and receive information (like usernames and passwords) to Active Directory. Want to learn more? Get a 1:1 AD demo and learn how Varonis helps protect your Active Directory environment.
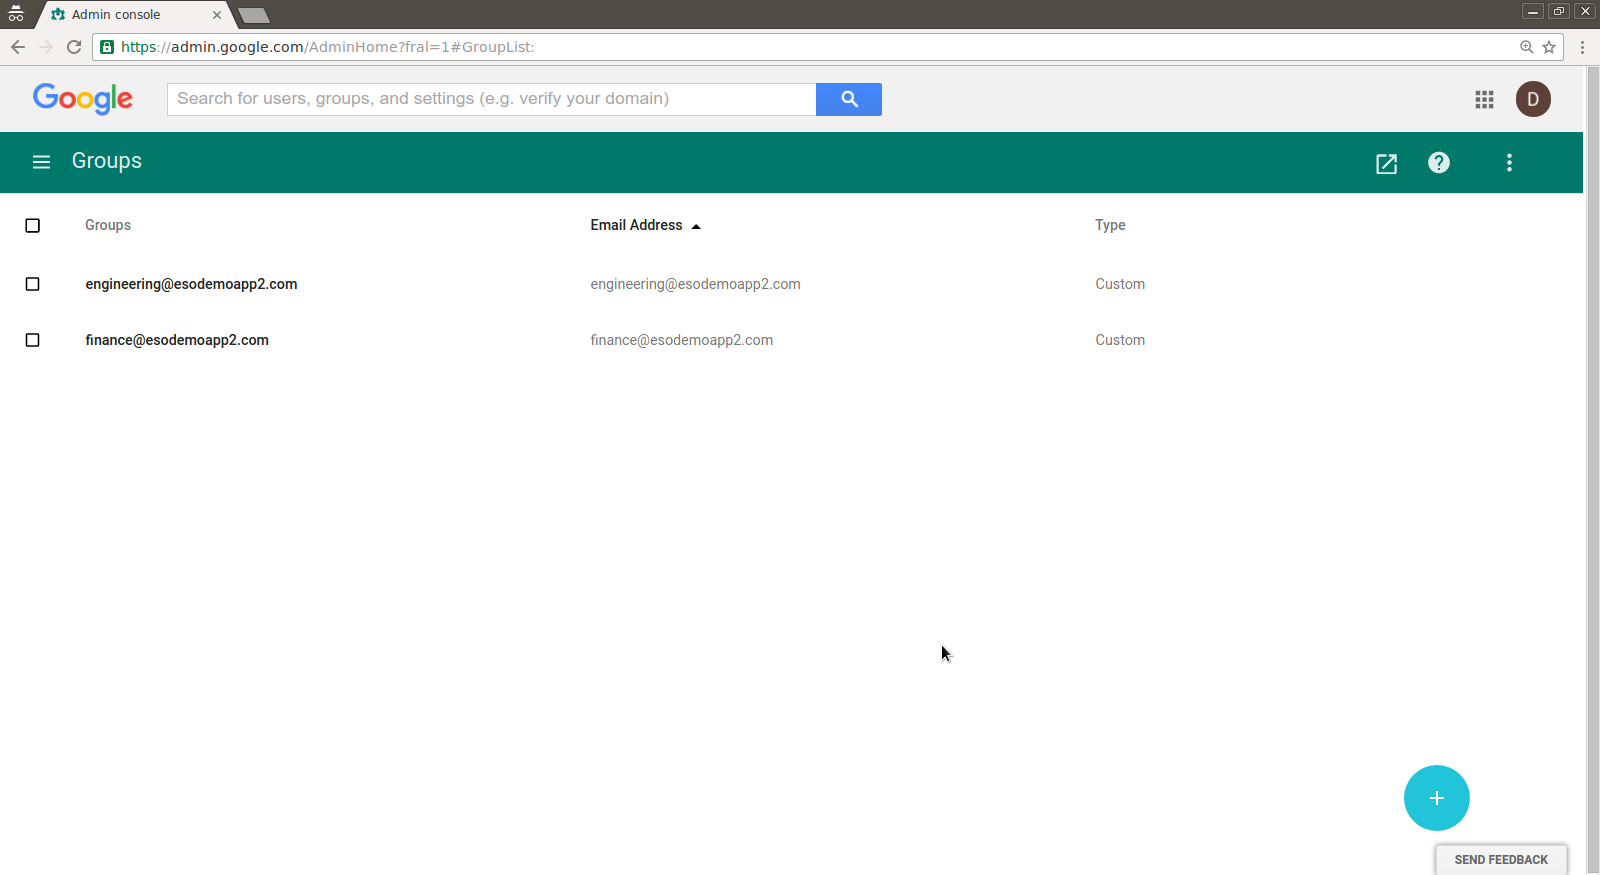
Tutorial on how to provision users and groups from a local LDAP server (OpenLDAP) into your G-suites domain. Any users and groups present in your local LDAP server will get created in G-suites. Once your users are present in your G-suites domain, you can authorize these users and groups access to Google Cloud Resources and other G-suites features.
This article is simply a tutorial on the simplified steps you would take for your on-prem directory server (ActiveDirectory, OpenLDAP). The Directory Sync utility overwrites any existing G-suites users and groups in favor of your local LDAP. As this is just a tutorial, only execute the ‘dry-run/simulate’ capabilities unless you are absolutely sure. You will need Domain Admin user privileges to your G-suites domain.
This sample will only sync the basic Users and Groups objects from your LDAP to G-suites.
This tutorial run a Docker container with a configurable OpenLDAP server that you can setup and load sample data reflecting your LDAP hierarchy. The the sample LDIF file is very basic and enables the domain dc=example, dc=com with users under ou=users and groups under ou=groups
You can edit the slapd.conf file and import.ldif file to map to your users and directory structure. You will need to initialize and load the LDIF files once the container starts up as shown below
** NOTE: I’ve made some specific modifications to the objectclass mappings for a users groups display name for simplicity **
Download the sample Dockerfile and LDAP configuration
Dockerfile Initializes a plain OpenLDAP server on secure (ldaps://) and insecure (ldap://) ports.
slapd.conf OpenLDAP configuration that defines the root password, baseDN and ACLs to apply
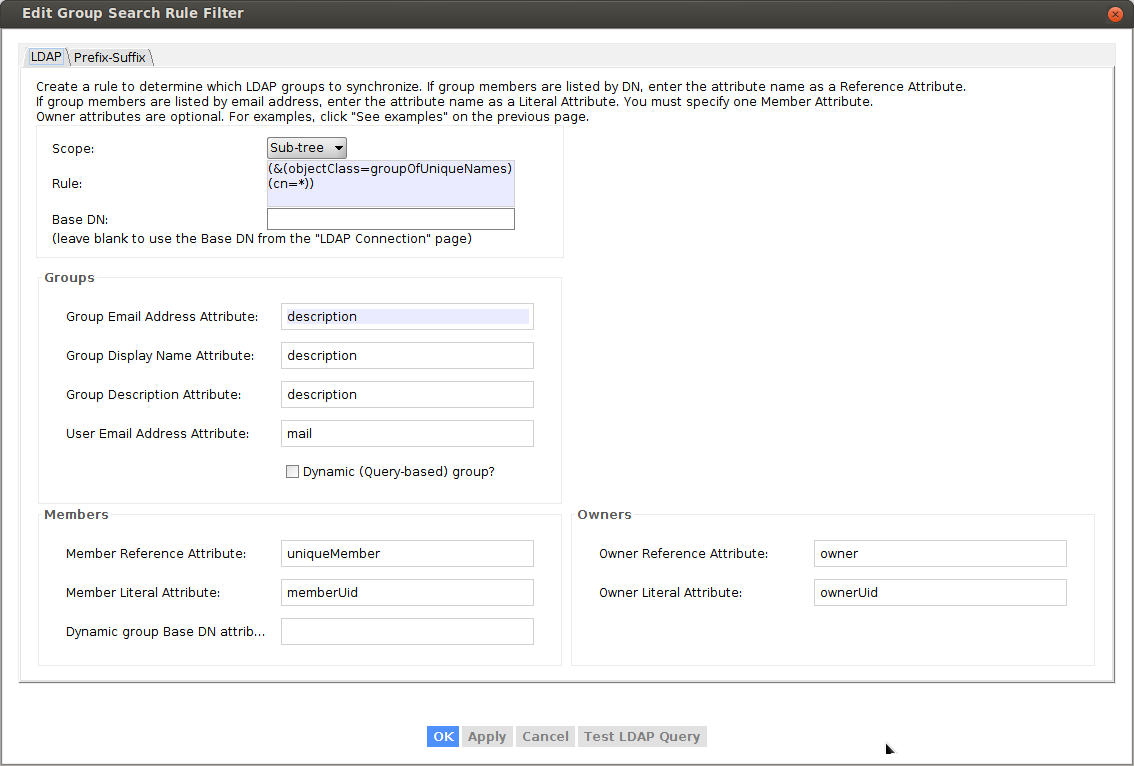
I did not want to override the default openldap schema so I ended up using the description attribute of objectclass: groupofuniquenames as the attribute the utility will use to infer the Group Email Address:
Group Email Address Attribute: description
Meaning the LDAP’s description field for a groupofuniquenames denotes the email address to provision in G-suites.
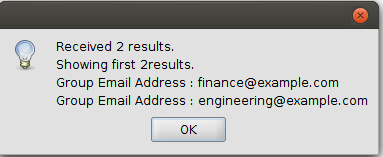
You can search for the groups by looking in the subtree for:
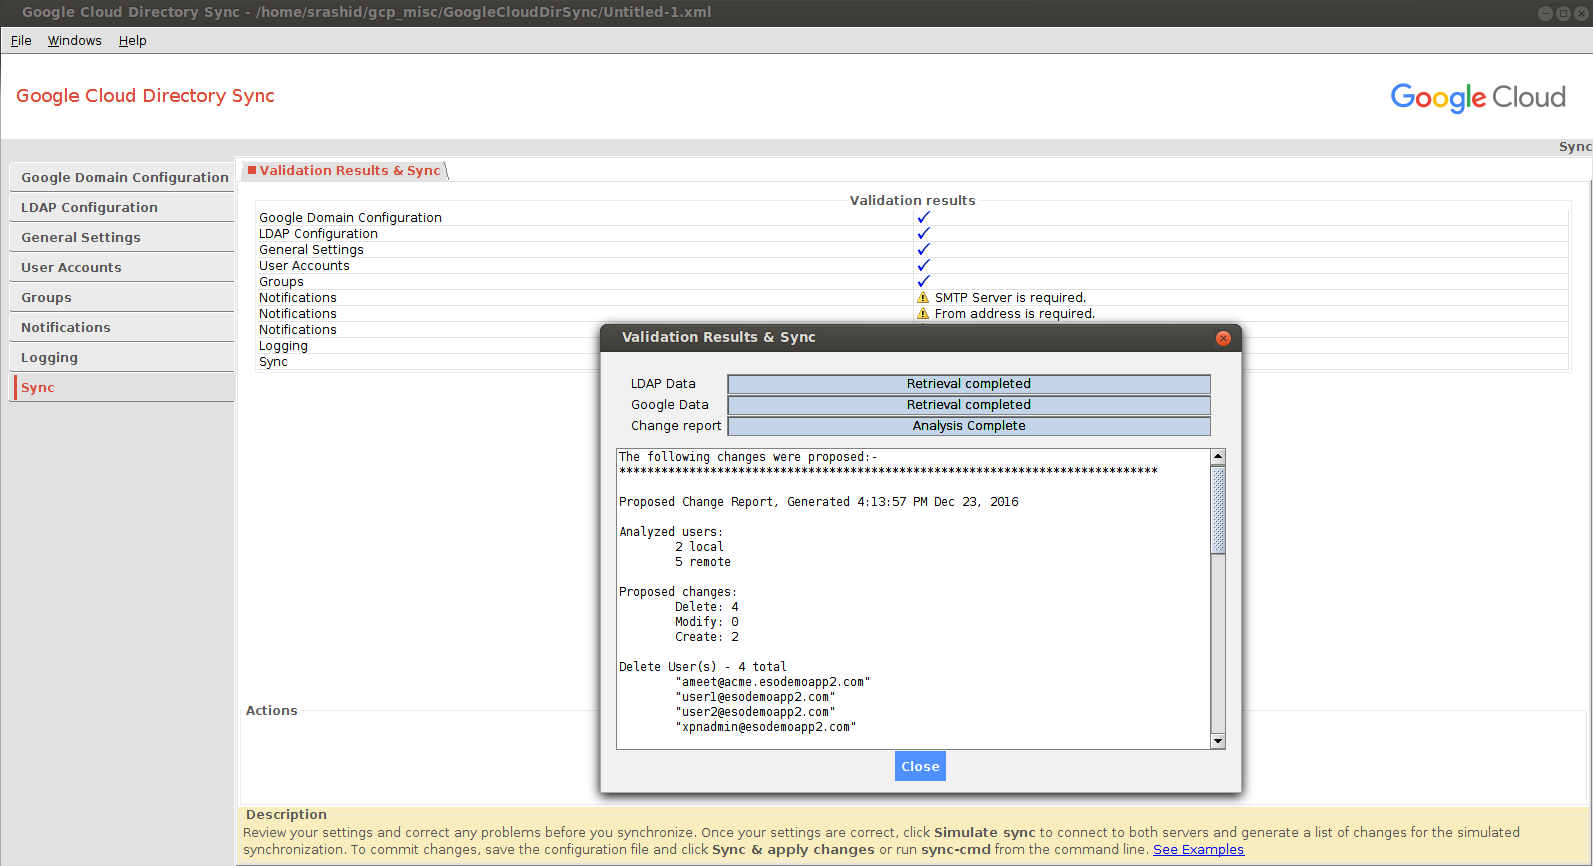
Now that you are all setup, click the ‘Simulate sync’ button to see what would happen.
REMEMBER TO SELECT “SIMULATE SYNC”
If had existing users already in my apps domain and I tried to import new ones, the reconciliation favored the local LDAP (meaning it would add local ldap and delete existing accounts~)
Execute Sync
Only execute a full sync if you are absolutely sure this is what you want to do!!
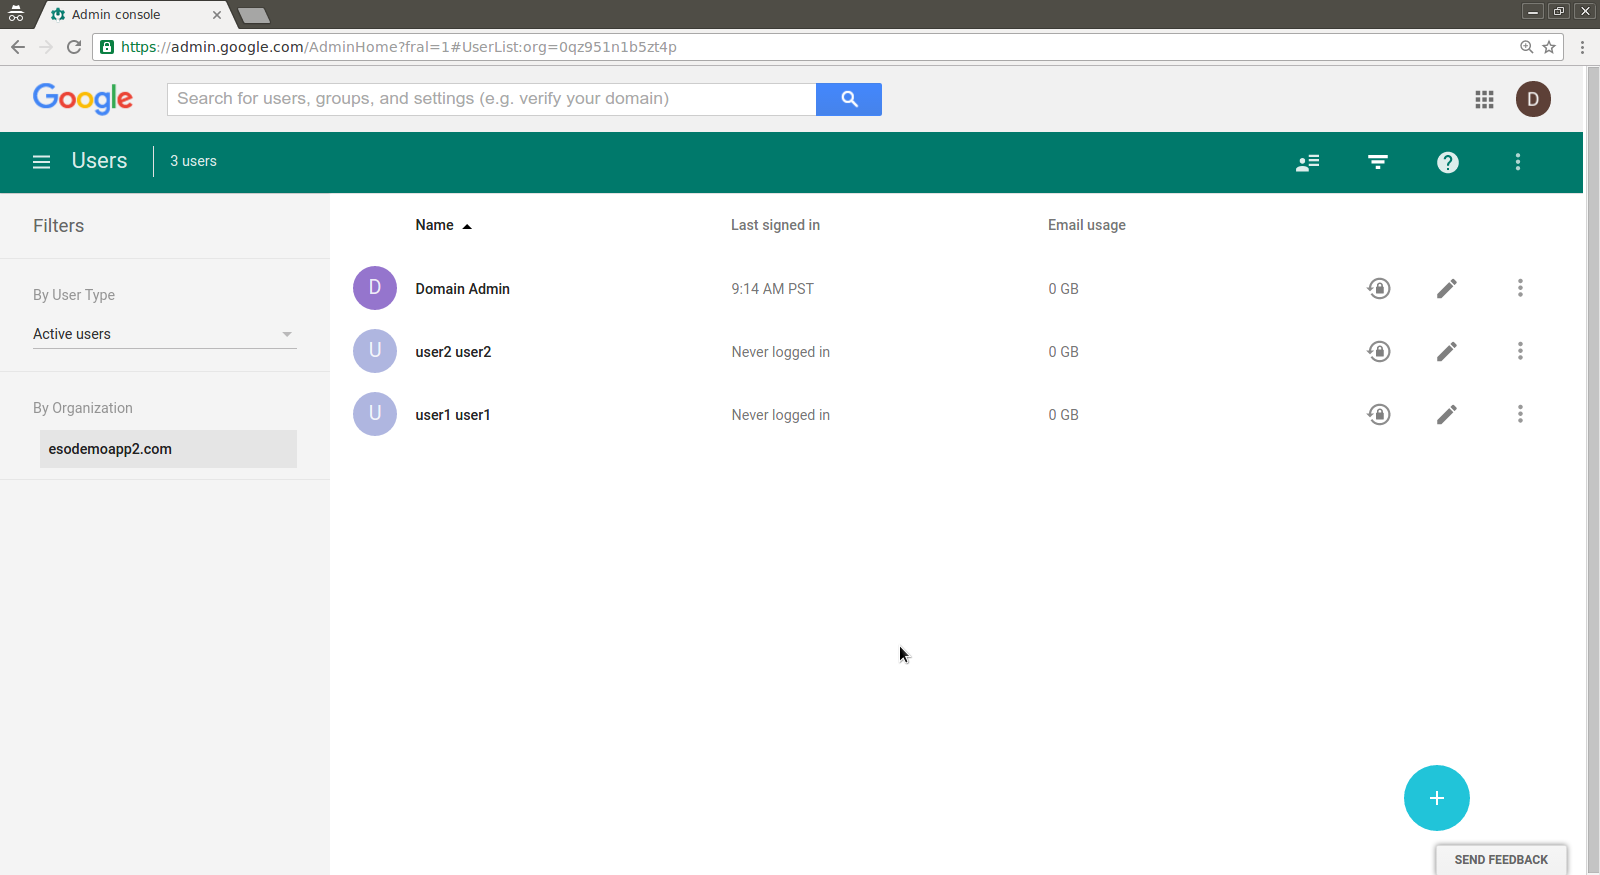
If you are confident on the sync setup, you can initiate the full synchronization. Once the users and groups are committed, you can see them in the Google Apps domain console.
Note, the setup does not sync or overwrite the domain admin users.
You can also backup/export your existing users list first to a .csv file prior to running the full sync.
The following changes were applied on the Google domain:-
*****************************************************************************Change Status Report, Generated 10:09:17 AM Dec 28, 2016
Successful user changes:
    Deleted:  0
    Modified: 0
    Created:  2Failures:
    Delete: 0
    Modify: 0
    Create: 0Created 2 new users
User: "user1@example.com"
    Local key "dXNlcjE"
    Given name "user1"
    Family name "user1"
    Set SHA-1 password hashUser: "user2@example.com"
    Local key "dXNlcjI"
    Given name "user2"
    Family name "user2"
    Set SHA-1 password hash
Successful group changes:
    Deleted:  0
    Modified: 2
    Created:  2Failures:
    Delete: 0
    Modify: 0
    Create: 0Successfully modified 2 groups
Group: "finance@example.com"
    Added user user1@example.comGroup: "engineering@example.com"
    Added user user1@example.com
    Added user user2@example.com
Created 2 new groups
Group: "engineering@example.com"
Group: "finance@example.com"The following changes were proposed:-
*****************************************************************************Proposed Change Report, Generated 10:09:16 AM Dec 28, 2016Analyzed users:
    2 local
    1 remoteProposed changes:
    Delete: 0
    Modify: 0
    Create: 2Create - 2 total
New user 1: "user1@example.com"
    Non-address primary key "dXNlcjE"
    Given name "user1"
    Family name "user1"
    SHA1 password
    0 aliasesNew user 2: "user2@example.com"
    Non-address primary key "dXNlcjI"
    Given name "user2"
    Family name "user2"
    SHA1 password
    0 aliasesAnalyzed groups:
    2 local
    0 remoteProposed changes:
    Delete: 0
    Modify: 2
    Create: 2
Create Group(s) - 2 total
    "engineering@example.com"
    "finance@example.com"
Modify (all proposed changes) - 2 total groups affected
Modify group 1: "engineering@example.com"
    Add address "user1@example.com"
    Add address "user2@example.com"Modify group 2: "finance@example.com"
    Add address "user1@example.com"
Directory Sync via Admin API
You can also script the provisioning and management of users and groups via the G-suites APIs such as Directory API
#!/usr/bin/pythonfrom apiclient.discovery import build
import httplib2
from oauth2client.service_account import ServiceAccountCredentials
from oauth2client.client import GoogleCredentials
import logging
import json
import sys
from apiclient import discovery
import oauth2client
from oauth2client import client
from oauth2client import toolsscope = 'https://www.googleapis.com/auth/admin.directory.user'
credentials = ServiceAccountCredentials.from_p12_keyfile('adminapi@fabled-ray-104117.iam.gserviceaccount.com',
                                                           'project1-5fc7d442817b.p12',
                                                           scopes=scope)
credentials = credentials.create_delegated('admin@example.com')
http = httplib2.Http()
http = credentials.authorize(http)
service = discovery.build('admin', 'directory_v1', http=http)
results = service.users().list(customer='C023zw2x7', domain='example.com').execute()
users = results.get('users', [])
print json.dumps(users, sort_keys=True, indent=4)
for u in users:
  print json.dumps(u['primaryEmail'], sort_keys=True, indent=4)
Testing is an important yet often overlooked aspect of building successful Laravel applications. This article will provide an introduction to testing applications written using the Laravel Framework.
For our purposes we’ll be writing feature tests that make HTTP requests to our application and then make assertions about the responses and the state of the application’s database after the request is complete. We will make minimal changes to the authentication scaffolding provided by Laravel and focus on testing the Password Reset feature.
Getting Started
Assuming you are familiar with setting up a new Laravel project, use your terminal and the Laravel installer to create a new project.
If you aren’t familiar with setting up a development environment for a new Laravel application I encourage you to check out the documentation on installation and the Vagrant box Homestead.
Create a new Laravel application in the directory password-reset-testing.
$ laravel new password-reset-testing
Once composer has finished installing everything, change your working directory to that of the new project.
Again using Artisan, run the database migrations to create the users and password_resets tables.
$ php artisan migrate
Naming Each Route
As a best practice, each of our application’s routes should have a name. By using route names and the route helper function instead of hard-coding routes, the URI of a route can be easily changed in the future.
Open up routes/web.php and change the contents to match below.
<?php
// Welcome Route Route::get('/', function () { return view('welcome'); })->name('welcome');
// Home Route Route::get('/home', 'HomeController@index') ->name('home');
Note that we didn’t change any of the routes provided by the original Auth::routes() statement, we simply rewrote them to include names for every route.
Editing the Base Test Case
Before we write our tests, let’s quickly edit the base test case. Open up the file at tests/TestCase.php and edit the contents to match below.
<?php

namespace Tests;

use Illuminate\Foundation\Testing\DatabaseTransactions;
use Notification;
use Illuminate\Foundation\Testing\TestCase as BaseTestCase;

abstract class TestCase extends BaseTestCase
{
    use CreatesApplication;
    use DatabaseTransactions;

    /**
     * Set up the test case.
     */
    protected function setUp()
    {
        parent::setUp();

        Notification::fake();
    }
}
First we import the Illuminate\Foundation\Testing\DatabaseTransactions trait and the Notification facade.
The statement use DatabaseTransactions at the top of the class tells Laravel to create a database transaction before each test and roll back the transaction after each test. This will keep our tests from affecting the state of our database; the database will be in the same starting state for each test.
We override the setUp method which is called before running each test. In this method we first call the parent setUp method then call fake on the Notificationfacade. This will fake all notifications sent out during any of our tests. Within each test we can then use another method on the Notification facade to assert a notification would have been sent to the correct destination.
Creating the Test Class
Use artisan to generate a new feature test called PasswordResetTest.
$ php artisan make:test PasswordResetTest
Open the new file at tests/Feature/PasswordResetTest.php and edit the contents to match below.
<?php
namespace Tests\Feature;
use App\User; use Hash; use Illuminate\Auth\Notifications\ResetPassword; use Illuminate\Foundation\Testing\WithFaker; use Notification; use Password; use Tests\TestCase;
class PasswordResetTest extends TestCase { use WithFaker;
Here we’ve added import statements for the model App\User, the facadesHash, Notification, and Password, and the notification Illuminate\Auth\Notifications\ResetPassword. We’ve also added an import statement for the trait Illuminate\Foundation\Testing\WithFaker which conveniently instantiates a Faker factory for us for use within our tests. We simply specify our class is using the WithFaker trait and each test case will have an instance of a Faker factory at $this->faker.
Within our class we replaced the example test case with a statement specifying we’re using the WithFaker trait, constants for each route name we’ll be using, and a constant for the password test users will have.
Writing Test Cases
We will write tests for the following cases:
Showing the password reset request page
Submitting the password reset request page with an invalid email address
Submitting the password reset request page with an email address not in use
Submitting the password reset request page with a valid email address in use
Showing the reset password page
Submitting the reset password page with an invalid email address
Submitting the reset password page with an email address not in use
Submitting the reset password page with a valid email address in use and a password that does not match the password confirmation
Submitting the reset password page with a valid email address in use and a password that isn’t long enough
Submitting the reset password page with a valid email address in use and a valid password matching the password confirmation
After each new test, feel free to run PHPUnit using your terminal.
$ ./vendor/bin/phpunit
Testing Showing the Password Reset Request Page
Now it’s time to write our first test! Edit the PasswordResetTest class by adding the method below. By convention each test case method starts with test which is then recognized by PHPUnit.
/**
 * Testing showing the password reset request page.
 */
public function testShowPasswordResetRequestPage()
{
    $this
        ->get(route(self::ROUTE_PASSWORD_REQUEST))
        ->assertSuccessful()
        ->assertSee('Reset Password')
        ->assertSee('E-Mail Address')
        ->assertSee('Send Password Reset Link');
}
In this test case we use the method get to make a GET request to the specified URI. We generate the URI using the route helper method and the name of our route, which is stored in a constant. The assertSuccessful method asserts the response has a 200 level status code. Next we use the assertSee method to check for the presence of the text Reset Password, E-Mail Address, and Send Password Reset Link.
Testing Submitting the Password Reset Request Page
Our next few tests will be testing submitting the password reset request page with various inputs.
Add the next test shown below which tests submitting a password reset request with an invalid email address.
/**
 * Testing submitting the password reset request with an invalid
 * email address.
 */
public function testSubmitPasswordResetRequestInvalidEmail()
{
    $this
        ->followingRedirects()
        ->from(route(self::ROUTE_PASSWORD_REQUEST))
        ->post(route(self::ROUTE_PASSWORD_EMAIL), [
            'email' => str_random(),
        ])
        ->assertSuccessful()
        ->assertSee(__('validation.email', [
            'attribute' => 'email',
        ]));
}
When a request fails validation, Laravel will return a redirect to the location the request came from with validation error messages flashed to the session. To make assertions on the response the user will see, therefore, we need to follow redirects with the followingRedirects method. We also specify a location we’re making the request from using the from method.
Next we use the post method to issue a POST request to the password.email route (again using the route helper and a previously defined constant) with data specifying the email key as a random string (using the str_randomhelper method).
We assert the response is successful and check for the presence of a validation message. The __helper method is used to format the validation message using localization files. validation.email specifies the file resources/lang/{locale}/validation.php and the email array key, where {locale} is the application’s configured locale. The :attribute parameter in the string The :attribute must be a valid email address. will be replaced by the string email as specified by the associative array passed as the second argument to the __ method.
Next we’ll be testing submitting the password reset request page with a valid email address that is not in use by any user of the application.
Add the test shown below.
/**
 * Testing submitting the password reset request with an email
 * address not in the database.
 */
public function testSubmitPasswordResetRequestEmailNotFound()
{
    $this
        ->followingRedirects()
        ->from(route(self::ROUTE_PASSWORD_REQUEST))
        ->post(route(self::ROUTE_PASSWORD_EMAIL), [
            'email' => $this->faker->unique()->safeEmail,
        ])
        ->assertSuccessful()
        ->assertSee(e(__('passwords.user')));
}
Again we follow redirects and set the location where our request should originate from, but this time we use Faker to generate an email address that is not in use by anyone in the world (as the domains are example.com, example.net, and example.org). We use the unique method to ensure the email address returned has not been previously returned by Faker.
We assert the response is successful and check for the presence of the validation error message specified by the user key in the associative array in the file resources/lang/{locale}/passwords.php. This time the validation message contains a reserved HTML character, ', so we must use the ehelper method to replace the character with it’s corresponding character entity.
Finally it’s time to test successfully submitting the password reset request page with a valid email address present in our application’s database.
Add the test shown below.
/** * Testing submitting a password reset request. */ public function testSubmitPasswordResetRequest() { $user = factory(User::class)->create();
In this test we use the factoryhelper method to create a new user in our database. Then we follow redirects for the response to our POST request to the password.email route. Our request specifies the created user’s email address in the email key of the payload. We assert the response is successful and check for the presence of the string We have e-mailed your password reset link!, specified with the argument passwords.sent passed to the __ helper method.
Using the Notification facade’s method assertSentTo we assert the ResetPassword notification was sent to the $user. We can pass the model stored in the variable $user directly into the assertSentTo method because our User model, by default, uses the Illuminate\Notifications\Notifiabletrait. When routing emails for any model using the Notifiable trait, the email property on the model will be used by default.
Testing Showing the Password Reset Page
Next, to test showing the password reset page, add the test shown below.
/** * Testing showing the reset password page. */ public function testShowPasswordResetPage() { $user = factory(User::class)->create();
We again create a user using the factory helper method. Next we create a valid password reset token using the Password facade.
The value of $token is used to replace the token parameter in the password.reset route. We send a GET request to this route, assert the response is successful, and check for the presence of the text for page elements.
Testing Submitting the Password Rest Page
Next we’ll test submitting the password reset page, starting with using an invalid email address.
Continue our testing by adding the test shown below.
/** * Testing submitting the password reset page with an invalid * email address. */ public function testSubmitPasswordResetInvalidEmail() { $user = factory(User::class)->create([ 'password' => bcrypt(self::USER_ORIGINAL_PASSWORD), ]);
In this test we’re again using the factory helper method to create at test user but this time we explicitly set the user’s password. To do this we use the bcrypthelper method to hash the value of our constant.
We create another password reset token and generate a random string to use as the new password for our request’s payload. Again following redirects we POST to the password.reset.submit route with a request originating from the password.reset route. A random string is used for the email address in the request payload.
After asserting the response was successful and checking for the validation.email validation message we refresh the user model and use the check method on the Hash facade to assert the user’s password has not changed.
Next we’ll test submitting the password reset page with an email address not in use by our application’s database.
Add the test shown below.
/** * Testing submitting the password reset page with an email * address not in the database. */ public function testSubmitPasswordResetEmailNotFound() { $user = factory(User::class)->create([ 'password' => bcrypt(self::USER_ORIGINAL_PASSWORD), ]);
Nothing new on this test. We create a user, password reset token, and new password. Then the follow redirects, POST to the password.reset.submit route from the password.reset route using the token, a random and unique safe email, and the new password. We assert the response is successful, check for the presence of the passwords.user translated string (after swapping any html character entities in the string), refresh the user, and assert the user’s password hasn’t changed.
The next test will be testing submitting the password reset page with a password that doesn’t match the password confirmation.
Add the test shown below.
/** * Testing submitting the password reset page with a password * that doesn't match the password confirmation. */ public function testSubmitPasswordResetPasswordMismatch() { $user = factory(User::class)->create([ 'password' => bcrypt(self::USER_ORIGINAL_PASSWORD), ]);
Again nothing new on this test except we’re checking for a different validation message.
Our last invalid submission case to test for submitting the password reset page is using a new password that’s too short.
Add the test shown below.
/** * Testing submitting the password reset page with a password * that is not long enough. */ public function testSubmitPasswordResetPasswordTooShort() { $user = factory(User::class)->create([ 'password' => bcrypt(self::USER_ORIGINAL_PASSWORD), ]);
This time we pass an argument 5 to the str_random helper function to specify the length of the random returned string (as opposed to the default length of 16). Another difference in this test is we’re checking for the presence of a validation message, validation.min.string, with two parameters, attribute and min.
Notice how we can use dot notation to specify a translation string in a nested array. To learn more about these validation messages and translation strings, check out the file at resources/lang/{locale}/validation.php.
Finally, it’s time to test the happy path: submitting the password reset page with a valid email address belonging to a user with a valid password reset token and a password matching the confirmation password (that isn’t too short).
Add the final test shown below.
/** * Testing submitting the password reset page. */ public function testSubmitPasswordReset() { $user = factory(User::class)->create([ 'password' => bcrypt(self::USER_ORIGINAL_PASSWORD), ]);
In this test we use the Hash facade to assert the user’s password has changed to the given password, thus successfully completing the password reset.
Conclusion
This concludes our testing for Laravel’s password resets. In ten short tests we were able to do things like create test users and valid password reset tokens, make HTTP requests to our application, assert the response contains desired content, and check if the user’s password has changed as a result of the request.
Laravel has provided ample testing capabilities and I strongly recommend reading the documentation for a deeper look at the possibilities.
You can view the source code for this project on GitHub.
Today we’ll be learning about working with geospatial data, or data relating to geographical locations, in Laravel 5.6. As an exercise for working with this kind of data we’ll be building a simple USA Neighborhood Finder application.
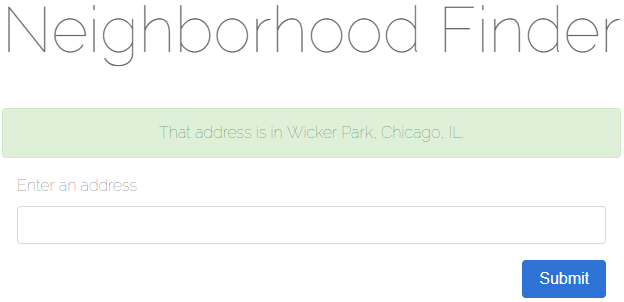
screenshot of a successful result in our application
There are three main learning objectives for this article:
How to use Google’s Geocoding API to geocode an address into corresponding coordinates consisting of a longitude and latitude.
How to determine if a point (in this case a longitude and latitude) is contained by a geometry (in this case a neighborhood boundary).
Overview
The flow of our application is as follows:
A user enters an address and clicks “Submit”.
The name of the neighborhood which contains the address is displayed to the user (or an error message stating no location or neighborhood could be found).
For the purposes of this article we won’t be tracking down the neighborhood boundaries of every neighborhood in the USA; instead we’ll be using three example data sets but set things up so more data sources can easily be added in the future.
You can take a look at the data sources using these links:
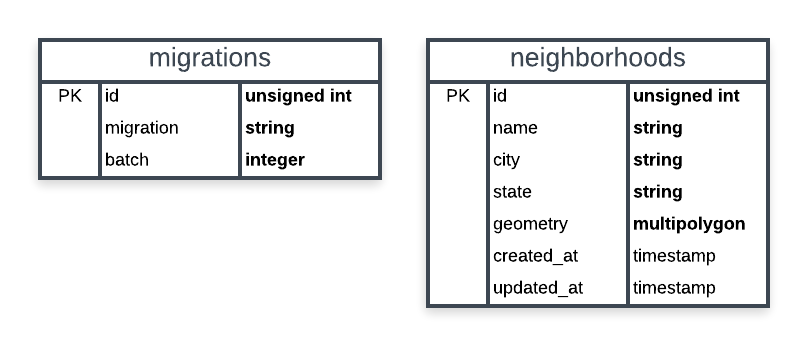
A basic schema of our application’s database is shown below. We only need two tables: Laravel’s table for migrations and a table for storing neighborhoods. Our spatial column will be named geometry and be of the multipolygon type. Think of a multipolygon as a collection of polygons. We’re using a multipolygon because a neighborhood may have more than one polygon to define its boundary. If a neighborhood uses a polygon to define its boundary we can always create multipolygon containing a single polygon (which we’ll be doing later).
schema of our application’s database
In addition to the Laravel Framework, we’ll be using two more packages to build our application:
We will also be using Bootstrap 4 for basic styling.
Creating Our Application
For this article it’s assumed you’re comfortable using a development environment for Laravel (such as Homestead).
Generating the Project
First, let’s create a new Laravel project using the terminal.
$ laravel new neighborhood-finder
Wait for the installation to finish and change directories to the root of the project.
$ cd neighborhood-finder/
Next let’s clean up some of the things Laravel comes with that we won’t be using for our application. This includes authentication controllers, the User model/migration/factory, and the password_resets table.
For our application each Neighborhood will have an (auto-incrementing) id, a name, a city, a state(abbreviation), and a geometry representing the neighborhood’s boundary as a multipolygon.
Open up the generated database/migrations/*_create_neighborhoods_table.php migration and edit the up method as shown below.
/**
 * Run the migrations.
 *
 * @return void
 */
public function up()
{
    Schema::create('neighborhoods', function (Blueprint $table) {
        $table->increments('id');
        $table->string('name');
        $table->string('city');
        $table->string('state', 2);
        $table->multiPolygon('geometry');
        $table->timestamps();
    });
}
Installing the First Package
Now let’s install our first package using composer: grimzy/laravel-mysql-spatial. This package will allow us to easily work with spatial data types.
$ composer require "grimzy/laravel-mysql-spatial"
Let composer install the package dependencies and regenerate autoload files.
The Neighborhood Model
Our Neighborhood model will be using the SpatialTrait found in the grimzy/laravel-mysql-spatial package. The package looks for any attributes defined in the $spatialFields array on a model using this trait.
Edit app/Models/Neighborhood.php to match below. Notice how a spatial field is still eligible to be fillable through mass assignment.
<?php

namespace App\Models;

use Grimzy\LaravelMysqlSpatial\Eloquent\SpatialTrait;
use Illuminate\Database\Eloquent\Model;

class Neighborhood extends Model
{
    use SpatialTrait;

    /**
     * The attributes that are mass-assignable.
     *
     * @var array
     */
    protected $fillable = [
        'name',
        'geometry',
    ];

    /**
     * The attributes that are spatial fields.
     *
     * @var array
     */
    protected $spatialFields = [
        'geometry'
    ];
}
Gathering Test Data
Many cities have data portals open to the public. To seed our database with neighborhoods including geospatial data for boundaries, our application will use Comma-separated values (CSV) files exported from three of these data portals.
Create a directory at database/seeds/flat-files for a place to store the flat files.
We want to ensure none of these flat files are checked into source control, so create a .gitignore file at database/seeds/flat-files/.gitignore containing the following:
*
!.gitignore
The * entry is a wildcard telling git to ignore all files in the directory. The !.gitignore entry excludes the .gitignore file from the wildcard so it is still checked into source control.
Download the following CSV files to each location specified below.
this CSV to database/seeds/flat-files/chicago-illinois.csv
this CSV to database/seeds/flat-files/baltimore-maryland.csv
this CSV to database/seeds/flat-files/east-baton-rouge-parish-louisiana.csv
Let’s take a quick peek at what this data looks like. Open up database/seeds/flat-files/chicago-illinois.csv and notice the file contains a header row specifying the columns. The two columns we want are PRI_NEIGH (primary neighborhood) and the_geom (the geometry data).
From the first row of data in the file, copy the MULTIPOLYGON(((...))) part. This is the WKT representation of the neighborhood’s boundary.
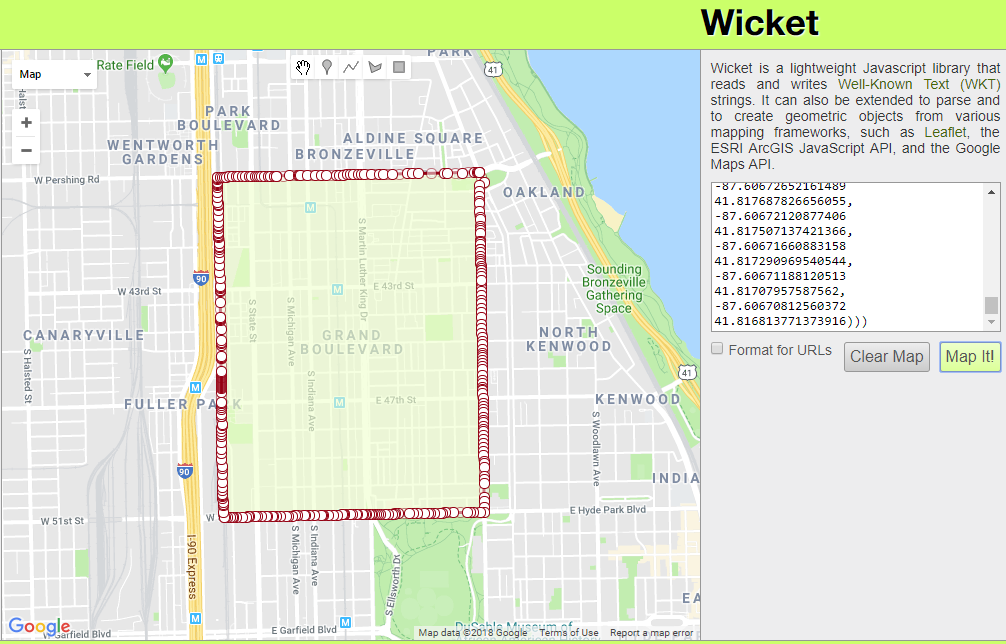
To visualize WKT data one of my favorite tools is Wicket by Arthur Endsley. Open up Wicket, paste the WKT data from your clipboard into the text box, and click “Map It!”. You’ll see the mapped multipolygon for Chicago’s neighborhood Grand Boulevard.
Creating Seeders
Now that we have our flat files and an understanding of what the data looks like let’s create some seeders.
For this exercise we’ll keep things simple with one seeder per file, each of which will extend a base class. The base class will hold logic for reading a CSV and creating a Neighborhood record. It will also contain an abstract method for transforming a geometry record into a Multipolygon. Each seeder extending the base class will implement this abstract method with logic specific to the file being processed. These seeders will also contain the run() method to be called by Laravel.
While this pattern works well for our purposes as we only have a few flat files to process, for a larger application with possibly hundreds of files I’d suggest a variation of this pattern and not defining one seeder per file.
First, let’s create our BaseNeighborhoodSeeder using artisan.
$ php artisan make:seeder BaseNeighborhoodSeeder
Update the created file at database/seeds/BaseNeighborhoodSeeder.php to match below.
<?php

use App\Models\Neighborhood;
use Grimzy\LaravelMysqlSpatial\Types\MultiPolygon;
use Illuminate\Database\Seeder;

abstract class BaseNeighborhoodSeeder extends Seeder
{
    /**
     * Mode for opening a file as read-only.
     */
    const FILE_MODE_READ = 'r';

    /**
     * Parses the given geometry value into a Multipolygon.
     *
     * @param mixed $geometry the geometry to parse
     * @return \Grimzy\LaravelMysqlSpatial\Types\MultiPolygon
     */
    protected abstract function parseGeometryToMultiPolygon($geometry): MultiPolygon;

    /**
     * Reads all records in a flat file, parses the geometry into a multipolygon,
     * and saves a Neighborhood in the database for each record.
     *
     * @param string $file_path path to the file to read data from
     * @param int $name_index the index of the column containing the neighborhood name
     * @param int $geometry_index the index of the column containing the neighborhood geometry
     * @param string $city the name of the neighborhoods' city
     * @param string $state the name of the neighborhoods' state
     * @param bool $skip_first_row if the first row of the file should be skipped (if there's a header row)
     * @param bool $use_title_case if the neighborhood names should be converted to Title Case
     * @throws \Throwable
     */
    protected function seedFromFlatFile(string $file_path,
                                        int $name_index,
                                        int $geometry_index,
                                        string $city,
                                        string $state,
                                        bool $skip_first_row,
                                        bool $use_title_case) {

        // throw an exception unless a file exists at the given location
        throw_unless(file_exists($file_path), new Exception("No file found at path '$file_path'"));

        try {
            // open the specified file at the given location
            $file = fopen($file_path, self::FILE_MODE_READ);

            // if the first row should be skipped, read the first row of the file
            if ($skip_first_row) {
                fgetcsv($file);
            }

            // while there's a row to be read in the file, read the next row
            while ($row = fgetcsv($file)) {
                // get the neighborhood name from the specified index
                $name = $row[$name_index];

                // if the name should be converted to Title Case, convert it
                if ($use_title_case) {
                    $name = title_case($name);
                }

                // parse the geometry at the specified index into a multipolygon
                $multipolygon = $this->parseGeometryToMultiPolygon($row[$geometry_index]);

                // make the new neighborhood model by filling the name, city, state, and geometry
                $neighborhood = new Neighborhood([
                    'name' => $name,
                    'city' => $city,
                    'state' => $state,
                    'geometry' => $multipolygon,
                ]);

                // throw an exception unless the neighborhood could be saved
                throw_unless($neighborhood->save(), new Exception("Failed to save neighborhood '$name'"));
            }
        } finally {
            // if the file has been opened, close it
            if (! empty($file)) {
                fclose($file);
            }
        }
    }
}
Here we’re defining an abstract class which cannot be instantiated; this class must be extended to be used. At the top of the class we have a constant for the file mode we’ll be using to open CSV files.
We define the abstract method parseGeometryToMulipolygon($geometry) and declare it returns a Multipolygon. This method must be implemented by any class extending BaseNeighborhoodSeeder and will contain the logic necessary for converting the geometry data in each CSV record to a Multipolygon. For our purposes this will always be parsing WKT but it could easily be parsing another format such as GeoJSON.
The seedFromFlatFile method contains parameters for the path to the file to read data from, the index of the neighborhood name column, the index of the neighborhood boundary geometry column, the name of the city for the neighborhoods, the name of the state for the neighborhoods, whether or not to skip the first row of the file (in case there is a header row), and whether or not the neighborhood name should be converted to Title Case before being saved.
In this method we first check if a file exists at $file_path using PHP’s file_exists function. If a file does not exist at the specified path we throw an exception.
Next, inside a try block, we open the file for reading using fopen with the file mode 'r'. If the $skip_first_row flag is true, we read the first row of the file using PHP’s function fgetcsv. Looping through each row, while there’s still a row left to read in the file, we use fgetcsv to parse the CSV row into an array of data.
Using the given $name_index we get the neighborhood name from the array and if $use_title_case is true we use Laravel’s helper method title_case to convert the string to Title Case. The neighborhood’s geometry is parsed into a MultiPolygon by passing the data of the geometry column into the parseGeometryToMultiPolygon method, which will be implemented by child classes.
Finally we create the new neighborhood record by passing an array of attributes to the Neighborhood model’s constructor. If the model could not be saved, an exception is thrown.
In the finally block we check if the $file variable has a value and if it does, we use fclose to close the file. Putting this logic inside the finally block ensures we close the file even if an exception is thrown.
With our base seeder class in place, we’re ready to create a seeder for each flat file. Start by creating ChicagoIllinoisNeighborhoodSeeder using artisan.
Update the file database/seeds/ChicagoIllinoisDatabaseSeeder.php with the content below.
<?php

use Grimzy\LaravelMysqlSpatial\Types\MultiPolygon;

class ChicagoIllinoisNeighborhoodSeeder extends BaseNeighborhoodSeeder
{
    /**
     * Index of the name column.
     */
    const COLUMN_INDEX_NAME = 0;

    /**
     * Index of the geometry column.
     */
    const COLUMN_INDEX_GEOMETRY = 1;

    /**
     * Name of the neighborhoods' city.
     */
    const CITY = 'Chicago';

    /**
     * Name of the neighborhoods' state.
     */
    const STATE = 'IL';

    /**
     * Path of the seed file relative to the `database` directory.
     */
    const DATABASE_FILE_PATH = 'seeds/flat-files/chicago-illinois.csv';

    /**
     * If the file has a header row.
     */
    const HAS_HEADER_ROW = true;

    /**
     * If the neighborhood names should be converted to Title Case.
     */
    const USE_TITLE_CASE = false;

    /**
     * Run the database seeds.
     *
     * @throws \Throwable
     */
    public function run()
    {
        // resolve the path of the seed file
        $file_path = database_path(self::DATABASE_FILE_PATH);

        // seed the neighborhoods from the flat file
        $this->seedFromFlatFile($file_path,
            self::COLUMN_INDEX_NAME,
            self::COLUMN_INDEX_GEOMETRY,
            self::CITY,
            self::STATE,
            self::HAS_HEADER_ROW,
            self::USE_TITLE_CASE);
    }

    /**
     * Parses the geometry to a multipolygon from well-known text.
     *
     * @param mixed $geometry
     * @return \Grimzy\LaravelMysqlSpatial\Types\MultiPolygon
     */
    protected function parseGeometryToMultiPolygon($geometry): MultiPolygon
    {
        return MultiPolygon::fromWKT($geometry);
    }
}
At the top of the file we have constants for the column indexes of the name and geometry data as well as constants for the neighborhood city, the neighborhood state, the file path relative to the database directory, whether or not the file has a header row, and whether or not the neighborhood names should be converted to Title Case.
Next we have the run method which is called by Laravel when executing the seeder. In this method we first resolve the path of the flat file using Laravel’s helper method database_path. Then we call the parent class’s method seedFromFlatFile using the file path and our constants as arguments.
Finally, we implement the parseGeometryToMultiPolygon method by using the fromWKT static method of Grimzy\LaravelMysqlSpatial\Types\Multipolygon to instantiate a new MultiPolygon and return it. Remember this method will be called by the base class during the execution of the seedFromFlatFile method.
Continuing with our seeders, use artisan to create BaltimoreMarylandSeeder.
$ php artisan make:seeder BaltimoreMarylandSeeder
Edit the file database/seeds/BaltimoreMarylandSeeder.php to match the contents below.
<?php

use Grimzy\LaravelMysqlSpatial\Types\MultiPolygon;

class BaltimoreMarylandSeeder extends BaseNeighborhoodSeeder
{
    /**
     * Index of the name column.
     */
    const COLUMN_INDEX_NAME = 3;

    /**
     * Index of the geometry column.
     */
    const COLUMN_INDEX_GEOMETRY = 1;

    /**
     * Name of the neighborhoods' city.
     */
    const CITY = 'Baltimore';

    /**
     * Name of the neighborhoods' state.
     */
    const STATE = 'MD';

    /**
     * Path of the seed file relative to the `database` directory.
     */
    const DATABASE_FILE_PATH = 'seeds/flat-files/baltimore-maryland.csv';

    /**
     * If the file has a header row.
     */
    const HAS_HEADER_ROW = true;

    /**
     * If the neighborhood names should be converted to Title Case.
     */
    const USE_TITLE_CASE = false;

    /**
     * Run the database seeds.
     *
     * @throws \Throwable
     */
    public function run()
    {
        // resolve the path of the seed file
        $file_path = database_path(self::DATABASE_FILE_PATH);

        // seed the neighborhoods from the flat file
        $this->seedFromFlatFile($file_path,
            self::COLUMN_INDEX_NAME,
            self::COLUMN_INDEX_GEOMETRY,
            self::CITY,
            self::STATE,
            self::HAS_HEADER_ROW,
            self::USE_TITLE_CASE);
    }

    /**
     * Parses the geometry to a multipolygon from well-known text.
     *
     * @param mixed $geometry
     * @return \Grimzy\LaravelMysqlSpatial\Types\MultiPolygon
     */
    protected function parseGeometryToMultiPolygon($geometry): MultiPolygon
    {
        return MultiPolygon::fromWKT($geometry);
    }
}
Notice how simple it was to implement a new flat file seeder because we abstracted away the logic into our base class.
Again using artisan, create our last seeder EastBatonRougeParishSeeder.
Open up the file database/seeds/EastBatonRougeParishSeeder.php and edit the contents to match below.
<?php

use Grimzy\LaravelMysqlSpatial\Types\MultiPolygon;
use Grimzy\LaravelMysqlSpatial\Types\Polygon;

class EastBatonRougeParishSeeder extends BaseNeighborhoodSeeder
{
    /**
     * Index of the name column.
     */
    const COLUMN_INDEX_NAME = 2;

    /**
     * Index of the geometry column.
     */
    const COLUMN_INDEX_GEOMETRY = 1;

    /**
     * Name of the neighborhoods' city.
     */
    const CITY = 'Baton Rouge';

    /**
     * Name of the neighborhoods' state.
     */
    const STATE = 'LA';

    /**
     * Path of the seed file relative to the `database` directory.
     */
    const DATABASE_FILE_PATH = 'seeds/flat-files/east-baton-rouge-parish-louisiana.csv';

    /**
     * If the file has a header row.
     */
    const HAS_HEADER_ROW = true;

    /**
     * If the neighborhood names should be converted to Title Case.
     */
    const USE_TITLE_CASE = true;

    /**
     * Run the database seeds.
     *
     * @throws \Throwable
     */
    public function run()
    {
        // resolve the path of the seed file
        $file_path = database_path(self::DATABASE_FILE_PATH);

        // seed the neighborhoods from the flat file
        $this->seedFromFlatFile($file_path,
            self::COLUMN_INDEX_NAME,
            self::COLUMN_INDEX_GEOMETRY,
            self::CITY,
            self::STATE,
            self::HAS_HEADER_ROW,
            self::USE_TITLE_CASE);
    }

    /**
     * Parses the geometry to a multipolygon from well-known text.
     *
     * @param mixed $geometry
     * @return \Grimzy\LaravelMysqlSpatial\Types\MultiPolygon
     */
    protected function parseGeometryToMultiPolygon($geometry): MultiPolygon
    {
        // parse the well-known text into a polygon
        $polygon = Polygon::fromWKT($geometry);

        // return a multipolygon containing the polygon
        return new MultiPolygon([$polygon]);
    }
}
This time the implementation of the parseGeometryToMultiPolygon method is different. If you check the east-baton-rouge-parish-louisiana.csv file you’ll notice the WKT contains polygons instead of multipolygons, but the method calls for a MultiPolygon to be returned. Therefore we first parse the Polygon from WKT and then create and return a new MutliPolygon using an array containing the Polygon passed to the constructor.
Next we need to edit database/seeds/DatabaseSeeder.php to call each of our seeders. Update the file to match the contents below.
<?php

use Illuminate\Database\Seeder;

class DatabaseSeeder extends Seeder
{
    /**
     * Seed the application's database.
     *
     * @return void
     */
    public function run()
    {
        $this->call([
            ChicagoIllinoisNeighborhoodSeeder::class,
            BaltimoreMarylandSeeder::class,
            EastBatonRougeParishSeeder::class,
        ]);
    }
}
Let’s quickly regenerate our autoload files using composer.
$ composer dump-autoload
Finally, let’s migrate and seed our database using an artisan command. This will create our neighborhoods table as well as seed all the neighborhoods from our flat files.
$ php artisan migrate --seed
Installing the Second Package
Use composer to require the toin0u/geocoder-laravel package we’ll be using to geocode addresses.
$ composer require "toin0u/geocoder-laravel"
While composer is running, this is a great time to get a Google API key for our project. We’ll be using Google’s Geocoding API.
For posterity’s sake let’s also add an entry in .env.example for the same key. Remember, don’t add your API key here; this file is only a template and is checked into source control.
GOOGLE_MAPS_API_KEY=
The Home Controller
Now let’s define our routes by editing routes/web.php, deleting the existing welcome route, and replacing it with the routes below.
The first route, named home.show, is for displaying the home page. The second route, named home.submit, will handle the submission of addresses and return a response containing the result of the search.
Next, create a HomeController using artisan.
$ php artisan make:controller HomeController
Edit app/Http/Controllers/HomeController.php to match the contents below.
<?php

namespace App\Http\Controllers;

use App\Models\Neighborhood;
use Grimzy\LaravelMysqlSpatial\Types\Point;
use Illuminate\Http\Request;

class HomeController extends Controller
{
    /**
     * The session key for storing the success message.
     */
    const SESSION_KEY_SUCCESS = 'success';

    /**
     * The session key for storing the error message.
     */
    const SESSION_KEY_ERROR = 'error';

    /**
     * The result message for an address that could not be geocoded.
     */
    const RESULT_BAD_ADDRESS = 'Failed to find a location for that address!';

    /**
     * The result message for an address that does not fall in any exiting Neighborhood's geometry.
     */
    const RESULT_NO_RESULTS = 'No results for that address!';

    /**
     * The result message prefix for a found Neighborhood.
     */
    const RESULT_NEIGHBORHOOD_PREFIX = 'That address is in ';

    /**
     * The route name for showing the home page.
     */
    const ROUTE_NAME_SHOW_HOME = 'home.show';

    /**
     * Shows the home page.
     *
     * @return \Illuminate\View\View
     */
    public function show()
    {
        return view('home');
    }

    /**
     * Handles submission of an address and returns a redirect to the home page with success or error message.
     *
     * @param \Illuminate\Http\Request $request
     * @return \Illuminate\Http\RedirectResponse
     */
    public function submit(Request $request)
    {
        // validate the request
        $this->validate($request, [
            'address' => 'required',
        ]);

        // get the given address from the request
        $address = $request->input('address');

        // make the geocoder
        $geocoder = app('geocoder');

        // geocode the address and get the first result
        $result = $geocoder->geocode($address)->get()->first();

        // if a result couldn't be found, redirect to the home page with a result message flashed to the session
        if (! $result) {
            return redirect(route(self::ROUTE_NAME_SHOW_HOME))->with(self::SESSION_KEY_ERROR, self::RESULT_BAD_ADDRESS);
        }

        // get the coordinates of the geocoding result
        $coordinates = $result->getCoordinates();

        // get the latitude of the coordinates
        $lat = $coordinates->getLatitude();

        // get the longitude of the coordinates
        $lng = $coordinates->getLongitude();

        // create a new point using the coordinates
        $point = new Point($lat, $lng);

        // get the first Neighborhood that has geometry containing the point
        $neighborhood = Neighborhood::contains('geometry', $point)->first();

        // if a Neighborhood couldn't be found, redirect to the home page with a result message flashed to the session
        if (! $neighborhood) {
            return redirect(route(self::ROUTE_NAME_SHOW_HOME))->with(self::SESSION_KEY_ERROR, self::RESULT_NO_RESULTS);
        }

        // format the result message for the found Neighborhood
        $message = $this->formatNeighborhoodResult($neighborhood);

        // redirect to the home page with the result message flashed to the session
        return redirect(route(self::ROUTE_NAME_SHOW_HOME))->with(self::SESSION_KEY_SUCCESS, $message);
    }

    /**
     * Format the result message for a found neighborhood.
     *
     * @param \App\Models\Neighborhood $neighborhood
     * @return string
     */
    private function formatNeighborhoodResult(Neighborhood $neighborhood) {
        return self::RESULT_NEIGHBORHOOD_PREFIX . $neighborhood->name . ', ' . $neighborhood->city . ', ' . $neighborhood->state . '.';
    }
}
In this file we first define constants for the session key storing success messages, the session key storing error messages, the text for result messages, and the home.show route name.
In the show method we simply return the view named home using the Laravel helper methodview.
The submit method accepts an argument of type Illuminate\Http\Request called $request. Laravel will automatically inject this variable containing the current request data.
First we validate the request by specifying a rule for address making the field required. The validated address is then retrieved using the input method on the $request variable. We use Laravel’s apphelper method which uses the service container to resolve an instance of the geocoder. Using method chaining we geocode the given address and get the first result. If a result couldn’t be found for the given address we redirect the user to the home page with an error message flashed to the session.
Next we get the longitude and latitude coordinates from the result and create a new Grimzy\LaravelMysqlSpatial\Types\Point instance by passing the coordinates into the constructor.
The eloquent query scopecontains provided by the grimzy/laravel-mysql-spaital package is then used to scope the query by records with a geometry containing the point. We use the first method to get the first result. This will generate a query along the lines of:
SELECT * FROM `neighborhoods` WHERE ST_Contains(`geometry`, ST_GeomFromText('POINT(0 0)')) LIMIT 1
In this case 'POINT(0 0)' is the WKT representation of our longitude and latitude (which won’t actually be 0, 0 unless our user lives in the middle of the ocean).
Notice that we are using MySQL to calculate if the the geometry contains the point. This is much faster than if we had chunked through all the records and had done the calculation in PHP.
Finally, if a resulting neighborhood containing the point couldn’t be found we return a redirect to the home page with an error message flashed to the session. Otherwise, we format the neighborhood name, city, and state into a success result message (using the formatNeighborhoodResult method) and return a redirect to the home page with the message flashed to the session.
The Home View
Rename the blade template at resources/views/welcome.blade.php to resources/views/home.blade.php and open the file.
Under the <!-- Styles --> comment, add a link to Bootstrap’s style sheet.
Here we use the blade directive @if to check if there’s a message in the success key of the current session. If there is one, we display an alert to the user containing the message. If there isn’t one, we use the blade directive @elseif to check if there’s a message in the error key of the current session, again displaying it to the user if it exists.
Next we define a form with an action specifying our submission route using the routehelper method. The @crsf blade directive is used to generate a Cross-Site Request Forgery field and token. If the $errors message bag contains an entry for address we add the has-error class to the form group div and display the error in a help block.
Conclusion
That’s it! Open the project in your browser and try out some different addresses! The address will be geocoded and a neighborhood will be returned if any neighborhoods in the database have a boundary containing the address’s coordinates. If no address coordinates or neighborhood could be found, an error message stating such will be returned.
Try some of these addresses:
1558 N Damen Ave, Chicago, IL 606221001 E Fayette St, Baltimore, MD 21202201 Community College Dr, Baton Rouge, LA 70806123 Fake St, NowhereYour Address