
Learn to build a web app which auto-completes any input text

Dev SharmaOct 27 · 8 min read
We will be using OpenAI’s GPT-2 as the model and Panel as the web dashboard framework. This guide will be split into two parts. In the first part, we will load our model and write a predictions function. In the second, we will build the web application.
What you will need
This tutorial assumes you already have Python 3.7+ installed and have some understanding of Language Models. Although the steps involved can be done outside of Jupyter, using a jupyter notebook is highly highly recommended.
We will be using PyTorch as our Deep Learning library of choice. Within PyTorch, we will use the transformers library to import the pre-trained OpenGPT-2 model. You can install these libraries by individually entering the following commands in your bash:
pip install torchpip install transformers
For our web application, we will be utilizing Panel, a great tool for easily creating servable dashboards from either jupyter notebooks or a regular python script. Use the following command to install panel:
pip install panel
Part 1: Setting up the Model
OpenAI’s GPT is a type of transformer model which has received a lot of buzz about its capabilities to produce human-like text. If you have not experimented with it before, you are likely to come away with the same opinion at the end of this read.
Loading the Model
First, we need to import the required packages.
import numpy as np
import torch
import torch.nn.functional as F
from transformers import GPT2Tokenizer, GPT2LMHeadModel
from random import choice
Next, we will load the OpenGPT2 Tokenizer and the Language Model: (it may take a few minutes to download the pre-trained model if run for the first time)
tok = GPT2Tokenizer.from_pretrained("gpt2")
model = GPT2LMHeadModel.from_pretrained("gpt2")
Predictions Function
At this stage, most of the work in already done. Since our model is pre-trained, we don’t need to train it or make any modifications. We simply need to write a function which can input text to the model and generate a prediction.
def get_pred(text, model, tok, p=0.7):
    input_ids = torch.tensor(tok.encode(text)).unsqueeze(0)
    logits = model(input_ids)[0][:, -1]
    probs = F.softmax(logits, dim=-1).squeeze()
    idxs = torch.argsort(probs, descending=True)
    res, cumsum = [], 0.
    for idx in idxs:
        res.append(idx)
        cumsum += probs[idx]
        if cumsum > p:
            pred_idx = idxs.new_tensor([choice(res)])
            break
    pred = tok.convert_ids_to_tokens(int(pred_idx))
    return tok.convert_tokens_to_string(pred)
There is a lot happening in this function. So, let’s break it down. First, we are tokenizing and encoding the input text from input_ids. Then, we ask our model to generate a logits vector for the next word/token. After applying softmax and sorting these probabilities in descending order, we have a vector, idxs, which lists the indices of each token in our vocab in order by their respective probabilities.
At this stage, we could just pick the token which has the highest probability. However, we want to be able to mix up our results so the same input text can generate a variety of text. To do this, we will add an element of randomness where we choose a random token from a list of the most probable next tokens. This way, we are not selecting the same predicted token each time. To do this, we utilize Nucleus (Top-p) Sampling.
We perform this by looping through each probability until the sum of all the probabilities we have looped over is greater than p, an arbitrary number between 0 and 1. All the tokens iterated through until p is exceeded are stored in a list, res. Once, p is exceeded, we choose a token at random from this list. Remember that the list of probabilities that we are looping through contains indices ordered by their probability. Note that if p is higher, more tokens will be included in our list. Vice versa. Therefore, if you want the same result each time, you can set p to 0.
Now, let’s test out our pred function a few times:

Each time, there is a different result which is exactly what we expect. Our prediction function is now ready. Let’s build our web app!
Part 2: Building the Web Application
Panel Overview

If you are not familiar with Panel, it facilitates the process of creating web dashboards and apps. At a first glance, what you need to know is that it has three primary components:
- Panels: containers which can contain one or more of panes (objects) such as text, image, graphs, widgets etc. (they can contain other panels as well)
- Panes: any single object such as text, image, dataframe, etc.
- Widgets: user adjustable items such as text input, sliders, buttons, checkboxes which can alter the behavior of panes
The next and final thing you need to know for our purpose is that there are multiple ways for us to define how different panes and widgets interact with each other. These are called “callbacks.” For example, if a certain button is pressed, how should the other panes be updated? We will be defining a callback function later on which does exactly this.
High Level Application Overview
Our text generator app will have an input for a user to enter their desired text. Next, the user should be able to generate a new token with a press of a button. After which, new text will be generated with a predicted token from the function we defined in Part 1. Lastly, the user should be able to continue to generate new text on top of the already predicted tokens.
Implementation
Let’s first import panel and create the text input widget:
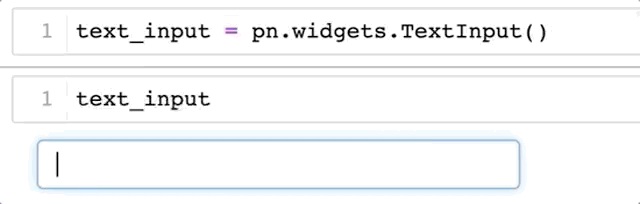
import panel as pn
pn.extension() # loading panel's extension for jupyter compatibility text_input = pn.widgets.TextInput()
Now, if we execute text_input in jupyter, we get the following:
Next, we want a pane which will store the whole text as we generate more and more tokens:
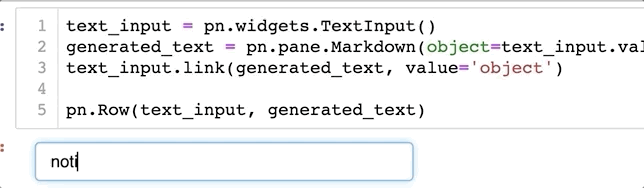
generated_text = pn.pane.Markdown(object=text_input.value)
Notice that we set the object of text to the value of text_input. We want the value of the generated_text to have the same value as the text_input since we will be predicting new text on top of the generated_text. As more tokens get added to our sequence, we will keep predicting over the generated_text until the user changes the text_input. In which case, the process will restart.
However, we are not quite done yet. Although generated_text will take the value of text_input at its initiation, it will not update itself if the text_input value changes. For this, we need to link these two objects together as so:
text_input.link(generated_text, value='object')
Here, we have formed a unidirectional link between text_input to generated_text. So whenever the value of the text_input changes, the value of generated_text is changed to the new value as well. See:
Now that we have both our text objects, let’s create our button widget:
button = pn.widgets.Button(name="Generate",button_type="primary")
Great, now that we have a button, we just have to link it to our desired behavior. For this we will be writing a callback function which will run every time the button is clicked:
def click_cb(event):
    pred = get_pred(generated_text.object, model, tok)
    generated_text.object += pred
Two things happen here. First, we pass generated_text as the input to the prediction function we wrote earlier which gives a new token. Second, this token is added to the generated_text. This process repeats each time there is a new click of the button.
Speaking of, we still have to tie the button click with the callback function. We can do that with:
button.on_click(click_cb)
We are now through creating all our widgets, panes and functions. We just need to put these objects in a panel and voila:
app = pn.Column(text_input, button, generated_text); app

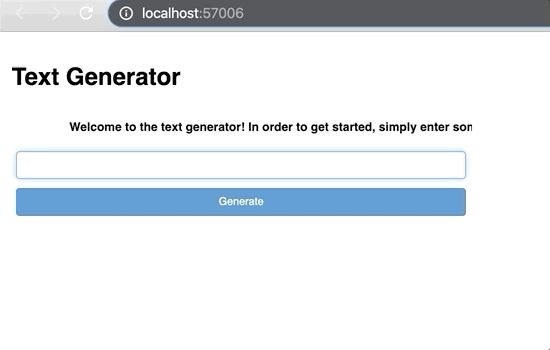
Let’s add a title and a brief description and we are through!
title = pn.pane.Markdown("# **Text Generator**")
desc = pn.pane.HTML("<marquee scrollamount='10'><b>Welcome to the text generator! In order to get started, simply enter some starting input text below, click generate a few times and watch it go!</b></marquee>")final_app = pn.Column(title, desc ,app)
Serve the Application
Panel makes it very easy to serve the app. There are two methods which can be used to do this. The first one is the “.show()” command. This is used for debugging usually and it is used as below. This will launch a new window with our final_app panel running as a web application.
final_app.show()
In order to put it in a production environment, you need to use the “.servable()” method. However, if you run this similarly to the show method, nothing different will happen in your current notebook. Instead, you have to serve the notebook through your machine’s bash like this:
panel serve --show text_generation_app.ipynb
This will launch your app on a local port as long as you have the following code in your notebook:
final_app.servable()
Done.
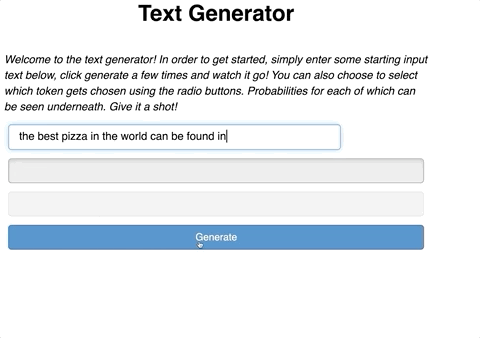
By now, you have the capabilities to build your own text generation app. You can further build upon it by adding more panel components. You can even embed this app in your other projects. As always, you can find my code base on github. Note: the app in the title image is the advanced variation found in my tutorial notebook: text_generation_app.ipynb.
Additional Resources
- OpenAI GPT-2: Understanding Language Generation through Visualization
- Getting Started with Panel
- Visualize any Data Easily, from Notebooks to Dashboards | Scipy 2019 Tutorial | James Bednar (Video: first hour is about Panel)
- Deploying Panel Apps on a Server

WRITTEN BY